Align objects in Publisher
You can arrange text boxes, pictures, AutoShapes, and drawing objects so that they line up with margin guides, ruler guides, and grid guides. Or you can line up objects relative to each other so that the placement of the objects is based on the placement of another object, group of objects, or the margins. You can also align objects to margins, guides, and other objects by dragging the objects. For more information on layout guides, please see Structure the page with layout guides.
Automatically align or distribute objects
Automatically aligning/distributing objects is controlled through the Align drop-down list in the Arrange group on the Home, Table Tools Layout, Picture Tools Format, or Drawing Tools Format tab.
Note: In Publisher 2010, the Align list is located on the Table Tools Design tab.
You can automatically align objects either relative to each other or relative to the margin guides.
To automatically align relative to a group of selected objects:
-
Select the objects you want to align.
-
On the Home, Table Tools Layout, Picture Tools Format or Drawing Tools Format tab, in the Arrange group, point to Align.

-
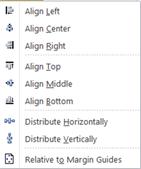
Select the option you want:
-
Align Left – This selection will align the left side of the objects with the left edge of the left-most object.
-
Align Center – This will align the center of the selected objects with the vertical center of the selected objects.
-
Align Right – This selection aligns the right side of the objects with the right edge of the right-most object.
-
Align Top – This will align the top side of the selected objects with the top edge of the top-most object.
-
Align Middle – This aligns the selected objects in the horizontal middle selected objects.
-
Align Bottom – This will align the bottom side of the selected objects with the bottom edge of the bottom-most object.
-
Distribute Horizontally – This selection will move the selected objects to evenly distribute them horizontally.
-
Distribute Vertically - This selection will move the selected objects to evenly distribute them vertically.
-
To automatically align relative to the margin guides:
-
Select the objects you want to align.
-
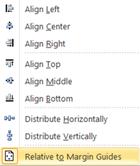
On the Home, Table Tools Layout, Picture Tools Format or Drawing Tools Format tab, in the Arrange group, point to Align, and then select Relative to Margin Guides.

-
Then select the option you want:
-
Align Left – This selection will align the left side of the objects with the left-most margin guide on the page.
-
Align Center – This will align the center of the selected objects with the vertical center of the page.
-
Align Right – This selection aligns the right side of the objects with the right-most margin guide on the page.
-
Align Top – This will align the top side of the selected objects with the top margin guide on the page.
-
Align Middle – This aligns the selected objects in the horizontal middle of the page.
-
Distribute Horizontally – This selection will move the selected objects to evenly distribute them horizontally on the page.
-
Distribute Vertically - This selection will move the selected objects to evenly distribute them vertically on the page.
Tip: To align objects down the center of a page, click Relative to Margin Guides, and then click Align Center.
-
Manually align an object to another object or guide
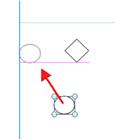
Objects can align based on their edges or their midlines. The snapping behavior in previous versions of Publisher has been replaced with a new mechanism: as you drag an object toward another object's edge or midline, or toward a guide, the object you are dragging will feel like it becomes sticky when it aligns and then release as you move past the alignment.
By dragging with the mouse, you can align:
-
An object's edge with all guides, other object edges, and text box columns
-
An object's middle with all guides and other object middles
-
A text box's column edge with all guides and other text box column edges
-
A table's row/column edges with all guides and other table row/column edges
-
A ruler guide with all of the above
Note: Groups are treated like a single object: the edges and centers of the group itself are used for alignment, not the edges/centers/columns of objects within the group.
To manually align an object:
-
Position the mouse pointer over the object until you see the Move pointer
 .
. -
Drag the object until it shows alignment to the guide or object that you want the object to align with.

Note: If the guides are hidden, objects will still align to the guides and the guides will show as the objects come into alignment.
-
You can turn manual alignment behavior on or off by using the Guides and Objects check-boxes in the Layout group of the Page Design tab.
Align objects in a row
-
Select the objects you want to align.
-
On the Arrange menu, point to Align or Distribute, and then select the option you want.
Tip: To align objects down the center of a page, click Relative to Margin Guides, and then click Align Center.
Align an object to another object, a grid line, or ruler mark
The Snap commands set objects so that they exert a magnet-like pull on nearby objects.
-
On the Arrange menu, point to Snap, and then select an option.
-
Select the object you want to move.
Selection handles will appear around the object.

-
Position the mouse pointer over the object until you see the Move pointer
 .
. -
Drag the object until its edge snaps to the guide, object, or ruler mark that you want the object to align with.
Notes:
-
If the guides are hidden, objects will still snap to the guides.
-
If you have turned on all of the Snap options, Microsoft Publisher tries to snap objects first to a nearby guide. If there's no guide nearby, Publisher snaps to the nearest object. If there are no objects nearby, Publisher snaps to the closest ruler mark.
Align objects relative to the margin
-
Select the objects you want to align.
-
On the Arrange menu, point to Align or Distribute, and then click Relative to Margin Guides
 .
. -
Select another Align or Distribute option.
Tip: To align objects down the center of a page, select both Relative to Margin Guides and Align Center.
No comments:
Post a Comment