Add closed captions or subtitles in PowerPoint
Depending on the version of PowerPoint you're using, you can use built-in features, an add-in, or workarounds to add closed captions or subtitles to videos and audio files in your presentations. Adding closed captions makes your presentation accessible to a larger audience, including people with hearing disabilities and those who speak languages other than the one in your video.
To read about best practices for accessibility, see Make your PowerPoint presentations accessible.
Beginning with version 2016, PowerPoint has a new, simpler format for caption files, called WebVTT. The video player in the following versions of PowerPoint can show those captions when you play the video:
-
PowerPoint 2016
-
PowerPoint 2019
-
PowerPoint for Office 365
The closed captions are stored in a text-based file with a .vtt filename extension. You can create a closed caption file on your own or use a caption-creation tool. To search online for available tools and detailed instructions, type "create vtt file" in your search engine.
For instructions on showing captions when watching a video in these versions of PowerPoint, see Turn on closed captions or subtitles.
Requirements for this feature
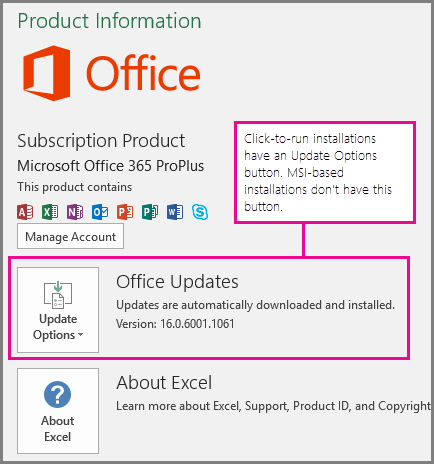
In Office 2016, the availability of the closed-captioning feature depends on the way Office was installed. Closed-captioning is only available for Office 2016 Click-to-Run installations; MSI-based installations don't have closed-captioning features. Read the next section to see whether the feature is available to your installation of PowerPoint 2016.
Check whether Office was installed using Click-to-Run or MSI
-
Open an Office 2016 application.
-
On the File menu, select Account.
-
For Office 2016 Click-to-Run installations, you'll have an Update Options button.
MSI-based installations don't have an Update Options button. You'll only see the About <application name> button.
If you have an MSI-based installation of Office 2016, read the instructions in the 2013 section of this article to see what captioning features are available to you.
Create closed captions
Prepare a text-based caption file with a .vtt filename extension before adding captions. For instructions on how to create the caption file, see Create closed captions for a video.
Add closed captions to a video
You can add captions to presentations that you've recorded with video narration, screen recordings, and any other video (except online videos) that you insert into PowerPoint. Currently, adding captions to an audio-only recording isn't supported.
-
In PowerPoint, in the Normal view, open the slide that has the video that you want to add captions to.
-
Select the video on the slide.
-
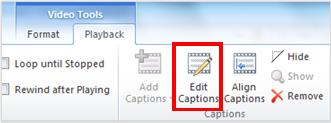
On the Playback tab, click the Insert Captions button, and then select Insert Captions.

-
In the Insert Captions dialog, browse to your caption file. Select the file and then click Insert .
-
If you need to add another caption file, just repeat the process.
-
Play the video and check that the captions appear correctly.
Remove closed captions from a video
If you need to edit a closed caption file that is inserted in a video in PowerPoint, you can first remove the file, modify it, and then add it back to the video. Before removing the file from the PowerPoint video, make sure you have the original copy of the closed caption file stored on your PC.
If you have added more than one caption file to a video, the following process removes all caption files assigned to the video.
-
In PowerPoint, in the Normal view, open the slide that has the video containing the captions.
-
Select the video on the slide.
-
On the Playback tab, click the Insert Captions button, and then select Remove All Captions.
Related Topics
Accessibility features in video playback on PowerPoint
In PowerPoint 2013 and PowerPoint 2010, and the MSI-based version of PowerPoint 2016, STAMP (the Subtitling text add-in for Microsoft PowerPoint) lets you add closed captions to your video and audio files. If you work with captioned video and audio files that already have Timed Text Markup (TTML) files associated with them, this add-in lets you import them directly into your presentation. If you don't have a TTML file, you can add captions directly in your presentation by using the STAMP Caption Editor.
The STAMP add-in allows you to:
-
Import captions from a Timed Text Markup (TTML) file to create captions against an audio or video in the presentation.
-
Create and edit closed captions in PowerPoint 2010, 2013, or 2016.
-
Delete your closed captions.
-
Export captions to a TTML file.
-
Turn captions on and off when in presentation mode. Viewers who have this add-in installed can do this also.
-
Use a video/audio playback while editing Timed Text captions.
-
Align captions when they have moved, or if you re-size the video.
-
Import communicative text formatting information from the TTML file, for example: styling, color and alignment.
What do you want to do?
Download and install STAMP
The add-in is designed for PowerPoint 2010, 2013, or 2016, and you must install the correct add-in for your version of Office (32-bit or 64-bit).
Step 1: Confirm your version of Microsoft Office
To check which version of Office you are using, and which installer you should download, do the following:
-
In PowerPoint, click the File tab.
-
Click Help.
-
Under About Microsoft PowerPoint is information about the version of Office that you have installed, including whether it is 32-bit or 64-bit.
Step 2: Download STAMP
After you are sure of the version you need, download the add-in by doing the following:
-
Go to Subtitling Text Add-in for Microsoft PowerPoint (STAMP).
-
Choose the correct version for your computer and save the .zip file to your computer.
-
Extract the files to a folder on your computer.
Step 3: Install STAMP
After you have downloaded the appropriate STAMP file, install it by doing the following:
-
Go to the folder where you extracted the installation files, and run STAMP Setup (32-bit or 64-bit).msi.
-
Follow the steps in the installation wizard.
To verify that the add-in installed correctly, do the following:
-
Open PowerPoint.
-
Click the File tab, and then click Options.
-
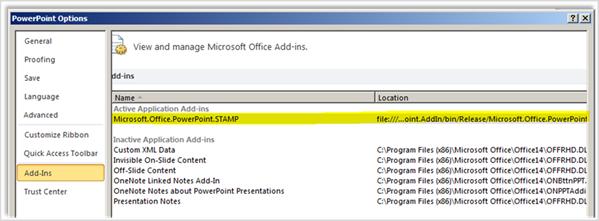
Click Add-ins, and verify that Sub-titling Text Add-in for Microsoft PowerPoint is listed under Active Application Add-ins.
After you have installed the STAMP add-in, you will see new options on the Playback tab in the Audio Tools or Video Tools group when you have an audio or video item selected in your presentation. The ribbon commands are enabled or disabled based on the media item selected and the captions already attached to it.
Keyboard shortcuts
The buttons on the caption editor can be accessed using standard Microsoft Windows Alt + key accelerators.
The following keys have also been assigned to functions in the Caption Editor:
| Key | Function |
| F2 | Move back 2 seconds of playback |
| F3 | Set start time of the current caption |
| F4 | Set end time of the current caption |
| F5 | Set focus to caption text for editing |
| F6 or Insert | Insert new caption at the bottom of grid, and set start time |
| Delete | Delete current caption |
| CTRL+P | Start or pause the playback |
| CTRL+SHIFT+S | Slows the playback speed |
| CTRL+SHIFT+N | Resumes normal playback speed |
| CTRL+SHIFT+G | Increases the playback speed |
Create new captions using the Caption Editor
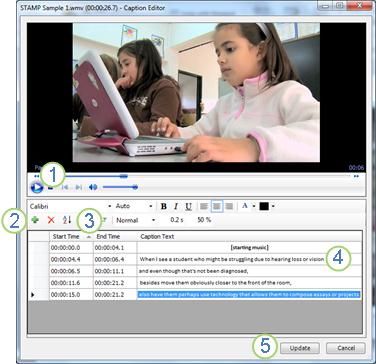
1 Play
2 Add caption
3 Set start and end time
4 Add or change caption text
5 Update captions
6 To add new captions to an audio or video in your presentation, do the following:
-
On the Insert tab, click the Video or Audio menu, and then select the media type and location that you want to insert into your presentation.
Note: See Add and play sounds in a presentation for more information.
-
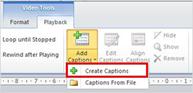
In Audio Tools or Video Tools, click the Playback tab, and then click the Add Captions menu.
-
Click Create Captions.
-
In the Caption Editor, Click the Play button to start playback of the audio or video.
-
With the media playing, listen for the dialog that you want to caption, and click New Caption
 to add a caption. The caption will be created with the current media playback time as the Start Time of the caption.
Clicking Start Time will reset the starting point of the active caption.
-
You can then do one of the following:
-
Click in the Caption Text field and type the text to appear in the caption; or
-
Click Set End Time
 to set the caption end time to match the current media playback position. You can also manually enter the end of each caption. If you leave the end time blank, it adjusts to the start time of the following caption.
-
-
Repeat steps 4 and 5 to create additional captions.
You don't have to create captions in order. To add a new caption between two existing captions, click Sort to put them into time sequence order.
Import captions as a TTML file
If captions for your media have already been created and saved as a TTML file, you can import them into PowerPoint by doing the following:
-
On the Insert tab, click the Video or Audio menu and then select the media type and location that you want to insert into your presentation.
See Add and play sounds in a presentation or Insert and play a video file from your PC or OneDrive for more information.
-
In Audio Tools or Video Tools, click the Playback tab, and then click the Add Captions menu.
-
Click Captions From File.

-
Browse to the TTML file location, select the file you want to import, and then click Open.
-
If you want to edit the captions after they have been imported into your presentation, select the Edit Captions check box.
-
Click OK.
Edit or delete captions in the Caption Editor
When you select media that already has captions added you can edit the captions by doing the following:
-
On the Playback tab, click Edit Captions.
-
Click in the text area of the caption you want to edit, and then make the necessary changes.
-
Click Update Captions.
You can delete a caption by doing the following:
-
On the Playback tab, click Edit Options.
-
Select the row of the caption you want to remove, and then click Delete Caption.
To see the captions you have entered or modified, switch to Slide Show view of your presentation and then click the audio or video to start it.
Align, show, hide, or remove captions
Align captions if you move or resize your video
If you move or change the size of the video in your presentation, you can realign the closed captions by selecting the video, and then clicking Align Captions on the Playback tab.
Hide or show captions in the presentation
You can hide captions from view in your presentation by selecting the media, and then clicking Hide on the Playback tab.
Hiding captions does not remove them from the presentation.
To display captions that you have previously hidden, select the media, and then click Show on the Playback tab.
Remove captions from the presentation
To completely remove captions from the media in your presentation select the media, and then click Remove on the Playback tab.
Related Topics
In PowerPoint 2007, you can add captions by converting your presentation to a video, publishing it as a webpage, or using text boxes with animations. Newer versions of PowerPoint provide other ways of creating captions for videos.
By Glenna Shaw
Summary: Glenna Shaw discusses three things you can add to your presentation to compensate for auditory limitations, such as hearing impairments, background noise, poor sound equipment, or presentations delivered in a different language. By adding captions (words at the bottom of your slides that communicate dialog), subtitles (words at the slide bottom that translate dialogue), or annotations (words on your slide that either communicate or translate dialog), you can increase the reach of your presentation and ensure that your message is delivered clearly.
PowerPoint continues to grow as a medium for the dissemination of ideas, from traditional presentations to education to performance art. This is a wonderful thing since it makes loads of information readily available to a global audience. But what if your audience has an auditory limitation such as a physical challenge, a noisy environment, nonfunctioning sound equipment, or speaks a different language? The easy answer is to add visual dialogue to your presentation. The not so easy answer is how to do it well.
For general guidance on best practices for accessibility, see Make your PowerPoint presentations accessible.
Contents
Overview
The Difference between Open and Closed Captions, Subtitles, Annotations, and Transcripts
For the purposes of this article, the following terms apply:
-
Captions: A series of words superimposed on the bottom of a presentation that communicate dialogue
-
Subtitles: A series of words superimposed on the bottom of a presentation that translate foreign dialogue
-
Annotations: A series of words superimposed on the body of a presentation that communicate dialogue or translate foreign dialogue
-
Transcripts: A written record of dialogue
-
Open: Are always in view and cannot be turned off
-
Closed: Are turned on and off by the viewer
A Word about Section 508 of the Rehabilitation Act
In 1998, Congress amended the Rehabilitation Act to require Federal agencies to make their electronic and information technology accessible to people with disabilities. Under this act, once you add sound to your presentation, PowerPoint is classified as a Multimedia product: products that involve more than one media and include, but are not limited to, video programs, narrated slide production, and computer generated presentations. In order to meet the requirements of Section 508, presentations must adhere to the following standards in relation to hearing impairments:
-
All training and informational video and multimedia productions which support the agency's mission, regardless of format, that contain speech or other audio information necessary for the comprehension of the content, shall be open or closed captioned
-
All training and informational video and multimedia productions which support the agency's mission, regardless of format, that contain visual information necessary for the comprehension of the content, shall be audio described
-
Display or presentation of alternate text presentation or audio descriptions shall be user-selectable unless permanent
For more on other Section 508 requirements, see Make your PowerPoint presentations accessible.
The Methods Available
There are three basic methods to include visual dialogue with your presentations:
-
Convert your presentation to a video and add captions
-
Publish your presentation to a web page and include transcripts in your notes
-
Use text boxes and custom animations to create and animate the captions
Converting the presentation to a video with captions is the ideal method, but cannot be accomplished without third party software. Using the notes portion of the slide to display transcripts on a web page with frames is the easiest but least desirable method since it is not synchronized with the dialogue. There are a wide variety of techniques to use custom animations, however, creating the effect of traditional captions that scroll up from the bottom of the screen in sequence with the dialogue requires a bit of thought.
Open Captions for Presentations
In this section:
Add Caption Space to Slide Masters
Create Scrolling Effects for Caption Placeholders
Add Caption Placeholders to Slide Masters
Add Captions to Slides
Add Text to Caption Placeholders
Remove Superfluous Captions
Incorporate Custom Animations
Include Sound Effects
Record Narrations and/or Rehearse Timings
Create a Custom Caption Template
Haven't Upgraded to PowerPoint 2007 Yet?
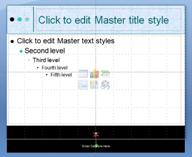
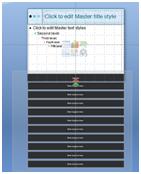
Add Caption Space to Slide Masters
Unless you're going to use annotations for all your visual dialogue, the first thing you need to do is reclaim space on your slides to add captions/subtitles at the bottom of the screen. The best method to do this is using the slide master and custom layouts.
-
Remove the date, footer, and page number placeholders from your slide master because you need this space for your captions. Uncheck the Footers box on the ribbon for each of the slide master layouts.
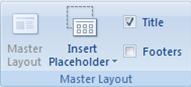
Master Layout group on the Slide Master tab
-
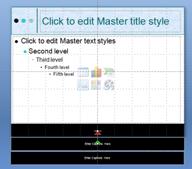
Adjust your design to make space for your captions. Insert a placeholder text box at the bottom of each of the slide master layouts used in your presentation with the following settings:
-
Size; Height: .75', Width: 10'
-
Position; Horizontal: 0', Vertical: 6.75'
-
Margins; Left: 1', Right: 1', Top: .05', Bottom: .05'
-
Vertical Alignment: Middle Centered, Horizontal Alignment: Center
-
Do Not AutoFit, Do Not Shrink Text on Overflow, Do Not Resize Shape to Fit Text, Do Not Wrap Text in Shape
-
Solid Fill: Black, Line: No Line
-
Font: Arial (Body) 12 pt., White
-
Remove Bullets
-
Remove tab stops
-
-
You can add your own text prompt to the new caption placeholder.
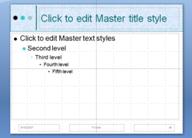
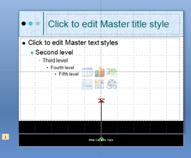
Before view of a Title and Content slide master layout
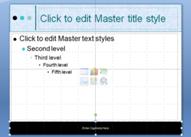
After view of a Title and Content slide master layout
-
Click on the outside edge of your caption placeholder and, using the arrow keys, move it directly below the slide.
-
Add a rectangle shape the same size and settings as the placeholder to the bottom of the slide. This will be the background on which your captions are displayed. You do not want any text on your rectangle, nor do you want it to be a placeholder.
| |
| Rectangle shape added to the slide master layout |

Create Scrolling Effects for Caption Placeholders
You're now ready to create the custom animations that will allow your captions to scroll up from the bottom so they can be synchronized with your narration.
-
Click on the Animations Tab on the ribbon and then click Custom Animation. Click Add Effect, Motion Paths, 6. Up.
Slide master with arrow indicating Up motion path
-
Click on the drop down next to your motion path in the Custom Animation pane, and then click on Effect Options.
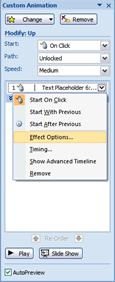
Custom Animation pane
-
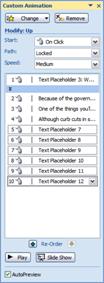
In the Up dialog box, on the Effect tab, change the Settings to Locked, and uncheck Smooth start and Smooth end.
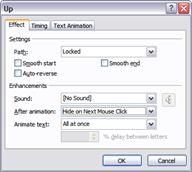
-
Change After animation to Hide on Next Mouse Click.
-
Click on the Text Animation tab and change Group text to All Paragraphs At Once and uncheck Animate attached shape.
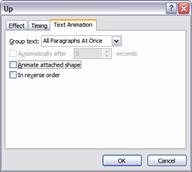
-
Click OK.
-
Click on the red arrow and resize the motion path by dragging the red arrow directly down to the middle of your background rectangle.
Slide master with resized motion path
-
Resize your viewing area by dragging on the slider in the lower right corner. You want to be able to see a lot of the area around the slide. I chose 30%.

Status bar showing a zoom of 30%
Add Caption Placeholders to Slide Masters
-
Click on the Home tab on the ribbon because we're now going to use Copy and Paste to create the remaining caption placeholders.
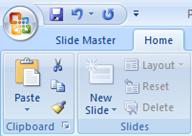
Copy and Paste icons in the Clipboard group on the Home tab
-
Click on the outside edge of the Caption placeholder and then click on the Copy icon and Paste icon to create an additional caption placeholder.

Slide master with 2 caption placeholders
-
Click on the new caption placeholder and, using the arrow keys, move the new caption placeholder until it's directly below the first one.
-
Using the same technique, click on the new motion path and, using the arrow keys, move it until it's directly on top of the first motion path.
Tip: Holding down the CTRL key with the arrow keys let you move objects in smaller increments.
Slide master with motion paths aligned on top of each other
-
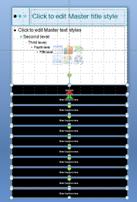
Repeat these steps until you have as many caption placeholders as you think you'll need.
Each caption placeholder will hold approximately 3 lines of text. Resize the screen as needed to see what you're doing. I created a total of 10 caption placeholders in my example. This will give me approximately 30 lines of text for my captions per slide. You have to be exact on the placement of the motion paths since they control the appearance of the text. However, you can spread the actual caption placeholders out more or less to accommodate editing them easily.
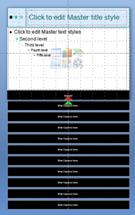
Slide master with 10 caption placeholders
To add the captions to your remaining slide master layouts, click outside the area directly above and to the left of the caption background rectangle.
-
While holding down the left button on your mouse drag a rectangle to encompass all your caption placeholders. This will select all the items at once.
Slide master with all the caption placeholders selected
-
Now click on the Copy icon on the Home tab, go to the slide master layout where you want them copied, click anywhere in the slide editing area and click on the Paste icon.
Slide master with selection handles for all the caption placeholders
-
Click on the auto text icon that will appear and choose Keep Source Formatting.
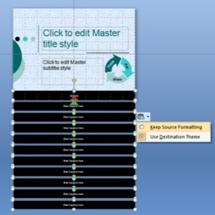
Slide master with formatting options displayed
-
Repeat these steps for each of the slide master Layouts that you use in your presentation. Adjust other placeholders on these layouts accordingly to accommodate room for the captions.
-
You can now close your Slide Master view by clicking on the Slide Master tab in the ribbon and click on Close Master View.

Slide Master tab
Add Captions to Slides
Now that you've created your custom layouts with custom caption placeholders, you're ready to use them with the slides in your presentation. When you create a new slide using one of your custom layouts, your caption placeholders will be in the slide and ready to be filled out.
Apply Custom Layouts
Your caption placeholders may not appear on any or all of your existing slides. This is especially true if you're working on a presentation that was created in PowerPoint 2003. Apply your new layouts to any slides that do not show the caption placeholders. Make adjustments to the appearance of slides, if needed, to accommodate room for the captions.
Add Text to Caption Placeholders
This is the fairly easy part.
Starting with the first placeholder under the slide, type your text into each of the caption placeholders. Be careful not to enter too much into any one placeholder. If you've entered your text in your notes section, copy and paste the text from your notes into the placeholders in chunks. Don't worry about having too many caption placeholders yet. Complete all your slides.
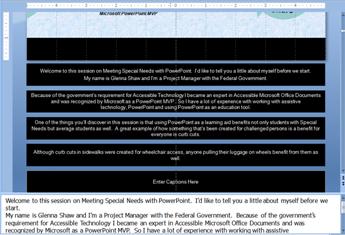
| Slide master with text in the caption placeholders |
Remove Superfluous Captions
If you have too many caption placeholders, you won't really remove them since they're on the master layout. Instead you'll keep them from showing up by removing their custom animation.
-
Click on the Animations tab and Custom Animation to view the Custom Animation pane.
-
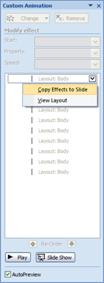
Click on the custom animation for the first caption placeholder.
-
Click on the drop down arrow and click on Copy Effects to Slide.
Custom Animation pane displaying placeholder animations
-
Select the empty placeholder animations by clicking on each one while holding the shift key.
Selected empty placeholder animations in the Custom Animation pane
-
Now click the Remove button.

Custom Animation pane without the empty placeholders
Now your empty caption placeholders will not show during your slide show.
Incorporate Custom Animations
You probably have your own custom animations that you've added to your slide show so you'll need to "weave" these into the animations for the captions.
-
Go to any slide that has custom animations and repeat the steps for copying the caption placeholder animations to your slide.
-
Then move your animations around on the Custom Animation pane to intersperse the captions into your own custom animations.
Keep in mind that the captions are set to disappear on next mouse click so you may need to change this setting and add exit animations for the relevant caption text.
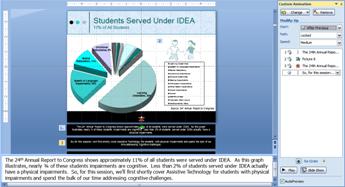
In the example below, I have an animation applied to the picture of the children.
-
To accommodate this, I removed the Hide on Mouse Click setting from my first caption and added an exit animation for the caption to disappear when clicked after the animation of the picture of the children. Remember to change the timing settings of any exit animations.
-
Set Group text to All Paragraphs At Once and uncheck Animate attached shape. I also chose to have the next caption appear automatically after the exit animation of the first caption.
Make sure you test each slide to be sure your custom animations work properly.
| |
| Custom Animation pane with both custom animations and caption placeholder animations |
Include Sound Effects
If you have sound effects in your presentation, add a description for them within your captioned text. Enclose the description in brackets [] to indicate that it's a sound, for example [wind blowing].
This may not be necessary for a presentation to be 508 compliant because it may not add/detract from the content of the presentation, but it's a considerate thing to do.
Record Narrations and/or Rehearse Timings
If this is a new presentation, record your narration and make sure you incorporate timings in your narration.
If this is an existing presentation and you don't want to re-record the narration, you can record and save timings only. This is done with the Rehearse Timings feature. This is also handy if you want a presentation with a fully readable visual dialogue whether or not you choose to narrate the presentation.
Create a Custom Caption Template
Now that you've created your custom caption placeholders and layouts, you may want to save them as a custom template so you can reuse them. You can customize this template with many different designs while maintaining the integrity of the caption placeholders and layouts.
Haven't Upgraded to PowerPoint 2007 Yet?
You can still add captions, but they won't be as flexible. Follow the same directions, except instead of creating custom placeholders, create textboxes on an individual slide and copy them to all your slides.
Annotations in Presentations
Since annotations a placed directly on a slide, they are particularly easy to do in PowerPoint.
Add Annotations to a Slide
First decide how and/or why you'd like to include an annotation and add it to your slide. For example, in the slide above I had a picture of children animated to peek in. I also have a sound effect of children laughing when this effect is played. So I might like to add an annotation that visually shows the children laughing sound effect. To do this I can add and animate a call out shape with the words [children laughing] in brackets to show there's a sound effect to go with the animation.
| |
| Slide with animated call out shape indicating the sound of children laughing |
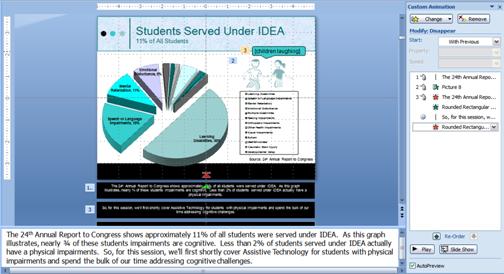
Annotations do not have to be in a shape but it helps to highlight them if you're going to use them. And you will need to accommodate them through the use of custom animations.
Subtitles in Presentations
Since subtitles are typically used for a foreign language, simply translate the text within your captions to the desired language and use the same techniques described in Add captions or subtitles in PowerPoint. Alternatively, you can also use annotations for your subtitles or a combination of the two.
Distribute Presentations
Since the ideal is that it should be the viewer's chose to view the presentation with or without captions and/or subtitles, you can accommodate this by distributing your presentation with both options: with captions/subtitles and without captions/subtitles.
| | Glenna Shaw is a Most Valued Professional (MVP) for PowerPoint and the owner of Glenna Shaw Visual Communications. She holds a Certificate in Accessible Information Technology and is a Certified Project Management Professional with the federal government. |

This blog is really helpful regarding all educational knowledge I earned. It covered a great area of subject which can assist a lot of needy people. Everything mentioned here is clear and very useful.
ReplyDeleteMicrosoft office professional 2019
This blog is really helpful for my database. It enhanced the area of my thoughts and pushed me beyond the boundaries. Work ethic of every point is different and represent a new way to improve myself.
ReplyDeleteOffice 2019 professional dvd