Design a template part to reuse in multiple form templates
You can design a single template part and then distribute it to other form template designers in your organization to use in their form templates. This is useful when you want to help ensure a consistent design across multiple form templates.
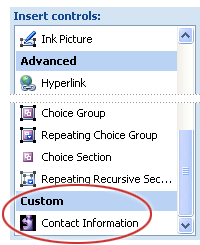
For example, imagine that you manage a team that designs and maintains a series of form templates, and that each of those form templates needs to include a company logo and several text boxes for collecting contact information from users. If you design the logo and controls as a template part (.xtp) file, you can save that file to a common location and then make your team aware of its availability. When team members add the template part to the Controls task pane, it appears under the Custom heading and can be inserted onto a form template.
To modify an existing template part, you open it, make the necessary changes, save the template part, and then distribute it to form designers. After form designers add the latest version of the template part to the Controls task pane, they can use it in their form templates. If they open a form template that contains an older version of the template part, Microsoft Office InfoPath will prompt them to update that template part with the latest version.
In this article
Overview of template parts
A template part is a portion of a form template that can be saved for reuse in multiple form templates. A typical template part consists of controls and a data source and may also include features such as data connections, data validation, and rules.
By creating and using template parts, you can help ensure that the form templates in your organization are consistent in tone, structure, and behavior. For example, a human resources department might use a single "Contact Information" template part in all of its form templates.
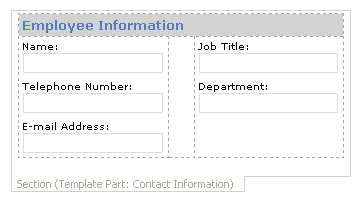
On a form template, the contents of a template part appear in a section control. You can differentiate a template part from a regular section because the words Section (Template Part: Name) appear as the section label, where Name is the name of the template part.
To design a template part, you must select the Template Part option instead of the Form Template option in the Design a Form Template task pane. When you open a template part, a (Template Part Design) prefix appears in the InfoPath title bar, indicating that you are in the correct mode for designing a template part.
Unlike a form template, you don't publish a template part when you finish designing it. Instead, you save it as a template part (.xtp) file. Then you can make your .xtp file available to other form designers who will need to use it. For example, you can copy the .xtp file to a file server on your organization's network and then send an e-mail message to form designers that describes the purpose of the template part, where it is located, and how they can add it to the Controls task pane in InfoPath.
When a form designer inserts a template part on a form template, it becomes part of the form template, and a form designer can customize it, if necessary.
Note: There is no way to prevent form designers from changing a template part after they insert it on a form template. If you don't want others to customize the template part, you should make that clear when you distribute it.
To insert your template part on an InfoPath form template, form designers must first add the template part to the Controls task pane by using the Add Custom Control Wizard. After they complete the wizard, the template part appears in the Controls task pane, under the Custom heading.
To modify a template part, you open it in InfoPath design mode, make the changes that you need, and then resave the template part. You must then send the updated template part to any form designers who used the original version of the template part. Form designers can use the Add Custom Control Wizard to add the updated version of the template part to the Controls task pane. After they do this, they can open each affected form template and have InfoPath replace the original template part with the newer version.
Note: If your organization creates a large number of template parts, you can build a repository of template parts that can be accessed from a common location on a company network, such as a shared folder, a Web server, or a form library located on a Microsoft Windows SharePoint Services site. It is possible to configure the InfoPath settings in the registry so that template parts appear automatically in the Controls task pane for users who have InfoPath installed. To make this happen, you may need to work with your information technology (IT) department, or with someone who is responsible for administering InfoPath in your organization. For more information about this topic, see the InfoPath documentation on Microsoft TechNet. TechNet is the resource that IT professionals use to successfully plan, deploy, manage, and support Microsoft products.
Features that are unavailable in template parts
When you design a template part, there are design limitations that you must consider. For example, certain features are not supported in template parts, such as the ability to create multiple views or to specify global, template-level settings in the Form Options dialog box. With the exception of ActiveX controls, all controls are available for use in template parts. Any features that are not supported in template parts are hidden in the user interface when you design your template part.
The following controls, features, or settings are not supported in template parts:
-
ActiveX controls
-
Color schemes
-
Background pictures
-
Data connections that submit data
-
Information Rights Management (IRM) settings
-
Script and managed code
-
Features for writing code, such as the Microsoft Script Editor
-
The Publishing Wizard
-
The Export Wizard
-
Certain view-related features, including the ability to create multiple views, read-only views, default views, or print views
-
Certain print-related features, including the ability to specify page setup options and create headers and footers
-
Certain features pertaining to the form template as a whole, including the ability to specify digital signatures, custom task panes, security levels, and custom save and open behaviors
-
The ability to use the Verify on server check box in the Design Checker task pane to retrieve server-generated errors and warnings for template parts that are designed for browser-compatible form templates
You can design a form template that can be opened by using InfoPath or a Web browser. If the form template can be opened by using a browser, then it is called a browser-compatible form template. Similarly, you can design a template part that is destined for use in browser-compatible form templates. In this scenario, when you design your template part, you have access to fewer controls and features than you would if you were designing the template part solely for use in InfoPath. This is because certain controls and features are not supported for use in browser-compatible form templates.
Design a template part
In the Design a Form dialog box, you can choose to design a template part instead of a form template. If you do this, InfoPath features that aren't supported in template parts are either hidden or disabled so that you aren't tempted to use them in your template part.
-
On the File menu, click Design a Form Template.
-
Under Design a new in the Design a Form Template dialog box, click Template Part.
-
In the Based on gallery, do one of the following:
-
To define the data source as you design the template part, click Blank.
-
To use an XML document (.xml) file or an XML Schema (.xsd) file as the data source for the template part, click XML or Schema.
Note: If you base your template part on an XML document or XML Schema, InfoPath populates the Data Source task pane with fields and groups that map to XML elements in the document or schema. The data source is locked. Depending on the document or schema, you might not be able to add new fields or groups to part or all of the data source, or to change certain aspects of existing fields and groups.
-
-
To make your template part compatible with InfoPath Forms Services, select the Enable browser-compatible features only check box.
-
Click OK.
A new template part opens in InfoPath.
-
Design your template part.
-
When you finish designing the template part, on the File menu, click Save.
Reuse the design of an existing template part
If you want to base the design of a new template part on an existing template part, you must open the existing template part, change its name in the Template Part Properties dialog box, and then save the new template part with another, distinguishing file name. When you change the template part name in the Template Part Properties dialog box, the template part ID is updated automatically. This ID further distinguishes one template part from another.
-
On the File menu, click Design a Form Template.
-
Under Open a form template in the Design a Form Template dialog box, click On My Computer.
-
In the Files of type list, click InfoPath Template Parts.
-
Browse to and click the template part that you want to open, and then click Open.
-
On the File menu, click Properties.
-
In the Template Part Properties dialog box, enter a new name in the Template part name box.
When you do this, the identifying text in the Template part ID box reflects the new name. The template part ID is generated automatically by InfoPath. It must be unique for each new template part that you create.
-
On the File menu, click Save As, and enter a new file name for the template part.
No comments:
Post a Comment