Create and share a public folder in Outlook
Public folders in Outlook give you a great place to collect, organize, and share information about particular topics or projects within an organization. "Public" in this case means viewable by everyone within the organization, not the world at large. When you post a message to a public folder, you're not emailing it to anyone, so no one's Inbox gets cluttered. Instead, people can check the folder whenever they want to look for interesting posts.
Important: You need a Microsoft Exchange Server and an Exchange email account to use public folders with Outlook. Most home and personal email accounts don't use Exchange.
Step 1: Check with your Exchange administrator
Your organization might not allow public folders or might have policies on how to use them. Check with your administrator so you'll be on the right track. If your organization allows and supports the use of public folders but a top level public folder doesn't exist yet, ask your Exchange administrator to create one.
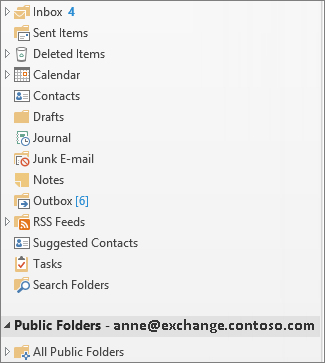
When the top level folder is available, simply press Ctrl + 6 to view it and its content in the Outlook Folder pane.
Step 2: Create and name your folder
-
Press Ctrl+6 to see Public Folders in the Folder Pane.
Important: If you don't see a Public Folders section in the Folder Pane, see your local Exchange email administrator. They must set it up for you.
-
Right-click Public Folders, and click New Folder.
-
Name the folder, and click OK.
Tips:
-
You can add a public folder to your Favorites folders. Then in Outlook Web App, you can perform certain functions within those same public folders, such as create, update or delete items. These actions can be done in Calendar, Contact, Mail and Post public folders.
-
To add a public folder to your Favorites, right-click the folder, then select Add to Favorites....
-
For information on how to use Favorite folders in Outlook Web App, see Working with message folders in Outlook Web App.
Step 3: Set folder permissions for users and groups
By default, Outlook grants permissions only to you, as the creator of the public folder, so you then need to specifically grant permissions to people so they can read and post content in the folder. Learn how to Change permissions for a public folder.
Get started using public folders
Here are some typical ways to use public folders in an organization:
Online discussions
Store each discussion topic in its own subfolder. As needed, set permissions for each subfolder (you may want to restrict access to folders that contain confidential or sensitive information). A topic can have its own moderator to control whether an item is posted, and to delete posts that don't meet organizational standards or violate policy.
Share calendars, contact lists, and task lists
Attach calendars, contacts, and tasks or task lists to posts to share information with people who have access to the folder. This type of centralized location facilitates communication and collaboration on team projects.
Differences between mail folders and public folders
-
When you switch from an email folder to a public folder, the New Post button above the Folder Pane changes to New Email – because you typically post items instead of send email messages in a public folder.
-
When you reply to a post in a public folder, there's no Reply All button. Anyone who views the contents of the folder can see your post.
More about Outlook folders
Create a public folder and specify permissions, views, forms, and rules
To create a public folder, you must have permission to create folders in an existing public folder. For information about how to obtain permission, see your administrator.
Step 1: Create the public folder
-
On the File menu, point to New, and then click Folder.
-
In the Name box, enter a name for the folder.
-
In the Folder Contains box, click the type of folder you want to create.
-
In the Select where to place the folder list, click the location for the folder.
To quickly start a public folder with existing items:
-
In the Folder List, in the Navigation Pane, click the folder you want to copy.
-
On the File menu, point to Folder, and then click Copy Folder name.
-
In the list, click the location you want the folder copied to.
-
Step 2: Set permission levels
-
In the Folder List, in the Navigation Pane, right-click the public folder you want to share, and then click Properties on the shortcut menu.
You must have Owner permission for a public folder to set sharing permissions for the folder. You can set permissions for only one folder at a time.
-
Click the Permissions tab.
-
Click Add.
-
In the Search box, enter the name of the person you want to grant sharing permissions to.
-
Click Add, and then click OK.
-
In the Name list, click the name of the person you just added.
-
Under Permissions, choose the settings you want.
Note: You can assign everyone who has access to the folder the same permissions by clicking Default in the Name list.
Step 3: Create views to organize and find information
Do one of the following:
-
Create a view from scratch
-
On the View menu, point to Current View, and then click Define Views.
-
Click New.
-
In the Name of new view box, type a name.
-
In the Type of view box, choose the view type you want.
-
To change where the view will be available, click an option under Can be used on.
-
Click OK.
-
To further customize the view, under Description, click a button, and then select the options you want to use.
-
When you finish selecting options, click OK.
-
To use the view immediately, click Apply View.
-
-
Create a view based on a standard view
-
Switch to the view you want to base the new view on.
-
On the View menu, point to Current View, and then click Customize Current View.
-
For each type of change you want to make, under Description, click a button, and then select the options you want.
-
When you're finished making changes, close the Customize View dialog box.
-
On the View menu, point to Current View, and then click Define Views.
-
In the Views for folder folder name box, click Current view settings.
-
Click Copy.
-
In the Name of new view box, type a name.
-
To change where the view will be available, click an option under Can be used on.
Note: New views are added to the Current View submenu (on the View menu, point to Arrange By).
-
Step 4: Change the default view for the folder
To change the default view for a public folder, you must have Owner permission for the folder, and there must be at least one custom view defined for the folder that is visible to everyone.
-
In the Folder List, in the Navigation Pane, right-click the public folder, and then click Properties on the shortcut menu.
-
Click the Administration tab.
If the Administration tab does not appear, you don't have Owner permission.
-
In the Initial view on folder list, click the view that you want to appear each time the folder is opened.
The Normal view displays the default Microsoft Outlook view for the type of items in the folder.
Step 5: Specify the forms available for others to post information in the public folder
You must have Editor, Publishing Editor, or Owner permission to add forms to a private shared folder or to a public folder. If the folder is a public folder, and you have Owner permission, you can limit the forms that are available to other people who use the folder.
-
In the Folder List, in the Navigation Pane, right-click the folder, and then click Properties on the shortcut menu.
-
Click the Forms tab.
-
To add a form to the Forms associated with this folder list, click Manage, then indicate the form.
-
Click Close.
-
To limit the forms that you want to be available for other people who use the folder, click an option under Allow these forms in this folder.
Step 6: Create rules to process items posted in the folder
You must have Owner permission for a public folder to create or modify rules for it.
-
In the Folder List, in the Navigation Pane, right-click the public folder you want to create or modify rules for, and then click Properties on the shortcut menu.
-
Click the Administration tab.
-
Click Folder Assistant.
-
Do either of the following:
-
To create a rule, click Add Rule.
-
To modify an existing rule, click a rule in the list, and then click Edit Rule.
-
-
Enter the conditions that the item must meet for the action to occur. For more conditions, click Advanced.
-
Under Perform these actions, select the options you want.
Note: When you create a rule, it is active by default.
Step 7: Add information to the public folder
Do any of the following:
-
Share a calendar
-
Create a new folder, and choose Calendar items in the Folder contains list.
-
In the Select where to place the folder list, click Calendar, and then click OK.
-
Add meetings and events to the folder.
-
-
Share a contact list
-
Create a new folder, and choose Contact items in the Folder contains list.
-
In the Select where to place the folder list, click Contacts, and then click OK.
-
Add contacts to the folder.
Note: The shared contact list appears in the Outlook Address Book/Contacts.
-
-
Share a task list
-
Create a new folder, and choose Task items in the Folder contains list.
-
In the Select where to place the folder list, click Tasks, and then click OK.
-
Add tasks to the folder.
Note: While you can copy a task list to a public folder, you cannot copy a task request to a public folder or create a task request from a public folder.
-
-
Post information in a public folder
-
Open the public folder you want to post information in.
-
To use the default form for posting information, click the File menu, point to New, and then click Post in This Folder.
-
In the form, enter the information you want to post.
-
Click Post.
-
Create a moderated public folder
You must have Owner permission for a public folder in order to designate it as a moderated folder.
-
In the Folder List, in the Navigation Pane, right-click the public folder, and then click Properties on the shortcut menu.
-
On the Administration tab, click Moderated Folder.
-
Select the Set folder up as a moderated folder check box.
-
In the Forward new items to box, enter the name of the person who receives incoming messages or the name of an alternate public folder where the messages are stored for review. The moderator who does the reviewing is specified in step 6.
-
Optional: To automatically send a response when a new message is received by the moderator, select an option under Reply to new items with.
Choose one of the following:
-
Standard response
"Thank you for your submission. Please note that submissions to some folders or discussion groups are reviewed to determine whether they should be made publicly available. In these cases, there will be a delay before approved submissions can be viewed by others."
-
Custom response
Click Custom response, and then click Template. Type the text of your custom response.
Moderators will not receive either of these responses when they post messages.
-
-
To add or remove names of people who are moderators, click Add or Remove.
-
Optional: To view the properties of a selected moderator, click Properties.
No comments:
Post a Comment