Configure or turn off AutoFormat as you Type
Use the AutoFormat feature to quickly apply or change automatic formatting for things such as hyphens and dashes, fractions, hyperlinks, quotation marks, and bulleted or numbered lists.
To turn off automatic formatting for a program, clear each option you want to turn off. To get to the AutoFormat settings go to File > Options > Proofing > AutoCorrect Options. (Except in Outlook where you need to go to Click File > Options > Mail > Editor Options > Proofing > AutoCorrect Options)

What's the difference between "AutoFormat" and "AutoFormat As You Type"?
-
AutoFormat As You Type settings are applied to text while you are typing.
-
The settings on the AutoFormat tab are applied when you manually run the AutoFormat command (which requires using the Quick Access Toolbar).
Most of this article describes options on the AutoFormat As You Type tab. See Using the AutoFormat tab and the AutoFormat command in Word below for information about the AutoFormat tab.
Click here for how to find the AutoFormat As You Type tab
To make changes to automatic formatting behavior in an Office program, first open the AutoCorrect Options window, then select the AutoFormat As You Type tab.
All programs except Outlook:
-
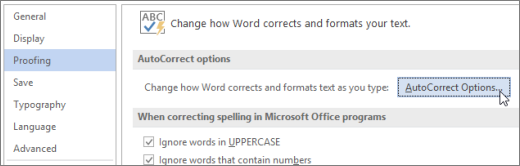
Click File > Options > Proofing > AutoCorrect Options.
-
Click the AutoFormat As You Type tab.
Outlook:
-
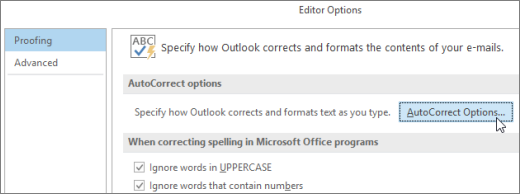
Click File > Options > Mail > Editor Options > Proofing > AutoCorrect Options.
-
Click the AutoFormat As You Type tab.
Word, Excel, and PowerPoint:
-
Click the Microsoft Office Button
 > [Program] Options > Proofing > AutoCorrect Options.
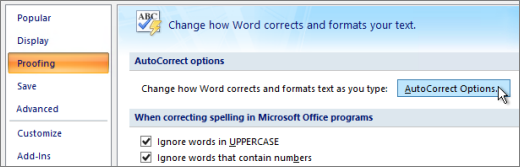
-
Click the AutoFormat As You Type tab.
Outlook:
-
Open a mail item, and then click the Microsoft Office Button
> Editor Options > Proofing > AutoCorrect Options.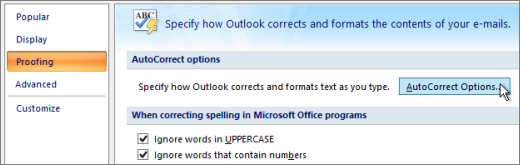
-
Click the AutoFormat As You Type tab.
Publisher and Visio:
-
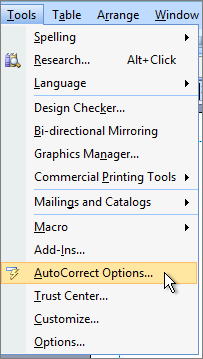
On the Tools menu, click AutoCorrect Options.
-
Click the AutoFormat As You Type tab.
What does each option mean?
The set of AutoFormat options you see may vary a bit depending upon which program you're in.
REPLACE AS YOU TYPE
| Option | Description |
| "Straight quotes" with "smart quotes" | Replaces straight quotation marks (" ") and straight apostrophes (' ') with curved, open and closed, quotation marks and apostrophes. |
| Fractions (1/2) with fraction character (½) | Replaces common typed fractions (such as 1/2) with single-character equivalents (½). This option works for the following typed fractions: 1/4, 1/2, and 3/4. To insert single-character equivalents of a few other fractions (such as 1/5) see: Insert a check mark or other symbol |
| *Bold* and _italic_ with real formatting | Applies bold font to any text enclosed in asterisks (*) and italic font to any text enclosed in underscores (_). For example, *computer* becomes computer and _computer_ becomes computer. Note that in Word the (*) or the (_) will be replaced by the formatting. In Outlook the (*) and (_) will remain even after the formatting is applied. |
| Internet and network paths with hyperlinks | Replaces typed Internet addresses, network paths, and email addresses with hyperlinks. |
| Ordinals (1st) with superscript | Replaces ordinal numbers (which show the relative position of an item in a sequence) such as 1st, 2nd, or 3rd with superscripted versions (such as " |
| Hyphens (--) with dash (—) | Replaces a double hyphen (--) with an em dash (—) and a space-hyphen-space sequence ( - ) with an en dash (–). Note that if you want an em dash do not use any spaces before and after the double hyphen. |
| Smiley faces :-) and arrows ==> with special symbols | Replaces typed smiley faces and arrows with equivalent character symbols and emoticons. |
 ").
").APPLY AS YOU TYPE
| Option | Description |
| Automatic bulleted lists | Creates a bulleted list when a line of text starts with *, -, or > followed by a space or tab. To end a bulleted list, press ENTER two times. |
| Border lines | Draws a line when you type three consecutive ~, #, *, -, _, or = characters on a new line and then press ENTER. For example, typing ~~~ on a new line and then pressing ENTER draws a wavy line across the page. |
| Built-in Heading styles | Applies heading styles to paragraphs of five or fewer words (that do not end with punctuation) after you press ENTER two times. For Heading 1, type a new line without any preceding tabs. For Heading 2, precede the new line with a single tab. For Heading 3, precede the new line with two tabs. Note: You must press ENTER two times after the previous paragraph to automatically apply heading styles. |
| Automatic numbered lists | Creates a numbered list when a line of text starts with the number 1 followed by a period or tab. To end a numbered list, press ENTER two times. |
| Tables | Creates a single-row table when you insert a sequence of plus signs (+) and hyphens (-) at the start of a line of text and then press ENTER. You must begin and end the sequence with a plus sign. For example, +---+---+------+ creates a single row table with three columns. The column width is proportional to the number of hyphens between the plus signs. To add rows anywhere in the table, position the cursor at the end of the row where you want to insert the new row, and then press ENTER. |
| Include new rows and columns in table (Excel only) | Adds a new row or column to an existing table when you enter data in an adjacent row or column. For example, if you have a two-column table in columns A and B, and then enter data in an adjacent cell in column C, column C is automatically formatted as part of the existing table. |
| AutoFit title text to placeholder (PowerPoint only) | Decreases the font size of the title text so the text fits in the defined title text placeholder. Note: The title text automatically decreases by only one font size increment (for example, from 44 to 40) based on the built-in font sizes for the font. If you want to further decrease the font size, select the title text and either choose a smaller built-in font size from the Font Size list or type the font size you want in the Font Size list. |
| AutoFit body text to placeholder (PowerPoint only) | Decreases the font size of the body text so the text fits in the defined body text placeholder. |
AUTOMATICALLY AS YOU TYPE
| Option | Description |
| Format beginning of list item like the one before it | Formats the lead-in text of a list item like the lead-in text of the previous list item. Lead-in formatting is repeated up to the first punctuation character of the list item, typically a period, colon, hyphen, em dash, question mark, exclamation point, or similar character. Only formatting that applies to all of the lead-in text is repeated in the next list item. Formatting that applies to only a section of the lead-in text is not repeated in the lead-in text of subsequent list items. |
| Set left- and first-indent with tabs and backspaces | Indent the first line of a paragraph by putting the cursor before the first line and pressing the TAB key. Indent the whole paragraph by putting the cursor before any line in the paragraph (except the first line) and pressing the TAB key. To remove an indent, put the cursor before the first line of the paragraph and press the BACKSPACE key. |
| Define styles based on your formatting | Applies a built-in style to manually formatted text when the text has the same formatting as a built-in style. |
| Fill formulas in tables to create calculated columns (Excel only) | Applies a single formula to all table cells in a column. The formula automatically adjusts to extend to all table cells in the column.Click the headings below for more information |
Click the headings below for more information
Undo automatic formatting while you type
You can immediately reject or change automatic formatting that occurs as you type. When Office applies the automatic formatting, hover your mouse over the item that got AutoFormatted, and select the AutoCorrect Options button  that appears:
-
Undo the formatting for this instance only. (You can choose to redo the formatting after you undo it, if desired.)
Tip: You can also use CTRL+Z (Undo) to immediately undo a formatting change for this instance only.
-
Change this specific AutoFormat option globally by clicking the Stop option so that Office stops making the automatic change it just did.
-
Change options by clicking Control AutoFormat Options to open the AutoFormat As You Type tab and change settings.
Using the AutoFormat tab and the AutoFormat command in Word
Word has an AutoFormat tab in addition to the AutoFormat As You Type tab. The AutoFormat As You Type settings are applied to text at the time you are typing, as described above. The AutoFormat tab is less commonly used, because the options on it are only applied when you run the AutoFormat command, which you must add the Quick Access Toolbar to use.
The AutoFormat command makes the same kinds of changes as those made by AutoFormat As You Type settings, but the formatting is applied to text that has already been typed. For example, you can use AutoFormat to replace straight quotes with smart quotes, or replace fractions with fraction characters, in an entire document at once.
To use the AutoFormat command, first add it to the Quick Access Toolbar, as follows:
-
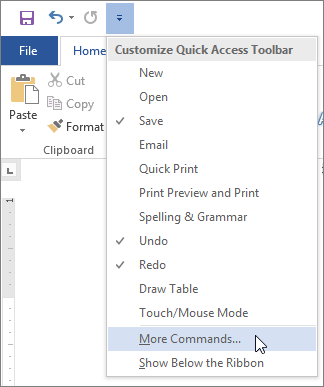
In Word, click the Customize Quick Access Toolbar icon, and then click More Commands.
-
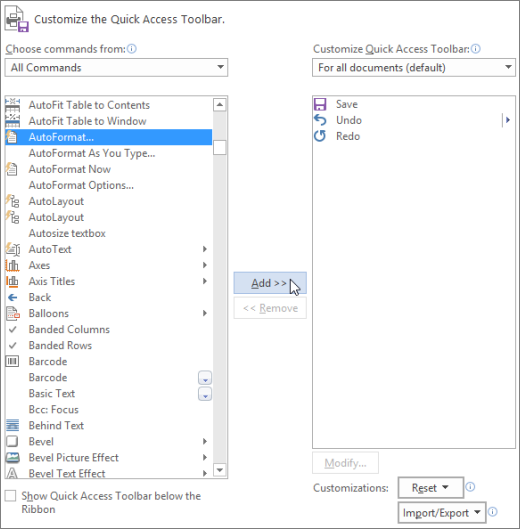
Under Choose commands from, select All Commands.
-
Scroll down in the list, select AutoFormat... or AutoFormat Now, click Add, then click OK.
-
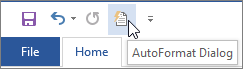
To run the command, click the AutoFormat icon in the Quick Access Toolbar.
See also
-
To use the AutoCorrect feature to correct typos, capitalization errors, and misspelled words, and automatically insert symbols text, see Choose AutoCorrect options for capitalization, spelling, and symbols.
-
To format a date in Excel, see Format a date the way you want.
-
To work with the Auto Fill feature in Excel, see Fill data automatically in worksheet cells.
-
To manually configure paragraph indents in Word, see Create a first line indent.
-
To automatically insert blocks of text using AutoText and the AutoText gallery in Word, see Automatically insert text.
Microsoft Office Tutorials: Configure Or Turn Off Autoformat As You Type >>>>> Download Now
ReplyDelete>>>>> Download Full
Microsoft Office Tutorials: Configure Or Turn Off Autoformat As You Type >>>>> Download LINK
>>>>> Download Now
Microsoft Office Tutorials: Configure Or Turn Off Autoformat As You Type >>>>> Download Full
>>>>> Download LINK cE