Set the rules for a mail merge
Learn about mail merge rules and explore how each rule might be used by your organization. When you're creating a letter or an email to all your customers and you want the letter to say different things depending on the different values in certain fields of your data source—you can set up a rule.
For example, that you've created a letter about an upcoming event to be held in three different geographical locations around the world. You created the letter using the Start Mail Merge option on the Mailings tab in Word, but after reviewing the document, you discover that not only is there repetitive content, but also realize some content needs to change based on the location of the event. In such a situation, you can use Rules in the Write & Insert Fields group to cover a variety of conditions.
Use rules
Adding rules to a mail merge document gives you the opportunity to make the workflow process more efficient and to introduce flexibility. With rules, you can bypass the need to generate multiple documents and set up content that can be changed quickly.
You can add rules while you're setting up the mail merge.
-
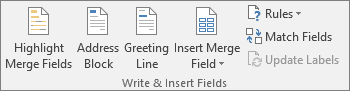
On the Mailings tab, in the Write & Insert Fields group, choose Rules.
-
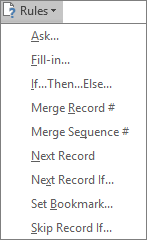
Choose an available rule.
You can't access rules until you've started the mail merge process. For details about how to set up any field, in the dialog box for the chosen Rule, choose the ? icon. You also can search for the field name in Word Help.
Tip: To switch between showing and hiding field codes, press ALT+F9.
| Field | Description | Example and method |
| Ask | Use to repeat a request for the same information in more than one place in a document. The response to the prompt appears in the merged document In the Insert Word Field: Ask dialog box there's an Ask once check box. Select the check box if you want if you want the prompt to occur only at the start of the final mail merge. Or clear the check box (the default setting) if you want the prompt to appear for each record. For more information, see Ask field. | There's a retirement party planned for an employee who spent years selling products manufactured by your organization. An invitation is being sent via email message to people inside and outside the organization asking each person if they'll attend. In the Insert Word Field: Ask dialog box, in the Bookmark box, type Invitation. In the Prompt box, type Do you plan to join us for the retirement party? In the Default bookmark text box, type Yes. Choose OK when done. |
| Fill-in | Use the Fill-in field when you want to pose a question. The Fill-in field is similar to the Ask field, multiple times in a document. In the Insert Word Field: Fill-in dialog box there's an Ask once check box. Select the check box if you want the response to apply to every record being merged. Or clear the check box (the default setting) if you want to be prompted for each record. For more information, see Fill-in field. | Your organization is sponsoring a health assessment event. There's a confidential sign up form being sent to each employee. That form asks for information—age, height, weight—that needs to be provided. In the Insert Word Field: Fill-in dialog box, in the Prompt box, type Hold old are you? Choose OK when done. |
| If Then Else | Use to define a condition that needs to be met. If the defined condition is met, then specific information is provided. But if the defined condition isn't met, then different information is provided. For more information, see If field. | You maintain a large membership database for a charitable organization. Members will receive different announcements about upcoming fundraising events based on their geographic location. In the Insert Word Field: IF dialog box, in the Field name drop-down list, choose the location column name in your data source (typically an Excel spreadsheet). In the Comparison drop-down list, choose Equal to. In the Compare to box, type South America. Then in the Insert this text box, type the content that is inserted if the comparison is met. And if the comparison isn't met, then the content provided in the Otherwise insert this text box is added. Choose OK when done. |
| Merge Record # | Use to capture the actual record number in the data source to be included in the merged document. The number reflects any sorting or filtering that you applied to the data source before the merge For more information, see MergeRec field. | Use a MergeRec field next to a Print date field to create unique invoice numbers. On the Mailings tab, in the Write & Insert Fields group, choose Rules, and then select Merge Record #. |
| Merge Sequence # | Use when you want a count of the records in the merged document. For more information, see MergeSeq field. | You have merged a batch of letters and the last record in a batch of form letters displays the total number of letters. You can use this total to calculate the cost of postage. On the Mailings tab, in the Write & Insert Fields group, choose Rules, and then selectMerge Sequence #. |
| Next Record | Use to insert the next data record into the current document without starting a new document. For more information, see Next field. | On the Mailings tab, in the Write & Insert Fields group, choose Rules, and then select Next Record. |
| Next Record If | Use to compare two values. A match between the contents of the data field and the value determines if the next record should be merged into the current document or into a new document. For more information, see NextIf field. | On the Mailings tab, in the Write & Insert Fields group, choose Rules, and then select Next Record If. In the Field name list, choose the merge field name, such as City. In the Comparison list, choose the operator that you want. For example, to single out recipients in a particular city, choose Equal to. In the Compare to box, type the value that you want to use. For example, to single out recipients in Tokyo, type Tokyo. |
| Set Bookmark | Use to associate a bookmark name to a specific value. A bookmark can be placed in multiple locations in a document. Wherever you insert a bookmark in a document, the value linked to that bookmark will appear. For more information, see Set field. | Your organization is preparing a public release of a summary of environmental work to be undertaken in a particular area. Project managers have a preliminary project title, but warn it might change. The best choice here is to add a bookmark because if the title does change, you only change the bookmark, not every reference to the title. In the Insert Word Field: Set dialog box, in the Bookmark box, type Project name.. In the Value block, type Big Frog Hollow Remediation Choose OK when done. |
| Skip Record If | Use to compare the contents of a data field to a value, and then to skip the inclusion of the current data record if the comparison is true. For more information see, SkipIf field. | You own a clothing store and find you have an overstock of a particular T-shirt, but not in the most popular size. So when you get ready to send out a sales flyer, you're going to exclude customers who wear a certain size. In the Insert Word Field: Skip Record If dialog box, in the Field name drop-down list, choose the Size column name in your data source (typically an Excel spreadsheet). In the Comparison drop-down list, choose Equal to. In the Compare to box, type XL. Choose OK when done. Any customer who wears an XL T-shirt won't receive the sales flyer. |
No comments:
Post a Comment