Insert or delete a Web Part zone
This article shows you how to insert and delete Web Part zones by using Microsoft Office SharePoint Designer 2007. It also explains and illustrates the relationships of Web Part zones to Web Parts and Web Part Pages.
To insert and delete Web Part zones in a Microsoft SharePoint site, you must have either the Add/Remove Private Web Parts permission or the Add And Customize Pages permission. By default, at least one of these permissions is granted to members of the Contributor, Web Designer, and Administrator site groups. If you are unable to insert or delete a Web Part zone, contact your server administrator.
In this article
What is a Web Part zone?
A Web Part zone is a Web Part container that can be configured to control the organization and format of the Web Parts contained in it. Web Part zones make it possible not only to group and arrange Web Parts but also to customize them in the browser and to control who can modify them there. Each of the individual Web Parts on a Web Part Page may or may not be located within a Web Part zone:
-
Web Parts located in a Web Part zone When a Web Part is located inside a Web Part zone, the Web Part properties are stored in the content database in Windows SharePoint Services 3.0, not in the ASPX page. By inserting a Web Part inside a zone, you make it possible for users to interact with or modify that Web Part through the browser.
-
Web Parts not located in a Web Part zone When a Web Part is not located inside a Web Part zone, the Web Part properties are stored in the ASPX page and not in the content database in Windows SharePoint Services 3.0. By inserting a Web Part without enclosing it in a zone, you allow users to view the Web Part, but you prevent them from interacting with or modifying the Web Part through the browser. This can be useful if you do not want users to be able to make any changes, either to the Web Part or to the way that it is displayed on the page.
You can think of Web Parts, Web Part zones, and Web Part Pages as nested containers. The Web Parts themselves contain the data that you want to view and perhaps to change or interact with. The Web Part zones are optional subcontainers within the Web Part Page, each of which contains one or more Web Parts — making it possible to group and arrange those Web Parts on the page, to customize them while viewing them in the browser, and to specify who has permissions to view and to customize them in that way. And the Web Part Page contains both the Web Parts and the Web Part zones.
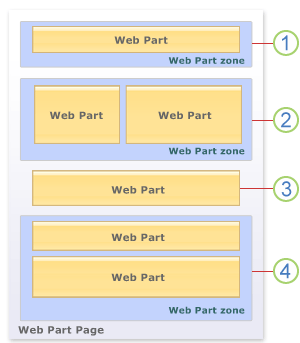
For example, in the following schematic drawing of a Web Part Page, one of the three shaded Web Part zones contains only one Web Part, and the others each contain two. Note that within any Web Part zone, multiple Web Parts can be arranged either horizontally or vertically. Note also that one of the Web Parts is not located in a zone at all — an arrangement that may be acceptable if users do not need to be able to customize that Web Part in the browser.

1. Web Part zone containing a single Web Part
2. Web Part zone containing two Web Parts arranged horizontally
3. Web Part not contained in a Web Part zone and therefore not customizable in the browser
4. Web Part zone containing two Web Parts arranged vertically
Each time you insert a Web Part on a Web Part Page, you decide whether to insert it in a Web Part zone. There are several advantages to using Web Part zones:
-
Customizing in the browser Only Web Parts that are located in a Web Part zone can be customized by a user who is viewing them in the browser.
-
Grouping and arranging Using Web Part zones gives you greater control over how your Web Parts are arranged on the page. Also, when you include multiple Web Parts in a single Web Part zone, you can either stack them vertically within the zone or arrange them side by side horizontally.
-
Format and appearance One of the properties that you can control for all Web Parts in a single Web Part zone is whether they display a title bar only, both a title bar and a border, or neither.
-
Access For each Web Part zone, you can control whether users are allowed to:
-
Add, delete, resize, and move the Web Parts.
-
Change their own personal Web Part settings.
-
Change Web Part settings for all users.
-
Insert a Web Part zone
-
In Office SharePoint Designer 2007, open the page where you want to insert the Web Part zone.
-
If the Web Parts task pane is not already open, open it by clicking Web Parts on the Task Panes menu.
-
In Design view, click the location on the page where you want to insert the Web Part zone.
-
At the bottom of the Web Parts task pane, click New Web Part Zone.
The new Web Part zone is inserted on the page.
-
Right-click the new Web Part zone, and then click Web Part Zone Properties on the shortcut menu.
-
In the Web Part Zone Properties dialog box, do any of the following:
-
Give the zone a title Under General settings, in the Zone title box, type a name for the new zone.
-
Choose a frame style Under General settings, in the Frame style list, click the style that you want.
-
Choose a layout for the zone Under Layout of Web Parts contained in the zone, click either Top-to-bottom (vertical layout) or Side-by-side (horizontal layout).
-
Control changes made in the browser Under Browser settings for Web Parts contained in the zone, select check boxes to allow users to make the indicated changes while they view the page in a browser, or clear check boxes to prevent users from making those changes.
-
-
When you finish, click OK.
For instructions about inserting Web Parts in your Web Part zone, see the article Insert or delete a Web Part.
Delete a Web Part zone
When you delete a Web Part zone from a page, you also delete from that page any Web Parts located in the zone.
When you select a Web Part zone for deletion, make sure that you select only the zone and not any other object. The Quick Tag Selector, which is located at the top of the document window and shown in the following illustration, makes this easier to do by identifying the precise object that is currently selected.

Tip: The arrow keys may be more useful than the mouse for adjusting the selection, particularly when objects overlap or are superimposed on other objects. Each time that you press an arrow key, check the Quick Tag Selector to see how the selection has changed.
-
In Office SharePoint Designer 2007, open the page from which you want to delete a Web Part zone.
-
If the Quick Tag Selector is not visible, click Quick Tag Selector on the View menu to display it.
-
In Design view, locate the Web Part zone that you want to delete, and then click it to select it.
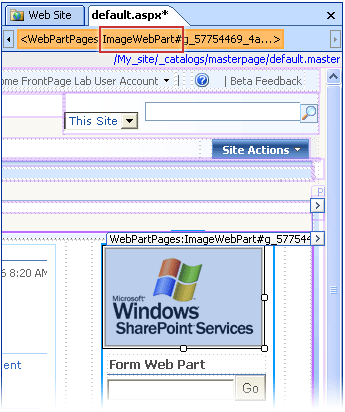
Check the Quick Tag Selector to make sure that you selected the correct object. Use the arrow keys to adjust the selection if necessary. For example, in the following illustration, the Quick Tag Selector indicates that a Web Part is selected and not the Web Part zone.

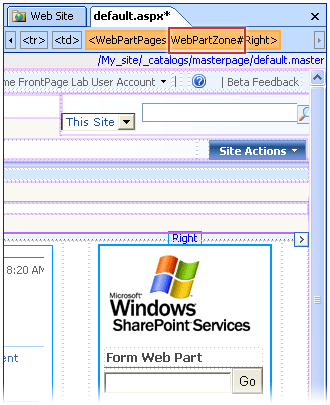
In the next illustration, the Web Part zone is selected, not the Web Part.

-
When you are sure that the Web Part zone is accurately selected, press DELETE.
The selected Web Part zone is deleted from the page, along with any Web Parts that are located in it.
No comments:
Post a Comment