Crop a picture
You can use the Office cropping tools to trim and remove unwanted portions of pictures. To remove the background of a picture, see Remove a picture background. In addition to standard picture cropping, you can also crop pictures to specific shapes and crop picture fills inside a shape in Office for Mac and Office 2010 and later.
Note: Cropping tools are not available for shapes, but in Office 2010 and later, you can resize a shape and use the Edit Points tool to achieve an effect similar to cropping, or to customize a shape. See Crop to fit or fill a shape below for more information.
Crop a picture
-
In your file, select the picture that you want to crop.
-
Click Picture Tools > Format, and in the Size group, click Crop.
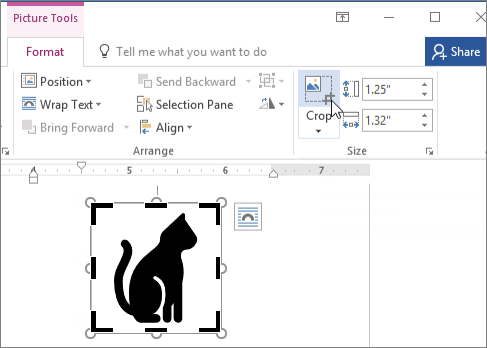
Note: If you do not see the Picture Tools and Format tabs, make sure that you selected a picture (and not a shape). You might have to double-click the picture to select it and open the Format tab.
-
Do one of the following:
-
To crop one side, drag the center cropping handle on that side inward.
-
To crop two adjacent sides at the same time, drag a corner cropping handle inward.
-
To crop equally on two sides at the same time, press and hold CTRL while you drag the center cropping handle on either side inward.
-
To crop equally on all four sides at the same time, press and hold CTRL while you drag a corner cropping handle inward.
-
-
To position the crop, move either the crop area (by dragging the edges of the crop rectangle) or the picture.
-
When you're finished, press ESC.
Note: To "outcrop" or add a margin around a picture, drag the cropping handles away from the center of the picture.
Note: After you crop a picture, the cropped parts remain as part of the picture file. To permanently remove the cropped portion and reduce your picture size, see Delete cropped areas of a picture.
Crop to a specific shape
A quick way to change the shape of a picture is to crop it to a specific shape. When you crop to a specific shape, the picture is automatically trimmed to fill the geometry of the shape and the proportions of the picture are maintained.
-
Select the picture or pictures that you want to crop to a specific shape.
If you are cropping multiple pictures, you must crop them to the same shape. To crop to different shapes, crop the pictures individually.
-
Click Picture Tools > Format, and in the Size group, click the arrow under Crop.
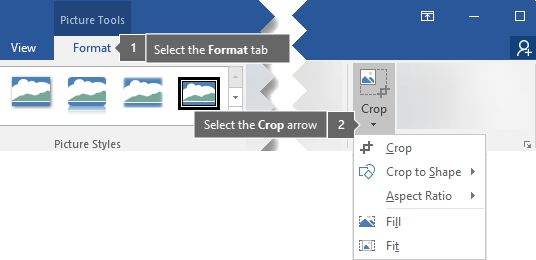
Note: If you do not see the Picture Tools and Format tabs, make sure that you selected a picture (and not a shape). You might have to double-click the picture to select it and open the Format tab.
-
Click Crop to Shape, and then click the shape you want to crop to.
Tip: If you want the same picture in different shapes, make a copy or copies of the picture, and then crop each picture individually to the shape that you want.
Crop to a common aspect ratio
You might want to crop a picture to a common photo size or aspect ratio so that it easily fits into a standard picture frame. This is also a good way to see the proportions of the picture when cropping it.
-
Select the picture that you want to crop to a common aspect ratio.
-
Click Picture Tools > Format, and in the Size group, click the arrow under Crop.

Note: If you do not see the Picture Tools and Format tabs, make sure that you selected a picture (and not a shape). You might have to double-click the picture to select it and open the Format tab.
-
Point to Aspect Ratio, and then click the ratio that you want.
-
When you're finished, press ESC.
Crop to fit or fill a shape
You can add a picture as fill for a shape, and then edit or crop the shape.
Add a picture to a shape
-
Add a shape to your document (see Add shapes for instructions), and then click the shape to select it.
-
Under Drawing Tools, on the Format tab, in the Shape Styles group, click Shape Fill > Picture, and select the picture that you want.
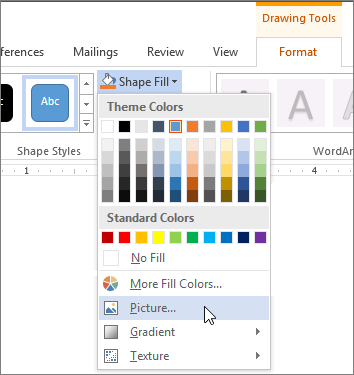
Note: If you do not see the Drawing Tools and Format tabs, make sure that you selected a picture. You might have to double-click the picture to select it and open the Format tab.
Resize the shape
To change a shape's dimensions while maintaining its basic format, simply select the shape and drag any of the sizing handles until the shape has the size and dimensions you want.
Choose how the picture fits in the shape
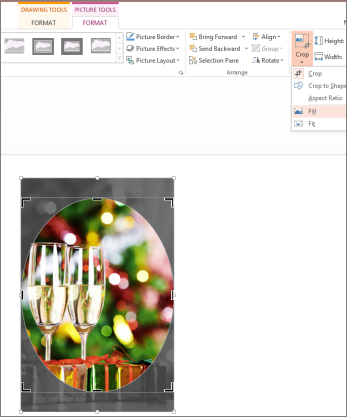
If your picture is skewed, cut off, or doesn't fill the shape the way you want, use the Fit and Fill tools for fine tuning. To remove (or "crop") part of the picture, but still fill the entire shape, choose Fill. If you want all of the picture to fit within the shape, choose Fit. The original picture aspect ratio is maintained, but you may have empty space inside your shape.
-
Click the picture that you want within the shape.
-
Click Picture Tools > Format, and in the Size group, click the arrow under Crop.

Note: If you do not see the Picture Tools and Format tabs, make sure that you selected your picture. You might have to double-click the picture to select it and open the Format tab.
-
Click Fill or Fit.
-
Fill sets the picture size to match the shape's height or width, whichever is greatest. This fills the shape with the picture and removes anything outside of the shape.
-
Fit sets the picture size so that the picture's height and width both match the shape's boundaries. This fits as much of the picture into the shape as possible. Some areas of the shape might remain empty.
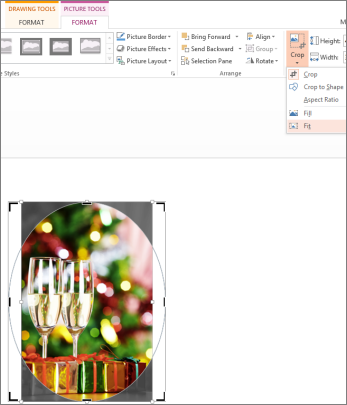
You can drag the picture to change what part shows within the shape.
-
-
When you are finished, press ESC.
Use edit points edit or crop the shape
Although cropping tools are not available for shapes, you can use the Edit Points tool to edit a shape manually:
-
Select the shape that you want to change.
-
Under Drawing Tools, on the Format tab, click Edit Shape
 , and then click Edit Points.
 Note: If you do not see the Drawing Tools and Format tabs, make sure that you selected a picture. You might have to double-click the picture to select it and open the Format tab.
-
Drag the vertex points (black dots) until the shape looks the way you want. You can add or delete points by pressing Ctrl while clicking the shape outline.
Delete cropped areas of a picture
Even after you crop parts of a picture, the cropped parts remain as part of the picture file. You can reduce the file size by removing the croppings from the picture file. This also helps prevent other people from viewing the parts of the picture that you have removed.
Important: If you delete cropped parts and change your mind, you can click the Undo  button to restore the cropped parts. But after you delete cropped parts, your changes cannot be undone if you have saved the file. You should save your file only after you are sure that you have made all the crops and changes that you want.
-
Select the picture or pictures from which you want to delete cropped areas.
-
Under Picture Tools, on the Format tab, in the Adjust group, click Compress Pictures.

Notes: If you do not see the Picture Tools and Format tabs, make sure that you selected a picture. You might have to double-click the picture to select it and open the Format tab. Also, if your screen size is reduced, you might only see the Compress Pictures icon.

-
Under Compression Options, select the Delete cropped areas of pictures check box.
To remove croppings for the selected picture or pictures only and not all of the pictures in the file, select the Apply only to this picture check box.
Tip: For more information about reducing the file size of the pictures and compressing pictures, see Reduce the file size of a picture.
Crop a picture
-
In your file, select the picture that you want to crop.
-
Click Picture Tools > Format, and in the Size group, click Crop.

Note: If you don't see the Picture Tools and Format tabs, make sure that you selected a picture (and not a shape). You might have to double-click the picture to select it and open the Format tab.
-
Do one of the following:
-
To crop one side, drag the center cropping handle on that side inward.
-
To crop two adjacent sides at the same time, drag a corner cropping handle inward.
Note: To "outcrop" or add a margin around a picture, drag the cropping handles away from the center of the picture.
-
See also
Crop a picture in Office for Mac
Reduce the file size of a picture
Change the size of a picture, shape, text box, or WordArt
Rotate a text box, shape, WordArt, or picture
No comments:
Post a Comment