Create a bulleted or numbered list
You can quickly add bullets or numbers to existing lines of text, or Word can automatically create lists as you type. By default, if you start a paragraph by typing an asterisk followed by a space, Word creates a bulleted list. Or if you begin by typing an actual number, then Word creates a numbered list. If you don't want your text turned into a list, you can click the AutoCorrect Options button  that appears and choose an option.
You can change how lists are handled in all documents. See turn on or turn off automatic bullets or numbering to learn more.
Create a single-level or multilevel list
You can make a list with just one level or with multiple levels to include lists within a list. When you create a bulleted or numbered list, you can do any of the following:
-
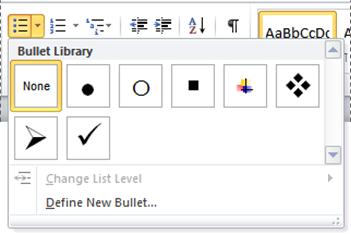
Use the convenient Bullet and Numbering libraries
Use the default bullet and numbering formats for lists, to customize the lists, or to select other formats from the Bullet and Numbering libraries.
-
Format bullets or numbers
Format bullets or numbers differently from the text in a list. Click a number and change the number color for the entire list, for example, without making changes to the text in the list.
-
Use pictures or symbols
Create a picture bulleted list to add visual interest to a document or a webpage.
Type a bulleted or numbered list
-
Do one of the following:
-
Type an * (asterisk) followed by a space to create a bulleted list.
-
Type a number (1.) to create a numbered list.
-
-
Type any text that you want, and then press Enter to create the next item.
Note: Word automatically inserts the next bullet or number.
-
To finish the list, press Enter twice, or press Backspace to delete the last bullet or number in the list.
Add bullets or numbering to a list
-
Select the items that you want to add bullets or numbering to.
-
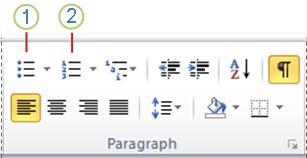
On the Home tab, in the Paragraph group, click Bullets or Numbering.

1 Bullets
2 Numbering
Note: You can find different bullet styles and numbering formats by clicking the down arrow next to Bullets or Numbering.
Add more line spacing between items in a list
You can increase the amount of space between the lines in a list.
-
On the Home tab, in the Styles group, click the More arrow next to the Styles gallery, and then right-click the List Paragraph style.

-
Click Modify.
-
In the Modify Style dialog box, click Format, and then click Paragraph.
-
Clear the Don't add space between paragraphs of the same style check box.
For more information, see Change line spacing between bullets in a list.
Bullets and numbering don't begin automatically
-
On the File tab, click Options.
Note: In Word 2007, click the Microsoft Office Button
 , and then click Word Options.
 -
Click Proofing > AutoCorrect Options
-
.
-
On the AutoFormat As You Type tab, under Apply as you type, select the Automatic bulleted lists check box and the Automatic numbered lists check box.
Move an entire list to the left or the right
-
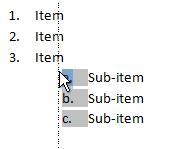
Click a bullet or number in the list to highlight the list.
-
Drag the list to a new location.
Note: The entire list moves as you drag. The numbering levels do not change.

Turn a one-level list into a multilevel list
You can turn an existing list into a multilevel list by changing the hierarchical level of items in the list.
-
Click any item that you want to move to a different level.
-
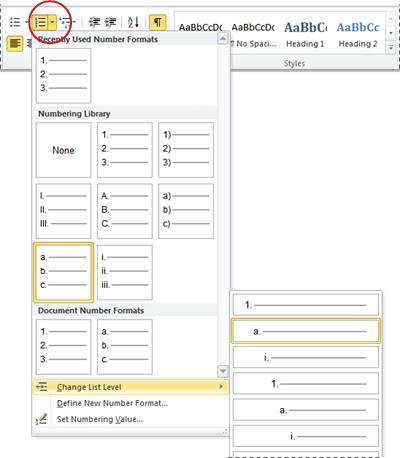
On the Home tab, in the Paragraph group, click Bullets down arrow or Numbering down arrow.

-
Click Change List Level, and then choose the level that you want.
Choose a multilevel list style from the gallery
You can apply a gallery style to any multilevel list.
-
Click an item in the list.
-
On the Home tab, in the Paragraph group, choose the Multilevel List down arrow, and then choose the multilevel list style that you want.

Create a new multilevel list style to add to the gallery
If the multilevel list styles in the gallery aren't what you are looking for, you can create and define a new multilevel list style. You can use your new list style each time you begin a new multilevel list in a document. The new list style is added automatically to the gallery of list styles.
-
On the Home tab, in the Paragraph group, click the Multilevel List down arrow.

-
Click Define New Multilevel List.
Note: When you define a multilevel list style, you can mix numbers and bullets in the same list. For example, in the Number style for this level box, you can scroll down and click a bullet style for a particular level.
-
Beginning with level 1, enter your number format, font, and position choices, and then continue to define each level that you want to use in your multilevel list.
-
Click OK and the multilevel list style that you defined is automatically set as the current multilevel list style.
The
Note: To move a multilevel item to a different numbering level, on the Home tab, in the Paragraph group, select the item. Next, click Bullets down arrow or Numbering arrow, choose Change List Level, and then click the list level that you want to move the list item to.
Define new list styles
What is the difference between the Define New Multilevel List and Define New List Style commands? The Define New Multilevel List command is convenient for creating and saving a list style that you won't ever change or that you will use in a single document. You can use the Define New List Style command to change the style design you created. If you use the Define New List Style command to define a new list style and then you make changes to the style, every instance of that list style is updated in the document.
Manually advance numbering in a list
Certain numbered lists—for example, legal lists—require the ability to change a number manually and for Word to correctly change the numbers that follow. You can use the Set Numbering Value option to change a number manually while Word renumbers the list that follows.
-
Right-click the number in the list that you want to change.
-
Click Set Numbering Value, and then do one of the following:
-
Click Start new list and change the value of the selected number in the Set value to box.
-
Click Continue from previous list, select the Advance value (skip numbers) check box, and then change the value of the selected number in the Set value to box that corresponds to the level of the number that you selected.
-
No comments:
Post a Comment