Build an expression
To build an expression in Access databases, select the object or property where you want to use an expression, and then press Ctrl+F2 – this opens the Expression Builder, a tool with lots of partially-built expressions to save you time, and built-in help to save you trouble. You can use expressions to do all kinds of things with your data – for example, determining how many days have passed since an order was shipped, or combining a FirstName and a LastName into a FullName. If you're an Excel person, think of expressions as the Access version of formulas.
Some expressions don't work the same way in Access web apps and in desktop databases. Everything in this article applies to both web apps and databases, except where otherwise noted. For more information about Access web apps, see the article Create an Access app.
For more information about expressions – when to use them, how to build them – read on.
In this article
Overview of expressions
Remember equations from math class? Letx2+z = (2y-1)/7, solve for x, that kind of stuff? Maybe you also remember that equations are the foundation of modern engineering – if you want to build something solid, you use equations to answer specific questions like "how thick do the bolts holding up the stairwell need to be?" That's what expressions are about – but instead of x, y and z, think [Unit Price], [Discount] and [Quantity]. And expressions don't just do math – you can do all kinds of things with text data too.
Things you can do with expressions
The following are just a few common examples out of the many things you can do with expressions.
-
Calculate age
-
Put first and last names together
-
Mark a changed record with the date and time that it changed
-
Specify a pattern data input must match
-
Crop characters off either side of a line of text
Technical overview
Note: This section isn't required reading to be able build expressions, but it may give you a better understanding of how expressions work, and it uses technical terms that may help you find related information on more technical sites, such as MSDN.
An expression is a combination of some or all of the following: built-in or user-defined functions, identifiers, operators, and constants. An expression evaluates to a single value.

For example, the following expression contains all four of these elements:
=Sum([Purchase Price])*0.08
In this example, Sum() is a built-in function, [Purchase Price] is an identifier, * is a mathematical operator, and 0.08 is a constant. This expression can be used in a text box in a form footer or report footer to calculate sales tax for a group of items.
Expressions can be much more complex or much simpler than this example. For example, this Boolean expression (an expression that evaluates to either True or False) consists of only an operator and a constant:
>0
This expression returns True when it is compared to a number that is greater than 0, and returns False when it is compared to a number that is less than or equal to 0. You might use this expression in the Validation Rule property of a control or table field to ensure that only values greater than 0 are entered.
In Access, expressions are used in many places to perform calculations, manipulate characters, or test data. Tables, queries, forms, reports, and macros all have properties that can accept an expression. For example, you can use expressions in the Control Source and Default Value properties for a control. In addition, when you write Microsoft Visual Basic for Applications (VBA) code for an event procedure or for a module, you often use expressions that resemble those that you use in an Access object, such as a table or query.
Using the Expression Builder
The Expression Builder has the following benefits:
-
You can easily look up and insert functions, operators, constants, and identifiers (for example, the names of fields, tables, forms, and queries), saving time and reducing errors.
-
The Expression Builder limits the available expression parts based on the context of the expression.
-
You can choose from a variety of ready-made expressions, such as page numbers, the current date, or the current date and time.
-
IntelliSense is available in the Expression Builder – so you don't have to remember all the arguments an expression needs.
-
Help is at your fingertips in the Expression Builder – just click the links that appear in the Quick Info tool.
Start the Expression Builder :
The keyboard shortcut for launching the Expression Builder is Ctrl + F2. The first time you use this shortcut it launches the Choose Builder dialog box – just double-click Expression Builder in the dialog box to proceed.
See more detailed information about how to use the Expression Builder.
The nesting limit for expressions in a web database is 65
Expressions nested more than 65 levels deep won't work in the browser, so you shouldn't use any such expressions in an Access web database. You won't get any error messages – the expression just won't work.
Important: The use of the &, AND, and OR operators can create additional nesting levels on the server that aren't reflected in the Access client. For example the expression "a" & "b" & "c" is not nested in the Expression Builder, but in SharePoint it becomes concatenate.Db("a", concatenate.Db("b", "c") ). This translation creates one level of nesting. Using many consecutive &, AND, or OR operators in a single expression can cause you to exceed the server's nesting limit of 65, at which point the expression won't work in the browser.
Calculate values for controls in forms and reports
When you use an expression as the data source for a control, you create a calculated control. For example, suppose that you have a report that displays multiple inventory records, and you want to create a total in the report footer that sums all the line items on the report.
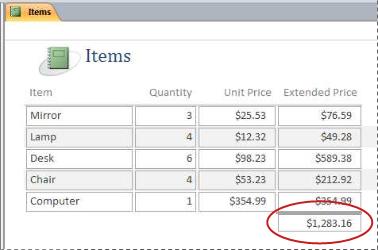
To calculate the total, place a text box control in the report footer, and then set the ControlSource property of the text box to the following expression:
=Sum([ table_field ])
In this case, table_field is the name of the field that contains your subtotal values. That field can come from a table or a query. The Sum function calculates the total for all the values of table_field.
The following procedure shows how to enter an expression in a text box control.
Enter an expression in a text box control
-
In the Navigation Pane, right-click the form that you want to change, and then click Layout View or Design View on the shortcut menu.
-
Select the control into which you want to enter an expression.
-
If the Property Sheet is not already displayed, press F4 to display it.
-
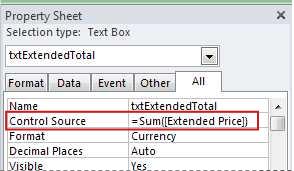
To manually create an expression, on the Data tab in the property sheet, click the ControlSource property of the text box, and then type = followed by the rest of your expression. For example, to calculate the subtotal shown above, type =Sum([table_field]), making sure that you substitute the name of your field for table_field.
-
To create an expression by using the Expression Builder, click the Build button
 in the property box.
After completing your expression, the property sheet will look like this:
Use expressions as query criteria
You use criteria in a query to narrow down query results. You enter the criteria as an expression, and Access returns only those rows that match the expression. To see an extensive set of examples, see the article Examples of query criteria.
For example, suppose that you want to see all the orders whose shipped date occurred in the first three months of the year 2010. To enter the criteria, you type the following expression in the Criteria cell for the Date/Time column in your query. This example uses a Date/Time column called ShippedDate. To define a date range, enter your criteria in this manner:
Between #1/1/2010# And #3/31/2010#
The ShippedDate column will resemble the following.

For each record in the Orders table, if the value in the ShippedDate column falls in the date range that you specify, the record is included in the query output. Note that in the expression, you enclose the dates with pound signs (#). Access treats a value enclosed in pound signs as a Date/Time data type. Treating those values as date/time data enables you to perform calculations on those values, such as subtracting one date from another.
Enter criteria in the query design grid
-
In the Navigation Pane, right-click the query that you want to change, and then click Design View on the shortcut menu.
-
Click in the Criteria cell in the column for which you want to enter your criteria.
-
To manually create your expression, type your criteria expression.
Note: Do not precede the criteria expression with the = operator.
-
To create your expression by using the Expression Builder, on the ribbon, click Design, and then in the Query Setup group, click Builder
 .
. If you want a larger area in which to edit the expression, place the cursor in the Criteria cell and then press SHIFT+F2 to display the Zoom box:

Create a calculated field in a query
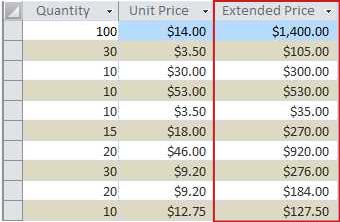
Suppose you're designing a query, and you want to display the results of a calculation using other fields in the query. To create the calculated field, you enter an expression in a blank cell in the Field row in your query. For example, if you have a query that contains a Quantity field and a Unit Price field, you can multiply the two to create a calculated field for Extended Price by entering the following expression in the Field row of the query:
Extended Price: [Quantity] * [Unit Price]
Prefacing the expression with the text Extended Price: names the new column Extended Price. This name is often called an alias. If you do not supply an alias, Access will create one, such as Expr1.

When you run the query, Access performs the calculation on each row, as shown in the following illustration:
Create a calculated field in query Design view
-
In the Navigation Pane, right-click the query that you want to change, and then click Design View on the shortcut menu.
-
Click the Field cell in the column where you want to create the calculated field.
-
To manually create your expression, type your expression.
Note: Do not precede the criteria expression with the = operator; instead, begin the expression with a descriptive label followed by a colon. For example, type Extended Price: to provide the label for an expression that creates a calculated field called Extended Price. Then, enter the criteria for your expression after the colon.
-
To create your expression by using the Expression Builder, on the ribbon, click Design, and then in the Query Setup group, click Builder.
Create a calculated field in a table
In Access, you can create a calculated field in a table. This eliminates the need for a separate query to do calculations. For example, if you have a table that lists the quantity, price and tax rate for each item in an order, you could add a calculated field that shows the total price, like so:
[Quantity]*([UnitPrice]+([UnitPrice]*[TaxRate]))
-
The calculation cannot include fields from other tables or queries.
-
The results of the calculation are read-only.
To create the calculated field:
-
Open the table by double-clicking it in the Navigation Pane.
-
Scroll horizontally to the rightmost column in the table, and click the Click to Add column heading.
-
In the list that appears, click Calculated Field, and then click the data type that you want for the result.
Access displays the Expression Builder.
-
Enter the calculation that you want for this field, for example:
[Quantity] * [Unit Price]
Note: For a calculated field, you don't start the expression with an equal sign (=).
-
Click OK.
Access adds the calculated field, and then highlights the field header so that you can type a field name.
-
Type a name for the calculated field, and then press ENTER.
Add a validation rule to a table field or record
Expressions are very useful for validating data as it is entered into the database – keeping bad data out. In tables, there are two kinds of validation rules: Field validation rules (which prevent users from entering bad data in a single field), and record validation rules (which prevent users from creating records that don't meet the validation rule). You use expressions for both kinds of validation rules.
For example, suppose that you have a table named Inventory with a field that is named Units On Hand, and you want to set a rule that forces users to enter a value greater than or equal to zero. In other words, inventory can never be a negative number. You can do this by using the following expression as a field validation rule in the Units On Hand field:
>=0
Enter a validation rule
Use the following procedure to enter either a field validation rule or a record validation rule:
-
In the Navigation Pane, double-click the table that you want to change.
Access opens the table in Datasheet view.
-
For a field validation rule, select the field that you want to change.
-
On the ribbon, click Fields, then in the Field Validation group click Validation, and then click Field Validation Rule or Record Validation Rule.
Access displays the Expression Builder.
-
Begin typing the criteria that you want. For example, for a field validation rule that requires that all values are greater than or equal to zero, type the following:
>=0
Note: Do not precede the expression with an equal sign (=).
Validation rule expressions are Boolean, which means that they are either True or False for any given input value. A validation rule must be True for the value or Access doesn't save the input and displays a validation message indicating the error. In this example, if you enter a value for the Units On Hand field that is less than zero, the validation rule is False, and Access does not accept the value. If you haven't entered a validation message as described in the following section, Access displays its own message to indicate that the value you entered is prohibited by the validation rule for the field.
Enter a validation message
To make your database easier to use, you can enter custom validation messages. These replace the generic messages that Access displays when data does not match a validation rule. You can use custom validation message to provide specific information that helps the user enter the correct data, for example, "The Units On Hand value cannot be a negative number." Use the following procedure to create a validation message:
-
In the Navigation Pane, double-click the table that you want to change.
Access opens the table in Datasheet view.
-
For a field validation message, select the field to which you added the validation rule.
-
On the ribbon, click Fields, then in the Field Validation group click Validation, and then click Field Validation Message or Record Validation Message.
-
In the Enter Validation Message dialog box, type the message that you want to appear when data does not match the validation rule, and then click OK.
Add a validation rule to a control
Note: Validation rules are not available for controls in Access web apps or web databases. Use field or record validation rules instead, as described in the preceding section.
In addition to table fields and records, controls also have a Validation Rule property that can accept an expression. For example, suppose that you use a form to enter the date range for a report, and you want to ensure that the beginning date isn't earlier than 1/1/2010. You can set the Validation Rule and ValidationText properties for the text box where you enter the beginning date to the following:
| Property | Setting |
| Validation Rule | >=#1/1/2010# |
| Validation Text | You cannot enter a date earlier than 1/1/2010. |
If you try to enter a date earlier than 1/1/2010, a message appears, and displays the text in the ValidationText property. If no text was entered in the ValidationText property box, Access displays a generic message. After you click OK, Access returns you to the text box.
Tip: Setting a validation rule for a table field enforces the rule throughout the database, wherever that field is modified. Alternatively, setting a validation rule for a control on a form enforces the rule only when that form is being used. Setting validation rules separately for table fields and for controls on forms can be useful if you want to establish different validation rules for different users.
Enter a validation rule for a control
-
In the Navigation Pane, right-click the form or report that you want to change, and then click Design View or Layout View on the shortcut menu.
-
Right-click the control that you want to change, and then click Properties on the shortcut menu.
Access displays the property sheet for the control.
-
Click the All tab, and then click the Validation Rule property box.
-
Type the expression, or click the Build button
 in the property box to create an expression by using the Expression Builder.
Note: Do not precede the expression with the = operator.
-
To customize the text that appears if a user enters data that does not match the validation rule, type the text that you want in the Validation Text property.
Set default values for a table field
You can use an expression to specify a default value for a field in a table – a value that Access uses for new records unless another value is provided. For example, suppose that you want to automatically insert the date and time into a field called OrderDate whenever someone adds a new record. To do this, you might use the following expression:
Now()
Specify a default value for a field in a table
-
In the Navigation Pane, double-click the table that you want to change.
Access opens the table in Datasheet view.
-
Select the field that you want to change.
-
On the ribbon, click Fields, and in the Properties group, click Default Value.
Access displays the Expression Builder dialog box.
-
Type your expression in the box, making sure to begin the expression with an equal sign (=).
Note: If you bind a control to a table field and both the control and table field have default values, the control's default value takes precedence over the table field.
Set default values for controls
Another common place to use an expression is in the Default Value property of a control. The Default Value property of a control is like the Default Value property of a field in a table. For example, to use the current date as the default value for a text box, you can use the following expression:
Date()
This expression uses the Date function to return the current date, but not the time. If you bind the text box to a table field, and the field has a default value, the control's default value takes precedence over the table field. It often makes better sense to set the Default Value property for the field in the table. That way, if you base several controls for different forms on the same table field, the same default value will apply to each control, helping ensure consistent data entry on each form.
Enter a default value for a control
-
In the Navigation Pane, right-click the form or report that you want to change, and then click Design View or Layout View on the shortcut menu.
-
Select the control that you want to change.
-
If the property sheet is not already displayed, press F4 to display it.
-
Click the All tab on the property sheet, and then click the Default Value property box.
-
Type the expression, or click the Build button
 in the property box to create an expression by using the Expression Builder.
Control which macro actions are run
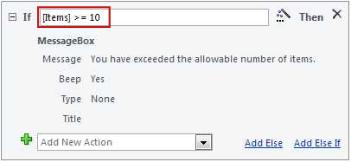
In some cases, you might want to carry out an action or series of actions in a macro only if a particular condition is true. For example, suppose that you want a macro action to run only when the value in a text box is greater than or equal to 10. To set this rule, you use an expression in an If block in the macro to define the condition in the macro.
In this example, assume the text box is named "Items." Your expression that sets the condition is [Items]>=10.
Enter an expression in an If block in a macro
-
In the Navigation Pane, right-click the macro that you want to change, and then click Design View on the shortcut menu.
-
Click the If block that you want to modify, or add an If block from the Action Catalog pane.
-
Click the top line of the If block.
-
Type your conditional expression in the box, or click the Build button
 next to the expression box to launch the Expression Builder.
Note: The expression you type must be Boolean, meaning it is either True or False. The macro actions within the If block run only when the condition is True.
Group and sort data in reports
You use the Group, Sort, and Total pane to define grouping levels and sorting orders for the data in a report. Most typically, you group or sort on a field that you select from a list. However, if you want to group or sort on a calculated value, you can enter an expression instead.
Grouping is the process of combining columns that contain duplicate values. For example, suppose that your database contains sales information for offices in different cities, and that one of the reports in your database is named "Sales by City." The query that provides the data for that report groups the data by your city values. This type of grouping can make your information easier to read and understand.
In contrast, sorting is the process of imposing a sort order on the rows (the records) in your query results. For example, you can sort records by their primary key values (or another set of values in another field) in either ascending or descending order, or you can sort the records by one or more characters in a specified order, such as alphabetical order.
Add grouping and sorting to a report
-
In the Navigation Pane, right-click the report that you want to change, and then click Layout View or Design View on the shortcut menu.
-
On the ribbon, click Design, and in the Grouping & Totals group, click Group & Sort.
The Group, Sort, and Total pane appears below the report.
-
To add a grouping level to the report, click Add a group.
-
To add a sort order to the report, click Add a sort.
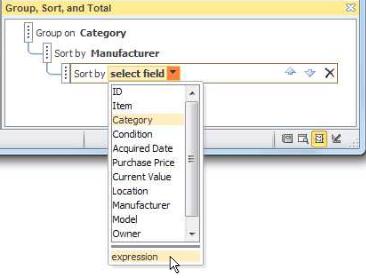
A new group level or sort order appears in the pane, plus a list of the fields that provide data for the report. This figure shows a typical new group level (grouping on Category) and sort order (sorting on Manufacturer), plus a list that contains the available fields for grouping and sorting:
-
Under the list of available fields, click expression to start the Expression Builder.
-
Enter the expression you want to use in the expression box (the upper box) of the Expression Builder. Make sure that you begin the expression with the equal (=) operator.
Add an expression to an existing group or sort
-
In the Navigation Pane, right-click the report that you want to change, and then click Layout View or Design View on the shortcut menu.
-
Click the group level or sort order that you want to change.
-
Click the down arrow next to Group on (for grouping levels) or Sort by (for sort orders).
A list that contains the available fields appears.
-
At the bottom of the list that contains the fields, click expression to start the Expression Builder.
-
Type your expression in the expression box (the upper box) of the Expression Builder. Make sure that you begin your expression with the equal (=) operator.
No comments:
Post a Comment