Wednesday, March 31, 2021

Send a form in microsoft forms

Choose who you want to respond to your form

In the Share pane under Send and collect responses, select the drop-down list and choose from whom you want to collect responses.

  • Anyone can respond - Anyone inside or outside of your organization can submit responses to your form or quiz.

  • Only people in my organization can respond - Only people within your organization, signed in with a work or school account, can submit responses to your form or quiz.

  • Specific people in my organization can respond - Only people or groups in your organization that you specify can respond to your form.
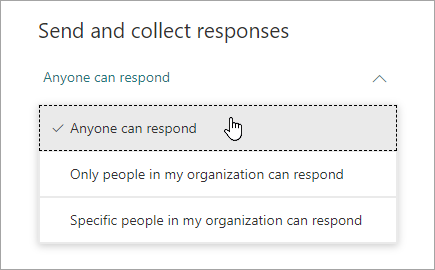
Share options for Microsoft Forms

Choose how you want to ask for responses

Copy and paste the link button

Select the Link button, and then click or tap Copy next to the text box that displays a web address. Copy and then paste this unique link wherever (e.g. a shared class notebook) your intended audience can see and click it to access your form or quiz.

Download QR code button

Select the QR code button, and then click or tap the Download button, which will download your QR code as a .png file. Insert the .png wherever your intended audience can scan it with a QR code scanner, such as a mobile device, to access your form or quiz.

More options button

Select the Embed button, and then click or tap Copy. Paste this embed code into a web page, Sway, or a document.

Email the link button

Select the Email button. When your designated email application opens, add email addresses of the people for whom you intend the form. Microsoft Forms includes a brief note in the email body and a link to your form. You can customize the email message as you like.
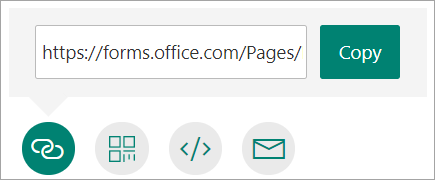
Copy a link to your form

Edit an assignment in microsoft teams

Edit an assignment even after you've assigned it to your students. Add additional resources, update the assignment timeline, change the points available, and more.
 

Note: Rubrics can't be added to assignments you've already posted to students.

  1. Navigate to the General channel in the desired classroom and then select Assignments. You can also use your search bar to search for an assignment by keyword.

  2. Select the assignment you'd like to edit, then Edit assignment.

    Edit assignment

    Tip: Select the Expansion icon (diagonal, double sided arrow) to enter full-screen mode.

  3. Make the changes you need.

  4. Select Update to save your changes.

Learn more

Create an assignment

Save an assignment as a draft

Review, return, and turn in assignments using the feedback loop

Additional resources for educators

Video use update queries to change data in access 2013

Your browser does not support video.

Learn how to build update queries that change data safely. Update queries can be a fast way to change a lot of existing data in one or more tables.

Inside this course:

Use Update queries to change data in Access 2013 (4:20)
The basics of changing data with a query.

Use an Update query to change data in multiple fields (1:43)
How to update data in more than one field.

Use an Update query to change data in multiple tables (2:01)
How to update data in more than one table.

Rules for building and troubleshooting Update queries (2:30)
Rules for building Update queries and staying out of trouble.

Course summary
A brief reminder of the key points in this course.

More courses available at Office 365 Training Center.

Open and close outlook data files pst

Outlook is part of your daily routine. You use it to send email messages, to set up calendar events, and to create tasks and other items. But do you wonder how and where all those items are stored? For Microsoft 365, Exchange, and Outlook.com accounts, all of your information is stored on the server, but an offline copy is also stored on your local computer in an Offline Outlook Data File (.ost).

For POP and IMAP accounts, you might store your Outlook items in an Outlook Data File (.pst). If you want to open or close an Outlook Data File (.pst), you can do that in a few simple steps.

Note: If your organization has policies in place that archive email messages automatically, your older email messages, calendar events, and tasks might be stored in an archive Outlook Data File (.pst). Even if your account uses an offline Outlook Data File (.ost) for all of its day-to-day information, you may still have an archive.pst file that contains older information.

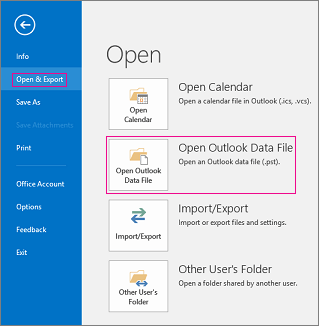
  1. Select File > Open & Export > Open Outlook Data File.

    Open an Outlook data file

    Note: Depending on how Outlook is set up, it's likely the folder where the .pst file is stored will open automatically. If it doesn't, browse to the file's location. If you're not sure where your Outlook data file is located, see Locating the Outlook data files.

  2. Select the Outlook Data File (.pst), and then select Open.

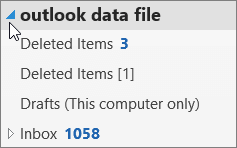
  3. Once you open the Outlook Data File (.pst), the file will appear in your folder pane. Usually you'll find it at the bottom of the list of folders. The following image is an example. The name of your Outlook Data File (.pst) will likely not be outlook data file. Usually, the name is based on the account the file is associated with. For example, an Outlook Data File for the account Cheryl.Parsons64@yahoo.com will likely be named Cheryl Parsons or Cheryl.Parsons64@yahoo.com.

    To open the outlook data file, choose the arrow next to the it.

You can remove an Outlook data file from the Folder pane by closing the file. This does not, however, remove the file from your computer.

  • In the Folder pane, right-click the name of the Outlook Data File, and then choose Close "Outlook Data File".

Support for Office 2010 ended on October 13, 2020

Upgrade to Microsoft 365 to work anywhere from any device and continue to receive support.

Upgrade now

What would you like to do?

If you have an Outlook Data File (.pst) that doesn't appear in the Navigation Pane, you can add it so that you can work with the items in the data file.

  1. On the File tab, click Account Settings > Account Settings.

    Account Settings in the Backstage view

  2. On the Data Files tab, click Add.

  3. Click the Outlook Data File (.pst) file that you want to open, and then click OK.

Outlook Data File (.pst) created by using Outlook 2010 are saved on your computer in the Documents\Outlook Files folder. If you're using Windows XP, these files are created in the My Documents\Outlook Files folder.

Files created in previous versions of Outlook are saved in a different location in a hidden folder.

  • Windows 7 and Windows Vista
    drive:\Users\user\AppData\Local\Microsoft\Outlook

  • Windows XP
    drive:\Documents and Settings\user\Local Settings\Application Data\Microsoft\Outlook

Tip: For information about hidden folders in Windows, see Windows Help and Support.

The file name that you specify for an Outlook Data File (.pst) appears in the Navigation pane. Before Outlook 2010, the default display name for Outlook Data File (.pst) was Personal Folders. This can be confusing if you work with multiple Outlook Data Files (.pst) that were created in previous versions of Outlook. We recommend that you use a descriptive display name for each Outlook Data File (.pst).

  1. On the File tab, click Account Settings > Account Settings.

  2. On the Data Files tab, click the Outlook Data File (.pst) file > Settings.

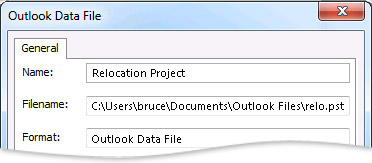
  3. In the Name box, enter a descriptive name for the Outlook Data File (.pst).

    Outlook Data File dialog box

    Note: Changing the display name doesn't rename the file. Only the name as it appears in the Navigation pane is changed.

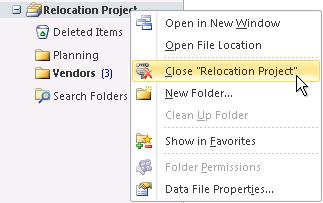
When you no longer need frequent access to an Outlook Data File (.pst), you can close the file. A closed file no longer appears in the Navigation pane, but isn't deleted from your computer.

  • Right-click the name of the Outlook Data File (.pst) that you want to remove from the Navigation pane, and then click Close name.

    Close Outlook Data File (.pst) command

Caution: If the Close command isn't available, you're probably trying to remove the default Outlook Data File (.pst) file that is used to save your new messages. If you were to remove that data file, new messages would have nowhere to go.

If you created a .pst file that doesn't appear in the Navigation pane, add the .pst file to Outlook so that you can work with the items in it.

  1. On the File menu, point to Open, and then click Outlook Data File.

  2. Click the .pst file that you want to open, and then click OK.

    Note: The name of the folder that is associated with the data file appears in the Folder List. To view the Folder List, on the Go menu, click Folder List. By default, the folder will be called Personal Folders.

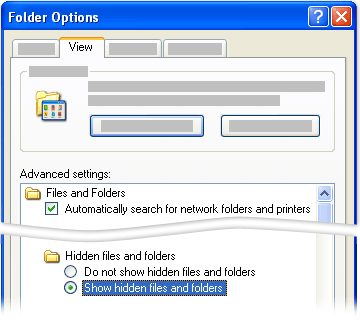
The following is a list of where Outlook data files are saved on your computer. Some of the folders might be hidden folders. To view them, do one of the following:

  1. Click the Start button, and then click Control Panel.

  2. Click Folder Options.

    Folder Options

  3. Click the View tab, and then click the Show hidden files and folders option.

File locations in Windows Vista

Outlook data files (.pst)    drive:\User\user name\Local Settings\Application Data\Microsoft\Outlook

Offline Folders file (.ost)    drive:\User\user name\Local Settings\Application Data\Microsoft\Outlook

File locations in Windows XP

Outlook data files (.pst)    drive:\Documents and Settings\user\Local Settings\Application Data\Microsoft\Outlook

Offline Folders file (.ost)    drive:\Documents and Settings\user\Local Settings\Application Data\Microsoft\Outlook

Keep these points in mind:

  • You can save, copy, or move a data file (other than the file that is used as your default delivery location) to another location on your hard disk or to a share on the network. Remember that you must have read/write permissions to open a Personal Folders file (.pst) from a network share.

  • If you need to access any data file that is stored on a network share or on another computer, close any program that might be using that file. A data file can be accessed by only one user or program at a time.

  • The .pst data file does not support read-only media such as CDs and DVDs.

If you use a Microsoft Exchange account, typically your e-mail messages, calendar, contacts, and other items are delivered to and stored in your mailbox on the server. When you install Outlook on a new computer and configure an Exchange account, all your items on the server will be available to you again. The remaining information in this article does not apply to you, unless you have archived local data files or specified that your Exchange email messages be delivered to a local data file.

If you use a POP3 email account, which is one of the more common types of personal e-mail account, your email messages are downloaded from your POP3 e-mail server at your Internet service provider (ISP) to your computer and delivered to and stored locally in a Personal Folders file (.pst) named Outlook.pst (the default data file name). Outlook.pst is stored in the drive:\Documents and Settings\user\Local Settings\Application Data\Microsoft\Outlook folder.

Notes: The default location of the .pst file is a hidden folder. To use Windows Explorer to navigate to this folder, you must first turn on the display of hidden folders.

  • In Windows Explorer, on the Tools menu, click Folder Options.

  • On the View tab, under Advanced Settings, under Files and Folders, under Hidden files and folders, click Show hidden files and folders.

  • If you want to see all file name extensions, clear the Hide extensions for known file types check box under Files and Folders.

    Hidden folders appear dimmed to indicate that they are not typical folders.

You can move any Outlook .pst file to any location on your computer. For example, some people like to keep their Outlook data files on drive D or under My Documents, so that creating backup files is easier.

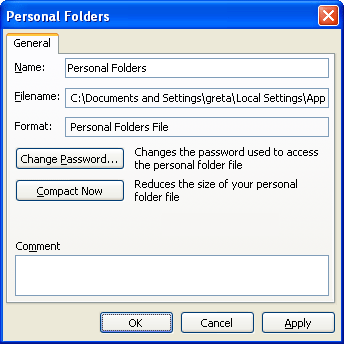
Before you move your .pst file, you might want to change its display name from Personal Folders to something more meaningful to you. Changing the name helps you to distinguish between different Outlook data files when you work with more than one .pst file.

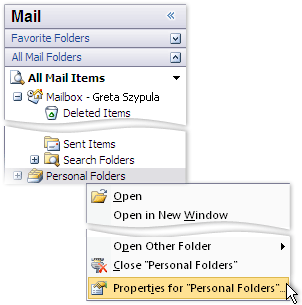
  1. In the Navigation pane, right-click Personal Folders, and then click Properties for "Personal Folders".

    File Properties

    Personal Folders is always a top-level folder in the Navigation pane, in Mail.

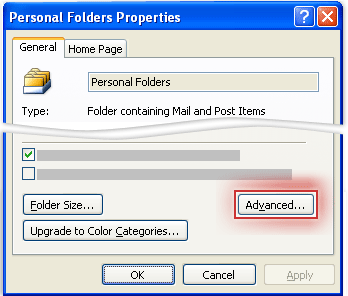
    Personal Folders Properties

  2. Click Advanced.

  3. In the Name text box, type a name that is meaningful to you, such as Greta's Outlook Data.

    Personal Folders

  4. Click OK twice.

Now you can begin moving Outlook Data Files to another location on your computer.

  1. In Outlook, make a note of the file location and name.

    • In the Navigation pane, right-click Personal Folders or the name that appears for your .pst file, and then click Properties for folder name.

    • Click Advanced.

    • In the File name text box, make a note of the complete path and file name of the .pst file.

  2. Exit Outlook and then move the file.

    • Use Windows Explorer to copy each .pst file from its default location in the drive:\Documents and Settings\user\Local Settings\Application Data\Microsoft\Outlook folder to any folder on your computer that you want.

      Notes: The default location is a hidden folder. To use Windows Explorer to navigate to this folder, you must first turn on the display of hidden folders.

      • In Windows Explorer, on the Tools menu, click Folder Options.

      • On the View tab, under Advanced Settings, under Files and Folders, under Hidden files and folders, click Show hidden files and folders.

      • If you want to see all file name extensions, clear the Hide extensions for known file types check box under Files and Folders.

        Hidden folders appear dimmed to indicate they aren't typical folders.

  3. In Control Panel, click User Accounts, and then click Mail.

    Note: If you are using the Classic view in Control Panel, double-click Mail.

  4. Click Show Profiles, and then choose the profile that contains the .pst file.

  5. Click Properties, and then click Data Files.

  6. Select the data file from the list, and then click Settings.

  7. When a message appears, notifying you that the data file cannot be found at the old location, click OK.

  8. Browse to the new folder location, select the data file, and then click Open.

  9. Click OK, and then click Close twice.

  10. Click OK and restart Outlook.

If you work offline with Outlook or use Exchange with Cached Exchange Mode, you can change the location of the local Offline Folder file (.ost) to a different folder or hard disk drive.

  1. Exit Outlook.

  2. Click Start, and then click Control Panel.

  3. Double-click Mail, and then click E-mail Accounts.

  4. Click Show Profiles, and then select the profile that contains the .pst file.

  5. Click Properties, and then click Data Files.

  6. Select the Exchange account, and then click Settings.

  7. On the Advanced tab, clear the Use Cached Exchange Mode check box.

    Note: When you see this message: You must restart Outlook for these changes to take effect, click OK.

  8. Click Settings, and on the Advanced tab, click Offline Folder File Settings.

  9. Click Disable Offline Use, and then click Yes in the dialog box that appears.

  10. Click Offline Folder File Settings.

  11. Click Browse, go to the location where you want to save your .ost file, enter a name in the File name box, and then click Open.

  12. Click OK, and then select the Use Cached Exchange Mode check box.

  13. Click OK. When you see this message: You must restart Outlook for these changes to take effect, click OK.

  14. Click Close.

    The next time that you start Outlook, the new .ost file will be synchronized with your mailbox on the server running Exchange.

Currently there is no way to password-protect Outlook on startup or to lock Outlook if you need to quickly walk away from your computer, other than by using your Microsoft Windows logon password or by using third-party software written specifically to password-protect Outlook. However, you can set a password on your Personal Folders file (.pst). If you use an Internet e-mail account in Outlook, such as a POP3 or HTTP account, your e-mail messages are delivered to a .pst data file on your computer's hard disk. You can use a password on your .pst file to help prevent accidental intrusion by other people with whom you share your computer.

  1. On the Go menu, click Folder List.

  2. Do one of the following:

    • If you have a POP3 e-mail account, right-click Personal Folders, and then click Properties For "Personal Folders" on the shortcut menu.

      Note: If you provided a custom display name for your data file, substitute that name for Personal Folders.

    • If you have an IMAP or HTTP e-mail account, such as Microsoft Windows Live Mail, right-click the name of the account, and then click Properties For account name on the shortcut menu.

  3. On the General tab, click Advanced.

  4. Click Change Password.

  5. In the Change Password dialog box, type your new password—up to 15 characters—and verify it by retyping it .

    Notes: 

    • Use strong passwords that combine uppercase and lowercase letters, numbers, and symbols. Weak passwords don't mix these elements. Example of a strong password: Y6dh!et5, and an example of a weak password: House27. Passwords should be 8 or more characters in length. A pass phrase that uses 14 or more characters is better. For more information, see Create stronger passwords and protect them.

    • It is critical that you remember your password. If you forget your password, Microsoft can't retrieve it. Store the passwords that you write down in a secure place away from the information that they help protect.

  6. Make sure that the Save this password in your password list check box is cleared. This prevents the password from being cached, so you will need to type the password each time you run Outlook. Don't forget the password.

    Important: Neither Microsoft, your Internet service provider (ISP), nor your mail administrator has access to your password, nor can they assist you to recover the contents of the .pst file if you forget the password.

  7. Click OK three times.

When you click the email account folder, you will be prompted for your password. After you gain access, you won't have to enter the password again for that session. If you exit and then restart Outlook, you will be prompted for the password when you click the e-mail account folder.

Important: The .pst password feature is not intended to provide security against hackers. It is just a way to prevent inadvertent intrusion by other people whom you trust and share your computer with, such as at home with your family. A more secure way of protecting your data on a computer that you share with other people is to create a password-protected Windows user account for each individual who uses the computer.

The default display name of the Personal Folders file (.pst) is Personal Folders. This can be confusing if you work with multiple .pst files, all of which have the same name. A best practice is to customize the display name.

  1. In the Navigation pane, right-click Personal Folders, and then click Properties for "Personal Folders".

    Personal Folders Properties

  2. Click Advanced.

    Personal Folders

  3. In the Name box, type a name that is meaningful to you, such as Greta's Outlook Data.

  4. Click OK twice.

In the Navigation pane, you see a top folder with the name that you entered. Now you can quickly distinguish your data file from any others.

Tip: Customizing the file names is also useful if you keep multiple .pst file archives. For example, if you create a monthly .pst file to store all of your sent items for that month, you can rename the display name from Personal Folders to something more friendly, such as Sent Mail Archive – December 2007.

Even if you have a tendency to hoard e-mail, you might want to clear some of the clutter in the Navigation pane. You might not always need instant access to an archive .pst file. You can remove an Outlook data file from the Navigation pane without deleting the file from your computer.

  • Right-click the Personal Folders file that you want to remove from the Navigation pane, and then click Close Personal Folders.

If the Close Personal Folders option is not available, you are probably trying to remove the .pst file that Outlook uses for saving your new messages. If you remove that data file, new messages will have nowhere to go.

Tip: Afraid of deleting a file and losing your data? Closing a .pst file doesn't delete the file or any items that it contains. The file just no longer appears in the Navigation pane. You can always add any .pst file back to the display by doing the following:

  1. On the File menu, point to Open, and then click Outlook Data File.

  2. Click the .pst file that you want to open, and then click OK.

More about Outlook data files

For more information about Outlook data files, see the following topics:

Create a chart with excel on a mobile device

You can use the Recommended Charts command on the Insert tab to quickly create a chart that's right for your data, or you can use other options to create a custom chart.

Create a chart on an Android tablet or phone
  1. Open your workbook and go to the spreadsheet that contains your data.

  2. Drag the handles Handle to select the data that you want to include in your chart.

  3. On your Android tablet, tap Insert.

    Insert tab

    On your Android phone, tap the Edit icon Edit icon , tap Home, and then tap Insert.

  4. Tap Recommended to see the charts that Excel recommends for your data.

  5. Scroll through the images of recommended chart designs, and tap any chart design to see how your data will look in that format.

    Tips: 

    • If you don't see a chart format that you like, tap Chart on the Insert tab to see all the available chart types.

    • Select chart on Insert tab

  6. When you select a chart design, the Chart tab appears.

    Chart tab

    You can use this tab to view and select chart formats organized by type, layouts with legends, color options, and specific chart elements. Additionally, you can tap the Switch option to see alternate views of your data.

  7. Tap your chart to see the context menu.

    Context menu

    You can cut and paste the chart, copy it to use elsewhere, or delete it. You can also tap the chart and drag it to another location on your spreadsheet.

Create a chart on an iPad or iPhone
  1. Open your workbook and go to the spreadsheet that contains your data.

  2. Drag the handles Handle to select the data that you want to include in your chart.

  3. On your iPad, tap Insert.

    Insert tab

    On your iPhone, tap the Edit icon Edit icon , tap Home, and then tap Insert.

  4. Tap Recommended to see the charts that Excel recommends for your data.

  5. Scroll through the images of recommended chart designs, and tap any chart design to see how your data will look in that format.

    Tips: 

    • If you don't see a chart format that you like, tap Charts on the Insert tab to see all the available chart types.

    • Select Charts on the Insert tab

  6. When you select a chart design, the Chart tab appears.

    Chart tab

    You can use this tab to view and select other recommended chart formats, chart formats organized by type, layouts with legends, and specific chart elements. Additionally, you can tap the Switch option to see alternate views of your data.

  7. Tap your chart to see the context menu.

    Context menu

    You can cut and paste the chart, copy it to use elsewhere, or delete it. You can also tap the chart and drag it to another location on your spreadsheet.

Create a chart on a Windows tablet or phone
  1. Open your workbook and go to the spreadsheet that contains your data.

  2. Drag the handles Handle to select the data that you want to include in your chart.

  3. On your Windows tablet, tap Insert.

    Insert tab

    On your Windows phone, tap More More , tap Home, and then tap Insert.

  4. To see the charts that Excel recommends for your data, on your Windows tablet, tap Chart and then tap Recommended.

    On your Windows phone, tap Recommended.

  5. Scroll through the images of recommended chart designs, and tap any chart design to see how your data will look in that format.

    Tips: 

    • If you don't see a chart format that you like, tap Chart on the Insert tab to see all the available chart types.

    • Select Chart on Insert tab

  6. When you select a chart design, the Chart tab appears.

    Chart tab

    You can use this tab to view and select other recommended chart formats, additional chart formats organized by type, layouts with legends, color options, and specific chart elements. You can enter a size, alternate text, and a description. Additionally, you can tap the Switch option to see different views of your data.

  7. Tap your chart to see the context menu.

    Context menu

    You can cut and paste the chart, copy it to use elsewhere, or delete it. You can also tap the chart and drag it to another location on your spreadsheet.

See also

Modify charts in Office on mobile

Work availability resource timephased field

Data Type    Duration

Entry Type    Calculated

Description    The Work Availability field contains the maximum amount of time a work resource is available to be scheduled for work during any selected time period, as distributed over time. The displayed amount of work, or person-hours, is based on the resource calendar and the Resource Availability table in the Resource Information dialog box. This field also shows a timephased representation of any changes in unit availability for different time periods.

How Calculated    Microsoft Office Project calculates work availability distributed over time based on the resource calendar and the Resource Availability table in the Resource Information dialog box. Project calculates work availability as follows:

Work Availability = Unit Availability * Time

Best Uses    Add the Work Availability field to the timephased portion of the Resource Usage view when you want to display the maximum amount of work a resource has available for accomplishing any tasks during the selected time period. Also use this field to show changes in work availability for different time periods, as established in the Resource Availability table of the Resource Information dialog box.

Example    You have planned for four painters to work on your project in March and April, six painters in May through August, and two painters in September and October. In the Resource Availability table of the Resource Information dialog box, you have reflected these dates with units of 400%, 600%, and 200%. You add the Work Availability field to the Resource Usage view so you can see the changes in the painters' work availability through the months. You can also see their availability by day or by week.

Create a list based on a spreadsheet

When creating a Microsoft list, you can save time by importing an existing Excel spreadsheet. This method converts the table headings to columns in the list, and the rest of the data is imported as list items. Importing a spreadsheet is also a way to create a list without the default Title column.

Note:  Another method of moving data into SharePoint is to export a table directly from Excel. For more info, see Export an Excel table to SharePoint. For more info on SharePoint supported browsers, see Plan browser support in SharePoint Server.

Create a list based on a spreadsheet

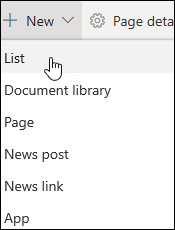
  1. From the Lists app in Microsoft 365, select +New list or from your site's home page, select + New > List.  

    • In Microsoft Teams, from the Files tab at the top of your channel, select More > Open in SharePoint, and then select New > List.

    Create a list from a spreadsheet

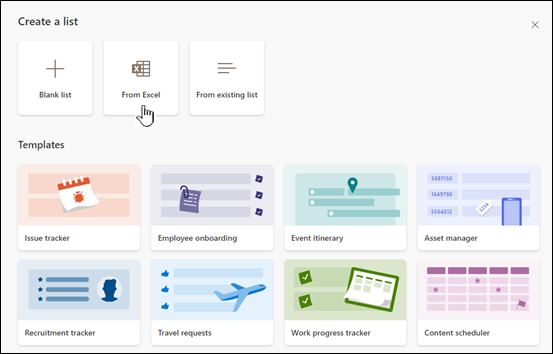
  2. On the Create a list page, select From Excel.

    Create a list from a spreadsheet

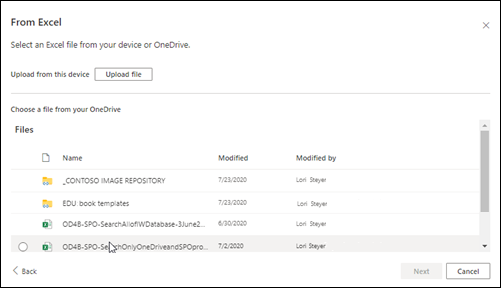
  3.  Choose Upload file to select a file on your device, or Choose a file already on this site.

    Upload from Excel file

    Note: If the Upload file button is greyed out, you don't have permission to create a list from a spreadsheet. For more information, see your organization's site admin.

  4.   Enter the name for your list.

      Create a list

  5.  (Optional) Check Show in site navigation to display the list on your site's Contents page. 

  6.  Click Create. 

    Notes: 

    • If the spreadsheet file you're importing doesn't have a table in it, follow the on-screen instructions to create a table in Excel, and then import the table to your list. If you get stuck creating a table, search for "Format as Table" at the top of your file in Excel.

    • You can use tables with up to 20,000 rows to create a list. 

Create a list based on a spreadsheet in SharePoint 2016 and 2013

  1. On the site where you want to add a spreadsheet based list, select Settings Office 365 Settings button , and then select Add an app.

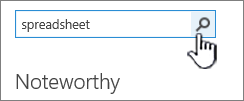
  2. In the Find an app field, enter spreadsheet, and then select the search icon Search box magnifying glass icon .

    find an app field with Spreadsheet typed in and search button highlighted
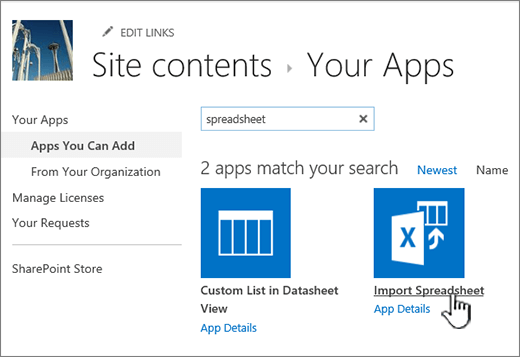
  3. In the search results page, select Import Spreadsheet.

    Import spreadsheet app highlighted in New apps dialog
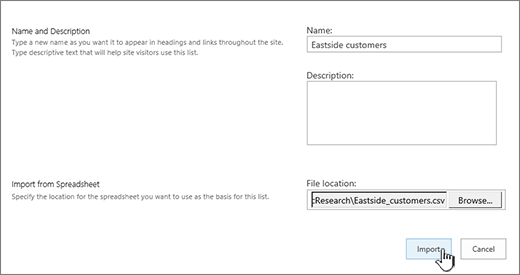
  4. In the New app page, enter a Name for the list.

    The name appears at the top of the list in most views, becomes part of the web address for the list page, and appears in site navigation to help users find the list. You can change the name of a list, but the web address will remain the same.

    New app dialog with name and file location filled in, import highlighted
  5. Enter an optional Description.

    The description appears underneath the name in most views. You can change the description for a list at any time using list settings.

  6. Browse to or enter the File location of the spreadsheet. When done, select Import.

    The spreadsheet opens in Excel, and the Import to Windows SharePoint Services List window appears.

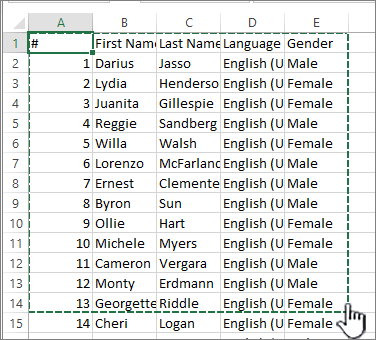
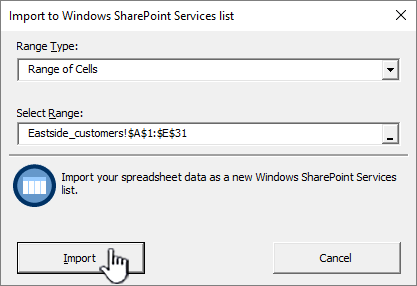
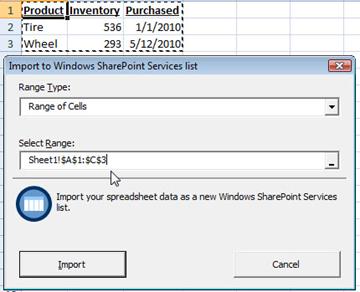
  7. In the Import to Windows SharePoint Services List window, select Table Range, Range of Cells, or Named Range. If you want to select a range manually, select Range of Cells, and then select Select Range. In the spreadsheet, select the upper left cell, hold down the Shift key, and select the lower right cell of the range you want.

    Excel spreadsheet with range highlighted

    The range appears in the Select Range field. Select Import.

    Import to spreadsheet dialog with Import highlighted

    After you import a spreadsheet, check the columns of the list to make sure that the data was imported as you expected. For example, you may want to specify that a column contains currency instead of a number. To view or change list settings, open the list, select the List tab or select Settings Office 365 Settings button , and then select List Settings.

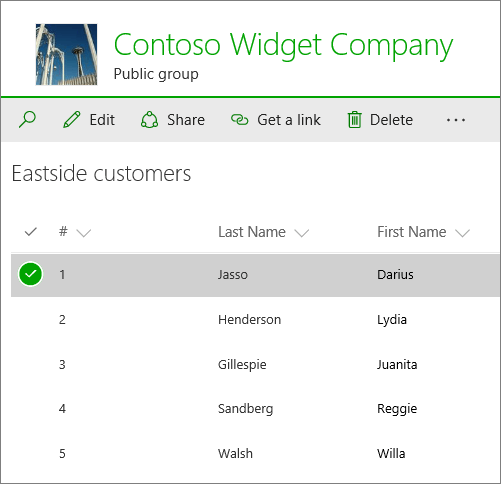
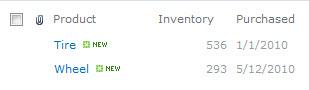
  8. The spreadsheet data appears in a list in SharePoint.

    List in SharePoint Online

Important: Be sure to use a 32-bit web browser, such as Microsoft Edge, to import a spreadsheet, as importing a spreadsheet relies on ActiveX filtering. Once you import the spreadsheet, then you can work with the list in any SharePoint-supported browser.

Create a list based on a spreadsheet in SharePoint 2010

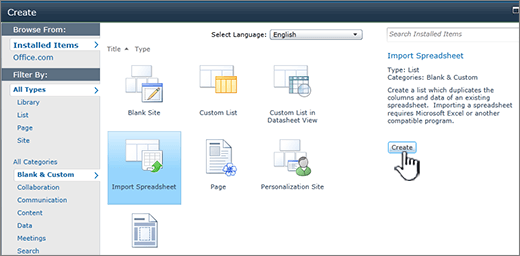
  1. Select Site Actions Site Actions Menu , select View All Site Content, and then select Create Create Button .

    Note: A SharePoint site can be significantly modified. If you cannot locate an option, such as a command, button, or link, contact your administrator.

  2. In SharePoint 2010, under All Categories, select Blanks & Custom, select Import Spreadsheet, and then select Create.

    In SharePoint 2007, under Custom Lists, select Import Spreadsheet, and then select Create.

    Create dialog with Import spreadsheet and create highlighted
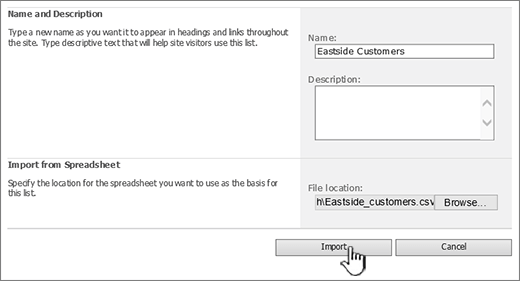
  3. Enter the Name for the list. Name is required.

    The name appears at the top of the list in most views, becomes part of the web address for the list page and appears in site navigation to help users find the list. You can change the name of a list at any time, but the web address will remain the same.

  4. Enter the Description for the list. Description is optional.

    The description appears underneath the name in most views. You can change the description for a list.

    Create import spreadsheet dialog with Import highlighted
  5. Browse or enter the File Location of the spreadsheet that you want to import, and then select Import.

  6. In the Import to Windows SharePoint Services list dialog, select the Range Type, and in Select Range, specify the range in the spreadsheet that you want to use to create your list.

    Import to SharePoint list

    Note: Depending on your spreadsheet program, you may be able to select the range of cells that you want directly in the spreadsheet. A table range and a named range must already be defined in the spreadsheet for you to select it in the Import to Windows SharePoint Services list dialog.

  7. Select Import.

Imported list

After you import a spreadsheet, check the columns of the list to make sure that the data was imported as you expected. For example, you may want to specify that a column contains currency instead of a number. To view or change list settings, open the list, select the List tab, or select Settings, and then select List Settings.

Important: Be sure to use a 32-bit web browser, such as Microsoft Edge, to import a spreadsheet, as importing a spreadsheet relies on ActiveX filtering. Once you import the spreadsheet, then you can work with the list in any SharePoint-supported browser.

The types of columns that are created for a list are based on the kinds of data that are in the columns of the spreadsheet. For example, a column in the spreadsheet that contains dates will typically be a date column in the SharePoint list.

All versions of SharePoint let you import a spreadsheet of data, though how you do it varies slightly between the versions. Examples here use Excel, but another compatible spreadsheet would work. If your spreadsheet program's native file format isn't supported, export your data to a comma delimited format (.CSV) and import using that file.

For more info about how to customize and add your imported list to a page or site, see Introduction to lists.

Note: Typically, the columns are set up on the SharePoint site based on the type of data that they contain. After you import a list, however, you should inspect the columns and data to make sure that everything was imported as you expected. For example, you may want to specify that a column contains currency rather than just a number. To view or change the list settings, open the list, and on the Settings menu, select List Settings.

Top of Page

Leave us a comment

Was this article helpful? If so, please let us know at the bottom of this page. If it wasn't helpful, let us know what was confusing or missing. Please include your version of SharePoint, OS, and browser. We'll use your feedback to double-check the facts, add info, and update this article.