Outlook is part of your daily routine. You use it to send email messages, to set up calendar events, and to create tasks and other items. But do you wonder how and where all those items are stored? For Microsoft 365, Exchange, and Outlook.com accounts, all of your information is stored on the server, but an offline copy is also stored on your local computer in an Offline Outlook Data File (.ost).
For POP and IMAP accounts, you might store your Outlook items in an Outlook Data File (.pst). If you want to open or close an Outlook Data File (.pst), you can do that in a few simple steps.
Note: If your organization has policies in place that archive email messages automatically, your older email messages, calendar events, and tasks might be stored in an archive Outlook Data File (.pst). Even if your account uses an offline Outlook Data File (.ost) for all of its day-to-day information, you may still have an archive.pst file that contains older information.
Open an Outlook Data File (.pst)
-
Select File > Open & Export > Open Outlook Data File.
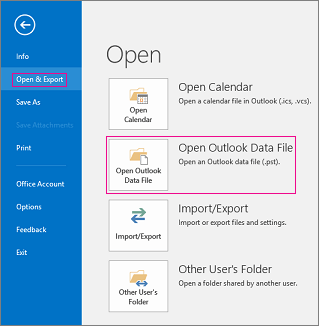
Note: Depending on how Outlook is set up, it's likely the folder where the .pst file is stored will open automatically. If it doesn't, browse to the file's location. If you're not sure where your Outlook data file is located, see Locating the Outlook data files.
-
Select the Outlook Data File (.pst), and then select Open.
-
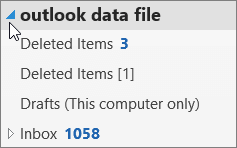
Once you open the Outlook Data File (.pst), the file will appear in your folder pane. Usually you'll find it at the bottom of the list of folders. The following image is an example. The name of your Outlook Data File (.pst) will likely not be outlook data file. Usually, the name is based on the account the file is associated with. For example, an Outlook Data File for the account Cheryl.Parsons64@yahoo.com will likely be named Cheryl Parsons or Cheryl.Parsons64@yahoo.com.
Remove (close) an Outlook Data File (.pst)
You can remove an Outlook data file from the Folder pane by closing the file. This does not, however, remove the file from your computer.
-
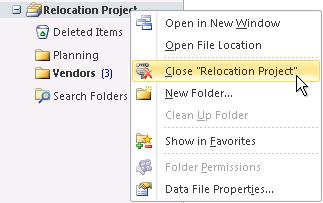
In the Folder pane, right-click the name of the Outlook Data File, and then choose Close "Outlook Data File".
What would you like to do?
Open an Outlook Data File (.pst)
If you have an Outlook Data File (.pst) that doesn't appear in the Navigation Pane, you can add it so that you can work with the items in the data file.
-
On the File tab, click Account Settings > Account Settings.

-
On the Data Files tab, click Add.
-
Click the Outlook Data File (.pst) file that you want to open, and then click OK.
Data file locations
Outlook Data File (.pst) created by using Outlook 2010 are saved on your computer in the Documents\Outlook Files folder. If you're using Windows XP, these files are created in the My Documents\Outlook Files folder.
Files created in previous versions of Outlook are saved in a different location in a hidden folder.
-
Windows 7 and Windows Vista
drive:\Users\user\AppData\Local\Microsoft\Outlook -
Windows XP
drive:\Documents and Settings\user\Local Settings\Application Data\Microsoft\Outlook
Tip: For information about hidden folders in Windows, see Windows Help and Support.
Change an Outlook Data File (.pst) display name
The file name that you specify for an Outlook Data File (.pst) appears in the Navigation pane. Before Outlook 2010, the default display name for Outlook Data File (.pst) was Personal Folders. This can be confusing if you work with multiple Outlook Data Files (.pst) that were created in previous versions of Outlook. We recommend that you use a descriptive display name for each Outlook Data File (.pst).
-
On the File tab, click Account Settings > Account Settings.
-
On the Data Files tab, click the Outlook Data File (.pst) file > Settings.
-
In the Name box, enter a descriptive name for the Outlook Data File (.pst).
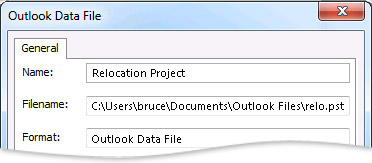
Note: Changing the display name doesn't rename the file. Only the name as it appears in the Navigation pane is changed.
Close an Outlook Data File (.pst)
When you no longer need frequent access to an Outlook Data File (.pst), you can close the file. A closed file no longer appears in the Navigation pane, but isn't deleted from your computer.
-
Right-click the name of the Outlook Data File (.pst) that you want to remove from the Navigation pane, and then click Close name.
Caution: If the Close command isn't available, you're probably trying to remove the default Outlook Data File (.pst) file that is used to save your new messages. If you were to remove that data file, new messages would have nowhere to go.
Open a .pst file
If you created a .pst file that doesn't appear in the Navigation pane, add the .pst file to Outlook so that you can work with the items in it.
-
On the File menu, point to Open, and then click Outlook Data File.
-
Click the .pst file that you want to open, and then click OK.
Note: The name of the folder that is associated with the data file appears in the Folder List. To view the Folder List, on the Go menu, click Folder List. By default, the folder will be called Personal Folders.
Data file locations
The following is a list of where Outlook data files are saved on your computer. Some of the folders might be hidden folders. To view them, do one of the following:
-
Click the Start button, and then click Control Panel.
-
Click Folder Options.
-
Click the View tab, and then click the Show hidden files and folders option.
File locations in Windows Vista
Outlook data files (.pst) drive:\User\user name\Local Settings\Application Data\Microsoft\Outlook
Offline Folders file (.ost) drive:\User\user name\Local Settings\Application Data\Microsoft\Outlook
File locations in Windows XP
Outlook data files (.pst) drive:\Documents and Settings\user\Local Settings\Application Data\Microsoft\Outlook
Offline Folders file (.ost) drive:\Documents and Settings\user\Local Settings\Application Data\Microsoft\Outlook
Keep these points in mind:
-
You can save, copy, or move a data file (other than the file that is used as your default delivery location) to another location on your hard disk or to a share on the network. Remember that you must have read/write permissions to open a Personal Folders file (.pst) from a network share.
-
If you need to access any data file that is stored on a network share or on another computer, close any program that might be using that file. A data file can be accessed by only one user or program at a time.
-
The .pst data file does not support read-only media such as CDs and DVDs.
If you use a Microsoft Exchange account, typically your e-mail messages, calendar, contacts, and other items are delivered to and stored in your mailbox on the server. When you install Outlook on a new computer and configure an Exchange account, all your items on the server will be available to you again. The remaining information in this article does not apply to you, unless you have archived local data files or specified that your Exchange email messages be delivered to a local data file.
If you use a POP3 email account, which is one of the more common types of personal e-mail account, your email messages are downloaded from your POP3 e-mail server at your Internet service provider (ISP) to your computer and delivered to and stored locally in a Personal Folders file (.pst) named Outlook.pst (the default data file name). Outlook.pst is stored in the drive:\Documents and Settings\user\Local Settings\Application Data\Microsoft\Outlook folder.
Notes: The default location of the .pst file is a hidden folder. To use Windows Explorer to navigate to this folder, you must first turn on the display of hidden folders.
-
In Windows Explorer, on the Tools menu, click Folder Options.
-
On the View tab, under Advanced Settings, under Files and Folders, under Hidden files and folders, click Show hidden files and folders.
-
If you want to see all file name extensions, clear the Hide extensions for known file types check box under Files and Folders.
Hidden folders appear dimmed to indicate that they are not typical folders.
Move a Personal Folders file (.pst)
You can move any Outlook .pst file to any location on your computer. For example, some people like to keep their Outlook data files on drive D or under My Documents, so that creating backup files is easier.
Before you move your .pst file, you might want to change its display name from Personal Folders to something more meaningful to you. Changing the name helps you to distinguish between different Outlook data files when you work with more than one .pst file.
-
In the Navigation pane, right-click Personal Folders, and then click Properties for "Personal Folders".
Personal Folders is always a top-level folder in the Navigation pane, in Mail.
-
Click Advanced.
-
In the Name text box, type a name that is meaningful to you, such as Greta's Outlook Data.
-
Click OK twice.
Now you can begin moving Outlook Data Files to another location on your computer.
-
In Outlook, make a note of the file location and name.
-
In the Navigation pane, right-click Personal Folders or the name that appears for your .pst file, and then click Properties for folder name.
-
Click Advanced.
-
In the File name text box, make a note of the complete path and file name of the .pst file.
-
-
Exit Outlook and then move the file.
-
Use Windows Explorer to copy each .pst file from its default location in the drive:\Documents and Settings\user\Local Settings\Application Data\Microsoft\Outlook folder to any folder on your computer that you want.
Notes: The default location is a hidden folder. To use Windows Explorer to navigate to this folder, you must first turn on the display of hidden folders.
-
In Windows Explorer, on the Tools menu, click Folder Options.
-
On the View tab, under Advanced Settings, under Files and Folders, under Hidden files and folders, click Show hidden files and folders.
-
If you want to see all file name extensions, clear the Hide extensions for known file types check box under Files and Folders.
Hidden folders appear dimmed to indicate they aren't typical folders.
-
-
-
In Control Panel, click User Accounts, and then click Mail.
Note: If you are using the Classic view in Control Panel, double-click Mail.
-
Click Show Profiles, and then choose the profile that contains the .pst file.
-
Click Properties, and then click Data Files.
-
Select the data file from the list, and then click Settings.
-
When a message appears, notifying you that the data file cannot be found at the old location, click OK.
-
Browse to the new folder location, select the data file, and then click Open.
-
Click OK, and then click Close twice.
-
Click OK and restart Outlook.
Move an Offline Folder file (.ost)
If you work offline with Outlook or use Exchange with Cached Exchange Mode, you can change the location of the local Offline Folder file (.ost) to a different folder or hard disk drive.
-
Exit Outlook.
-
Click Start, and then click Control Panel.
-
Double-click Mail, and then click E-mail Accounts.
-
Click Show Profiles, and then select the profile that contains the .pst file.
-
Click Properties, and then click Data Files.
-
Select the Exchange account, and then click Settings.
-
On the Advanced tab, clear the Use Cached Exchange Mode check box.
Note: When you see this message: You must restart Outlook for these changes to take effect, click OK.
-
Click Settings, and on the Advanced tab, click Offline Folder File Settings.
-
Click Disable Offline Use, and then click Yes in the dialog box that appears.
-
Click Offline Folder File Settings.
-
Click Browse, go to the location where you want to save your .ost file, enter a name in the File name box, and then click Open.
-
Click OK, and then select the Use Cached Exchange Mode check box.
-
Click OK. When you see this message: You must restart Outlook for these changes to take effect, click OK.
-
Click Close.
The next time that you start Outlook, the new .ost file will be synchronized with your mailbox on the server running Exchange.
Data file security
Currently there is no way to password-protect Outlook on startup or to lock Outlook if you need to quickly walk away from your computer, other than by using your Microsoft Windows logon password or by using third-party software written specifically to password-protect Outlook. However, you can set a password on your Personal Folders file (.pst). If you use an Internet e-mail account in Outlook, such as a POP3 or HTTP account, your e-mail messages are delivered to a .pst data file on your computer's hard disk. You can use a password on your .pst file to help prevent accidental intrusion by other people with whom you share your computer.
-
On the Go menu, click Folder List.
-
Do one of the following:
-
If you have a POP3 e-mail account, right-click Personal Folders, and then click Properties For "Personal Folders" on the shortcut menu.
Note: If you provided a custom display name for your data file, substitute that name for Personal Folders.
-
If you have an IMAP or HTTP e-mail account, such as Microsoft Windows Live Mail, right-click the name of the account, and then click Properties For account name on the shortcut menu.
-
-
On the General tab, click Advanced.
-
Click Change Password.
-
In the Change Password dialog box, type your new password—up to 15 characters—and verify it by retyping it .
Notes:
-
Use strong passwords that combine uppercase and lowercase letters, numbers, and symbols. Weak passwords don't mix these elements. Example of a strong password: Y6dh!et5, and an example of a weak password: House27. Passwords should be 8 or more characters in length. A pass phrase that uses 14 or more characters is better. For more information, see Create stronger passwords and protect them.
-
It is critical that you remember your password. If you forget your password, Microsoft can't retrieve it. Store the passwords that you write down in a secure place away from the information that they help protect.
-
-
Make sure that the Save this password in your password list check box is cleared. This prevents the password from being cached, so you will need to type the password each time you run Outlook. Don't forget the password.
Important: Neither Microsoft, your Internet service provider (ISP), nor your mail administrator has access to your password, nor can they assist you to recover the contents of the .pst file if you forget the password.
-
Click OK three times.
When you click the email account folder, you will be prompted for your password. After you gain access, you won't have to enter the password again for that session. If you exit and then restart Outlook, you will be prompted for the password when you click the e-mail account folder.
Important: The .pst password feature is not intended to provide security against hackers. It is just a way to prevent inadvertent intrusion by other people whom you trust and share your computer with, such as at home with your family. A more secure way of protecting your data on a computer that you share with other people is to create a password-protected Windows user account for each individual who uses the computer.
Customize the display name of the data file
The default display name of the Personal Folders file (.pst) is Personal Folders. This can be confusing if you work with multiple .pst files, all of which have the same name. A best practice is to customize the display name.
-
In the Navigation pane, right-click Personal Folders, and then click Properties for "Personal Folders".
-
Click Advanced.
-
In the Name box, type a name that is meaningful to you, such as Greta's Outlook Data.
-
Click OK twice.
In the Navigation pane, you see a top folder with the name that you entered. Now you can quickly distinguish your data file from any others.
Tip: Customizing the file names is also useful if you keep multiple .pst file archives. For example, if you create a monthly .pst file to store all of your sent items for that month, you can rename the display name from Personal Folders to something more friendly, such as Sent Mail Archive – December 2007.
Remove a .pst file from the Navigation pane
Even if you have a tendency to hoard e-mail, you might want to clear some of the clutter in the Navigation pane. You might not always need instant access to an archive .pst file. You can remove an Outlook data file from the Navigation pane without deleting the file from your computer.
-
Right-click the Personal Folders file that you want to remove from the Navigation pane, and then click Close Personal Folders.
If the Close Personal Folders option is not available, you are probably trying to remove the .pst file that Outlook uses for saving your new messages. If you remove that data file, new messages will have nowhere to go.
Tip: Afraid of deleting a file and losing your data? Closing a .pst file doesn't delete the file or any items that it contains. The file just no longer appears in the Navigation pane. You can always add any .pst file back to the display by doing the following:
-
On the File menu, point to Open, and then click Outlook Data File.
-
Click the .pst file that you want to open, and then click OK.
More about Outlook data files
For more information about Outlook data files, see the following topics:
I know of a group of private investigators who can help you with they are also hackers but prefer to be called private investigators They can help with your bitcoin issues and your clients will be happy doing business with you,they can also help yo with your bad credit score,hacking into phones,binary recovery,wiping criminal records,increase school score, stolen files in your office or school,blank atm etc. Just name it and you will live a better life
ReplyDeletewhatsapp +1 (984) 733-3673
telegram +1 (984) 733-3673
Premiumhackservices@gmail.com
Microsoft Office Tutorials: Open And Close Outlook Data Files Pst >>>>> Download Now
ReplyDelete>>>>> Download Full
Microsoft Office Tutorials: Open And Close Outlook Data Files Pst >>>>> Download LINK
>>>>> Download Now
Microsoft Office Tutorials: Open And Close Outlook Data Files Pst >>>>> Download Full
>>>>> Download LINK 6i
El sistema de apuestas en vivo de BetJam funciona con actualizaciones en tiempo real, lo que permite seguir eventos deportivos mientras se desarrollan. Las cuotas se ajustan constantemente según lo que ocurre en el partido https://betjam.com. Esto hace que las decisiones deban tomarse rápido, ya que el mercado cambia en segundos. La velocidad del sistema es adecuada para una experiencia fluida, aunque depende también de la conexión del usuario.
ReplyDelete