Wednesday, March 31, 2021

Delete a class notebook in onedrive

When you'd like to delete one or more of your Class Notebooks stored in OneDrive, follow these steps. This applies to notebooks you've created using the Class Notebook app.

Note: Class Notebooks you create for classes in Microsoft Teams are not stored in OneDrive. They can only be deleted by deleting the team and all its contents. Archiving a team that's no longer active may be a good solution instead.

  1. Sign in to Office 365 with your school email and password.

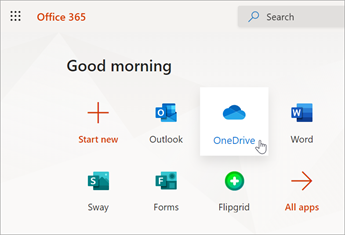
  2. From the Office 365 landing page, select OneDrive.

    Select OneDrive.

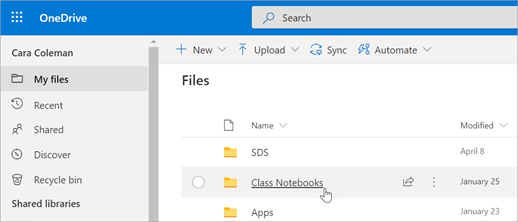
  3. From My files, select the ClassNotebooks folder.

    From My files, select Class Notebooks.

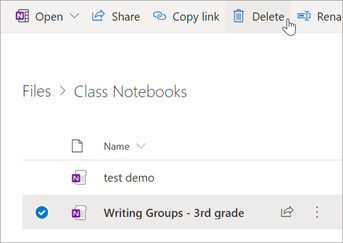
  4. Select the check box next to the Class Notebook you'd like to delete, then select Delete.

    Select the Class Notebook you'd like to Delete, then select Delete.

  5. When prompted, confirm that you'd like to Delete the notebook. Your Class Notebook and all its contents will be deleted.

Learn more

Recover deleted Class Notebook files from the OneDrive Recycle bin

Create a Class Notebook in OneNote

Use OneNote Class Notebook in Teams

Additional resources for educators

Import a custom region file into 3d maps

Custom regions allows data to be mapped to the regions that matter most to you, even if they are not the traditional zip code, county, state, or country regions. Custom regions are useful for scenarios involving sales districts, school districts, congressional districts, land lot development, crop rotation, geological analysis, and anything else using custom-defined polygons.

You can import .KML or .SHP files that contain custom polygons. Once imported, you can use custom regions in the same manner as you would use standard regions such as zip codes.

Import a custom region file

  1. Open a 3D map.

    The 3D Maps window appears.

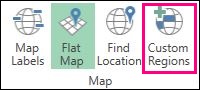
  2. On the Home tab, in the Map group, click Custom Region.

    Custom Regions

    The Manage Custom Region Set dialog box appears.

  3. Click Import New Set.

  4. In the File name box, browse to and select the file you want to import, and then click Open.

    The Manage Custom Region Set dialog box appears, with the file listed in the Set Name box.

  5. Click Import.

Email notifications for missed messages for organization chats and groups

Kaizala lets people within your organization directory discover and start 1:1 or group chats with each other. This feature ensures that employees who do not have Kaizala installed get email notifications for messages sent to them via Kaizala. This feature provides the following capabilities:

Start chats and form groups with non-Kaizala users within your organization directory

Employees can discover and start secure chats and groups with other employees in the organization via directory search feature in Kaizala. If the recipients are not on Kaizala and in Azure Active Directory (Azure AD), they will receive notifications via email for these messages.

Example: Rishi can start a chat with Rohan in his organization and invite him, even though Rohan is not on Kaizala.
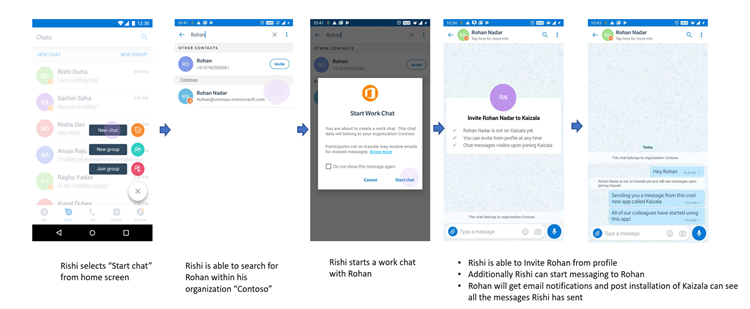
Images of phone UI of starting a chat with a user who is not on Kaizala.

Example: Rishi can add Rohan to his work group and invite him, even though Rohan is not on Kaizala.
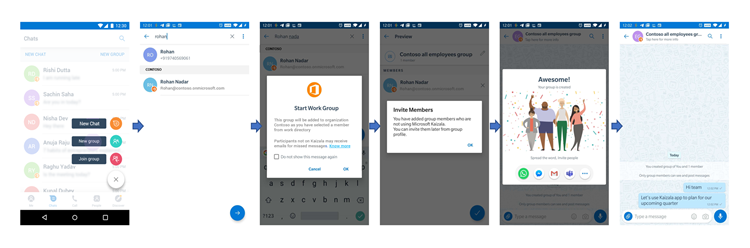
Images of phone UI of adding to a work group a user who is not on Kaizala.

Users will automatically receive missed message emails inviting them to Kaizala

Employees who are not on Kaizala will receive email messages on their Azure AD account for missed messages periodically. Employees will be provided with a guided experience to install Kaizala, link their Microsoft 365 account, and see the chats and groups of which they are a part.

Example: Rohan receives missed message notifications via email that help him to install Kaizala.
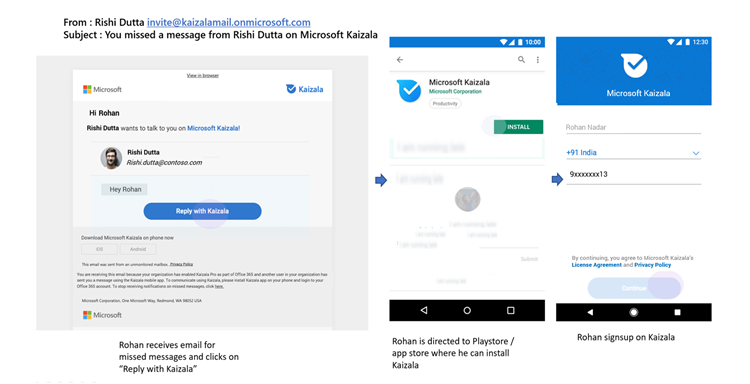
Images of phone UI of missed messages notifications for a user who is not on Kaizala.

Example: After installing Kaizala and linking to his Microsoft 365 account, Rohan gets all the chats and groups of which he was a part prior to joining Kaizala.
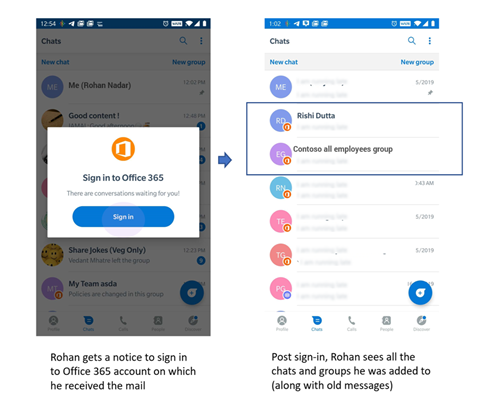
Images of phone UI of receiving chats and groups by a user who previously was not on Kaizala.

Tenant admin controls

The Microsoft 365 global administrator or Kaizala administrator can turn on or off the email notifications in the Kaizala management portal. The policy control is available in the Settings > Tenant Policy > Invitations section.
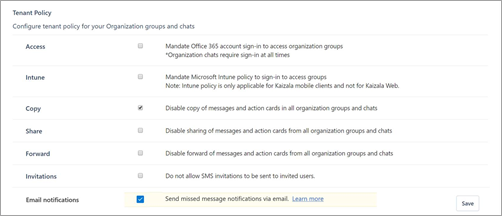
Screenshot of the Tenant policies page in Kaizala.
  • When turned on, users who are not on Kaizala will start receiving missed message emails. The frequency will be capped at 1 in 24 hours and a maximum limit of 10.

  • When turned off, users will stop receiving missed message emails.

  • Additionally, users get an option to unsubscribe from the email notifications at any point, directly from the mailer.

Regional availability

In addition to the previous admin controls, the feature is automatically enabled in Austria, Bahrain, Bangladesh, Bolivia, Brazil, Brunei, Cambodia, Cayman Islands, Chile, Croatia, Czech Republic, Ecuador, Egypt, El Salvador, Ethiopia, Finland, France, Guatemala, Hong Kong, India, Indonesia, Ireland, Japan, Jordan, Kenya, Lebanon, Libya, Maldives, Mexico, Myanmar, Netherlands, Nicaragua, Nigeria, Panama, Portugal, Puerto Rico, Qatar, Romania, Rwanda, South Africa, Spain, Sri Lanka, Sweden, Switzerland, Tanzania, Thailand, Turkey, Uganda, and United States. Roll out of this feature will start in June 2019. For the rest of the countries and regions, the feature can be enabled anytime from the Kaizala management portal by the tenant admin (as shown in the Tenant admin controls section).
Organization chats and groups in Kaizala

Kaizala help center

we can t open this attachment error message in delve

Problem

Consider the following scenario:

  • You browse to the Home view in Office Delve.

  • You see email attachments that are presented on cards.

  • You click the link to one of the attachments.

In this scenario, you receive the following error message:

We can't open this attachment

The email may have been moved or deleted.

Solution

This issue occurs when a message is permanently deleted in Outlook, or the Deleted Items folder is cleared which previously contained the attachment. Delve indexes items from Outlook but after a message that has an attachment is permanently deleted, it takes some time for it to be removed from Delve.

For more information about what you'll find in Office Delve, go to Connect and collaborate in Office Delve.

More information

Still need help? Go to Microsoft Community.

Geocode your power map data

Power Map supports several geographic formats and levels including:

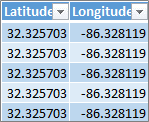
  • Latitude/Longitude (formatted as decimal)

Lattitude and Longitude data

  • Street Address

  • City

  • County

  • State / Province

  • Zip Code / Postal Code

  • Country/Region

To plot your data, pick the columns that make up your geography from the field list, and specify the geographic level they represent. Power Map takes it from there and plots your data.

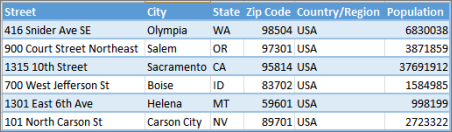
For example, Power Map automatically detects and matches the columns in this data set to the geography fields.

Data structure for Power Map

In this case, Power Map starts geocoding the data based on the street address, like this:

Geography and Map Level in the Task pane

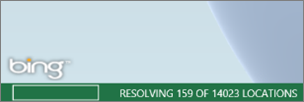
After verifying that fields correspond to their geography levels in the Geography section and clicking Next, Power Map automatically starts plotting your data by using Bing. You'll see progress on the status bar, and can make changes to the field list and the globe while Power Map resolves your geographic data.

Power Map status on the Bing Bar

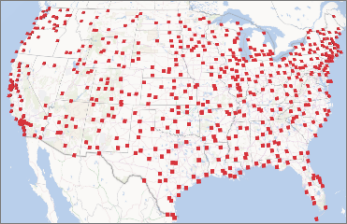
If there are multiple geographic levels, you can quickly view your data at a different level on your map. Using our example, picking the Street level visualizes the data by street, like this:

Power Map showing data by street

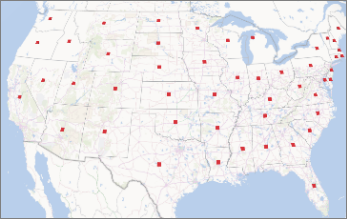
Picking the State level visualizes the same data by state, like this:

Power Map showing data by state

Change geography fields

To change the geography fields that are shown on the map by default, you can pick different fields in the Geography list. They'll automatically appear in the Geography and Map Level box, where you can verify and change their map level.

Common geocoding errors

Geocoding conflicts can occur during the geocoding process. For example, Power Map may show an error message to let you know it couldn't map some geography fields. This might happen when there are several cities in different states that have the same name, such as Springfield.

Power Map and Bing will try to find a solution by looking at surrounding data to determine where the city in each row of your data might be located, checking for state, country/region, province, and other geographic fields. If additional data is available, the city appears on the map, but in some cases, rows will be skipped. To avoid such conflicts, you can try adding columns that provide additional data (such as Zip Code or Country/Region) so Power Map can use that information to resolve the location with better accuracy.

Use a screen reader to enable live tile for to do in windows

Read out loud symbol with the label Screen reader content. This topic is about using a screen reader with Office

This article is for people with visual impairments who use a screen reader program with the Office products and is part of the Office Accessibility content set. For more general help, see Office Support home.

Use To Do with your keyboard and a screen reader to access a task list quickly by pinning it to your Windows Start menu as a Live Tile. We have tested it with Narrator and JAWS, but it might work with other screen readers as long as they follow common accessibility standards and techniques.

Notes: 

In this topic

Pin a list to the Start menu

Pinning a task list to the Windows Start menu as a Live Tile allows you to quickly preview the list content without opening it in the To Do app.

  1. In To Do, press the Tab key until you hear: "Lists," followed by the name of the currently selected list.

  2. Press the Up or Down arrow key until you hear the name of the list you want to pin to the Start menu.

  3. To open the context menu, press Shift+F10.

  4. Press the Up or Down arrow key until you hear "Pin to Start," and then press Enter.

  5. To confirm pinning the Live Tile, press the Tab key until you hear "Yes," and then press Enter.

Note: To remove a pinned list from the Start menu, repeat the steps above until you hear "Unpin from Start," and then press Enter.

Access a list from its Live Tile

You can quickly access a list in the To Do app by selecting its Live Tile in the Windows Start menu.

  1. To open the Start menu on your computer, press the Windows logo key.

  2. Press the Tab key until you hear: "Pinned tiles."

  3. Use the arrow keys to navigate to the To Do Live Tile you want. You hear: "To Do," followed by the name of the list, the number of list items, and a preview of the list content.

  4. To open the list in To Do, press Enter.

See also

Use a screen reader to work with lists in To Do

Use a screen reader to work with To Do with Cortana

Set up your device to work with accessibility in Microsoft 365

Use a screen reader to explore and navigate To Do

Technical support for customers with disabilities

Microsoft wants to provide the best possible experience for all our customers. If you have a disability or questions related to accessibility, please contact the Microsoft Disability Answer Desk for technical assistance. The Disability Answer Desk support team is trained in using many popular assistive technologies and can offer assistance in English, Spanish, French, and American Sign Language. Please go to the Microsoft Disability Answer Desk site to find out the contact details for your region.

If you are a government, commercial, or enterprise user, please contact the enterprise Disability Answer Desk.

Yearfrac function

This article describes the formula syntax and usage of the YEARFRAC function in Microsoft Excel.

Description

YEARFRAC calculates the fraction of the year represented by the number of whole days between two dates (the start_date and the end_date). For instance, you can use YEARFRAC to identify the proportion of a whole year's benefits, or obligations to assign to a specific term.

Syntax

YEARFRAC(start_date, end_date, [basis])

The YEARFRAC function syntax has the following arguments:

  • Start_date    Required. A date that represents the start date.

  • End_date    Required. A date that represents the end date.

  • Basis    Optional. The type of day count basis to use.

Basis

Day count basis

0 or omitted

US (NASD) 30/360

1

Actual/actual

2

Actual/360

3

Actual/365

4

European 30/360

Important: 

  • Dates should be entered by using the DATE function, or as results of other formulas or functions. For example, use DATE(2018,5,23) for the 23rd day of May, 2018. Problems can occur if dates are entered as text.

  • The YEARFRAC function may return an incorrect result when using the US (NASD) 30/360 basis, and the start_date is the last day in February.

Remarks

  • Excel stores dates as sequential serial numbers so they can be used in calculations. By default, January 1, 1900 is serial number 1, and January 1, 2018 is serial number 43101 because it is 43,101 days after January 1, 1900.

  • All arguments are truncated to integers.

  • If start_date or end_date are not valid dates, YEARFRAC returns the #VALUE! error value.

  • If basis < 0 or if basis > 4, YEARFRAC returns the #NUM! error value.

Example

Copy the example data in the following table, and paste it in cell A1 of a new Excel worksheet. For formulas to show results, select them, press F2, and then press Enter. If you need to, you can adjust the column widths to see all the data.

Data

Description

1/1/2012

Start date

7/30/2012

End date

Formula

Description

Result

=YEARFRAC(A2,A3)

Fraction of the year between 1/1/2012 and 7/30/12, omitting the Basis argument.

0.58055556

=YEARFRAC(A2,A3,1)

Fraction between same dates, using the Actual/Actual basis argument. Because 2012 is a Leap year, it has a 366 day basis.

0.57650273

=YEARFRAC(A2,A3,3)

Fraction between same dates, using the Actual/365 basis argument. Uses a 365 day basis.

0.57808219

Need more help?

You can always ask an expert in the Excel Tech Community, get support in the Answers community, or suggest a new feature or improvement on Excel User Voice.