Saturday, December 1, 2018

Your browser does not support video. Install Microsoft Silverlight, Adobe Flash Player, or Internet Explorer 9.

Try it!

Create and send an email, reply to an email message, and forward one.

Create and send an email

  1. Select Home > New Email.

  2. Add attendees, a subject, and a message in the email body.

  3. Select Send.

Reply to an email

  1. Select an email to reply to.

  2. Select Reply.

  3. Type a response in.

  4. Select Send.

Forward to share email with others

  1. Select an email to forward.

  2. Select Forward.

  3. Type in who you'd like to forward to.

  4. Add a note in the email body if you'd like.

  5. Select Send.

Want more?

Create an email message

Discover more courses like this at LinkedIn Learning

Your browser does not support video. Install Microsoft Silverlight, Adobe Flash Player, or Internet Explorer 9.

Here's how to download and use a template to create a sharp resume. We'll show how you can cut and paste parts of your old resume and make the fonts and spacing look perfect.

Format a resume with a template

  1. Whether you're online or offline go to FILE > New and search for "Resume."

  2. Preview and click the one you want to open.

  3. You can start typing right away or cut and paste text into the document.

  4. After pasting old text, it might look funny, or not formatted correctly. Select Ctrl to see Paste Options and choose one like Keep Text Only. Then the text use the font and formatting of the new resume.

Want more?

Six steps to developing a great resume

Look up words in the thesaurus

Most people submit resumes online these days, but there are still reasons why you need a paper resume.

A big one is at the interview. You want to come in with copies of your resume so you can hand it to the person.

So they don't have to scramble to find the copy of theirs or look for on their computer.

So I'm going to show you a couple of different ways of formatting a resume.

First of all it's going to be with a template.

I'm going to open up Word 2013 here, and it opens to this new gallery view that shows off templates.

If you have an earlier version of Word, you just want to go to FILE and New and you'll be able to search for resume or search for templates.

I'm going to type in "Resume".

If I was offline I get about a dozen or so resumes, here online I can get the full power of Office.com.

I can get a couple hundred I can look for.

Some with categories, occupations… Let me just click on this thumbnail, I can see a little bigger thumbnail, and I can click through these arrows to find one I like.

You can also see customer ratings which is Ahh..You know that way you can see what's populate what people like.

I'm going to use this one here called the Timeless design. Open that up. And it populates with my name.

Today I'm Daryl McFarland. And it gives you some instructions of how to use the template if you need that or you can just start typing away with your new objective here for your resume.

Now with resumes, most of the time people have older resume, they may cut and paste in, they want to format it so let's look at that for a few moments here. I'm going to open up some text that I have here.

And just cut and paste this objective.

And you want to ahh.. make sure you know each resume has to have a different objective for each company.

Don't want to be general. You want to be specific with your resume.

So, here I have the text that I want but, of course, it looks a little different. The font size is wrong.

There is a couple of different ways to change the formatting. You can look at styles. Some people use Format Painter.

But when you cut and paste, if you don't touch any other keys, you get this little box here at the end, with a little clipboard that says Ctrl by it.

Ctrl is the shortcut. So let me click Ctrl. And it opens up Paste options. And it gives me several options I can use.

I can use this one called Keep Text Only. And look, it shrinks down my text. Perfect. So that's good. Let's do it one more time.

We're going to grab some of these old skills I have and I'll update them as I work this new resume. Again, little too big.

Now notice this last line I have some bold text in it.

I want to keep that bold text but if I chose the option -- Keep text only, it strips out all formatting.

So hyperlinks and everything is striped out so I don't want to use that.

I want to go over here and Merge Formatting, and there, it keeps the bold and also makes the text look proper for this template.

Templates in general especially in resumes, templates have what we call control content.

If you look up here we have boxes for street address, telephone, email.

That just gives you some structure to the template, you can delete those if you want.

Also down here in the experience area we have this.

If you don't want it, again you can just simply right-click and remove content control and it'll strip that away.

A lot of times people just want to update a resume with a different look.

You can do that really quickly with the DESIGN tab. Let's go over there.

So click DESIGN and I get all this formatting options here at the top and I can just mouse over and my resume changes, it previews.

Now some of these look good. Some of them really don't look good.

But it's a quick way to kind of get a different look for your resumes.

Because sometimes we just want a fresh start with a new resume. You can also do that with Themes over here on the far left.

Themes are a great way to control color, font size, spacing.

I use it a lot for PowerPoint and not as much in Word, but you can set a difference to your resume and just click the one that you want. So that's working with templates.

In our next video, we're going to use formatting, well, we're going to format without a template.

Your browser does not support video. Install Microsoft Silverlight, Adobe Flash Player, or Internet Explorer 9.

Use Excel Online to change the formatting of numbers and text to help make your information stand out.

Want more?

Top tips for working in Excel Online

When your Excel Web App worksheet is a crowd of data, changing the formatting of numbers and text can help make information stand out.

Let's look at three ways to make this worksheet easier to read with formatting.

One way is to change how the text or numbers in cells look, by changing font style, size or color.

Column or row titles are a great place for this.

Select the cells you want to change and use the Font options on the Home tab.

Here I'll make the column titles bold, and change the font.

And then the font size.

My column titles will pop even more with different background and text colors.

I click Fill Color and choose this blue color.

Then I click Font Color and choose this white color.

Another way to format information in Excel Web App is with text alignment.

In my worksheet, I notice that some of the cells are aligned to the right, and others to the left.

My worksheet will look better and read more clearly if all my cells are aligned the same way.

I select all the columns in my spreadsheet, and click Align Text Left.

The text in one of my column titles is a little long – some of the text is cut off.

To make the text easier to read, I select the cell and click Wrap Text.

The text wraps so the entire column title is now visible.

A third way to help add clarity and readability to your worksheet is by formatting the way the numbers appear.

This column has dates that use different formats.

I want them all to look the same, so I select the column, and click Number Format.

I'd like my dates to include the weekday, so I click Long Date.

I can also change the way currency is shown.

I select the Sales Amount column, click Number Format, and click Currency.

I'm done making changes to my worksheet, but I don't need to manually save my updates.

That's because Excel Web App automatically saves my changes for me.

Now that my worksheet looks the way I want it, it's time to crunch the numbers.

In the next video we'll show how to add numbers in Excel Web App.

Save and share a presentation to OneDrive

Save and share a presentation to OneDrive

You can save a PowerPoint presentation to OneDrive to make it easier to access, store, and share your files in the cloud.

Important:  This feature doesn't support synchronization between OneDrive and your local drive in Office on a Windows RT PC. However, you can open and save your presentations to your OneDrive by clicking the File tab and then clicking the Open and Save tabs.

  1. To set up a free OneDrive account, you must have a Microsoft account. See Sign up for a Microsoft account.

    Note:  If you already have a OneDrive account, skip to step 2.

  2. Sign in to OneDrive with your Microsoft account.

    Note:  If you have never saved to the cloud, in PowerPoint, you'll start by adding a cloud service, such as OneDrive, to your list of places. If you have already added OneDrive as a Place in PowerPoint, go to step 5.

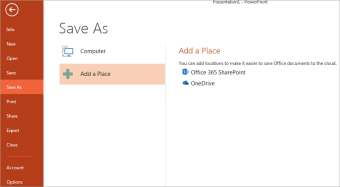
  3. In PowerPoint, click File > Save As > Add a Place.

    Add OneDrive as a place

  4. Under Add a Place, click OneDrive.

  5. In PowerPoint, open the presentation that you want to save to OneDrive.

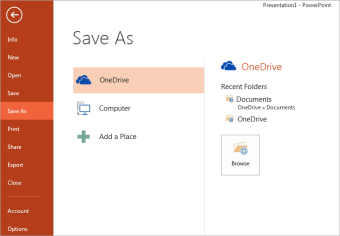
  6. On the File tab, click Save As.

  7. Under Save As, click <your name's> OneDrive.

  8. Select a folder from the Recent Folders list, or click Browse to find a folder on OneDrive, and then click Open.

    Save to my OneDrive

  1. To set up a free OneDrive account, you must have a Microsoft account. See Sign up for a Microsoft account.

    Note:  If you already have a OneDrive account, skip to step 2.

  2. Go to http://office.live.com, and sign in with your Microsoft account.

  3. Navigate to the folder where you want to upload the video, or create a New folder

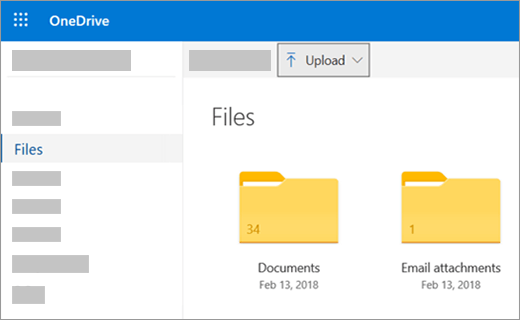
  4. Click Upload > Files.

    Upload files or pictures in OneDrive
  5. In the Open dialog box, locate the file you want to upload, select it, and click Open.

  6. After a few moments the file will be uploaded to OneDrive and it'll be listed on the page. To share it with someone else, select it in OneDrive and click Share. See Share files and folders in OneDrive for more details.

Restore a record in Business Contact Manager

Restore a record in Business Contact Manager

Because the Deleted Items folder stores deleted items until you empty it, you can restore deleted records by dragging them from the Deleted Items folder to the original folder.

For example, to restore a deleted Business Contact record, you would drag it to the Business Contacts folder. All record information, including the history items that are linked to it, are restored along with the record.

Note: You cannot drag records from the Deleted Items folder to the Contact Management, Sales, Marketing, or Project Management workspaces.

Move a record from the Deleted Items folder

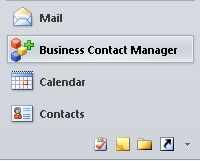
  1. In the Navigation Pane, click the Business Contact Manager button.

    business contact manager button in the navigation pane

  2. Under Business Contact Manager click Deleted Items.

  3. Do one of the following:

    • Click the item that you want to restore, and then on the Ribbon, in the Edit group, click Restore.

      How do I select more than one record?

      To select records that are adjacent to each other, press the SHIFT key, and then click the first and last records of the group that you want to add. To select nonadjacent records, press the CTRL key, and then click the individual records. To select all records, click one, and then press CTRL+A.

    • Drag the item to its original record type folder under Business Records.

      For example, drag an Account to the Accounts folder.

      Tip: Double-click the Business Records folder to expand it.

      Note: Communication history items that are linked to a deleted record do not appear as separate items in the Deleted Items folder unless you deleted the item itself.