Remove the background of a picture
In Word, PowerPoint, Excel, and Outlook, you can remove a background from a picture to accent or highlight the subject of the picture or to remove distracting detail.
Background removal isn't available for vector graphic files, such as Scalable Vector Graphics (SVG), Adobe Illustrator Graphics (AI), Windows Metafile Format (WMF), and Vector Drawing File (DRW).

1:24

Figure 1: Original picture

Figure 2: Same picture with the background removed
You can use the automatic background removal or you can draw lines to indicate which areas of the picture background to keep and which to remove.

Figure 3: Original picture showing background removal lines
-
Click the picture that you want to remove the background from.
-
Under Picture Tools, on the Format tab, in the Adjust group, click Remove Background.
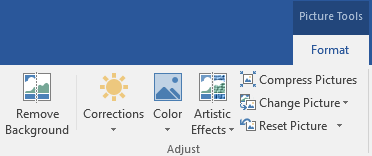
(If you do not see Remove Background or the Picture Tools tab, make sure that you have selected a picture. You might have to double-click the picture to select it and open the Format tab. (Also, this feature isn't available in PowerPoint 2007.)
The default background area will be colored magenta to mark it for removal, while the foreground will retain its natural coloring. In some cases, you will have the result you want without any additional work; in other cases, you will want to add or remove areas of the picture, as described in the next step.
-
If necessary, under Picture Tools, on the Background Removal tab, do one or both of the following:
-
If parts of the picture that you want to keep were removed, click Mark Areas to Keep and use the free-form drawing pencil
 to mark the areas on the picture that you want to keep.
 -
To remove more parts of the picture, click Mark Areas to Remove and use the drawing pencil
to mark those areas.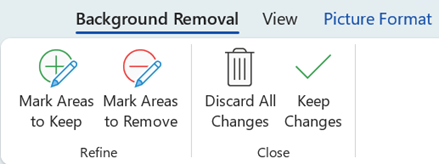
-
-
When you are done, click Keep Changes or Discard All Changes in the Close group.
Save the edited picture
-
The changes that you make to your picture's background only affect the copy of the image that is shown in the presentation, document, workbook, or email message. They don't affect the original image file. However, once you are done and have selected Keep Changes, you can then right-click the image and click Save as Picture to save your newly revised image as a separate file.
-
Click the picture that you want to remove the background from.
-
Under Picture Tools, on the Format tab, in the Adjust group, click Remove Background.
If you do not see Remove Background or the Picture Tools tab, make sure that you have selected a picture. You might have to double-click the picture to select it and open the Format tab.
-
Click one of the handles on the marquee lines and then drag the line so that it contains the portion of the picture that you wish to keep, and excludes most of the areas you wish to remove.
Picture showing background removal marquee lines and handles
In many cases, you can get the result you want without any additional work, by experimenting with the position and size of the marquee lines.
-
If necessary, under Picture Tools, on the Background Removal tab, do one or both of the following:
-
If parts of the picture that you want to keep were removed, click Mark Areas to Keep and use the drawing pencil
to mark the areas on the picture that you want to keep. -
To remove more parts of the picture, click Mark Areas to Remove and use the drawing pencil
to mark those areas.Tip: If you change your mind about an area you have marked to keep or remove, click Delete Mark and then click the line.
-
-
When you are done, click Keep Changes or Discard All Changes in the Close group.
You can apply an artistic effect, such as Pencil Sketch or Cement, or add picture effects such as shadows, reflections or glows, to the picture remaining after you have removed the background. For example, if keep only one flower in a picture and apply a shadow, the shadow will appear only for only the flower you kept when you removed the background.
Save the edited picture
-
The changes that you make to your picture's background only affect the copy of the image that is shown in the presentation, document, workbook, or email message. They don't affect the original image file. However, once you are done and have selected Keep Changes, you can then right-click the image and click Save as Picture to save your newly revised image as a separate file.
Important: Compressing a picture to reduce the size of the file changes the amount of detail retained in the source picture. This means that after compression, the picture can look different from before it was compressed. Because of this, you should compress the picture and save the file, before removing the background. You can redo the compression even after you save the file as long as you have not closed the program that you are working in, if the compression plus the background removal is not the look you want.
-
Click the picture that you want to remove the background from.
-
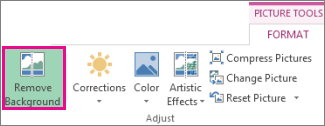
Under Picture Tools, on the Format tab, in the Adjust group, click Remove Background.

If you do not see Remove Background or the Picture Tools tab, make sure that you have selected a picture. You may have to double-click the picture to select it and open the Format tab. (Also, this feature isn't available in PowerPoint 2007.)
-
Click one of the handles on the marquee lines and then drag the line so that it contains the portion of the picture that you wish to keep and excludes most of the areas you wish to remove.
Picture showing background removal lines and handles
In many cases, you can get the result you want without any additional work by experimenting with the position and size of the marquee lines.
-
If necessary, do one or both of the following:
-
To indicate which parts of the picture you do not want automatically removed, click Mark Areas to Keep.
-
To indicate which parts of the picture you do want removed in addition to those automatically marked, click Mark Areas to Remove.
Tip: If you change your mind about an area you have marked with a line, either to keep or to remove it, click Delete Mark and then click the line to change it.
Background Removal tab
-
-
Click Keep Changes in the Close group.
Note: To cancel the automatic background removal click, Discard All Changes in the Close group.
You can add effects such as shadows, reflections, and glows, to a picture from which you have removed the background. These effects will apply only to the visible picture. For example, if you apply a shadow to the picture, only the part of the picture you kept when you removed the background will cast a shadow.
Save the edited picture
-
The changes that you make to your picture's background only affect the copy of the image that is shown in the presentation, document, workbook, or email message. They don't affect the original image file. However, once you are done and have selected Keep Changes, you can then right-click the image and click Save as Picture to save your newly revised image as a separate file.
Video: Remove the background from a picture in PowerPoint for Mac 2011:
Thanks for sharing. By the way, I just read a post including some tools to remove photo background in batch, and hope it a help too: 5 Best Bulk Image Bakcground Removers
ReplyDeleteI was looking for an appropriate clarification of the clipping path service. I much appreciate the administrator for sharing such extraordinary substance on this theme. Presently I have all I require about it. Here’s another enlightening substance for Clipping Path Service , you will get well-informed data about it here.
ReplyDeleteMicrosoft Office Tutorials: Remove The Background Of A Picture >>>>> Download Now
ReplyDelete>>>>> Download Full
Microsoft Office Tutorials: Remove The Background Of A Picture >>>>> Download LINK
>>>>> Download Now
Microsoft Office Tutorials: Remove The Background Of A Picture >>>>> Download Full
>>>>> Download LINK 3X