Open a blank datasheet
This article explains how to open a new, blank datasheet in Microsoft Office Access 2007. The article also explains how to use design-in-browse, a new feature that allows you to design large parts of a datasheet visually instead of having to use the table designer.
In this article
About opening blank datasheets
A datasheet is the visual representation of the data contained in a table, or of the results returned by a query. Datasheets resemble Microsoft Office Excel 2007 worksheets, but with different functionality in some cases. For example, you can usually add only one record to each field in a datasheet, and you must usually enter a specific type of data in a given field, such as dates and times or Yes/No values. A field can also impose limits on the size or length of your data, something Office Excel 2007 does not do by default. For example, you can enter a maximum of 256 characters in some text fields.
New datasheet features
Office Access 2007 simplifies the process of creating a table. You can now open a blank datasheet (a table) and perform most of the design tasks that you previously could do only by using the table designer. For example, after you create a new datasheet, you can set the data type for most of the fields in the new table by entering data manually or by pasting data into the fields. For example, if you enter a date in a blank field, Access sets the Date/Time data type for that field. If you enter text such as a name, Access applies the Text data type to the field, and so on.
You can also set or change field names without having to use the table designer, and you can add new fields by entering text in the blank column at the right or left side of the grid, depending on your language settings. In addition, you can use formatting commands such as Bold and Italic to add display formats to fields, a task you did previously in the table designer.
Note: Finally, even though Access makes it faster and easier to create a table, your tables should still conform to the rules of database design.
For more information about those rules, see the article Database design basics.
The process of opening a blank datasheet
When you open a blank datasheet, you add a new, blank table to your database. You cannot open a blank datasheet without creating a new table. Once Access loads the new datasheet, you follow these broad steps:
-
You can enter a name for each field, or you can accept the default names that Access provides.
-
You can enter data into the fields manually, or you can paste data. You no longer have to set a data type for each field first, because as you type, Access infers a data type based on the kind of data that you enter. For example, if you enter a name in the first field in your new table, Access sets that field to the Text data type. If you enter a date in the next field, Access sets it to the Date/Time data type, and so on. For more information about the data types that Access sets as you enter data, see How Access assigns data types as you enter information manually and How Access assigns data types when you paste information, later in this article.
Note: Some data types cannot be set for a field by just pasting data. For example, you cannot set the Attachment or OLE Object data types by pasting a file into a blank field. Also, you cannot create a Lookup field by pasting a list of data into a field. For more information about using those data types, see the sections Set the Attachment or OLE Object data types and Add a Lookup field to a datasheet, later in this article.
-
If you later need to change the data type set for a field, you can use tools that Access provides.
How design rules affect datasheets
As you open and begin to fill in a datasheet, remember that relational databases adhere to a set of design rules, and you must follow those design rules as you create your datasheets. The rules enable databases to function properly, and they help ensure that you can retrieve the correct data from a database. A discussion of the design rules is beyond the scope of this article. .
If you are not familiar with the rules of database design, see the article Database design basics.
How Access adds a primary key to new datasheets
By default, Access creates a primary key field named "ID" for all new datasheets, and it sets the data type for the field to AutoNumber. Also by default, Access hides the field from Datasheet view, but you can show the ID field at any time by right-clicking any column header, clicking Unhide Columns, and then using the Unhide Columns dialog box to show the hidden field. This figure shows the Unhide Columns dialog box for a new table:
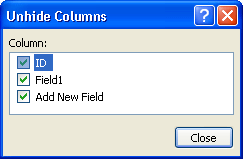
You can also view the ID field and any other hidden fields by opening the table in Design view — and also when you view the list of table fields in the Field List pane. For more information about using the task pane, see the section Relate your new datasheet to the rest of your database, later in this article.
Create a blank datasheet in a new database
When you need to create a simple database, such as a list of contacts, you can create a new database with a blank datasheet. Office Access 2007 makes the process faster and easier than earlier versions because you don't have to use Design view to create the new table. Remember that you can use Datasheet view to perform all table design tasks except the creation of a Lookup field. For more information about adding a Lookup field to a table, see the section Add a Lookup field to a datasheet, later in this article.
Create a new table in a new database
-
Start Access, and on the Getting Started with Microsoft Access page, under New Blank Database, click Blank Database.
-
Under Blank Database, in the File Name box, enter a name for the new database. To change the location of the new database, click the folder icon. When you finish, click Create.
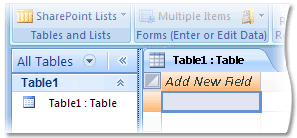
Access creates the new database and opens a table named Table1 in Datasheet view, like so:
-
In the datasheet, double-click the first column header (the colored cell that reads Add New Field) and enter a name for the field.
-
Click the next column header, or use the arrow keys to place the focus on the next header, and then enter a name for that field. Repeat this process until you finish naming your table fields.
-
In the first blank cell below a field name, enter the appropriate data.
Access uses the data that you enter to set a data type for the field. For example, if you enter a date, Access sets the field to the Date/Time data type.
Important: Remember that a field should contain only one type of data. For example, a date field should not contain customer names, and a price field should not contain phone numbers.
For more information about the data types that Access sets as you enter data, see How Access assigns data types as you enter information manually and How Access assigns data types when you paste information, later in this article.
-
Click Save.
Keyboard shortcut Press CTRL+S.
The Save As dialog box appears.
-
In the Table Name field, enter a name for the new table and click OK.
Notes:
-
When Access creates the table, it adds a primary key field named ID, and it sets the data type for the field to AutoNumber. Access also hides the field by default. To see the field, right-click any column header, click Unhide Columns, and then use the Unhide Columns dialog box to show the column.
-or-
Right-click the document tab for the table and click Design View.
-
You can change or remove the primary key only by opening the table in Design view. For information on doing so, see the article Add, set, change or remove the primary key.
-
If you're new to Access and unfamiliar with database design and why you need primary keys, see the article Database design basics.
-
Add a blank datasheet to an existing database
When you add a new datasheet (a table) to an existing database, that new table stands alone until you relate it to your existing tables. For example, say you need to track orders placed by a government agency. To do that, you add a table named Government Contacts to a sales database. To take advantage of the power that a relational database can provide — to search for the orders placed by a given contact, for example — you must create a relationship between the new table and the table (or tables) that contain the order data.
For more information about database design and table relationships, see the articles Database design basics and Create, edit or delete a relationship.
Also, remember that you must add Attachment or OLE Object fields to the new table manually by using either the Data Type list (on the Datasheet tab, in the Data Type & Formatting group) or by using the table designer. The steps in the section Set the Attachment or OLE Object data types, later in this article, explain how to add those types of fields.
Add a datasheet to a database
-
Open the database that you want to change.
-
On the Create tab, in the Tables group, click Table.

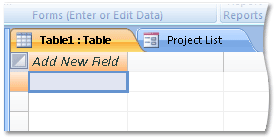
Access adds a new, blank table and opens it in Datasheet view.
-
In the datasheet, double-click the first column header (the colored cell that reads Add New Field) and enter a name for the field.
-
Click the next field or use the arrow keys to put the focus on the next field and enter a name for that field. Repeat this process until you finish naming your table fields.
-
In the first blank cell below a field name, enter the appropriate data.
Access uses the data that you enter to set a data type for the field. For example, if you enter a date, Access sets the field to the Date/Time data type.
For more information about the data types that Access sets as you enter data, see How Access assigns data types as you enter information manually, later in this article.
-
Click Save.
Keyboard shortcut Press CTRL+S.
The Save As dialog box appears.
-
In the Table Name field, enter a name for the new table and click OK.
Add a templated datasheet to an existing database
In addition to blank tables, Office Access 2007 also provides a set of templated tables. Each of the templated tables corresponds to the database templates that Office Access 2007 provides. For example, you can add a table designed to accept Asset, Contact, or Issue data. The templated tables provide a way to create small databases in less time because you don't have to name the fields and set the data types.
As you proceed, remember that you can add a templated table only to an existing database.
Add a templated table to a database
-
Open the database that you want to change.
-
On the Create tab, in the Tables group, click Table Templates and then select one of the available templates from the list.

Access opens the new table in Datasheet view. Each field in the new table contains a name and a data type, and you can enter data without doing additional work.
-
Enter your data.
-
Click Save.
Keyboard shortcut Press CTRL+S.
The Save As dialog box appears.
-
In the Table Name field, enter a name for the new table and click OK.
Set the Attachment or OLE Object data types
When you use Datasheet view to create a new table, you can set most data types by entering some data in the first row of a field. However, you cannot use that method to set the Attachment and OLE Object data types; you must set those data types manually by using the Set Data Type list on the Datasheet tab, or by using the table designer. The steps in this section explain how to use both methods to set the data types.
Use the Set Data Type list
-
In the Navigation Pane, double-click the table that you want to change.
This opens the table in Datasheet view.
-
Select a new field.
By default, new fields reside at either the right or left side of the datasheet (depending on your Windows Regional and Language settings), and the header reads Add New Field.

Note: You must select a new field. You cannot change the data type of an existing field to the Attachment or OLE Object types.
-
If you are adding an OLE Object field, double-click the header row and enter a name for the field. Otherwise, skip to the next step because when you add an Attachment field, Access changes the header row to a paperclip icon.
-
Click the first blank data row below the header.
-
On the Datasheet tab, in the Data Type & Formatting group, click the down arrow next to Data Type (the list at the top of the group), and select either OLE Object or Attachment.
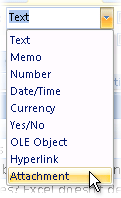
If you select the Attachment data type, Access sets the header row to show the paperclip icon, like so:

-
Save your changes.
-
To add a piece of data to the new field, double-click the first blank row and use the Attachments dialog box to locate the data.
For more information about attaching files to your database, see the article Attach files and graphics to the records in your database.
Use Table Design view
-
In the Navigation Pane, right-click the table that you want to change and click Design View on the shortcut menu.
-
In the Field Name column, select a blank row and enter a name for the new field.
Note: You must select a new field. You cannot change the data type of an existing field to the Attachment or OLE Object types.
-
In the Data Type column, click the down arrow next to your new field name and select either OLE Object or Attachment from the list.
-
Save your changes.
For information about attaching files to the records in your datasheet, see the article Attach files and graphics to the records in your database.
Add a Lookup field to a datasheet
A Lookup field is the other feature that must set manually for a new datasheet. A Lookup field displays a set of values in the form of a list. As a rule, whenever you select an item from a drop-down list in an Access database, you're using a Lookup list. You can create two types of Lookup lists.
-
Table-based lists use queries to retrieve values from other tables. The query resides in the table that underlies your new datasheet. You create a table-based list when you need to use values that reside elsewhere in your database. For example, say you maintain a database of support issues. The issue information resides in one table, but the list of people who deal with issues resides in another table, and the data in that table changes frequently. Using a table-based list saves you from having to enter a long list of names manually, and it provides you with the most current data. You can use the data in a table to populate a table-based list, or you can use the data returned by another query to populate a table-based list.
-
Value-based lists are relatively short lists of items that you only use in one place in a database. For example, say you use Access to store and manage information about company assets. You can create a Lookup field called Condition (or something similar) and allow users to choose a value from that list such as Good, Fair, Poor, and so on. You create value lists by entering a list of items directly in the table that underlies your new datasheet.
When you add a table-based Lookup list to your new datasheet, Access creates a relationship between the table that underlies your new datasheet and the table from which the Lookup field takes its data. The resulting Lookup field also becomes a foreign key — a column whose values match the primary key values in the other table. If you are new to Access and need more information about relationships, primary keys, and foreign keys, see the article Database design basics.
Finally, you can add a value-based or table-based lookup list by using a wizard or by creating them manually in the table designer. The wizard provides the easiest and fastest method for creating a lookup field, so the steps in this section explain how to use that method.
Add a Lookup field in Datasheet view
-
In the Navigation Pane, double-click the table that you want to change.
Access opens the table in Datasheet view.
-
On the Datasheet tab, in the Fields & Columns group, click Lookup Column.
The Lookup Wizard starts.
-
Do one of the following:
-
Create a table-based list
-
Select I want the lookup column to look up the values in a table or query and then click Next.
-
Under View, select an option, select a table or query from the resulting list, and then click Next.
For example, If you want to use values from a table in your Lookup field, click Tables. If you want to use a query, click Queries. To see a list of all the tables and queries in the database, click Both.
-
Move the fields that you want to appear in your Lookup list from the Available Fields pane to the Selected Fields pane, and then click Next.
-
Optionally, choose one or more sorting choices for the fields that you selected in the previous step, and then click Next.
-
Optionally, adjust the width of each column in your lookup list, and then click Next.
-
Optionally, under What label would you like for your lookup column, enter a name in the text box.
-
Optionally, select the Allow Multiple Values check box.
Selecting this option allows you to select and store more than one item from the list.
-
Click Finish. If Access prompts you to save the table, click Yes.
Access adds the lookup query to your new table. By default, the query retrieves the fields that you specify, plus the primary key values for the source table. Access then sets the data type for the Lookup field to match the data type set for the primary key field in the source table. For example, if the primary key field in the source table uses the AutoNumber data type, Access sets the data type for your lookup field to the Number data type.
-
Return to Datasheet view, go to your Lookup field, and select an item from the list.
-
-
Create a value-based list
-
Click I will type in the values that I want, and then click Next.
-
In the Number of columns box, enter the number of columns that you want to appear in your list, and then go to the first blank cell and enter a value.
When you enter your first value, another blank cell appears below the current cell.
-
When you finish entering your first value, use the TAB or down-arrow key to move focus to the next cell, and then enter a second value.
-
Repeat steps 2 and 3 until you finish creating your list, and then click Next.
-
Optionally, enter a name for the new field, and then click Finish.
-
-
Add a Lookup field in Design view
-
In the Navigation Pane, right-click the table that underlies your new datasheet and click Design View on the shortcut menu.
-
Select the field that you want to convert.
-or-
Select a blank row and, in the Field Name column, enter a name for the new field.
-
In the Data Type column, click the down arrow and select Lookup Wizard.
The Lookup Wizard appears.
-
Follow the steps in the previous section for using the wizard.
When you create a Lookup field, you can use a new feature called a multivalued list. For more information about multivalued lists and the technology behind them (a feature called multivalued fields), see the articles Add or change a lookup field that lets you store multiple values, Guide to multivalued fields, and Use a list that stores multiple values.
Relate your new datasheet to the rest of your database
By default, the information in a new datasheet remains isolated from the other information in a database until you create at least one relationship between the table that underlies your datasheet and the other tables in your database. Office Access 2007 simplifies the process of creating relationships, because now you can drag and drop fields from a task pane onto an open datasheet.
You can create two types of relationships using the new technique.
-
Add a foreign key field to the table that underlies your new datasheet. This puts your new datasheet on the many side of a one-to-many relationship.
-
Share the primary key values from your new datasheet with another table. This puts your new datasheet on the "one" side of a one-to-many relationship.
When you create either type of relationship, you use the Lookup Wizard to create a table-based lookup field. The following steps explain how to create both types of relationships.
Important You must be familiar with database design to successfully create relationships among tables.
For more information about database design and relationships, see the articles Database design basics, Add, set, change or remove the primary key, Guide to table relationships and Create, edit or delete a relationship.
Add a foreign key field to your new datasheet
-
If it isn't already, open your new datasheet in Datasheet view. To do so, in the Navigation Pane, double-click the table.
-
On the Datasheet tab, in the Fields & Columns group, click Add Existing Fields.
The Field List task pane appears and lists the other tables in the database.
-
Expand the entry for the table that you want to use.
-
Drag the primary key field from the Field List to your open datasheet, and drop the field between two of the existing fields in your datasheet. The mouse cursor changes to an I-beam when you select a valid dropping point.
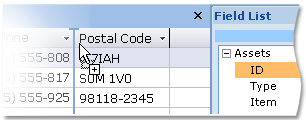
When you finish dropping the new field, the Lookup Wizard starts.
-
Go to the next set of steps to complete the process.
Use the Lookup Wizard to create the relationship
-
Move the fields that you want to appear in your Lookup list from the Available Fields pane to the Selected Fields pane, and then click Next.
-
Optionally, choose one or more sorting choices for the fields that you selected in the previous step, and then click Next.
-
Optionally, adjust the width of each column in your lookup list, and then click Next.
-
Optionally, under What label would you like for your lookup column, enter a name in the text box.
-
Optionally, select the Allow Multiple Values check box.
Selecting this option allows you to select and store more than one item from the list.
-
Click Finish. If Access prompts you to save the table, click Yes.
Access adds the lookup query to your new table. By default, the query retrieves the fields that you specify, plus the primary key values for the source table. Access then sets the data type for the Lookup field to match the data type set for the primary key field in the source table. For example, if the primary key field in the source table uses the AutoNumber data type, Access sets the data type for your lookup field to the Number data type.
Add the primary key from your new datasheet to another table
-
If you have your new datasheet open, close it.
-
In the Navigation Pane, double-click the table to which you want to add the new foreign key.
-
On the Datasheet tab, in the Fields & Columns group, click Add Existing Fields.
The Field List task pane appears and lists the other tables in the database, including your new datasheet.
-
In the task pane, click the plus sign next to the entry for your new datasheet, drag the primary key field (the default name for the field is ID) from the task pane to the open datasheet, and drop it in a convenient location.
By default, you must drop the new field between two of the existing fields in your datasheet. The mouse cursor changes to an I-beam when you select a valid dropping point.

When you finish dropping the new field, the Lookup Wizard starts.
-
Follow the previous set of steps to complete the Lookup Wizard.
Change the data type of a field
When you create a table in Datasheet view, you might find that you entered data that resulted in Access selecting the wrong data type. For example, if you only enter the first five digits of a U.S. style postal code, Access applies the number data type to the field, a choice that prevents you from entering postal codes from other parts of the world. To correct that type of problem, you can change the data type for the field.
Access provides two ways to change a data type. You can use commands on the Datasheet tab or you can use the table designer. The following steps explain how to use both techniques.
Important Changing data types can cause Access to delete existing data. For example, if you change a Text field to the Number data type, and the field contains letters as well as numbers, Access deletes the existing data because it can't perform calculations on text characters.
Use the Ribbon commands to change a data type
-
In the Navigation Pane, double-click the table that you want to change.
This opens the table in Datasheet view.
-
Select the field that you want to change.
-
On the Datasheet tab, in the Data Type & Formatting group, select an option from the Set Data Type list, located at the top of the group.
The Ribbon is part of the Microsoft Office Fluent user interface.
-
If Access asks you to confirm the change, click Yes only if you are sure you want to proceed.
-
Save your changes.
Use the table designer to change a data type
-
In the Navigation Pane, right-click the table that you want to change and click Design View on the shortcut menu.
-
Click the Data Type column and select a new data type.
-
If Access asks you to confirm the change, click Yes only if you are sure you want to proceed.
-
Save your changes.
Manage the fields in a datasheet
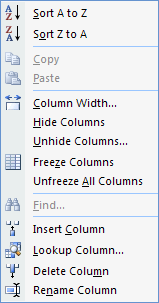
You can perform a number of table-management tasks by right-clicking the header row and selecting a command from the resulting shortcut menu. For example, you can insert a field in a specific location, delete or rename a field, show or hide a column, and start the Lookup Wizard and convert a column to a lookup field.
Use commands on the shortcut menu
-
Right-click a column header and select a command from the shortcut menu.
This figure shows the shortcut menu:
How Access assigns data types as you enter information manually
When you create a blank datasheet, Access assigns a data type to each field when you first enter data in that field. The following table lists the various types of data that you can enter and the data type that Access applies to each one.
Note: You can not set the Attachment or OLE Object data types by entering data in a blank field. For information on how to set those data types, see Set the Attachment or OLE Object data types earlier in this document.
| If you type: | Office Access 2007 creates a field with a data type of: |
| John | Text |
| A block of text or text and numbers longer than 256 characters. | Memo. Note: You cannot use design-in-browse to enable rich-text formatting. For information on enabling rich-text formatting, see the article Enter or edit data in a control or column that supports rich text. |
| http://www.contoso.com Access recognizes the following Internet protocols: http, ftp, gopher, wais, file, https, mhtml, mailto, msn, news, nntp, midi, cid, prospero, telnet, rlogin, tn3270, pnm, mms, outlook. Note: For Access to recognize the protocol and set the Hyperlink data type, you must follow the protocol with a non-whitespace character. | Hyperlink |
| 50000 | Number, Long Integer |
| 50,000 | Number, Long Integer |
| 50,000.99 | Number, Double |
| 50000.389 | Number, Double |
| 12/31/2006 The date and time formats specified in your Windows Regional and Language Settings control how Access formats Date/Time data. Show me how to set or change those settings In Windows Vista
In Microsoft Windows XP (Classic view)
In Microsoft Windows XP (Category view)
| Date/Time |
| December 31, 2006 Note: Access does not recognize day names (Monday, Tuesday, and so on) as valid input for selecting the Date/Time data type. You must enter the name of a month. | Date/Time |
| 10:50:23 | Date/Time |
| 10:50 am | Date/Time |
| 17:50 | Date/Time |
| $12.50 Access recognizes the currency symbol specified in your Windows Regional and Language settings. Show me how to set or change those settings In Windows Vista
In Microsoft Windows XP (classic view)
In Microsoft Windows XP (Category view)
| Currency |
| 21.75 | Number, Double |
| 123.00% | Number, Double |
| 3.46E+03 | Number, Double |
How Access assigns data types when you paste information
When you paste data into new worksheet, you can paste mixed or inconsistent types of data into one or more fields. For example, say you paste several columns of contact data, and that data includes postal codes from around the world — a mix of records and numbers.
When you paste data, Access processes each record (each row in the column) and it determines the data type for each record. Access then tries to choose a data type that stores all your information without losing or truncating any records. As part of that, Access sometimes applies a broad data type to a field.
This list provides some examples of how Access chooses data types.
-
When Access finds mixed data types, it typically sets the field to the Text data type because text fields provide the greatest flexibility.
-
When Access finds numbers mixed with one currency symbol, Access sets the Number data type and strips out the currency symbol. Doing so provides greater sorting and filtering capabilities, and a greater number of aggregate functions. If you want a currency symbol, you can apply a currency format to the Number field or convert the field to a Currency data type.
-
If you paste data with a mix of currency symbols, Access applies the Text data type to the field and preserve the symbols.
-
If you paste dates and times with a mix of display formats (such as 12/14/2005 and 14.12.2005), Access applies the Date/Time data type and the general date format.
 , and then click Control Panel.
No comments:
Post a Comment