Apply or remove highlighting
Word contains many highlighters to make your text pop off the screen just as if you were highlighting paper with a fluorescent marker. You can select text or an image and then highlight it, or use the Highlight tool to mark different parts of a document. You can also remove highlighting or quickly find highlighted items in your document.
Note: Highlighted parts of a document are easiest to see when the document is online.
Highlight selected text
-
Select the text that you want to highlight.
-
On the Home tab, click the arrow next to Text Highlight Color.

-
Click the color that you want.
Note: Use a light highlight color if you plan to print the document by using a monochrome palette or dot-matrix printer.
Highlight multiple parts of a document
This method is best for highlighting multiple parts of a document because the Highlight tool stays on until you decide to turn it off.
-
On the Home tab, click the arrow next to Text Highlight Color.

-
Click the color that you want.
The Text Highlight Color button displays the selected color, and the mouse pointer becomes a
 when you point to the area of your document that contains text.
Note: Use a light highlight color if you plan to print the document by using a monochrome palette or dot-matrix printer.
-
Select the text or graphic that you want to highlight.
-
To stop highlighting, click the arrow next to Text Highlight Color
 and click Stop Highlighting, or press Esc.
The mouse pointer becomes a
 when you point to your document.
Remove highlighting from part or all of a document
-
Select the text that you want to remove highlighting from, or press Ctrl+A to select all of the text in the document.
-
On the Home tab, click the arrow next to Text Highlight Color.

-
Click No Color.
Quickly find highlighted text
-
If you are using Word 2016 or Word 2013, click Find > Advanced Find.
If you are using Word 2010, click Find.
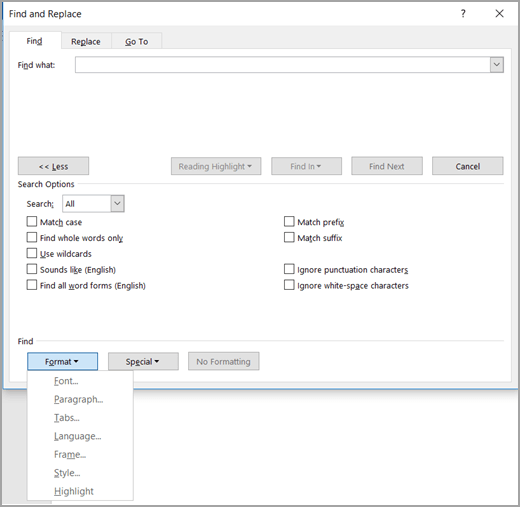
The Find and Replace box appears.
-
Click Format > Highlight.

If you don't see the Format button, click More.
-
Click Find Next.
Highlight selected text
-
Select the text that you want to highlight.
-
On the Home tab, click the arrow next to Text Highlight Color.

-
Click the color that you want.
Note: Use a light highlight color if you plan to print the document by using a monochrome palette or printer.
Highlight multiple parts of a document
This method is best for highlighting multiple parts of a document because the Highlight tool stays on until you decide to turn it off.
-
On the Home tab, click the arrow next to Text Highlight Color.

-
Click the color that you want.
The Text Highlight Color button displays the selected color, and the mouse pointer becomes a
 when you point to the area of your document that contains text.
Note: Use a light-toned highlight color if you plan to print the document by using a monochrome palette or printer.
-
Select the text or graphic that you want to highlight.
-
To stop highlighting, click the arrow next to Text Highlight Color
 and click Stop Highlighting, or press Esc.
The mouse pointer becomes a
 when you point to your document.
Remove highlighting from part or all of a document
-
Select the text that you want to remove highlighting from, or press Ctrl+A to select all of the text in the document.
-
On the Home tab, click the arrow next to Text Highlight Color.

-
Click No Color.
Quickly find highlighted text
-
Click Find > Advanced Find.
The Find and Replace box appears.
-
Click Format > Highlight.

If you don't see the Format button, click More.
-
Click Find Next.
No comments:
Post a Comment