Friday, March 31, 2017

Introduction to data connections

Introduction to data connections

A data connection is a dynamic link between a Microsoft Office InfoPath form and an external data source that stores or provides data for that form. A data source is a collection of fields and groups that define and store the data for a form. Controls are bound to fields and groups in the data source and display the data to users.

A form can have one primary data connection, called the main data connection, and it can optionally have one or more secondary data connections. Depending on your goals for the form, a data connection might query or submit form data to an external data source, such as a Microsoft SQL Server database or a Web service.

In this article

Overview of data connections

Working with the main data connection

Working with secondary data connections

Storing data for offline use

Considerations for connecting to external data sources

Overview of data connections

A data connection is a dynamic link between a form and a data source that stores or provides data for that form. A form can have one primary data connection, called the main data connection, and it can optionally have one or more secondary data connections. The main data connection defines the main data source of the form. An XML Schema describes how data is stored in the form's main data source. There can be only one main data connection for a form, and it is created automatically when you create a form template that is based on an external data source. You can create as many secondary data connections as you want when you design a form template.

Depending on your goals for the form, you can create a main or secondary data connection to an external data source, such as a Microsoft SQL Server database or a Web service. An external data source is a data store that sends data to or can receive data from a form that is based on your form template. InfoPath works with the following external data sources:

  • Microsoft Office Access database

  • Microsoft SQL Server database

  • Web service

  • Document library or list on a server running Microsoft Windows SharePoint Services

  • XML file

You can create three types of data connections to an external data source: query data only, submit data only, or both query and submit data. A query data connection receives data from a data source and stores that data in the form. A submit data connection sends data from the form to a data source, to an application on a Web server, to a document library on a server running Microsoft Windows SharePoint Services, or in an e-mail message. Query and submit data connections both receive data from and send data to a data source. When you create a data connection, you specify the type of data connection that you want. For example, you can create a data connection that does any of the following:

  • Queries data from a database

  • Submits form data in an e-mail message

  • Submits form data to an application on a Web server

  • Submits form data to a custom application that uses the XmlFormView control

  • Queries or submits data through custom programming code, such as C#, Microsoft Visual Basic .NET, or Microsoft JScript.

  • Uses connection settings stored in a data connection library on a server running Microsoft Office SharePoint Server 2007

  • Queries or submits data to Human Workflow Services on Microsoft BizTalk Server 2004 or BizTalk Server 2006

The type of connection that you use depends on your goals for the form and the type of external data source that you want to connect the form to.

Query data connections

A query data connection gets data from an external data source and stores that data in fields in the main or secondary data source of a form. You can then bind controls to those fields to display that data in the form. You can create a query data connection in the following ways:

  • Design a form template that is based on a database, Web service, or settings stored in a connection library. The structure of the external data source then defines the main data source for the form.

  • Modify an existing form template by adding a secondary data connection that queries a database, Web service, SharePoint list or library, or XML file.

When you design a new form template that is based on a database, Web service, or settings in a connection library, you create a query data connection that becomes the main data connection for forms that are based on that form template. You can define only one query data connection as the main data connection for a form template. If you need to query data from additional data sources, you can create secondary data connections that query data from those data sources. You will learn more about secondary data connections later in this article.

When you add a secondary data connection that queries data to your form template, you can specify whether InfoPath should use the data connection each time that the user opens the form or after specific events occur when the user fills out the form, such as clicking a button to display a list of options. To use the data connection after specific events occur, use one of the following methods:

  • Insert a button control that refreshes data in the form.

  • Add a rule to use the data connection when a condition on the form exists.

  • Write custom code for specific events.

Submit data connections

When users submit a form, data from that form is sent through a submit data connection to an external data source. You can configure that form template to allow users to send data to the following types of external data sources:

  • Microsoft Office Access database

  • Microsoft SQL Server database

  • Web service

You can also add secondary data connections that submit data in the following ways:

  • Submit form data to a document library on a server running Microsoft Windows SharePoint Services.

  • Submit form data in an e-mail message.

  • Submit form data to an application on a Web server.

You create a submit data connection in the following ways:

  • Design a new form template that is based on a database, Web service, or settings stored in a connection library on a server running Office SharePoint Server 2007. The structure of the external data source then defines the main data source for the form.

  • Modify an existing form template by adding a secondary data connection, and then configure the form template to allow users to submit their forms through this secondary data connection.

    Tip: When you design a form template that is based on an Office Access or SQL Server database, InfoPath automatically configures a submit data connection if the database meets certain requirements. Find links to more information about those requirements in the See Also section. You can choose to disable the Submit feature if you want your users to submit their completed forms by using another type of submit data connection.

In most cases, you will configure one submit data connection as the main submit action for your form template. However, you can design your form template so that your users can submit their completed forms to multiple locations by using rules or custom code. For example, you can configure your form template to allow your users to submit their completed forms to a Web service as well as through an e-mail message. Typically, you configure the form template to submit all of the data in the form. However, if you use custom code to submit the form data or you are configuring the form template to allow the form to submit data to a Web service, you can submit a portion of the form's data.

Query and submit data connections

When you design a form template that is based on a database or a Web service, you can create a data connection that can get data from and submit data to the database or Web service. If you are designing a form template that is based on a database, the data connection can get or submit data. However, in order for forms based on this form template to submit data to the database, the following requirements must be met:

  • You are not designing a browser-compatible form template.

  • All of the tables in the main data connection must contain a primary key, unique constraint, or unique index.

  • All of the tables in the query must have a simple, hierarchical relationship.

  • None of the data fields in the main data source of the form can store a large binary data type.

You can learn more about these requirements in Considerations for connecting to external data sources later in this article.

A data connection that can get data from or submit data to a Web service is just like a query data connection and a submit data connection combined into a single data connection.

Top of Page

Working with the main data connection

The main data connection establishes a connection to the main data source of the form. An XML Schema describes the structure for storing data in the main data source of the form. You can design the data source by using the Data Source task pane, or you can let InfoPath create the data source automatically as you add controls to your form template. You can also design a form template based on an external data source, which in turn defines the structure of the main data source. A form template can have only one main data connection.

If the main data connection connects to an external data source, how you work with the main data connection depends on the type of data source that it connects to.

Database    When you design a form template based on a database, InfoPath creates a main data connection that queries and optionally submits data to that database. If the form will be filled out only by using InfoPath and the database meets the requirements listed in the Considerations for connecting to external data sources section, InfoPath automatically creates a submit data connection and configures the form template to allow users to submit their forms. If the form will be filled out by using a browser, InfoPath does not create a submit data connection to the database. Data connections that submit data to a database are not supported in browser-compatible form templates.

Tip: If the form will be filled out by using a browser and you want to submit data to a database, you can do so by connecting the form to a Web service that submits data to the database.

Web service    When you design a form template based on a Web service, you can create a main data connection that both queries and submits data, only queries data, or only submits data. If you choose to submit data, InfoPath automatically configures the form template to allow users to submit their forms. You can specify whether to submit some of the form data or all of the form data. If only some of the data is submitted, you can specify which fields in a particular group contain the data that should be submitted, depending on the requirements of the Web service.

When you design a form template based on a database or Web service, InfoPath creates a main data source with query fields, data fields, and groups that correspond to the way that data is stored in the database or Web service. A query field contains the value that is used in a query to retrieve data from a database by using the query data connection. The results of the query are put into data fields, which can be edited when the user opens the form. When the user submits the form, the data in the data fields is sent by using the submit data connection. Because the fields and groups in the main data source must match the way that the data is stored in the external data source, you cannot modify these fields and groups. You can, however, add fields or groups to the root field in the main data source.

To enable users to view, select, edit, or submit data in data fields, you can bind controls, such as text boxes and check boxes, to the fields in the form. If you want to query and display additional values that users can select as a choice, you can bind a control such as a list box to the query fields. If you want users to select a value from a list, you can bind a control such as a list box to a data field and then set the properties of the control to display values from a secondary data source or a repeating field in the main data source.

Top of Page

Working with secondary data connections

A secondary data connection connects a form to an external data source. Secondary data connections are useful when you need to query or submit form data to an external data source other than the external data source in the main data connection, or when you want users to submit data to multiple external data sources. You can create as many secondary data connections as you want.

A secondary data connection can query or submit data to the following types of external data sources:

  • Office Access database

  • SQL Server database

  • Web service

  • Document library or list on a server running Windows SharePoint Services

  • XML file

By using a secondary data connection, you can also enable users to submit form data to an application on a Web server, to a document library on a server running Windows SharePoint Services, or through an e-mail message.

If you create a secondary data connection that queries data, by default the form uses this data connection when the form opens. You can also use this data connection by configuring the form template in the following ways:

  • Add a refresh button to the form template that the user can click to send the query.

  • Add a rule to the form template to query the data source by using this data connection.

  • Add custom code to the form template that sends the query.

When you add a secondary data connection to a form, InfoPath automatically creates a secondary data source with data fields and groups that match the way that data is stored in the external data source. This helps ensure the integrity of the data. You cannot modify the fields and groups in a secondary data source.

Top of Page

Storing data for offline use

When you add a secondary data connection that queries data from an external data source, you can configure the connection to store the results of the query on the user's computer. This ensures that users can fill out the form if their computers are not connected to a network. This is called working offline.

If you configure a secondary data connection in this way, the query is sent to the external data source while the user's computer is connected to the network. The results of the query are then stored in the secondary data source of the form, and they appear in the form when the user fills out the form. Data is cached each time the user performs a new query, so that the data is kept up to date as much as possible.

InfoPath considers query parameters when deciding whether stored data is appropriate for a given query. When you create the data connection, you can choose whether to display a default set of stored data in the form, in case the data source is not available. You should consider whether the data from the query is appropriate for all of your users or whether the form should display data that is specific to each user. For example, if the data returned by the query is based on the user's identity or role, using a default set of data that was configured at design time instead of using query results may result in incorrect data for that user.

Top of Page

Considerations for connecting to external data sources

InfoPath supports data connections to the following types of external data sources:

  • Office Access database

  • SQL Server database

  • Web service

  • Document library or list on a server running Microsoft Windows SharePoint Services

  • XML file

The following sections provide information and considerations for connection to each of these external data sources.

Microsoft Office Access or SQL Server database

InfoPath supports data connections to Access databases and SQL Server databases. To connect to another kind of database, you can use a Web service that works with that database.

A form can query data from a database through either a main or a secondary data connection, and you can select any number of database tables for a connection. The first table that you select is the primary table. Any table that you subsequently select must contain a field that is related to the primary table. InfoPath attempts to set this relationship by matching the field names in the two tables. You can choose to use this relationship or add your own table relationship when you create the data connection.

A form can submit data to a database through the form's main data connection if the form template that the form is based on and the database meet the following requirements:

  • The form template is not a browser-compatible form template    InfoPath will not create a submit data connection in the main data connection if you are designing a browser-compatible form template. To allow users to submit data in a form that is based on a browser-compatible form template, use a Web service that works with the database.

  • The left table in each pair of related tables in the main data source contains a primary key    At least one of the relationships for every pair of related tables must include a primary key from the left table.

  • None of the data fields in the main data source of the form store a large binary data type    InfoPath will disable the submit data connection if the query includes fields that can store a large binary data type, such as pictures, images, OLE objects, file attachments, the Office Access memo data type, or the SQL Text data type.

If the form template and the database meet all of these requirements, InfoPath creates the submit data connection and configures the form template to allow users to submit their forms. You can disable the submit data connection in the main data connection if you want users to submit their form data through a different data connection.

When you design a form template that is based on a database, InfoPath creates a main data source that contains query fields and data fields that match the way that data is stored in the database. InfoPath also adds Run Query and New Record buttons to the default view of the form template. When a user clicks the Run Query button, InfoPath sends a query with the data in the query field to the database. The New Record button clears any data currently in the form and sets controls that are bound to the data fields to the default value of the data field. When a user submits data to the database, any changes to the data in the data fields change the corresponding records in the database. If a user deletes data from a data field, the corresponding record is deleted from the database. Finally, any data that has been added to the data fields updates the corresponding fields or adds the corresponding records to the database.

If you want to connect a form to a database, and the main data connection has already been created for the form, you can add a secondary data connection that queries the database. When you add a secondary data connection, InfoPath creates a secondary data source with query fields, data fields, and groups that match fields in the database tables. You can select multiple database tables and establish table relationships just as you would for the main data connection.

When you create a secondary data connection that queries data, you can configure the connection to send a query each time the user opens the form, or you can do one of the following to send the query:

  • Add a button that users can click to refresh the data from the data connection.

  • Create a rule that sends the query by using the data connection.

  • Write custom code that sends the query when it is run.

Web service

A form can query or submit data to a Web service through either a main or a secondary data connection. InfoPath adheres to the following standards for connections to Web services:

  • Simple Object Access Protocol (SOAP)    SOAP is the communication protocol that defines the XML messages that are used to communicate with the Web service.

  • Web Services Description Language (WSDL)    WSDL is the XML Schema standard that is used to describe the location, communication protocols, and interfaces to the Web service. InfoPath can consume only document-literal style Web services.

  • Universal Description Discovery and Integration (UDDI)    UDDI is the directory service that describes the Web services offered by a business.

When you design a new form template that is based on a Web service, InfoPath creates a main data connection to the Web service and then creates a main data source that contains query fields, data fields, and groups that match the XML Schema of the Web service.

If you configure the form template to use another operation in the same Web service or you want to use a different Web service altogether, you can add secondary data connections to the form template. When you add a secondary data connection that queries data, InfoPath creates a secondary data source with fields and groups that match the schema of the Web service. If you add a secondary data connection that submits data, you can configure the connection to send all or only some of the data in the form, depending on the parameters in the Web service.

When you create either a main or secondary data connection to a Web service, you can specify whether the connection queries data only, submits data only, or both queries and submits data. If the connection queries data, InfoPath adds the Run Query button to the form template. When a user clicks the Run Query button, InfoPath sends a query with the data in the query fields to the Web service. If the connection submits data, InfoPath enables the Submit feature for the form. When you configure a submit data connection, InfoPath determines what data is required by the Web service. Based on that information, you can specify what fields in the form template should submit their data to the Web service.

Document library or a list on a SharePoint site

A form can query data through a secondary data connection to a document library or a list on a server running Windows SharePoint Services. A form can also submit data to a document library on a server. You cannot connect to a library or list through a main data connection.

If you create a secondary data connection that queries data from a document library or list, InfoPath creates a secondary data source for the form that matches the columns in the document library or list.

If you create a secondary data connection that submits data to a document library and you want this submit data connection to be the main submit action for the form template, you must enable the Submit feature for the form template and associate it with the data connection by using the Submit Options dialog box (Tools menu, Submit Options command). By default, all of the data in the form is submitted through the submit data connection. If you want to submit only some of the data, you can do so by writing custom code for the form template.

XML file

A form can query data through a secondary data connection to an XML file. For example, you can save a Microsoft Office Excel worksheet as an XML file and then use a secondary data connection to query and display the data from that file in the form. You can also use a secondary data connection to query data from an XML file in order to retrieve data from an application on a Web server that returns XML, such as a Microsoft ASP.NET application, a Common Gateway Interface (CGI) script, or an application that uses the Internet Server Application Programming Interface (ISAPI).

Application on a Web server

You can create a secondary data connection that submits data to an application on a Web server, such as an ASP.NET application, a CGI script, or an application that uses ISAPI. To submit data to an application on a Web server, you must configure the form template to allow users to submit their form data and configure the submit options for the data connection by selecting Web server (HTTP) in the Submit Options dialog box (Tools menu, Submit Options command).

Note: A form can have only one data connection that submits data to an application on a Web server. You cannot configure a form template to allow forms to use a rule to submit data to an application on a Web server.

Connection settings in a data connection library

If several forms use the same or similar data connections, consider storing the settings for each data connection in a data connection file in a data connection library on a server running Office SharePoint Server 2007. A data connection file is an XML file that contains connection information for a single external data source and has an .xml or .udcx file name extension. When a user opens a form that connects to a data connection file, InfoPath uses the settings in that file to connect to the external data source. Advantages of using data connection files include the following:

  • Multiple forms can use the same data connection file, so there is no need to create the same data connection from scratch for each form.

  • If the location or connection settings for an external data source change, you need to update only the data connection file, not each form template.

  • The data connection file can contain alternative authentication information that can be used by the server when a user fills out a form by using a browser.

  • Forms that are filled out in a browser without a full trust security level can connect to a computer in another domain if all of the data connections in the form use data connection files.

To connect a form to a data connection file, the file must be stored in a data connection library on a server running Office SharePoint Server 2007 and it must follow the Universal Data Connection (UDC) version 2.0 file format.

Note: The UDC 2.0 file format is a superset of the version 1.0 format used by Microsoft Office FrontPage. InfoPath cannot use a data connection file in the version 1.0 format. Find links to more information about data connection libraries and data connection files in the See Also section.

Top of Page

Server rules vs. client rules in Outlook 2016 for Mac

Server rules vs. client rules in Outlook 2016 for Mac

There are two types of rules in Outlook 2016 for Mac: server rules and client rules.

  • Server rules     If you are using a Microsoft Exchange account managed by Microsoft Exchange Server 2010 SP1 or later, you can use Outlook 2016 for Mac to create and edit server-based rules. In the Rules box of Outlook 2016 for Mac, server rules are grouped by account under Server Rules in the left pane. These rules run on the Exchange mail server, even when Outlook is not open. Because Outlook does not need to be open, server rules are useful if you access your account from more than one computer. One limitation of server rules is that they cannot carry out actions that require Outlook to be open, such as playing a sound.

    If your account is managed by a version of Exchange that is earlier than Microsoft Exchange Server 2010 SP1, you can create or edit server-based rules by using Outlook Web App or Outlook for Windows.

  • Client rules     Client rules are rules that run only in Outlook 2016 for Mac. In the Rules dialog box of Outlook 2016 for Mac, client rules are grouped by account type under Client Rules in the left pane. You can create client rules for any account that you use in Outlook 2016 for Mac. Unlike server rules, client rules allow you to specify actions within Outlook, such as playing a sound.

Help for Management Reporter (PerformancePoint Server 2007)

Help for Management Reporter (PerformancePoint Server 2007)

Are you looking for help for PerformancePoint Management Reporter?

Microsoft Office PerformancePoint 2007 Management Reporter, which was originally part of Microsoft Office PerformancePoint Server 2007, is now part of the Microsoft Dynamics ERP product family.

To view Help content about Management Reporter, see Management Reporter for Microsoft Dynamics ERP.

Find and select cells that meet specific conditions

Find and select cells that meet specific conditions

You can use the Go To command to quickly find and select all cells that contain specific types of data (such as formulas) or only cells that meet specific criteria (such as the last cell on the worksheet that contains data or formatting).

  1. Do one of the following:

    • To search the entire worksheet for specific cells, click any cell.

    • To search for specific cells within a defined area, select the range, rows, or columns that you want.

      How to select ranges, rows, or columns

      To select

      Do this

      A single cell

      Click the cell, or press the arrow keys to move to the cell.

      A range of cells

      Click the first cell in the range, and then drag to the last cell, or hold down SHIFT while you press the arrow keys to extend the selection.

      You can also select the first cell in the range, and then press F8 to extend the selection by using the arrow keys. To stop extending the selection, press F8 again.

      A large range of cells

      Click the first cell in the range, and then hold down SHIFT while you click the last cell in the range. You can scroll to make the last cell visible.

      All cells on a worksheet

      Click the Select All button.

      Select All button

      To select the entire worksheet, you can also press CTRL+A.

      Note: If the worksheet contains data, CTRL+A selects the current region. Pressing CTRL+A a second time selects the entire worksheet.

      Nonadjacent cells or cell ranges

      Select the first cell or range of cells, and then hold down CTRL while you select the other cells or ranges.

      You can also select the first cell or range of cells, and then press SHIFT+F8 to add another nonadjacent cell or range to the selection. To stop adding cells or ranges to the selection, press SHIFT+F8 again.

      Note: You cannot cancel the selection of a cell or range of cells in a nonadjacent selection without canceling the entire selection.

      An entire row or column

      Click the row or column heading.

      Worksheet headings

      1. Row heading

      2. Column heading

      You can also select cells in a row or column by selecting the first cell and then pressing CTRL+SHIFT+ARROW key (RIGHT ARROW or LEFT ARROW for rows, UP ARROW or DOWN ARROW for columns).

      Note: If the row or column contains data, CTRL+SHIFT+ARROW key selects the row or column to the last used cell. Pressing CTRL+SHIFT+ARROW key a second time selects the entire row or column.

      Adjacent rows or columns

      Drag across the row or column headings. Or select the first row or column; then hold down SHIFT while you select the last row or column.

      Nonadjacent rows or columns

      Click the column or row heading of the first row or column in your selection; then hold down CTRL while you click the column or row headings of other rows or columns that you want to add to the selection.

      The first or last cell in a row or column

      Select a cell in the row or column, and then press CTRL+ARROW key (RIGHT ARROW or LEFT ARROW for rows, UP ARROW or DOWN ARROW for columns).

      The first or last cell on a worksheet or in a Microsoft Office Excel table

      Press CTRL+HOME to select the first cell on the worksheet or in an Excel list.

      Press CTRL+END to select the last cell on the worksheet or in an Excel list that contains data or formatting.

      Cells to the last used cell on the worksheet (lower-right corner)

      Select the first cell, and then press CTRL+SHIFT+END to extend the selection of cells to the last used cell on the worksheet (lower-right corner).

      Cells to the beginning of the worksheet

      Select the first cell, and then press CTRL+SHIFT+HOME to extend the selection of cells to the beginning of the worksheet.

      More or fewer cells than the active selection

      Hold down SHIFT while you click the last cell that you want to include in the new selection. The rectangular range between the active cell and the cell that you click becomes the new selection.

      Tip: To cancel a selection of cells, click any cell on the worksheet.

  2. On the Home tab, in the Editing group, click Find & Select, and then click Go To. Excel Ribbon Image

    Keyboard shortcut  You can also press CTRL+G.

  3. Click Special.

  4. In the Go To Special dialog box, click one of the following options.

Click

To select

Comments

Cells that contain comments.

Constants

Cells that contain constants.

Formulas

Cells that contain formulas.

Note: The check boxes below Formulas define the type of formula that you want to select.

Blanks

Blank cells.

Current region

The current region, such as an entire list.

Current array

An entire array if the active cell is contained in an array.

Objects

Graphical objects, including charts and buttons, on the worksheet and in text boxes.

Row differences

All cells that differ from the active cell in a selected row. There is always one active cell in a selection, whether this is a range, row, or column. By pressing ENTER or TAB, you can change the location of the active cell, which by default is the first cell in a row.

If more than one row is selected, the comparison is done for each individual row of that selection, and the cell that is used in the comparison for each additional row is located in the same column as the active cell.

Column differences

All cells that differ from the active cell in a selected column. There is always one active cell in a selection, whether this is a range, row, or column. By pressing ENTER or TAB, you can change the location of the active cell, which by default is the first cell in a column.

If more than one column is selected, the comparison is done for each individual column of that selection, and the cell that is used in the comparison for each additional column is located in the same row as the active cell.

Precedents

Cells that are referenced by the formula in the active cell. Under Dependents, do one of the following:

Click Direct only to find only cells that are directly referenced by formulas.

Click All levels to find all cells that are directly or indirectly referenced by the cells in the selection.

Dependents

Cells with formulas that refer to the active cell.

Click Direct only to find only cells with formulas that refer directly to the active cell.

Click All levels to find all cells that directly or indirectly refer to the active cell.

Last cell

The last cell on the worksheet that contains data or formatting.

Visible cells only

Only cells that are visible in a range that crosses hidden rows or columns.

Conditional formats

Only cells that have conditional formats applied. Under Data validation, do one of the following:

Click All to find all cells that have conditional formats applied.

Click Same to find cells that have the same conditional formats as the currently selected cell.

Data validation

Only cells that have data validation rules applied.

Click All to find all cells that have data validation applied.

Click Same to find cells that have the same data validation as the currently selected cell.

Rotate a page to landscape or portrait orientation in Word

Rotate a page to landscape or portrait orientation in Word

You can choose either portrait (vertical) or landscape (horizontal) orientation for all or part of your document.

Change the orientation of your entire document

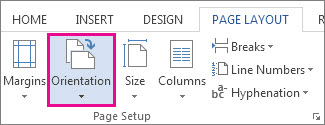
  1. Click > Page Layout > Orientation.

    Page orientation options

  2. Click Portrait or Landscape.

Note:  When you change the orientation, the cover pages in the Cover Page gallery change to the orientation you've chosen.

Use different orientations in the same document

There may be times when you want certain pages or sections of your document to have a different orientation from the rest of it. Note that Word puts selected text on its own page, and the surrounding text on separate pages.

Note: This option is not available when editing a document in Word Online.

  1. Select the pages or paragraphs whose orientation you want to change.

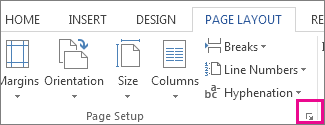
  2. Click Page Layout > Page Setup Dialog Box Launcher.

    Button that opens the Page Setup box

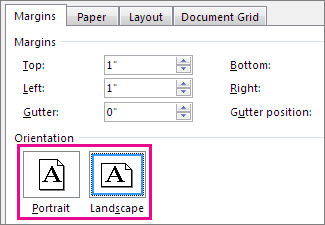
  3. In the Page Setup box, under Orientation, click Portrait or Landscape.

    Portrait and Landscape buttons in the Page Setup box.

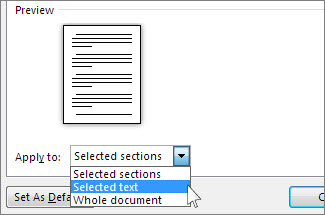
  4. Click the Apply to box and click Selected text.

    Page orientation options

Note:  Word automatically inserts section breaks before and after the text that has the new page orientation. If your document is already divided into sections, you can click in a section (or select multiple sections), and then change the orientation for only the sections that you select. Read about how to find out where the section breaks are in your document.

Office Communicator 2007 Error ID: 3122

Office Communicator 2007 Error ID: 3122

Details

Product:

Office Communicator 2007, Office Communicator 2007 R2

Version:

2.0, 3.0

Source:

Office Communications Server

ID:

3122

Message:

Cannot join the conference.

Explanation

Cannot join the conference.

Cause

The conferencing service cannot be reached. The server may be temporarily busy.

Resolution

Wait a moment and then try to join the conference again. If the problem persists, contact your system administrator.

Convert slide text to a SmartArt graphic

Convert slide text to a SmartArt graphic

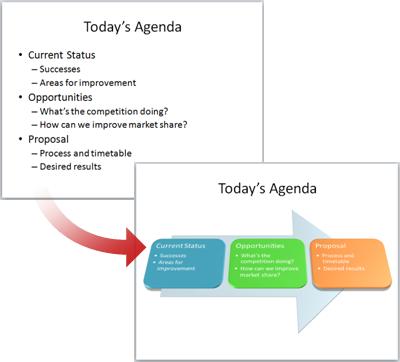
Presentations often contain slides with bulleted lists. With one click, you can convert a boring Agenda (or any other) slide to a SmartArt graphic.

A plain slide converted to a SmartArt graphic.

Simply, select the text you want to convert, click Home, click Convert to SmartArt Graphic Button image , and then pick the layout you want. To see more choices, click More SmartArt Graphics.
You can also convert pictures on a slide to a SmartArt graphic.

The text is automatically put in shapes and arranged based on the layout you chose. You can now spiff it up by changing the shape colors or adding a pre-made combination of effects to it.

Note: 

  • To convert your SmartArt graphic back to text, right-click the graphic and select Convert to Text.

  • If you want both a slide with the text and another slide with the SmartArt graphic created from that same text, create a copy of the slide before you convert it.

  • Text customizations, such as text color or font size, will be lost when you convert the text to a SmartArt graphic.

Top of Page

Change the colors of an entire SmartArt graphic

  1. Click the SmartArt graphic.

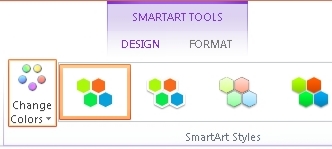
  2. Under SmartArt Tools, click Design, and then click Change Colors.

    Change Colors button in SmartArt Styles group

    If you don't see SmartArt Tools or Design, make sure that you've selected a SmartArt graphic. You may have to double-click the SmartArt graphic to open the Design tab.

  3. Click the color variation that you want.

    The different color combinations are all derived from the theme colors of your presentation.

Top of Page

Apply a style to your SmartArt graphic

A SmartArt Style is a combination of various effects, such as line style, bevel, or 3-D, that you can apply to your SmartArt graphic to quickly jazz it up.

  1. Click the SmartArt graphic.

  2. Under SmartArt Tools, click Design, and then click the SmartArt Style that you want.

    To see more SmartArt Styles, click the More button Button image .

Top of Page

Partners: Offer delegated administration

Partners: Offer delegated administration

Note:  This feature is available only to Microsoft Cloud Partners who are certified to offer delegated administration.

When you administer an organization's account on behalf of a client, you're providing delegated administration. As a delegated administrator, you can perform tasks such as adding users, resetting passwords, and adding domains.

Before you can start administering a client's account, the client must authorize you as a delegated administrator. To get client approval, you first send them an offer for delegated administration, which you can include with a trial invitation or purchase offer. You can also offer delegated administration to your client at a later time.

For more information about creating trial invitations, see Create a trial invitation. For more information about creating a purchase offer, see Create a purchase offer.

Use this procedure if you want to offer delegated administration at a later time.

Send a delegated administration offer

  1. If you manage 100 or more clients, navigate to Partner overview > Send delegated administration offers.

  2. If you manage fewer than 100 clients, navigate to Build your business > delegate admin offer.

  3. Copy the information and offer URL for the delegated administration, and then paste it into a customized email, document, or webpage.

  4. Send the offer to your client.

This offer isn't client-specific; you can reuse this offer for multiple clients.

When your client receives your offer, the message contains a link that they can follow to grant you delegated administration privileges. If the client accepts your offer, you receive an email with their response. When you're authorized as a delegated administrator, you can then access the client's account and administer their services on their behalf.

Note: Delegated access to Mobile Device Management for Office 365 is not supported.

Assign permissions for delegated administration

As a partner, you have your own account with Office 365, which includes your organization's user accounts. You can give a user in your own organization the permissions to act as a delegated administrator on behalf of your clients; however, until the client grants delegated administration privileges, you won't be able to access their organization. For more information, see Add or delete a delegated admin.

  1. Go to Dashboard > Users > Active Users.

  2. Select the user, click Edit Edit , and then click Settings.

  3. On the Settings tab, under Assign administrative access to companies you support, click Yes to allow the user to create trial invitations and purchase offers on the Partner overview page.

  4. Choose the appropriate role, and then click Save.

    • Full administration: This role has the same privileges as the global admin role for the companies you support

    • Limited administration: This role has the same privileges as the password admin role for the companies you support.

For more information about admin roles and permissions, see Assigning admin roles.

Video: Add tags to notes

Video: Add tags to notes

Your browser does not support video. Install Microsoft Silverlight, Adobe Flash Player, or Internet Explorer 9.

Add a tag (a question or a to-do, for example) to an item (such as text), and then review all of your tags on the Tags Summary pane.

Other videos in this course

This video is part of a training course called Create your first OneNote 2013 notebook.

Use a screen reader to create and send email in Outlook 2016

Use a screen reader to create and send email in Outlook 2016

Use keyboard shortcuts and your screen reader to compose and send an email message in Outlook 2016. Type a simple message, add special formatting, or paste in content from other Office apps.

Note: This topic assumes that JAWS users have turned off the Virtual Ribbon Menu feature.

Create a new email message

  1. In the Outlook 2016 Inbox, to open a new message, press Alt, H, and then N. The focus is in the To… field. You hear "Untitled message." (JAWS does not announce the To: field. In Narrator, you hear "To, Editing.")

  2. Address your message.

    If you know the email address that you want to use, type it in the box. Otherwise, take these steps to search your Outlook address book:

    Note: If there are no results, you hear a message that tells you to try your search again. To try a new search, press Shift+Tab until you hear "Search colon edit."

    • Press Shift+Tab until you hear "To button."

    • To launch the Global Address List box, press Enter. You hear "Select Names: Global Address List." The focus is in the Search field.

    • To choose a different address list, press Shift+Tab until you hear "Address book combo box."

    • To select an address book, press the Down Arrow key. Press the Tab key until you get back to the Search field.

    • Type part of the person's name. This brings up a list of email addresses that contain those letters.

    • Press the Tab key. You hear "Extended select list box" plus the first item in the list. Narrator says, "Selected," plus the first item in the list.

    • To select the recipient of the message, use the arrow keys and press Enter. This places the name you selected in the Global Address List box in the To: field. The focus is back in the Global Address List box in the Search field. You hear "Search colon text."

  3. Press the Tab key until you hear "Subject, Edit."

  4. Type the subject, and press Enter. The focus is in the message area. You hear "Message, Edit."

  5. Type your message.

  6. To get to the Send button, press Shift+Tab. To send the message, press Enter.

More information

Create a form that contains a subform

Create a form that contains a subform

When you are working with relational data (related data that is stored in separate tables), you often need to view data from multiple tables or queries on the same form. For example, you might want to see a customer record from one table and information about that customer's orders from another table at the same time. Subforms are a convenient tool for doing this, and Microsoft Access provides several ways to help you create them quickly.

In this article

Overview of subforms

Create or add a subform

Create a form that contains a subform by using the Form Wizard

Add one or more subforms to an existing form by using the SubForm Wizard

Create a subform by dragging one form onto another

Change the default view of a subform

Add related data to a form without creating a subform

Example: Add a linked PivotTable query to a form

Overview of subforms

A subform is a form that is inserted in another form. The primary form is called the main form. A form/subform combination is sometimes referred to as a hierarchical form, a master/detail form, or a parent/child form.

Subforms are especially effective when you want to show data from tables or queries that have a one-to-many relationship. A one-to-many relationship is an association between two tables in which the primary key value of each record in the primary table corresponds to the value in the matching field or fields of many records in the related table. For example, you can create a form that displays employee data, and contains a subform that displays each employee's orders. The data in the Employees table is the "one" side of the relationship. The data in the Orders table is the "many" side of the relationship (each employee can have more than one order).

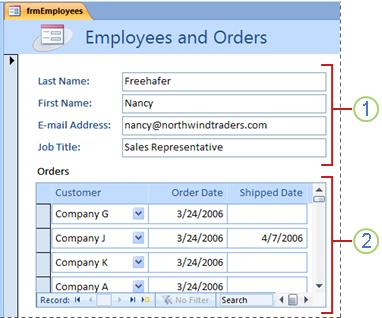
A form that contains a subform

The main form shows data from the "one" side of the relationship.

The subform shows data from the "many" side of the relationship.

The main form and subform are linked so that the subform displays only records that are related to the current record in the main form. For example, when the main form displays Nancy Freehafer's information, the subform displays only her orders. If the form and subform were unlinked, the subform would display all the orders, not just Nancy's.

The following table defines some of the terminology that is associated with subforms. Access will handle most of the details if you use the procedures in this article, but it is helpful to know what is occurring behind the scenes if you need to make modifications later.

Term

Definition

Subform control

The control that embeds a form into a form. You can think of the subform control as a "view" of another object in your database, whether it is another form, a table, or a query. The subform control provides properties which allow you to link the data displayed in the control to the data on the main form.

Source Object property

The property of the subform control that determines what object is displayed in the control.

Datasheet

A simple display of data in rows and columns, much like a spreadsheet. The subform control displays a datasheet when its source object is a table or query, or when its source object is a form whose Default View property is set to Datasheet. In these cases, the subform is sometimes referred to as a datasheet or subdatasheet instead of as a subform.

Link Child Fields property

The property of the subform control that specifies which field or fields in the subform link the subform to the main form.

Link Master Fields property

The property of the subform control that specifies which field or fields on the main form link the main form to the subform.

Notes: 

  • For best results, establish table relationships before following the procedures in this article. This enables Access to automatically create the links between subforms and main forms. To view, add, or modify relationships between the tables in your database, on the Database Tools tab, in the Show/Hide group, click Relationships. For more information about how to create relationships, see the links in the See Also section.

  • When a subform control has a form as its source object, it contains the fields that you place on the form, and it can be viewed as a single form, continuous form, or datasheet. One advantage of basing a subform on a form object is that you can add calculated fields to the subform, such as [Quantity] * [Unit price].

  • You can insert a datasheet or pivot view into a form by creating a subform control whose source object is a table or query. For more information, see the section Add related data to a form without creating a subform.

Top of Page

Create or add a subform

Use the following table to determine which procedure is most appropriate for your situation.

Scenario

Recommended procedure

You want Access to create both a main form and a subform, and to link the subform to the main form.

Create a form that contains a subform by using the Form Wizard

You want to use an existing form as the main form, but you want Access to create a new subform and add it to the main form.

Add one or more subforms to an existing form by using the Subform Wizard

You want to use an existing form as the main form, and you want to add one or more existing forms to that form as subforms.

Create a subform by dragging one form onto another

Create a form that contains a subform by using the Form Wizard

Important:  Forms that you create by using the Form Wizard are not compatible with the Publish to Access Services feature. However, you can still use the forms when you have the database open in the Access program.

This procedure creates a new form and subform combination by using the Form Wizard. This is also the quickest way to get started if you have not already created the forms that you want to use as the main form or the subform.

  1. On the Create tab, in the Forms group, click Form Wizard.

Note:  If you are working in a web database, the Form Wizard command is located under Client Forms.

  1. On the first page of the wizard, in the Tables/Queries drop-down list, select a table or query. For this example, to create an Employees form that displays orders for each employee in a subform, we will select Table: Employees (the "one" side of the one-to-many relationship).

Note:  It does not matter which table or query you choose first.

  1. Double-click the fields that you want to include from this table or query.

  2. On the same page of the wizard, in the Tables/Queries drop-down list, select another table or query from the list. For this example, we will select the Orders table (the "many" side of the one-to-many relationship).

  3. Double-click the fields that you want to include from this table or query.

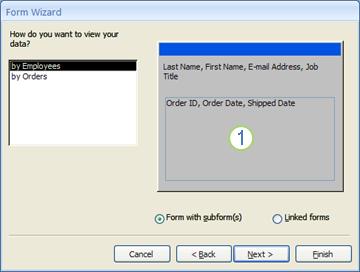
  4. When you click Next, assuming that you set up the relationships correctly before you started the wizard, the wizard asks How do you want to view your data? - that is, by which table or query. Select the table on the "one" side of the one-to-many relationship. For this example, to create the Employees form, we will click by Employees. The wizard displays a small diagram of a form. The page should resemble the following illustration:

    The subform page of the Form Wizard

    The box in the lower portion of the form diagram represents the subform.

Note:  If the wizard does not ask How do you want to view your data?, that means that Access did not detect a one-to-many relationship between the tables or queries that you selected. The wizard will continue, but Access will not add a subform to the form. You might want to click Cancel and examine your table relationships before you continue. Find links to more information about relationships in the See Also section.

  1. At the bottom of the wizard page, select Form with subform(s), and then click Next.

  2. On the What layout would you like for your subform? page, click the layout option that you want, and then click Next. Both layout styles arrange the subform data in rows and columns, but a tabular layout is more customizable. You can add color, graphics, and other formatting elements to a tabular subform, whereas a datasheet is more compact, like the datasheet view of a table.

  3. On the last page of the wizard, type the titles that you want for the forms. Access names the forms based on the titles that you type, and labels the subform based on the title that you type for the subform.

  4. Specify whether you want to open the form in Form view, so that you can view or enter information, or in Design view, so that you can modify its design, and then click Finish.

    Access creates two forms - one for the main form that contains the subform control, and one for the subform itself.

Top of Page

Add one or more subforms to an existing form by using the SubForm Wizard

Use this procedure to add one or more subforms to an existing form. For each subform, you can choose to have Access create a new form or use an existing form as the subform.

  1. Right-click the existing form in the Navigation Pane, and then click Design View .

  2. On the Design tab, in the Controls group, click the down-arrow to display the Controls gallery, and ensure that Use Control Wizards is selected.

  3. On the Design tab, in the Controls gallery, click the Subform/Subreport button.

  4. Click on the form where you want to place the subform.

  5. Follow the directions in the wizard.

When you click Finish, Access adds a subform control to your form. If you chose to have Access create a new form for the subform instead of using an existing form, Access creates the new form object and adds it to the Navigation Pane.

Create a subform by dragging one form onto another

Use this procedure if you want to use an existing form as a main form, and you want to add one or more existing forms to that form as subforms.

  1. In the Navigation Pane, right-click the form that you want to use as the main form, and then click Layout View.

  2. Drag the form that you want to use as the subform from the Navigation Pane onto the main form.
    Access adds a subform control to the main form and binds the control to the form that you dragged from the Navigation Pane. Access also tries to link the subform to the main form, based on the relationships that have been defined in your database.

  3. Repeat this step to add any additional subforms to the main form.

  4. To verify that the linking was successful, on the Home tab, in the Views group, click View, click Form View, and then use the main form's record selector to advance through several records. If the subform filters itself correctly for each employee, then the procedure is complete.

If the previous test does not work, Access was unable to determine how to link the subform to the main form, and the Link Child Fields and Link Master Fields properties of the subform control are blank. You must set these properties manually by doing the following:

  1. Right-click the main form in the Navigation Pane, and then click Layout View.

  2. Click the subform control one time to select it.

  3. If the Property Sheet task pane is not displayed, press F4 to display it.

  4. In the Property Sheet, click the Data tab.

  5. Click the Build button Button image next to the Link Child Fields property box.

    The Subform Field Linker dialog box appears.

  6. In the Master Fields and Child Fields drop-down lists, select the fields that you want to link the forms with, and then click OK. If you are not sure which fields to use, click Suggest to have Access try to determine the linking fields.

    Tip:  If you do not see the field that you want to use to link the forms, you might need to edit the record source of the master form or child form to help make sure that the linking field is in it. For example, if the form is based on a query, you should make sure that the linking field is present in the query results.

  7. Save the main form, switch to Form view, and then verify that the form works as expected.

Top of Page

Change the default view of a subform

Note:  The procedure in this section does not apply to forms that are compatible with Access Services.

When you add a subform to a form, the subform/subreport control displays the subform according to the subform's Default View property. This property can be set to the following values:

  • Single Form

  • Continuous Forms

  • Datasheet

  • PivotTable

  • PivotChart

  • Split Form

When you first create a subform, this property may be set to Continuous Forms or perhaps Single Form. However, if you set the Default View property of a subform to Datasheet, then the subform will display as a datasheet on the main form.

To set the Default View property of a subform:

  1. Close any open objects.

  2. In the Navigation Pane, right-click the subform and then click Layout View.

  3. If the Property Sheet is not already displayed, press F4 to display it.

  4. In the drop-down list at the top of the Property Sheet, make sure Form is selected.

  5. On the Format tab of the Property Sheet, set the Default View property to the view you want to use.

Note:  If the view you want to use is not in the list, make sure the "Allow…View" property for the view is set to Yes. For example, if you want to specify Datasheet as the default view for the form, make sure that the Allow Datasheet View property is set to Yes.

  1. Save and close the subform, and then open the main form to check the results.

Top of Page

Add related data to a form without creating a subform

Note:  The procedure in this section does not apply to forms that are compatible with Access Services.

It is not always necessary to create a separate form object to display related data. For example, if you are working on a form in Layout view or Design view and you drag a table or query from the Navigation Pane to the form, Access creates a subform/subreport control that displays the data in that object. The object's Default View property determines how the data is displayed. Usually, this is set to Datasheet view, but you can also set the Default View property of a table or query to PivotTable or PivotChart, giving you more flexibility in displaying related data on forms.

Note:  Changing the Default View property for a table or query determines how it is displayed whenever it is opened, whether you open it from the Navigation Pane or view it in a subform/subreport control. Because changing the view settings for a table can sometimes cause confusion when opening the table from the Navigation Pane, we recommend using a query for this procedure instead of a table.

Example: Add a linked PivotTable query to a form

Suppose that you have a main form that displays salesperson information, and you want to add a linked PivotTable to the form that summarizes each salesperson's sales across several regions and time periods. The general process would be as follows:

  1. Create the main form that displays the salesperson information.

  2. Create a query that contains the sales information. In this example, the query would likely contain the dollar amount, region, date, and the salesperson ID.

  3. If the Property Sheet is not already displayed, press F4 to display it.

  4. Click in a blank area above the query grid to make the Property Sheet display Query Properties.

  5. On the Format tab of the Property Sheet, set the Default View property to PivotTable. Also, set the Allow PivotTable View property to Yes.

  6. On the Home tab, in the Views group, click View, and then click PivotTable View.

  7. Create the PivotTable view to display the information the way you want it.
    For more information about creating a PivotTable view, see the video Pivot your data in Access.

  8. Save and close the query.

  9. In the Navigation Pane, right-click the main form and then click Layout View.

  10. Drag the PivotTable query from the Navigation Pane to the form.

  11. Select the subform/subreport control that contains the PivotTable.

  12. If the Property Sheet is not already displayed, press F4 to display it.

  13. On the Data tab of the Property Sheet, make sure that the Link Master Fields and Link Child Fields properties are set correctly. In this example, the ID of the salesperson defines the relationship between the salesperson table and the sales table.

  14. Save the main form, and then switch to Form view.
    As you move from one salesperson record to the next, the PivotTable should change to reflect each salesperson's sales data.

Top of Page