Sunday, February 27, 2022

Add branching logic to a survey

You can add branching logic to a survey so that the survey changes according to the responses to specific questions. In a survey that branches, questions appear only if they apply to someone's situation. If the questions don't apply, the person can answer a different set of questions or skip that set of questions.

For more info on creating surveys, see Create a survey. To see how to delete existing response data without deleting the survey, see Delete all data from an existing survey.

Add branching logic to a survey question

Before you begin adding branching logic, create your survey and enter all the questions that you want.

  1. If the survey is not already open, select its name on the Quick Launch.

    If the name of your survey does not appear, select Settings Office 365 Settings button, and then select View Site Contents.

    If the name of your survey does not appear, select Settings  Office 365 Settings button, then select Site Content, or select Site Actions  Site Actions MenuView All Site Content, and then select the name of your survey.

  2. Locate the survey, point to it, and select the survey title.

  3. On the Settings menu, select Survey Settings.
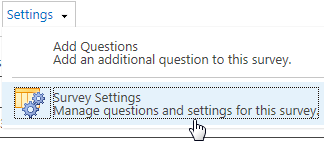
    Survey settings

  4. Under Questions, select the question to which you want to add branching logic.

  5. Under Branching Logic, for each possible response to the question, select the question that you want to branch to.

    For example, if someone answers Yes to a question about home ownership, you might branch to the next question that is about owning a home. If someone answers No to the question, you may want to skip forward to a question that follows the home ownership questions. Some question types have a single Jump to option, which means that regardless of the response, the user should jump to the specified question. Question types such as Choice and Yes/No allow users to specify a branching option for each possible answer.

  6. Select OK.

  7. To insert additional branches to your survey, repeat steps 3-5.

    Notes: 

    • You cannot specify a branching option for each possible answer for Choice question types with the Checkboxes (allow multiple selections) display option. For this question type, you can only choose a single Jump to option.

    • If you want to change the order of the questions in your survey, you should first evaluate any impact on the branching. If you reorder a survey so that the question that followed the branching logic is now before the question that contains the branching logic, the branching logic will be removed. A question can only branch to questions that follow it.

SharePoint surveys don't allow you to end a survey before the last question. However, if you create a final question, such as thanking the participant and offering a comments field, you then create a branch to the final question from the questions where you want to exit the survey.

When you add branching logic to a survey, you can ensure that only the relevant questions are displayed to the appropriate respondents.

By default, every question in a survey appears in numerical order, but you can enable questions to be skipped if they don't apply, or make multiple sets of questions appear, based on the response to a branching question.

For example, you may want to direct questions about home renovations and repairs only to people who already own homes. You can ask people if they own a home, and if the answer is Yes, the questions about painting, flooring, and so on appear. If the answer is No, the survey can skip to the next set of questions.
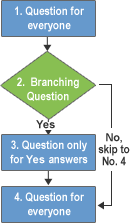
survey branching logic

You can offer multiple sets of questions and use more complex branching to guide people through your survey. For example, you can display questions about current home loans to people who already own homes, and display questions about leasing and renting to people who don't own homes. The following image shows the logic for multiple branches.
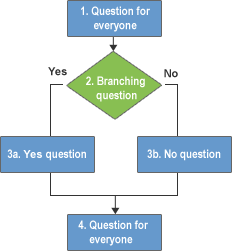
Branching logic for surveys

You can make the survey jump to another question, regardless of the answer. This returns people from a branch of a survey to the main part of the survey, if the survey has multiple branches. The following image shows how to implement the logic for multiple branches.
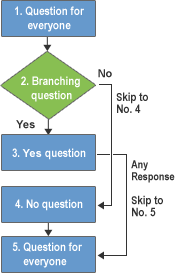
Implementation of survey logic

To create a survey, you start by determining the logic that you want to use for the branching. You may want some questions to appear only if someone chooses a specific answer to a question, or you may want to offer two or more sets of questions based on the answer.

If your survey is large or complex, consider sketching out the questions and their logic first. After that, you create the survey, add your questions, and then specify where and how the survey branches.

To cause a survey to branch, you can use a branching question. The branching question determines which additional questions appear, based on the person's response to the branching question. When you add branching logic to a question, a page break is automatically inserted between the branching question and the remaining questions.

Note: If you want to change the order of the questions in your survey, you should first evaluate any impact on the branching. If you reorder a survey so that the question that followed the branching logic is now before the question that contains the branching logic, the branching logic will be removed. A question can only branch to questions that follow it.

Leave us a comment

Was this article helpful? If so, please let us know at the bottom of this page. If it wasn't helpful, let us know what was confusing or missing. Please be as specific as you can, such as version of SharePoint, operating system, and the browser you're using. We'll use your feedback to double-check the steps, correct issues, and update this article.

Use a formula in a word or outlook table

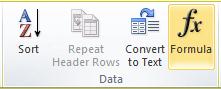
You can perform calculations and logical comparisons in a table by using formulas. The Formula command is found on the Table Tools, Layout tab, in the Data group.

The Data group of the Table Tools Layout tab on the Word 2010 ribbon

A formula in Word automatically updates when you open the document that contains the formula. You can also update a formula result manually. For more information, see the section Update formula results.

Note:  Formulas in Word or Outlook tables are a type of field code. For more information about field codes, see the See Also section.

In this article

Insert a formula in a table cell

  1. Select the table cell where you want your result. If the cell is not empty, delete its contents.

  2. On the Table Tools, Layout tab, in the Data group, click Formula.

  3. Use the Formula dialog box to create your formula. You can type in the Formula box, select a number format from the Number Format list, and paste in functions and bookmarks using the Paste Function and Paste Bookmark lists.

Update formula results

In Word, the result of a formula is calculated when it is inserted, and when the document containing the formula opens. In Outlook, the result of a formula is only calculated when it is inserted and won't be available for the recipient of the email to edit.

You can also manually update:

  • The result of one or more specific formulas

  • The results of all formulas in a specific table

  • All the field codes in a document, including formulas

Update the result of specific formulas

  1. Select the formulas that you want to update. You can select multiple formulas by holding down the CTRL key while you make selections.

  2. Do one of the following:

    • Right-click the formula, then click Update field.

    • Press F9.

Update all the formula results in a table

  • Select the table that contains formula results that you want to update, and then press F9.

Update all the formulas in a document

Important:  This procedure updates all the field codes in a document, not just formulas.

  1. Press CTRL+A.

  2. Press F9.

Examples: Sum numbers in a table by using positional arguments

You can use positional arguments (LEFT, RIGHT, ABOVE, BELOW) with these functions:

  • AVERAGE

  • COUNT

  • MAX

  • MIN

  • PRODUCT

  • SUM

As an example, consider the following procedure for adding numbers by using the SUM function and positional arguments.

Important:  To avoid an error while summing in a table by using positional arguments, type a zero (0) in any empty cell that will be included in the calculation.

  1. Select the table cell where you want your result. If the cell is not empty, delete its contents.

  2. On the Table Tools, Layout tab, in the Data group, click Formula.

  3. In the Formula dialog box, do one of the following:

To add the numbers…

Type this in the Formula box

Above the cell

=SUM(ABOVE)

Below the cell

=SUM(BELOW)

Above and below the cell

=SUM(ABOVE,BELOW)

Left of the cell

=SUM(LEFT)

Right of the cell

=SUM(RIGHT)

Left and right of the cell

=SUM(LEFT,RIGHT)

Left of and above the cell

=SUM(LEFT,ABOVE)

Right of and above the cell

=SUM(RIGHT,ABOVE)

Left of and below the cell

=SUM(LEFT,BELOW)

Right of and below the cell

=SUM(RIGHT,BELOW)

  1. Click OK.

Available functions

Note:  Formulas that use positional arguments (e.g., LEFT) do not include values in header rows.

The following functions are available for use in Word and Outlook table formulas:

Function

What it does

Example

Returns

ABS()

Calculates the absolute value of the value inside the parentheses

=ABS(-22)

22

AND()

Evaluates whether the arguments inside the parentheses are all TRUE.

=AND(SUM(LEFT)<10,SUM(ABOVE)>=5)

1, if the sum of the values to the left of the formula (in the same row) is less than 10 and the sum of the values above the formula (in the same column, excluding any header cell) is greater than or equal to 5; 0 otherwise.

AVERAGE()

Calculates the average of items identified inside the parentheses.

=AVERAGE(RIGHT)

The average of all values to the right of the formula cell, in the same row.

COUNT()

Calculates the count of items identified inside the parentheses.

=COUNT(LEFT)

The number of values to the left of the formula cell, in the same row.

DEFINED()

Evaluates whether the argument inside the parentheses is defined. Returns 1 if the argument has been defined and evaluates without error, 0 if the argument has not been defined or returns an error.

=DEFINED(gross_income)

1, if gross_income has been defined and evaluates without error; 0 otherwise.

FALSE

Takes no arguments. Always returns 0.

=FALSE

0

IF()

Evaluates the first argument. Returns the second argument if the first argument is true; returns the third argument if the first argument is false.

Note:  Requires exactly three arguments.

=IF(SUM(LEFT)>=10,10,0)

10, if the sum of values to the left of the formula is at least 10; 0 otherwise.

INT()

Rounds the value inside the parentheses down to the nearest integer.

=INT(5.67)

5

MAX()

Returns the maximum value of the items identified inside the parentheses.

=MAX(ABOVE)

The maximum value found in the cells above the formula (excluding any header rows).

MIN()

Returns the minimum value of the items identified inside the parentheses.

=MIN(ABOVE)

The minimum value found in the cells above the formula (excluding any header rows).

MOD()

Takes two arguments (must be numbers or evaluate to numbers). Returns the remainder after the second argument is divided by the first. If the remainder is 0 (zero), returns 0.0

=MOD(4,2)

0.0

NOT()

Takes one argument. Evaluates whether the argument is true. Returns 0 if the argument is true, 1 if the argument is false. Mostly used inside an IF formula.

=NOT(1=1)

0

OR()

Takes two arguments. If either is true, returns 1. If both are false, returns 0. Mostly used inside an IF formula.

=OR(1=1,1=5)

1

PRODUCT()

Calculates the product of items identified inside the parentheses.

=PRODUCT(LEFT)

The product of multiplying all the values found in the cells to the left of the formula.

ROUND()

Takes two arguments (first argument must be a number or evaluate to a number; second argument must be an integer or evaluate to an integer). Rounds the first argument to the number of digits specified by the second argument. If the second argument is greater than zero (0), first argument is rounded down to the specified number of digits. If second argument is zero (0), first argument is rounded down to the nearest integer. If second argument is negative, first argument is rounded down to the left of the decimal.

=ROUND(123.456, 2)

=ROUND(123.456, 0)

=ROUND(123.456, -2)

123.46

123

100

SIGN()

Takes one argument that must either be a number or evaluate to a number. Evaluates whether the item identified inside the parentheses if greater than, equal to, or less than zero (0). Returns 1 if greater than zero, 0 if zero, -1 if less than zero.

=SIGN(-11)

-1

SUM()

Calculates the sum of items identified inside the parentheses.

=SUM(RIGHT)

The sum of the values of the cells to the right of the formula.

TRUE()

Takes one argument. Evaluates whether the argument is true. Returns 1 if the argument is true, 0 if the argument is false. Mostly used inside an IF formula.

=TRUE(1=0)

0

Use bookmarknames or cell references in a formula

You can refer to a bookmarked cell by using its bookmarkname in a formula. For example, if you have bookmarked a cell that contains or evaluates to a number with the bookmarkname gross_income, the formula =ROUND(gross_income,0) rounds the value of that cell down to the nearest integer.

You can also use column and row references in a formula. There are two reference styles: RnCn and A1.

Note:  The cell that contains the formula is not included in a calculation that uses a reference. If the cell is part of the reference, it is ignored.

RnCn references

You can refer to a table row, column, or cell in a formula by using the RnCn reference convention. In this convention, Rn refers to the nth row, and Cn refers to the nth column. For example, R1C2 refers to the cell that is in first row and the second column. The following table contains examples of this reference style.

To refer to…

…use this reference style

An entire column

Cn

An entire row

Rn

A specific cell

RnCn

The row that contains the formula

R

The column that contains the formula

C

All the cells between two specified cells

RnCn:RnCn

A cell in a bookmarked table

Bookmarkname RnCn

A range of cells in a bookmarked table

Bookmarkname RnCn:RnCn

A1 references

You can refer to a cell, a set of cells, or a range of cells by using the A1 reference convention. In this convention, the letter refers to the cell's column and the number refers to the cell's row. The first column in a table is column A; the first row is row 1. The following table contains examples of this reference style.

To refer to…

…use this reference

The cell in the first column and the second row

A2

The first two cells in the first row

A1,B1

All the cells in the first column and the first two cells in the second column

A1:B2

Last updated 2015-8-29

See Also

Field codes in Word and Outlook

Use a screen reader to change the indentation and spacing options in outlook

Decorative icon. Screen reader content

This article is for people with visual impairments who use a screen reader program with Office products and is part of the Office Accessibility content set. For more general help, see Microsoft Support home.

Use Outlook with Narrator, the built-in Windows screen reader, to add space before and after each paragraph and create indents. You can create an indent only in the first line of a paragraph, or create a hanging indent, in which the first line of the paragraph is not indented, but subsequent lines are. Additionally, you can change the line spacing for a paragraph.

Notes: 

  • New Microsoft 365 features are released gradually to Microsoft 365 subscribers, so your app might not have these features yet. To learn how you can get new features faster, join the Office Insider program.

  • This topic assumes that you are using the built-in Windows screen reader, Narrator. To learn more about using Narrator, go to Complete guide to Narrator.

In this topic

Add paragraph spacing

  1. When composing an email, select the paragraphs where you want to add spacing.

    Tip: To select a paragraph, in the message body, swipe up or down on the screen with one finger until you hear "Paragraphs," swipe left or right to browse to the paragraph you want to select, and then triple-tap the screen. After selecting the paragraph, swipe up or down on the screen with one finger until you hear: "Items."

  2. Swipe right with one finger until you hear: "More Options button, button collapsed, double-tap to expand." Double-tap the screen. The More Options menu expands. You hear: "Discard, button."

  3. Swipe right until you hear "Format," and then double-tap the screen. The Format menu opens.

  4. To open the Line & Paragraph Spacing submenu, swipe right until you hear "Line and paragraph spacing, button collapsed," and double-tap the screen.

  5. Do one of the following:

    • To add space before a paragraph, swipe right until you hear "Add space before paragraph, button," and double-tap the screen.

    • To add space after a paragraph, swipe right until you hear "Add space after a paragraph," and then double-tap the screen.

  6. After you select an option, the space is added before or after the paragraph and the focus moves to the email message body.

Set line spacing

  1. Select the paragraph where you want to change the line spacing.

  2. Open the Line & Paragraph Spacing submenu. Then swipe right until you hear "Line spacing, button, double-tap to activate," and double-tap the screen. The Line Spacing submenu opens.

  3. Swipe right until you hear the line spacing option you want. To select, double-tap the screen.

Create paragraph indents

Create a special paragraph indent

  1. When composing a message, select the paragraphs in which you want to create the indent.

  2. Swipe right with one finger until you hear: "More Options button, button collapsed, double-tap to expand." Double-tap the screen. The More Options menu expands. You hear: "Discard, button."

  3. Swipe right until you hear "Format," and then double-tap the screen. The Format menu opens.

  4. Swipe right until you hear "Special indent," and double-tap the screen. The Special Indent submenu opens.

  5. Do one of the following:

    • To indent all but the first line of a paragraph, swipe right until you hear "Hanging," and double-tap the screen.

    • To indent only the first line of the paragraph, swipe right until you hear "First line," and double-tap the screen.

  6. After you select an option, the indent is created and the focus moves to the email message body.

Note: All subsequent paragraphs that you type will be indented.

Increase or decrease the indent of an entire paragraph

  1. When composing a message, select the paragraphs you want to indent.

  2. Swipe right with one finger until you hear: "More Options button, button collapsed, double-tap to expand." Double-tap the screen. The More Options menu expands. You hear: "Discard, button."

  3. Swipe right until you hear "Format," and then double-tap the screen. The Format menu opens.

  4. Do one of the following:

    • To add indent to the left, swipe right until you hear "Decrease indent button," and double-tap the screen.

    • To add indent to the right, swipe right until you hear "Increase indent button," and double-tap the screen.

  5. After you select an option, the indent is created and the focus moves to the email message body.

See also

Use a screen reader to align text and paragraphs in Outlook

Use a screen reader to create bulleted or numbered lists in Outlook

Basic tasks using a screen reader with email in Outlook

Use a screen reader to explore and navigate Outlook Mail

Technical support for customers with disabilities

Microsoft wants to provide the best possible experience for all our customers. If you have a disability or questions related to accessibility, please contact the Microsoft Disability Answer Desk for technical assistance. The Disability Answer Desk support team is trained in using many popular assistive technologies and can offer assistance in English, Spanish, French, and American Sign Language. Please go to the Microsoft Disability Answer Desk site to find out the contact details for your region.

If you are a government, commercial, or enterprise user, please contact the enterprise Disability Answer Desk.

Replay ink strokes in onenote for windows 10

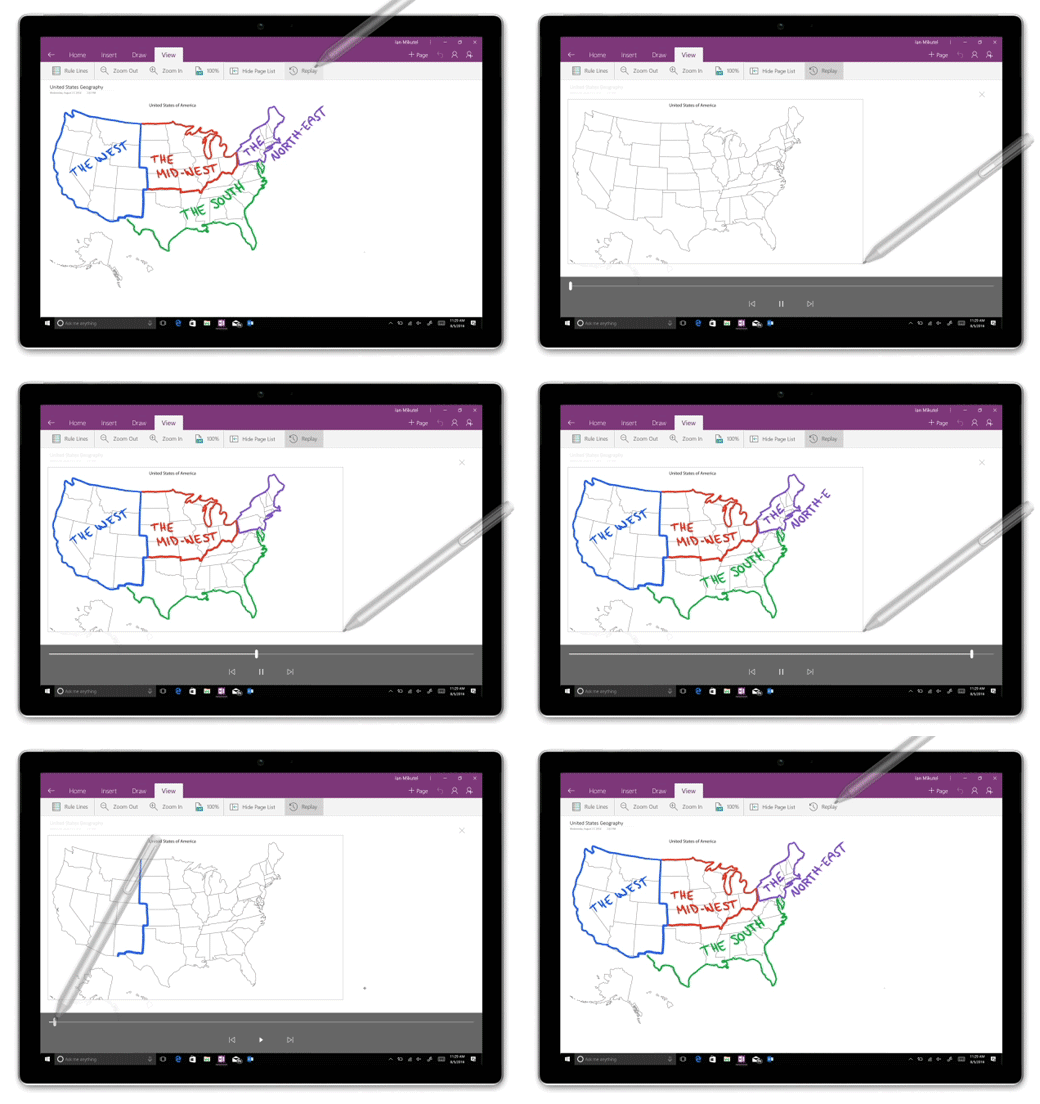
After adding drawings, sketches, and handwritten notes on any page in OneNote for Windows 10, you can easily rewind and replay each ink stroke at any time, allowing others to see how your ideas took shape.


Ink replay in OneNote for Windows 10

Note:  This feature is only available if you have a Microsoft 365 subscription. If you are a Microsoft 365 subscriber, make sure you have the latest version of Office.


To replay your drawings and handwritten ink strokes in OneNote for Windows 10, do the following:

  1. On any page, click or tap the Draw tab.

  2. On the Draw tab, select a pen and a pen color, and then draw, sketch, or handwrite something on the page.

  3. On the View tab, click or tap the Replay button.

  4. When prompted, do one of the following:

    • Drag over your screen to select the part of your drawing or handwriting that you want to replay.

    • To replay all of the drawn or handwritten notes on the current page, click or tap replay everything on the page.

  5. During playback of your ink strokes, use the controls at the bottom of the page to manually step backward or forward in the sequence, to play or pause the sequence from the current frame, or to replay the entire animation. You can also drag the progress bar to any part of the animation that you want to replay.

  6. To exit playback at any time and return to your notes, click or tap the X near the upper right corner of the page, or press the Esc key on your keyboard.

Infopath forms services differences between sharepoint online dvnext mt and sharepoint on premises

Using windows narrator in office for the web

In Windows Narrator, there are a number of tips and tricks that you'll want to be aware of while you're using Office for the web. Here they are, by program.

Note: To get started with Windows Narrator, see Use Windows 8 Narrator with Office 2013.

Word for the web

Navigation. To navigate commands in Word for the web, use Tab, Shift+Tab, and Enter. Use Ctrl+F6 to move the focus between the command ribbon and the content of your document.

Text. In Reading view, tab to the View document in more accessible mode command. Press Enter, and then press Enter again to open the document rendered as a PDF. In Editing view, select the entire document (Ctrl+A). Narrator reads text formatting such as background color, font color, size, and style when you press Caps+0.

Note: Narrator doesn't read formatting such as headers, styles, tables, lists, spelling errors, and alignment.

Hyperlinks. Hyperlinks work, but Narrator does not identify them as links while reading the document.

Rich Media. Narrator reads videos as images. Select content with Shift+Left/Right/Up/Down for Narrator to call out images (using the arrow keys won't work). Narrator reads Alt text for videos and images .

Excel for the web

Navigation. To navigate commands in Excel for the web, use Tab, Shift+Tab, and Enter. Use Ctrl+F6 to move the focus between the command ribbon and the cell grid.

Cell grid. Tab or use arrow keys to move from one cell to another. Select a cell or range for Narrator to read it. Narrator reads text formatting such as background color, font color, size, and style when you press Caps+0.

Sheets: adding, deleting, and renaming tabs. Press Ctrl+F6 until you hear, "Scroll to the first sheet button," then tab to get to the sheet tabs. When focused on a sheet tab, press Shift+F10 to get additional options such as Insert, Delete, Rename, and Hide/Unhide.

Charts: chart type, alt text title and description. Narrator reads charts as images, including the name of the chart and its tooltip, but no other details.

Formulas. Press F2 in a cell, and use Ctrl+A to select the formula.

Comments. Narrator reads a comment after reading the content of a cell.

Hyperlinks. Narrator reads link text and destination after reading the content of a cell.

PivotTables. Tab, use arrow keys, or tap to select a cell in the PivotTable. Then press Ctrl+F6 to open the PivotTable Fields pane. Use the arrow keys to move from one field button to another, and press Enter to select a field. Press Tab to jump to the lower section of the pane, where you use the arrow keys to access the contextual commands. Press Esc to close context menus.

Note: Narrator does not read the following kinds of elements: tables, conditional formatting and slicers, and form controls.

PowerPoint for the web

Navigation. To navigate commands in PowerPoint for the web, use Tab, Shift+Tab, and Enter. Use Ctrl+F6 to move the focus to different parts of the PowerPoint for the web interface (from a slide to the thumbnail pane, for example), and to move in and out of the content of a slide.

Thumbnail pane. Press Ctrl+F6 to switch focus to the thumbnail pane, then tab or use Up/Down arrow keys to move through the slides. To edit the selected slide, Press Ctrl+F6 again: once to go to the slide's speaker notes (if the notes area is open), once again to go to the slide content.

Speaker notes. Press Ctrl+F6 until speaker notes are selected.

Slide text. Narrator reads the type of placeholder and its content. Narrator reads text formatting such as background color, font color, size, and style when you press Caps+0.

SmartArt. Narrator reads the content of the SmartArt. Press Enter to edit SmartArt text.

Slide objects such as shapes, text boxes, images, and charts. Narrator reads text box shapes and information about images.

Comments. Press Ctrl+F6 to move focus to the command ribbon. Tab to View, press Enter, and then tab to Show Comments > Comments Pane. If the command pane is already open, press Ctrl+F6 to move focus to the pane.

Not supported. Narrator does not read slide content in Reading view, Slides Show view, or the Notes pane. Instead, in Reading view, go to File > Help > Accessibility Mode for an outline view that is accessible to screen readers. For many kinds of objects (for example, images, media, and charts), Narrator identifies the object only as "object placeholder." For other kind of objects (such as Office art shapes), Narrator does not read the object at all. For hyperlinks, Narrator reads the link text and destination, but the link is not clickable. Narrator does not read spell-check misspellings.

OneNote for the web

Navigation. To navigate commands in OneNote for the web, use Tab, Shift+Tab, and Enter. Use Ctrl+F6 to move the focus between the command ribbon and the content of your notebook. To move from one note container to another on a page, press Ctrl+A three times, and then use Tab and Shift+Tab to move back and forth among the note containers.

Section and page tabs. Tab through the section and page tabs. To expand or collapse a section, press Enter while the section tab is selected. To jump to the content of a page, press Enter while the page tab is selected. When you go to a password-protected section, press Enter and then type the password.

Search. Tab until you hear, "Empty line," and then type your search.

Text. The easiest way to read a page is to use Ctrl+A to select all the content on the page (press Ctrl+A three times).

Ink (drawings). Narrator reads ink drawings as images.

Not fully supported. Narrator reads the content of a bulleted list or tag with no indication that it is a list of items or a tagged item. Narrator reads the content of the table with no indication of rows or columns.

Sort data using a custom list

With built-in custom lists, you can sort data—either by days of the week or months of the year. Optionally, you can create your own custom lists to sort by any other characteristic that doesn't sort well alphabetically—such as high, medium, and low—or S, M, L, XL.

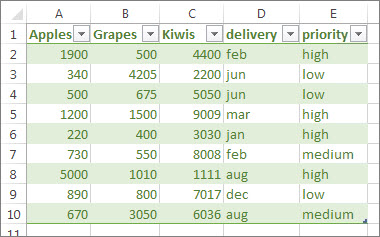
With custom lists, you could sort this worksheet either by Delivery month or by Priority.

Sample table

Sort by days of the week or months of the year with a built-in custom list

Follow these steps:

  1. Select the columns to sort.

    Note: For the best results, each column should have a heading.

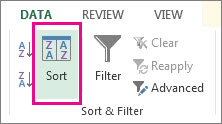
  2. In the ribbon, click Data > Sort.

    Sort button

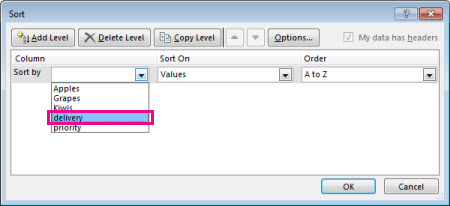
  3. In the Sort popup window, in the Sort by drop-down, choose the column on which you need to sort.

    For example, if you want to re-sort the previous example by delivery date, under Sort by, choose delivery.

    Sort by the delivery column

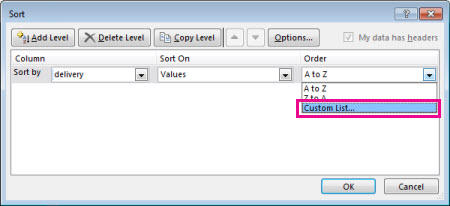
  4. From the Order drop-down, select Custom List.

    Sort dialog box

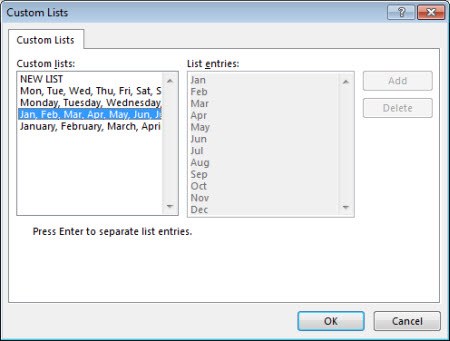
  5. In the Custom Lists box, select the list that you want, and then click OK to sort the worksheet.

    Custom lists dialog box

Create your own custom list

Follow these steps to create your own custom list for sorting:

  1. In a column of a worksheet, type the values to sort by. Arrange them in the order that you want to define the sort order—from top to bottom. For example:

    Custom list example

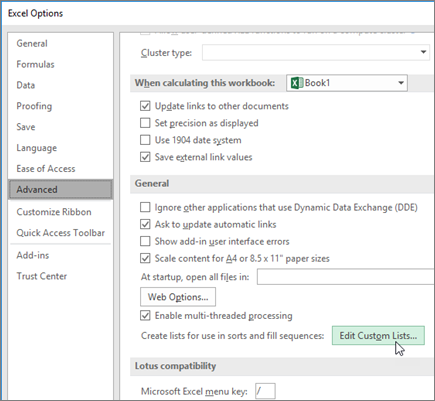
  2. Select all of the cells in that list, and then click File > Options > Advanced.

  3. Scroll way down to the General section and click Edit Custom Lists...

    Edit Custom Lists

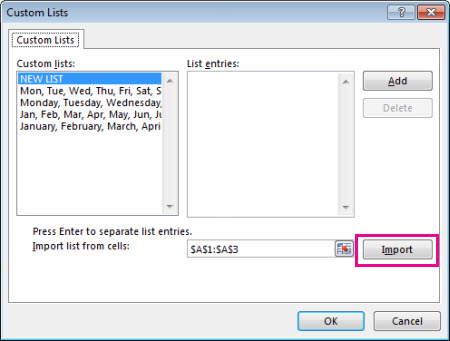
  4. In the Custom Lists box, click Import.

    Import a custom list

Tip: For a short list—such as High, Medium, and Low, it may be faster to enter it directly into the List entries box in the Custom Lists box.

Need more help?

You can always ask an expert in the Excel Tech Community or get support in the Answers community.

Create or delete a custom list for sorting and filling data