Wednesday, May 11, 2022

Make your mail messages and calendar events accessible to people with disabilities

This topic gives you step-by-step instructions to make your email messages and calendar events accessible to people with disabilities.
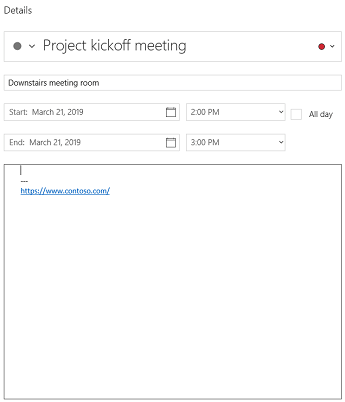
Calendar for Windows 10 event details view

People who are blind or have low vision can understand your email messages and calendar events more easily if you create them with accessibility in mind.

Best practices for making email and calendar events accessible

The following table includes key best practices for creating Mail for Windows 10 email and Calendar for Windows 10 events that are accessible to people with disabilities.

What to fix

Why fix it

How to fix it

Include alternative text with all visuals.

Visual content includes pictures, SmartArt graphics, shapes, groups, charts, embedded objects, ink, and videos.

Alt text helps people who can't see the screen to understand what's important in images and other visuals.

Avoid using text in images as the sole method of conveying important information. If you must use an image with text in it, repeat that text in the document. In alt text, briefly describe the image and mention the existence of the text and its intent.

Add alt text to visuals

Add meaningful hyperlink text.

People who use screen readers sometimes scan a list of links. Links should convey clear and accurate information about the destination. For example, instead of linking to the text Click here, include the full title of the destination page.

Add hyperlink text

Ensure that color is not the only means of conveying information.

People who are blind, have low vision, or are colorblind might miss out on the meaning conveyed by particular colors.

For example, add an underline to color-coded hyperlink text so that people who are colorblind know that the text is linked even if they can't see the color. For headings, consider adding bold or using a larger font.

Use accessible font format

Use sufficient contrast for text and background colors.

The text in your email should be readable in High Contrast mode so that everyone, including people with visual disabilities, can see it well.

For example, use bright colors or high-contrast color schemes on opposite ends of the color spectrum. White and black schemes make it easier for people who are colorblind to distinguish text and shapes.

Use accessible font color

Use a larger font size (11pt or larger), sans serif fonts, and sufficient white space.

People who have dyslexia describe seeing text "swim together" on a page (the compressing of one line of text into the line below). They often see text merge or distort.

For people who have dyslexia or have low vision, reduce the reading load. For example, they may benefit from familiar sans serif fonts such as Arial or Calibri. Avoid using all capital letters and excessive italics or underlines. Include ample white space between paragraphs.

Use accessible font format

Use built-in headings and styles.

To preserve tab order and to make it easier for screen readers to read your email or calendar event, use a logical heading order and the built-in formatting tools in Mail for Windows 10 and Calendar for Windows 10.

For example, organize headings in the prescribed logical order. Use Heading 1, Heading 2, and then Heading 3, rather than Heading 3, Heading 1, and then Heading 2. And, organize the information into small chunks. Ideally, each heading would include only a few paragraphs.

Use accessible font format

Use bulleted list styles

Use ordered lists

Use a simple table structure, and specify column header information.

Screen readers keep track of their location in a table by counting table cells. If a table is nested within another table or if a cell is merged or split, the screen reader loses count and can't provide helpful information about the table after that point. Blank cells in a table could also mislead someone using a screen reader into thinking that there is nothing more in the table.

Screen readers also use header information to identify rows and columns.

Use table headers

Add alt text to visuals

Add alt text to visuals, such as pictures, screenshots, icons, videos, and 3D models, so that screen readers can read the text to describe the visual to users who can't see it.

Note: You cannot add alt text in Calendar for Windows 10.

  1. Select a visual, and then select Picture > Alt Text.

  2. Type the Title and Description to describe the image and its context to someone who cannot see it.
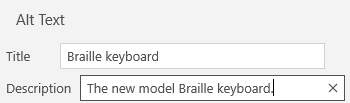
    Mail for Windows 10 alt text dialog

Add hyperlink text

  1. Select the text to which you want to add the hyperlink.

  2. In Mail, select Insert > Link. In Calendar, select Format > Link. The text you selected displays in the Text to display box. This is the hyperlink text.

  3. If necessary, change the hyperlink text. In the Address box, type the destination URL.

Tip: If the title on the hyperlink's destination page gives an accurate summary of what's on the page, use it for the hyperlink text. For example, this hyperlink text matches the title on the destination page: Templates and Themes for Office Online.
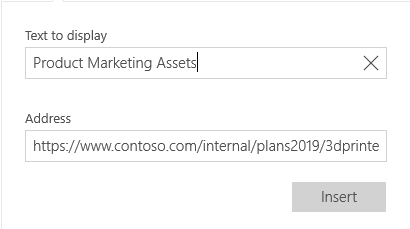
Mail for Windows 10 hyperlink text dialog

Use accessible font format

  1. Select your text.

  2. Select the Format tab.

  3. Select your formatting choices for font type, size, style, and color.

Mail for Windows 10 font formatting options

Use accessible font color

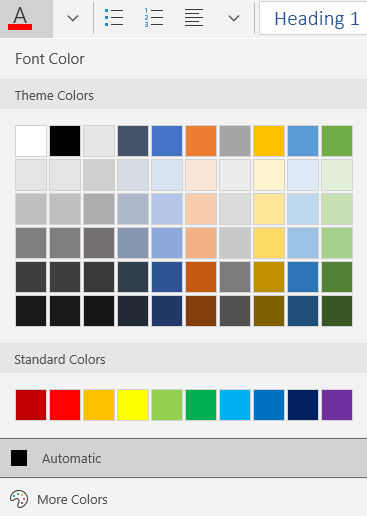
To ensure that text displays well in High Contrast mode, use the Automatic setting for font colors.

Note: You cannot use Automatic font color in Calendar for Windows 10. You should pick high-contrast colors such as black and white manually.

  1. Select your text.

  2. Select the Format tab.

  3. Select the Font Color button.

  4. Select Automatic.

Mail for Windows 10 font color options

Use bulleted list styles

Create bulleted lists by using the Bullets button.

Note:  Calendar for Windows 10 only has one bulleted style.

  1. Position the cursor anywhere in your email.

  2. Select the Format tab.

  3. Select the Bullets button, and select the style you want.

  4. Type each bullet item in the bulleted list.
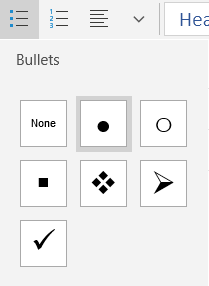
Mail for Windows 10 bulleted list options

Use ordered lists

Create sequential steps by using the Numbering button.

Note:  Calendar for Windows 10 only has one ordered style.

  1. Position the cursor anywhere in your email.

  2. Select the Format tab.

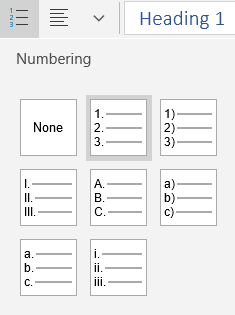
  3. Select the Numbering button, and select the style you want.

  4. Type the sequential steps.

Mail for Windows 10 ordered list options

Use table headers

Specify a header row in a table.

  1. Position the cursor anywhere in a table.

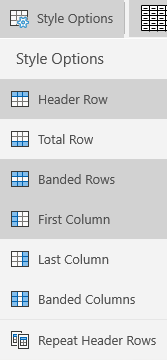
  2. Select Table > Style Options, and then select the Header Row option.

  3. Type your column headings.

Mail for Windows 10 table style options

See also

Rules for the Accessibility Checker

Make your Word documents accessible to people with disabilities

Make your Excel documents accessible to people with disabilities

Make your PowerPoint presentations accessible to people with disabilities

Technical support for customers with disabilities

Microsoft wants to provide the best possible experience for all our customers. If you have a disability or questions related to accessibility, please contact the Microsoft Disability Answer Desk for technical assistance. The Disability Answer Desk support team is trained in using many popular assistive technologies and can offer assistance in English, Spanish, French, and American Sign Language. Please go to the Microsoft Disability Answer Desk site to find out the contact details for your region.

If you are a government, commercial, or enterprise user, please contact the enterprise Disability Answer Desk.

Adjust your audio during a lync meeting

When you join a Lync meeting, you can decide which type of audio to use and, depending on your choice, you'll have different options and audio controls.

Tip:  Check the quality of your audio before a meeting, or when you switch your device. For details, see Set up, test, and troubleshoot Skype for Business (Lync) audio.

If you're using computer audio (mic and speakers):

  • Pause on the phone/mic icon, in the meeting window, to access the controls, and then do any of the following:

  • To help audio quality, click the Mute button if you're not speaking.

    Tip:  To quickly mute your audio, just click the Microphone icon.

  • To put the call on hold, click the Hold Call button.

  • To change your audio device, click the Devices tab, and pick the device you want.

If you used the Call me feature (Lync calls you) or dialed in to the meeting audio with a phone:

  • Press *1 on your phone key pad to access the meeting help system. You can control your audio with the touch-tone commands, such as mute, unmute, and other commands.

Introduction to the outlook calendar

Calendar is the calendar and scheduling component of Outlook that is fully integrated with email, contacts, and other features.

Just as you write in a notebook, you can click any time slot in the Outlook Calendar and start typing. By using the Calendar you can create appointments and events, organize meetings, view group schedules, and much more.

  • Create appointments and events     

    Click any time slot in the Outlook Calendar and start to type to create your appointment or event. You can opt to have a sound or message remind you of appointments, meetings, and events, and you can color items for quick identification.

    For more information, see Create or schedule an appointment and Create an event.

  • Organize meetings    

Select a time on the Calendar, create a meeting request, and select the people to invite. Outlook helps you find the earliest time when all the invitees are free. When you send the meeting request by email, the invitees receive the request in their Inbox. When the invitees open the request, they can accept, tentatively accept, or decline your meeting by clicking a single button. If your request conflicts with an item on the invitees' Calendar, Outlook displays a notification. If you, as the meeting organizer, allow this, invitees can propose an alternative meeting time. As the organizer, you can track who accepts or declines the request or who proposes another time for the meeting by opening the request.

For more information, see Schedule a meeting with other people.

  • View group schedules    

    You can create calendars that show the schedules of a group of people or resources. For example, you can view the schedules of all the people in your department or all the resources, such as conference rooms, in your building. This helps you schedule meetings quickly.

  • View calendars side-by-side    

    You can view side-by-side multiple calendars that you created and also calendars shared by other Outlook users. For example, you can create a separate calendar for your personal appointments and view both your work and personal calendars side-by-side.

    For more information, see View multiple calendars at the same time.

    You can also copy or move appointments between the displayed calendars. Use the Navigation Pane to quickly share your own calendar and open other shared calendars. Depending on the permissions granted by the owner of a calendar, you can create or appointments on shared calendars.

    For more information, see Share an Outlook calendar with other people and Manage another person's mail and calendar items.

  • View calendars on top of one another in overlay view     

    You can use overlay view to display multiple calendars that you created and also calendars shared by other Outlook users. For example, you can create a separate calendar for your personal appointments and overlay your work and personal calendars to quickly see where you have conflicts or free time.

    For more information, see View multiple calendars at the same time.

  • Link to calendars on Microsoft SharePoint sites    

    If you have access to a SharePoint site, you can view the lists of events from that site in your Outlook Calendar. You can change the list in Outlook, even when you are working offline. The changes are automatically synchronized when you connect to the Internet again. Also, you can view the SharePoint calendars side-by-side with other personal or shared calendars.

  • Send calendars to anyone through email    

You can send your calendar to a mail recipient as an Internet Calendar, but keep control over how much information is shared. Your calendar information appears in the body of the email message as an Internet Calendar attachment that the recipient can open in Outlook.

For more information, see Introduction to calendar sharing.

  • Subscribe to Internet Calendars    

    Internet Calendar Subscriptions resemble Internet Calendars, except that the downloaded calendar is synchronized regularly with the Internet Calendar and updated.

  • Manage another user's calendar    

    With the Delegate Access feature, one person can use his or her own copy of Outlook to easily manage another person's calendar. For example, an administrative assistant can manage the calendar of a manager. When the manager designates the assistant as a delegate, the assistant can create, move, or delete appointments and can organize meetings on the manager's behalf.

    For more information, see Manage another person's mail and calendar items.

Call a contact on their work or mobile number

To call someone on their work or mobile number, tap Contacts, find the person in your Contacts list, or type the person's name in the search box. When you find the contact, tap their name, and then tap either their work or mobile number. This will call the person on their work line or mobile phone.

Depending on how you set your VoIP call options, when you make a call it could use Wi-Fi or your cellular data plan. For more information, go to Adjust your data use settings.

Create and print mailing labels for an address list in excel

If you want to send a mass mailing to an address list that you maintain in a Microsoft Excel spreadsheet, you can use a Microsoft Word mail merge. The mail merge process creates a sheet of mailing labels that you can print, and each label on the sheet contains an address from the list.

To create and print the mailing labels, you must first prepare the worksheet data in Excel, and then use Word to configure, organize, review, and print the mailing labels.

Here are some tips to prepare your data for a mail merge. Make sure:

  • Column names in your spreadsheet match the field names you want to insert in your labels.

  • All data to be merged is present in the first sheet of your spreadsheet.

  • Postal code data is correctly formatted in the spreadsheet so that Word can properly read the values.

  • The Excel spreadsheet to be used in the mail merge is stored on your local machine.

  • Changes or additions to your spreadsheet are completed before it's connected to your mail merge document in Word.

Note: You can import information from your Excel spreadsheet by importing information from a comma-separated value (.csv) or a text (.txt) file and use the Text Import Wizard to build a new spreadsheet.
For more information, see Prepare your Excel data source for a Word mail merge.

When the spreadsheet is ready, store it on your computer. Then open Word, and follow the steps to Print labels for your mailing list

Show or hide the ribbon in office

The ribbon is a set of toolbars at the top of the window in Office programs designed to help you quickly find the commands that you need to complete a task. 

Show Ribbon options

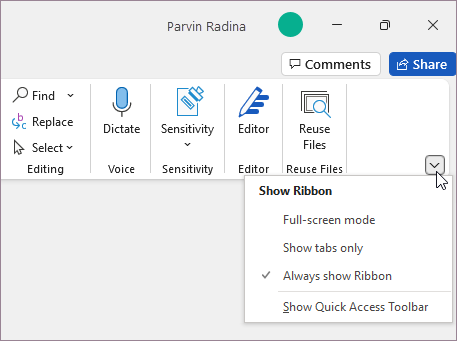
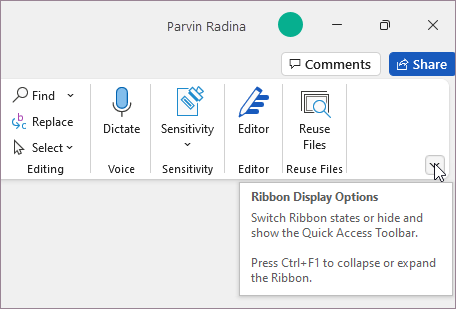
  1. When the ribbon is visible, in the lower-right corner of the ribbon, click the Ribbon Display Options icon.

    Ribbon display options

  2. Choose a state for the ribbon:

  • Full-screen mode hides the ribbon for the best view of your document, and only shows the ribbon when you select More , or press the ALT key.

    Click the More icon

  • Show tabs only shows only the ribbon tabs, so you see more of your document, and you can still quickly switch among the tabs.

  • Always show Ribbon keeps all the tabs and commands on the ribbon visible all the time.

Expand or collapse the ribbon

You can toggle between having the ribbon expanded or collapsed in multiple ways.

If the ribbon is collapsed, expand it by doing do one of the following:

  • Double-click any of the ribbon tabs.

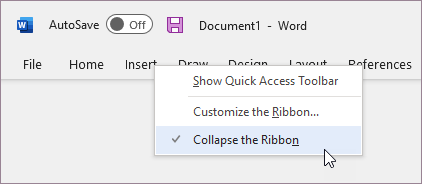
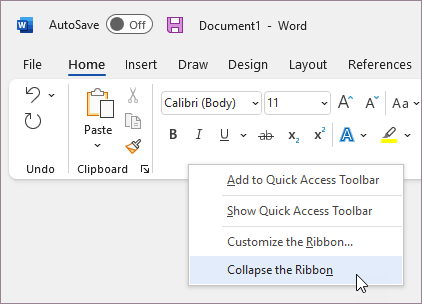
  • Right-click any of the ribbon tabs, and then select Collapse the ribbon.

    Expand the ribbon

  • Press CTRL+F1.

If the ribbon is expanded, collapse it by doing do one of the following:

  • Double-click any of the ribbon tabs.

  • Right-click any of the ribbon tabs, and then select Collapse the ribbon.

    Collapse the ribbon

  • Right-click Ribbon display options in the lower right of the ribbon, and then select Collapse the ribbon.

  • Press CTRL+F1.

If the ribbon isn't visible at all

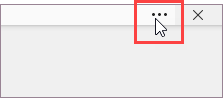
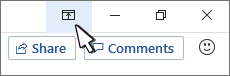
If the ribbon isn't visible at all (no tabs are showing), then you probably have the state set to Full-screen mode. Select More  at the top right of the screen. This will temporarily restore the ribbon.

Click the More icon

When you return to the document, the ribbon will be hidden again. To keep the ribbon displayed, select a different state from the Ribbon Display Options menu.

Ribbon display options menu

The ribbon is a set of toolbars at the top of the window in Office programs designed to help you quickly find the commands that you need to complete a task.

Show Ribbon options

  1. At the top-right corner, select the Ribbon Display Options icon Ribbon icon.

    Show or Hide ribbon
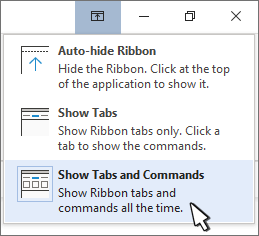
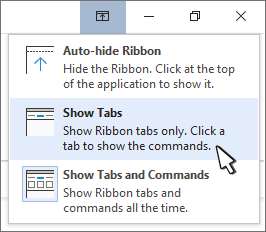
  2. Choose an option for the ribbon:

    • Show Tabs and Commands keeps all the tabs and commands on the ribbon visible all the time.

    • Show tabs shows only the ribbon tabs, so you see more of your document, and you can still quickly switch among the tabs.

    • Auto-Hide ribbon hides the ribbon for the best view of your document, and only shows the ribbon when you select More  , or press the ALT key.

Collapse the ribbon or expand it again

Double-click any of the ribbon tabs or press CTRL+F1 to collapse the ribbon if you need to see more of your document.

To see the ribbon again, just double-click any ribbon tab, or press CTRL+F1.

If the ribbon isn't visible at all

If the ribbon isn't visible at all (no tabs are showing), then you probably have it set to Auto-hide. Select More  at the top right of the screen. This will temporarily restore the ribbon.

The Ribbon more button

When you return to the document, the ribbon will be hidden again. To keep the ribbon displayed, select one of the Show options above.

See also

Customize the ribbon in Office

Important:  Office 2010 is no longer supported. Upgrade to Microsoft 365 to work anywhere from any device and continue to receive support.

Upgrade now

Minimize the ribbon

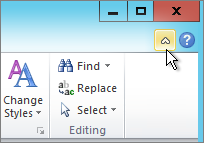
You can minimize the ribbon if you need to see more of the document you are creating. To collapse the ribbon, select the Minimize the Ribbon arrow at the top right.

To see the ribbon again, select the arrow again.

See also

Customize the ribbon in Office

The ribbon is a set of toolbars at the top of the window in Office programs designed to help you quickly find the commands that you need to complete a task.

Show ribbon options  

  1. At the right corner of the ribbon, select the Ribbon Display Options icon Dropdown arrow for ribbon options.

    Note: If you don't see the ribbon or the Ribbon Display Options icon, it may be hidden. Move your cursor to the top of the browser window to make the ribbon appear as well as the icon.

  2. Choose an option in the menu:

  Menu for changing the menu in Microsoft 365.

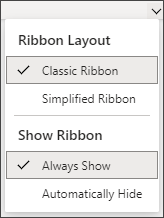
  • Classic Ribbon displays the full ribbon you may be used to from previous versions of Office.

  • Simplified Ribbon displays a more compact version that takes up less space.

  • Always Show will always have the ribbon visible.

  • Automatically Hide will hide the ribbon until you move your cursor to the top and it will reappear.

    Notes: 

    • For keyboard users, you can use CTRL + F6 or WIN + ALT to invoke the ribbon.

    • For touch users, simply scroll back up or tap the title bar to bring it back. Scrolling up and down quickly will also trigger showing and hiding the ribbon.

See also

Customize the ribbon in Office

Create or modify tables or indexes by using a data definition query

You can create and modify tables, constraints, indexes and relationships in Access by writing data-definition queries in SQL view. This article explains data-definition queries and how to use them to create tables, constraints, indexes, and relationships. This article can also help you to decide when to use a data-definition query.

In this article

Overview

Unlike other Access queries, a data-definition query does not retrieve data. Instead, a data-definition query uses Data Definition Language to create, modify, or delete database objects.

Note: Data Definition Language (DDL) is part of Structured Query Language (SQL).

Data-definition queries can be very convenient. You can regularly delete and re-create parts of your database schema merely by running some queries. Consider using a data-definition query if you are familiar with SQL statements and you plan to delete and re-create particular tables, constraints, indexes or relationships.

Warning: Using data-definition queries to modify database objects can be risky, because the actions are not accompanied by confirmation dialog boxes. If you make a mistake, you can lose data or inadvertently change the design of a table. Be careful when you use a data-definition query to modify objects in your database. If you are not responsible for maintaining the database that you are using, you should consult with the administrator of the database before running a data-definition query.

Important: Make a backup copy of any tables involved before you run a data-definition query.

DDL keywords

Keyword

Use

CREATE

Create an index or table that does not already exist.

ALTER

Modify an existing table or column.

DROP

Delete an existing table, column, or constraint.

ADD

Add a column or a constraint to a table.

COLUMN

Use with ADD, ALTER, or DROP

CONSTRAINT

Use with ADD, ALTER, or DROP

INDEX

Use with CREATE

TABLE

Use with ALTER, CREATE, or DROP

Top of Page

Create or modify a table

To create a table, you use a CREATE TABLE command. A CREATE TABLE command has the following syntax:

CREATE TABLE table_name 
(field1 type [(size)] [NOT NULL] [index1]
[, field2 type [(size)] [NOT NULL] [index2]
[, ...][, CONSTRAINT constraint1 [, ...]])

The only required elements of a CREATE TABLE command are the CREATE TABLE command itself and the name of the table, but usually you will want to define some fields or other aspects of the table. Consider this simple example.

Suppose that you want to create a table to store the name, year, and the price of used cars that you are considering for purchase. You want to allow up to 30 characters for the name, and 4 characters for the year. To use a data-definition query to create the table, do the following:

Note: You might first need to enable the contents of the database in order for a data definition query to run:

  • On the Message Bar, click Enable Content.

Create a table

  1. On the Create tab, in the Macros & Code group, click Query Design.

  2. On the Design tab, in the Query Type group, click Data Definition.

    The design grid is hidden, and the SQL view object tab is displayed.

  3. Type the following SQL statement:

    CREATE TABLE Cars (Name TEXT(30), Year TEXT(4), Price CURRENCY)

  4. On the Design tab, in the Results group, click Run.

Modify a table

To modify a table, you use an ALTER TABLE command. You can use an ALTER TABLE command to add, modify, or drop (remove) columns or constraints. An ALTER TABLE command has the following syntax:

ALTER TABLE table_name predicate

where predicate can be any one of the following:

ADD COLUMN field type[(size)] [NOT NULL] [CONSTRAINT constraint]

ADD CONSTRAINT multifield_constraint

ALTER COLUMN field type[(size)]

DROP COLUMN field

DROP CONSTRAINT constraint

Suppose that you want to add a 10-character text field to store information about the condition of each car. You can do the following:

  1. On the Create tab, in the Macros & Code group, click Query Design.

  2. On the Design tab, in the Query Type group, click Data Definition.

    The design grid is hidden, and the SQL view object tab is displayed.

  3. Type the following SQL statement:

    ALTER TABLE Cars ADD COLUMN Condition TEXT(10)

  4. On the Design tab, in the Results group, click Run.

Top of Page

Create an index

To create an index on an existing table, you use a CREATE INDEX command. A CREATE INDEX command has the following syntax:

CREATE [UNIQUE] INDEX index_name
ON table (field1 [DESC][, field2 [DESC], ...])
[WITH {PRIMARY | DISALLOW NULL | IGNORE NULL}]

The only required elements are the CREATE INDEX command, the name of the index, the ON argument, the name of the table that contains the fields that you want to index, and the list of fields to be included in the index.

  • The DESC argument causes the index to be created in descending order, which can be useful if you frequently run queries that look for top values for the indexed field, or that sort the indexed field in descending order. By default, an index is created in ascending order.

  • The WITH PRIMARY argument establishes the indexed field or fields as the primary key of the table.

  • The WITH DISALLOW NULL argument causes the index to require that a value be entered for the indexed field — that is, null values are not allowed.

Suppose that you have a table named Cars with fields that store the name, year, price, and condition of used cars that you are considering for purchase. Also suppose that the table has become large and that you frequently include the year field in queries. You can create an index on the Year field to help your queries return results more quickly by using the following procedure:

  1. On the Create tab, in the Macros & Code group, click Query Design.

  2. On the Design tab, in the Query Type group, click Data Definition.

    The design grid is hidden, and the SQL view object tab is displayed.

  3. Type the following SQL statement:

    CREATE INDEX YearIndex ON Cars (Year)

  4. On the Design tab, in the Results group, click Run.

Top of Page

Create a constraint or a relationship

A constraint establishes a logical condition that a field or combination of fields must meet when values are inserted. For example, a UNIQUE constraint prevents the constrained field from accepting a value that would duplicate an existing value for the field.

A relationship is a type of constraint that refers to the values of a field or combination of fields in another table to determine whether a value can be inserted in the constrained field or combination of fields. You do not use a special keyword to indicate that a constraint is a relationship.

To create a constraint, you use a CONSTRAINT clause in a CREATE TABLE or ALTER TABLE command. There are two kinds of CONSTRAINT clauses: one for creating a constraint on a single field, and another for creating a constraint on multiple fields.

Single-field constraints

A single-field CONSTRAINT clause immediately follows the definition of the field that it constrains, and has the following syntax:

CONSTRAINT constraint_name {PRIMARY KEY | UNIQUE | NOT NULL |
REFERENCES foreign_table [(foreign_field)]
[ON UPDATE {CASCADE | SET NULL}]
[ON DELETE {CASCADE | SET NULL}]}

Suppose that you have a table named Cars with fields that store the name, year, price, and condition of used cars that you are considering for purchase. Also suppose that you frequently forget to input a value for the car's condition, and that you always want to record this information. You can create a constraint on the Condition field that prevents you from leaving the field empty, by using the following procedure:

  1. On the Create tab, in the Macros & Code group, click Query Design.

  2. On the Design tab, in the Query Type group, click Data Definition.

    The design grid is hidden, and the SQL view object tab is displayed.

  3. Type the following SQL statement:

    ALTER TABLE Cars ALTER COLUMN Condition TEXT CONSTRAINT ConditionRequired NOT NULL

  4. On the Design tab, in the Results group, click Run.

Now suppose that, after a while, you notice that there are many similar values in the Condition field that should be the same. For example, some of the cars have a Condition value of poor and others have a value of bad.

Note: If you want to follow along with the remaining procedures, add some fake data to the Cars table that you created in preceding steps.

After you clean up the values so that they are more consistent, you could create a table, named CarCondition, with one field, named Condition, that contains all the values that you want to use for the condition of cars:

  1. On the Create tab, in the Macros & Code group, click Query Design.

  2. On the Design tab, in the Query Type group, click Data Definition.

    The design grid is hidden, and the SQL view object tab is displayed.

  3. Type the following SQL statement:

    CREATE TABLE CarCondition (Condition TEXT(10))

  4. On the Design tab, in the Results group, click Run.

  5. Create a primary key for the table by using an ALTER TABLE statement:

    ALTER TABLE CarCondition ALTER COLUMN Condition TEXT CONSTRAINT CarConditionPK PRIMARY KEY

  6. To insert the values from the Condition field of the Cars table into the new CarCondition table, type the following SQL into the SQL view object tab:

    INSERT INTO CarCondition SELECT DISTINCT Condition FROM Cars;

    Note: The SQL statement in this step is an append query. Unlike a data-definition query, an append query ends with a semicolon.

  7. On the Design tab, in the Results group, click Run.

Create a relationship by using a constraint

To require that any new value inserted in the Condition field of the Cars table matches a value of the Condition field in the CarCondition table, you can then create a relationship between CarCondition and Cars on the field named Condition, by using the following procedure:

  1. On the Create tab, in the Macros & Code group, click Query Design.

  2. On the Design tab, in the Query Type group, click Data Definition.

    The design grid is hidden, and the SQL view object tab is displayed.

  3. Type the following SQL statement:

    ALTER TABLE Cars ALTER COLUMN Condition TEXT CONSTRAINT FKeyCondition REFERENCES CarCondition (Condition)

  4. On the Design tab, in the Results group, click Run.

Multiple-field constraints

A multiple-field CONSTRAINT clause can be used only outside a field-definition clause, and has the following syntax:

CONSTRAINT constraint_name 
{PRIMARY KEY (pk_field1[, pk_field2[, ...]]) |
UNIQUE (unique1[, unique2[, ...]]) |
NOT NULL (notnull1[, notnull2[, ...]]) |
FOREIGN KEY [NO INDEX] (ref_field1[, ref_field2[, ...]])
REFERENCES foreign_table
[(fk_field1[, fk_field2[, ...]])] |
[ON UPDATE {CASCADE | SET NULL}]
[ON DELETE {CASCADE | SET NULL}]}

Consider another example that uses the Cars table. Suppose that you want to make sure that no two records in the Cars table have the same set of values for Name, Year, Condition, and Price. You could create a UNIQUE constraint that applies to these fields, by using the following procedure:

  1. On the Create tab, in the Macros & Code group, click Query Design.

  2. On the Design tab, in the Query Type group, click Data Definition.

    The design grid is hidden, and the SQL view object tab is displayed.

  3. Type the following SQL statement:

    ALTER TABLE Cars ADD CONSTRAINT NoDupes UNIQUE (name, year, condition, price)

  4. On the Design tab, in the Results group, click Run.

Top of Page