Tuesday, March 1, 2022

View internet message headers in outlook

An email message internet header provides a list of technical details about the message, such as who sent it, the software used to compose it, and the email servers that it passed through on its way to the recipient. Most of the time, only an administrator will need to view internet headers for a message. If you want to add a header to your email message, see Apply stationery, backgrounds, or themes to email messages.

Some senders use spoofing to disguise their email address. By checking the header, you can find out if the email address is different than it appears, and add it to your blocked senders list.

View message headers in Outlook on your desktop

  1. Double-click an email message to open it outside of the Reading Pane.

  2. Click File > Properties.

  3. Header information appears in the Internet headers box.
    Tip:  You can highlight the information in that box, press Ctrl+C to copy, and paste it into Notepad or Word to see the entire header at once.

Consider an email exchange between two people, Anton Kirilov and Kelly J. Weadock. Anton's email address is anton@proseware.com and Kelly's address is kelly@litwareinc.com. Kelly uses Microsoft Office Outlook 2007. The Internet header associated with Kelly's message to Anton looks as follows:

Microsoft Mail Internet Headers Version 2.0Received: from mail.litwareinc.com ([10.54.108.101]) by mail.proseware.com with Microsoft SMTPSVC(6.0.3790.0);Wed, 12 Dec 2007 13:39:22 -0800Received: from mail ([10.54.108.23] RDNS failed) by mail.litware.com with Microsoft SMTPSVC(6.0.3790.0);Wed, 12 Dec 2007 13:38:49 -0800From: "Kelly J. Weadock" <kelly@litware.com>To: <anton@proseware.com>Cc: <tim@cpandl.com>Subject: Review of staff assignmentsDate: Wed, 12 Dec 2007 13:38:31 -0800MIME-Version: 1.0Content-Type: multipart/mixed;X-Mailer: Microsoft Office Outlook, Build 12.0.4210X-MimeOLE: Produced By Microsoft MimeOLE V6.00.2800.1165Thread-Index: AcON3CInEwkfLOQsQGeK8VCv3M+ipA==Return-Path: kelly@litware.comMessage-ID: <MAILbbnewS5TqCRL00000013@mail.litware.com>X-OriginalArrivalTime: 12 Dec 2007 21:38:50.0145 (UTC)

Note: The sample header might not contain all items found in your email headers. These are the most common entries.

When Kelly sends an email message to anton@proseware.com, she composes it from her computer, which is identified as (i101-177.nv.litwareinc.com). The composed text is passed from her computer to the email server, mail.litwareinc.com. This is the last that Kelly will see of her email message, because further processing is handled by email servers with no intervention from her. When Kelly's email server receives the message for anton@proseware.com, it contacts Proseware's email server and delivers the message to it. The message is stored on the proseware.com server until Anton checks his Proseware email messages.

The following is an explanation of the common email header fields.

  Microsoft Mail Internet Headers Version 2.0  

This header is added by Outlook.

  Received: from mail.litwareinc.com ([10.54.108.101]) by mail.proseware.com with Microsoft SMTPSVC(6.0.3790.0);  Tue, 12 Dec 2017 13:39:22 -0800  

This information says that the message transfer occurred on Tuesday, December 12, 2017, at 13:39:22 (1:39:22 in the afternoon) Pacific Standard Time (which is 8 hours later than Coordinated Universal Time (Greenwich Mean Time); thus the "–0800").

  Received: from mail ([10.54.108.23] RDNS failed) by mail.litware.com with Microsoft SMTPSVC(6.0.3790.0);  Tue, 12 Dec 2017 13:38:49 -0800  

This message transfer occurred on Tuesday, December 12, 2017, at 13:38:49 (1:38:49 in the afternoon) Pacific Standard Time (which is 8 hours later than Coordinated Universal Time (UTC); thus the "–0800").

  From: "Kelly J. Weadock" <kelly@litware.com>  

This message was sent by Kelly J. Weadock from the email address kelly@litware.com.

  To: <anton@proseware.com>  

This is the person to whom the email message is addressed.

  Cc: <tim@cpandl.com>  

These are the person or persons who receive carbon copies of the message.

Note: Recipients of blind carbon copies (Bcc) do not appear in the header.

  Subject: Review of staff assignments  

This is the subject of the email message.

  Date: Tue, 12 Dec 2017 13:38:31 -0800  

This indicates the date and time that the email message was sent, based upon the computer clock on the sender's computer.

  MIME-Version: 1.0  

This parameter specifies the version of the MIME protocol that was used by the sender.

  Content-Type: multipart/mixed;  

This is an additional MIME header. It tells MIME-compliant email programs about the type of content to expect in the message.

  X-Mailer: Microsoft Office Outlook, Build 12.0.4210  

This information indicates that the message was sent by using Microsoft Office Outlook with a build version of 12.0.4210.

  X-MimeOLE: Produced By Microsoft MimeOLE V6.00.2800.1165  

This entry indicates the email software (MIME OLE software) used by the sender.

  Thread-Index: AcON3CInEwkfLOQsQGeK8VCv3M+ipA==  

This header is used to associate multiple messages with a similar thread. For example, in Outlook, the conversation view uses this information to find messages from the same conversation thread.

  Return-Path: kelly@litware.com  

This entry specifies how to reach the message sender.

  Message-ID: <MAILbbnewS5TqCRL00000013@mail.litware.com>  

The message has been assigned this number by mail.litware.com for identification purposes. This ID will always be associated with the message.

  X-OriginalArrivalTime: 12 Dec 2017 21:38:50.0145 (UTC)  

This is a time stamp placed on the message when it first passes through a server running Microsoft Exchange.

View message headers in Outlook on the web or Outlook.com

  1. Select More actions button at the top of the message window and select View message source.
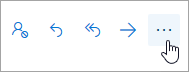
    Screenshot of the More actions button

Find the sender's address

  • Scroll down in the Message source until you find the From field.

  • Highlight the email address enclosed within < > and right-click to Copy.
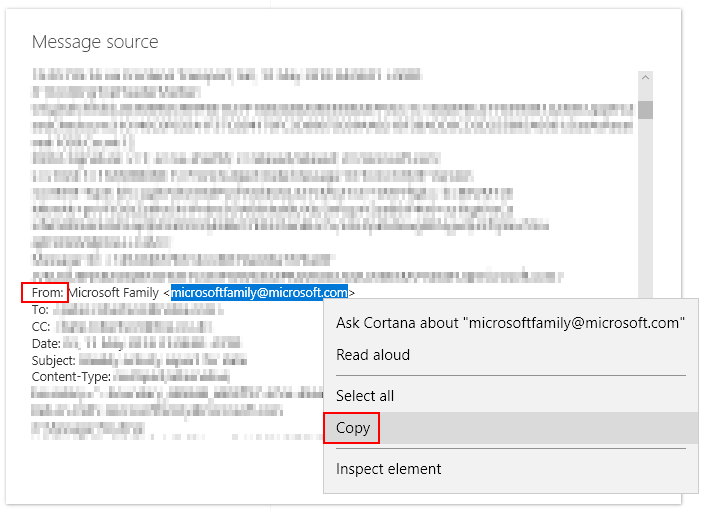
    Message header details window

  • Use this email address to block the sender. Read how to block or unblock senders.

Consider an email exchange between two people, Anton Kirilov and Kelly J. Weadock. Anton's email address is anton@proseware.com and Kelly's address is kelly@litwareinc.com. Kelly uses Microsoft Office Outlook 2007. The Internet header associated with Kelly's message to Anton looks as follows:

Microsoft Mail Internet Headers Version 2.0Received: from mail.litwareinc.com ([10.54.108.101]) by mail.proseware.com with Microsoft SMTPSVC(6.0.3790.0);Wed, 12 Dec 2007 13:39:22 -0800Received: from mail ([10.54.108.23] RDNS failed) by mail.litware.com with Microsoft SMTPSVC(6.0.3790.0);Wed, 12 Dec 2007 13:38:49 -0800From: "Kelly J. Weadock" <kelly@litware.com>To: <anton@proseware.com>Cc: <tim@cpandl.com>Subject: Review of staff assignmentsDate: Wed, 12 Dec 2007 13:38:31 -0800MIME-Version: 1.0Content-Type: multipart/mixed;X-Mailer: Microsoft Office Outlook, Build 12.0.4210X-MimeOLE: Produced By Microsoft MimeOLE V6.00.2800.1165Thread-Index: AcON3CInEwkfLOQsQGeK8VCv3M+ipA==Return-Path: kelly@litware.comMessage-ID: <MAILbbnewS5TqCRL00000013@mail.litware.com>X-OriginalArrivalTime: 12 Dec 2007 21:38:50.0145 (UTC)

Note: The sample header might not contain all items found in your email headers. These are the most common entries.

When Kelly sends an email message to anton@proseware.com, she composes it from her computer, which is identified as (i101-177.nv.litwareinc.com). The composed text is passed from her computer to the email server, mail.litwareinc.com. This is the last that Kelly will see of her email message, because further processing is handled by email servers with no intervention from her. When Kelly's email server receives the message for anton@proseware.com, it contacts Proseware's email server and delivers the message to it. The message is stored on the proseware.com server until Anton checks his Proseware email messages.

The following is an explanation of the common email header fields.

  Microsoft Mail Internet Headers Version 2.0  

This header is added by Outlook.

  Received: from mail.litwareinc.com ([10.54.108.101]) by mail.proseware.com with Microsoft SMTPSVC(6.0.3790.0);  Tue, 12 Dec 2017 13:39:22 -0800  

This information says that the message transfer occurred on Tuesday, December 12, 2017, at 13:39:22 (1:39:22 in the afternoon) Pacific Standard Time (which is 8 hours later than Coordinated Universal Time (Greenwich Mean Time); thus the "–0800").

  Received: from mail ([10.54.108.23] RDNS failed) by mail.litware.com with Microsoft SMTPSVC(6.0.3790.0);  Tue, 12 Dec 2017 13:38:49 -0800  

This message transfer occurred on Tuesday, December 12, 2017, at 13:38:49 (1:38:49 in the afternoon) Pacific Standard Time (which is 8 hours later than Coordinated Universal Time (UTC); thus the "–0800").

  From: "Kelly J. Weadock" <kelly@litware.com>  

This message was sent by Kelly J. Weadock from the email address kelly@litware.com.

  To: <anton@proseware.com>  

This is the person to whom the email message is addressed.

  Cc: <tim@cpandl.com>  

These are the person or persons who receive carbon copies of the message.

Note: Recipients of blind carbon copies (Bcc) do not appear in the header.

  Subject: Review of staff assignments  

This is the subject of the email message.

  Date: Tue, 12 Dec 2017 13:38:31 -0800  

This indicates the date and time that the email message was sent, based upon the computer clock on the sender's computer.

  MIME-Version: 1.0  

This parameter specifies the version of the MIME protocol that was used by the sender.

  Content-Type: multipart/mixed;  

This is an additional MIME header. It tells MIME-compliant email programs about the type of content to expect in the message.

  X-Mailer: Microsoft Office Outlook, Build 12.0.4210  

This information indicates that the message was sent by using Microsoft Office Outlook with a build version of 12.0.4210.

  X-MimeOLE: Produced By Microsoft MimeOLE V6.00.2800.1165  

This entry indicates the email software (MIME OLE software) used by the sender.

  Thread-Index: AcON3CInEwkfLOQsQGeK8VCv3M+ipA==  

This header is used to associate multiple messages with a similar thread. For example, in Outlook, the conversation view uses this information to find messages from the same conversation thread.

  Return-Path: kelly@litware.com  

This entry specifies how to reach the message sender.

  Message-ID: <MAILbbnewS5TqCRL00000013@mail.litware.com>  

The message has been assigned this number by mail.litware.com for identification purposes. This ID will always be associated with the message.

  X-OriginalArrivalTime: 12 Dec 2017 21:38:50.0145 (UTC)  

This is a time stamp placed on the message when it first passes through a server running Microsoft Exchange.


Set options and use features in business contact manager the backstage view

Play your emails on the go

Play your emails on the go

Organize and answer email with short voice responses or simple swipes. Play My Emails in the Outlook app helps you stay on top of what matters.

Play my emails

Customize the navigation pane

Want to organize database objects in a way that works best for you? Then create custom categories and groups in the Navigation Pane to reorganize, highlight, and even hide objects. You can also hide the Navigation Pane to provide your own method of navigation and use macros for more advanced control.

If you are looking for just the basics, see Use the Navigation Pane.

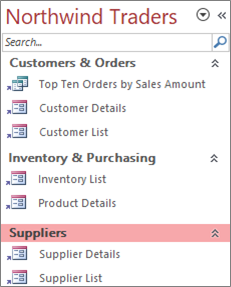
Custom navigation of Northwind Traders

A customized Navigation Pane organized by three business functions

In this article

Before you begin

To help things go smoothly: plan your approach, proceed in phases, and understand security implications.

Planning custom categories and groups

When you plan and design the navigation system for a database, work with the people who will use it. If that's not practical, keep their needs central to your design process. Depending on your resources, consider using focus groups for planning and conducting usability tests during your design. In short, focus on the user.

For example, suppose you have many reports in your database, and that you run the reports with varying frequencies. You might create a Reports category, and then create Daily, Weekly, Monthly, Quarterly, and Yearly groups. In each group, you could add the appropriate reports.

For many examples of Navigation Pane customization, see Featured Access Templates.

Taking a phased approach

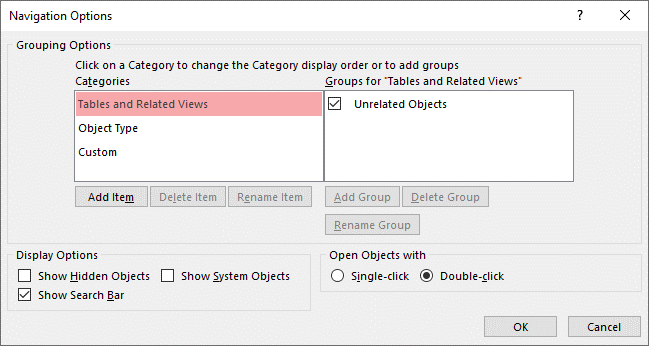
When you're ready, create your custom categories, custom groups within those categories, and then add the database objects to each group. Use the Navigation Options dialog box to create and manage custom categories and groups. The dialog box displays a list of all the categories that have been defined in the database, and shows the groups for a selected category.

The default custom category

Creating custom categories and groups

Think of the creation of custom categories and groups as the scaffolding for you custom navigation.

  • Create custom categories    Access provides one pre-built custom category for you called Custom. You can rename that category and then add or remove groups to suit your needs. You can also create new custom categories.

    Note    When you create a custom category, it applies to the current database only. You cannot transfer custom categories and groups to other databases.

  • Create custom groups    After you create a category, you create one or more custom groups for the new category. You can create as many groups as you need.

When you create a new custom category, groups named Unassigned Objects and Custom Group 1 are created for that category. By default, Access doesn't put any objects in the Unassigned Objects group. Instead, all the objects in a category that aren't in a group are displayed in the Unassigned Objects group in the Navigation Pane.

Organizing database objects in custom groups

Once you have created your categories and groups, you can add, hide, or show groups and objects to fit your needs. You can add or remove the objects in a group at any time.

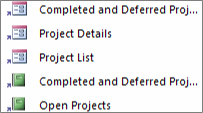
  • Add objects to custom groups   In the Navigation Pane, you can drag or copy and paste the objects from the Unassigned Objects to assign to a custom group. By doing so, you are adding a shortcut to a database object and not moving or copying the object itself. Shortcuts can be identified by a small arrow next to the lower-left corner of the object icon.

    Shortcuts in a custom category view

    Each group should have only one shortcut to a given database object. When you open a shortcut, you open the object it points to.

    Note   The built-in categories and groups in the Navigation Pane do not display shortcuts, and instead display actual database objects. These groups include all groups in any built-in category and the Unassigned Objects group of any custom category.

  • Show or hide groups or objects    After you populate your custom group or groups, you can hide the Unassigned Objects group and any other groups that you don't want to display.

    You can hide some or all of the groups in a custom category and some or all of the objects in a group. You can use right-click commands that are provided by the Navigation Pane or you can choose a property for each object and hide it from all the groups and categories in the open database.

    You can make hidden objects and groups completely invisible, or you can display them in the Navigation Pane as dimmed, unavailable icons. You make that choice by selecting or clearing the Show Hidden Objects check box in the Navigation Options dialog box. You also use that check box when you need to unhide a group or an object.

Important    Although you can remove objects from a custom category or group, you cannot remove objects from a predefined category or group. Although you can delete (that is, permanently remove) predefined groups, we do not recommend doing this because it can cause problems in the database. Databases are sets of components that work together, and if an object is deleted from that set of components, it can break part or all the functionality of the database.

Advanced customization   

There are several advanced ways to customize the Navigation Pane.

Hide the Navigation Pane    You may prefer to provide your own method of navigation, such as a switchboard form or a navigation form.

Disable Design View    You can hide database objects to help prevent design changes, but still provide shortcuts to them in custom categories and groups.

Related macros    You can also use macro actions to control the Navigation Pane:

  • SetDisplayedCategories     Use to show or hide a category regardless of the settings in the Navigation Options dialog box.

  • NavigateTo     Use to navigate to a category or group, or automatically navigate to a category or group when the database opens.

  • LockNavigationPane     Use to prevent users from accidentally adding, moving, or deleting items in the Navigation Pane. You can also use RunMenuCommand.

Security considerations

Usability features can be bypassed. Customizing the Navigation Pane doesn't prevent a malicious user from making unwanted design changes to your database or prevent unauthorized access to data. Consider the following:

  • If you use a macro to control and lock the Navigation Pane, users can disable the macro at startup by pressing and holding the SHIFT key.

  • You can hide the categories and groups that contain database objects and you can hide the objects themselves, but it is possible for users to unhide them.

  • Locking the Navigation Pane does not prevent users from copying database objects to the clipboard.

For more information on database security, see Decide whether to trust a database and Encrypt a database by using a database password. For more information on controlling database startup, see Set user options for the current database.

Top of Page

Create custom categories and groups

The following procedures show how to create and rename custom categories and groups.

Important    For the following procedures to work, the Navigation Pane must be visible and its right-click menu command enabled. For more information, see Advanced customization and Set user options for the current database.

Create a custom category

  1. Right-click the top of the Navigation Pane and then select Navigation Options.

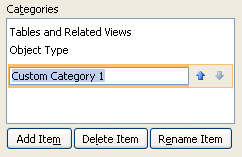
  2. In the Navigation Options dialog box, under the Categories list, click Add Item. A new category appears in the list.

    A new custom category in the Navigation Pane

  3. Type a name for the new category and then press ENTER.

    Try to create a name that makes sense to the people who use your database. After you create the name, notice that the caption for the list on the right changes to match that name. For example, if you name the new category My Switchboard, the caption in the list on the right reads Groups for "My Switchboard".

    Also, notice that the list on the right contains a group called Unassigned Objects. Access creates that group by default. This group contains all of the objects in your database, and you use those objects to populate your custom group.

Rename a custom category

  1. Right-click the top of the Navigation Pane and then select Navigation Options.

  2. Under Categories, click the custom category, and then click Rename Item.

  3. Type a new name for the category, and then press ENTER.

Create a custom group

  1. Right-click the top of the Navigation Pane and then select Navigation Options.

  2. Select the category for which you want to add one or more groups.

  3. For each group, under the Groups for <Group Name> list, click Add Group.

  4. Type a name for the new group, and then press ENTER.

  5. Leave the check box next to Unassigned Objects selected, and then click OK. Access closes the Navigation Options dialog box and adds your new custom group to the Navigation Pane.

Rename a custom group

  1. Right-click the top of the Navigation Pane and then select Navigation Options.

  2. Under Groups for <Group Name>, click the custom group, and then click Rename Group.

  3. Type a new name for the group, and then press ENTER.

Create a custom group from a database object

  1. With a custom category and group open in the Navigation Pane, right-click an object that you want to place in a new group.

  2. Point to Add to group, and then click New Group.

    A new group appears in the Navigation Pane.

    A new custom group in the Navigation Pane

  3. Enter a name for the new group, and then press ENTER.

Top of Page

Organize objects in custom groups

The following procedures show how to organize database objects within custom categories and groups.

Important    For the following procedures to work, the Navigation Pane must be visible and its right-click menu command enabled. For more information, see Advanced customization and Set user options for the current database.

Add objects to a custom group

You can add object shortcuts to a custom group in several different ways.

  1. Click the menu at the top of the Navigation Pane, and in the upper section of the menu, click your new category.

    The group or groups that you created for your category appear in the lower section of the menu, along with the Unassigned Objects group.

  2. In the Unassigned Objects group, select the items that you want to use in your custom group, and then move them to that group. Access provides several ways to move the selected items. You can:

    • Drag the items individually.

    • Hold down CTRL, click multiple items, and then drag the items to your custom group.

    • Right-click one of the selected items, point to Add to group, and then click the name of your custom group.

    • Copy and paste:

      • In the Navigation Pane, right-click the object that you want to copy, and then click Copy.

      • Right-click the group in the Navigation Pane where you want to paste the object, and then click Paste. You can also paste the object into the Navigation Pane of another open Access database.

When you finish, you can leave the Unassigned Objects group visible in the Navigation Pane, or you can hide it.

Hide the Unassigned Objects group

  1. Right-click the top of the Navigation Pane and then select Navigation Options.

  2. In the Categories pane, select the appropriate category.

  3. In the Groups for <Category> pane, clear the Unassigned Objects check box.

Hide a group

  1. Right-click the top of the Navigation Pane and then select Navigation Options.

  2. In the Groups for <Category> list, clear the check box next to the group that you want to hide.

Alternatively in the Navigation Pane, right-click the title bar of the group that you want to hide, and then click Hide.

Unhide a group

  1. Right-click the top of the Navigation Pane and then select Navigation Options.

  2. In the Groups for <Category> list, select the check box next to the group that you want to hide or unhide.

Hide an object

  1. Right-click the top of the Navigation Pane and then select Navigation Options.

  2. In the Categories list, select the appropriate category.

  3. In the Groups for <Category> list, select the group that contains the hidden object.

    Clear the check box next to the object.

  4. Click OK.

Alternatively in the Navigation Pane, right-click the object and then click Hide.

Note   You can't hide objects in the Unassigned Objects group of a custom category in the Navigation Pane.

Unhide an object

  1. Right-click the top of the Navigation Pane and then select Navigation Options.

  2. Under Display Options, select the Show Hidden Objects check box.

  3. Click OK.

    In the Navigation Pane, a dimmed icon appears for all hidden objects.

  4. Do one of the following:

    • If you hid a shortcut in a group, right-click the shortcut and then click Unhide in this Group.

    • If you hid the object only from its parent group and category, right-click the object and then click Unhide.

    • If you hid the object from all categories and groups by setting the Hidden property, right-click the object, click View Properties, and then clear the Hidden check box.

Hide an object from all categories and groups

  1. Right-click the top of the Navigation Pane and then select Navigation Options.

  2. Right-click the object that you want to hide, and then click Object Properties or (for a table) Table Properties on the shortcut menu.

  3. Select the Hidden check box.

  4. Click OK.

Rename an object shortcut

When you rename an object shortcut, Access doesn't rename the database object that the shortcut points to.

  1. In the Navigation Pane, right-click the object that you want to rename, and then click Rename Shortcut.

  2. Type the new name for the shortcut and then press ENTER.

Delete an object shortcut

  • In the Navigation Pane, right-click the shortcut that you want to remove, and then click Remove.

    When you delete an object shortcut, Access doesn't delete the database object that the shortcut points to.

Delete an object

  • In the Navigation Pane, right-click the object that you want to remove, and then click Delete.

    Important    If you choose to delete an object from a group, be aware that this can cause problems. We do not recommend deleting an object because a database is a set of components that work together, and if an object is deleted from that set of components, it can break part or all of the functionality of the database.

Top of Page

Advanced customization

There are more advanced ways to customize the Navigation Pane. You can hide the Navigation Pane by using the Options dialog box and disable an object Design view by using an object property. You can also use macros to selectively show or hide categories, navigate to a category or group, hide the Navigation Pane, or lock the Navigation Pane.

To run macro actions automatically when a database opens, put the actions in a macro named autoexec. For more information, see Create a macro that runs when you open a database. For more information about creating macros to control the user interface, see Create a user interface (UI) macro.

Hide the Navigation pane using the Options dialog box

You can hide the Navigation Pane and use an alternative method of navigation, such as a switchboard form, a navigation form, or strategically located buttons and links on a startup form (See Featured Access Templates).

  1. From the open desktop database, click the File tab, and then click Options.

  2. Click the Current Database category, and under Navigation, clear the Display Navigation Pane check box.

  3. Click OK.

  4. For this setting to take affect, close and then re-open the database.

Note    To redisplay the Navigation pane, repeat the procedure, but, select the check box.

Disable Design view for database objects

In the Navigation Pane, you can set a shortcut's Disable Design View shortcuts property (Right-click the shortcut and click Object Properties) to control whether users can use the shortcut to open the target object in Design view or Layout view. For example, if you enable this property for a shortcut to a form, users cannot change the design or layout of the form by using the shortcut.

  1. In the Navigation Pane, right-click the shortcut for which you want to disable Design view, and then click Object Properties or (for a table) Table Properties.

  2. In the <Object Name> Properties dialog box, select the Disable Design View shortcuts check box.

Use the SetDisplayedCategories Macro to show or hide a category

  1. Do one of the following:

    • To create a new macro, on the Create tab, in the Macros & Code group, click Macro.

    • To add the actions to an existing macro, right-click that macro in the Navigation Pane, and then click Design View.

  2. On the Design tab, in the Show/Hide group, click Show All Actions.

  3. In the macro designer, select SetDisplayedCategories from the drop-down list. The action appears in the macro designer.

  4. In the Show box, choose a setting. Choose Yes if you want the category to display in the Navigation Pane. Choose No if you do not want the category to display in the Navigation Pane.

  5. In the Category box, click the name of the category that you want to show or hide.

  6. Repeat steps 3 through 5 for each category that you want to control by using the macro.

For more information, see SetDisplayedCategories Macro Action.

Use the NavigateTo Macro to navigate to a category or group

  1. Do one of the following:

    • To create a new macro, on the Create tab, in the Macros & Code group, click Macro.

    • To add the action to an existing macro, right-click that macro in the Navigation Pane, and then click Design View.

  2. On the Design tab, in the Show/Hide group, click Show All Actions.

  3. In the macro designer, select NavigateTo from the drop-down list. The action appears in the macro designer.

  4. In the Category box, click the name of the category that you want to navigate to.

  5. If you want to navigate to a specific group in the category, click the arrow in the Group box, and then click the name of the group that you want to navigate to.

For more information, see NavigateTo Macro Action.

Use the LockNavigationPane Macro to lock the Navigation Pane

  1. Do one of the following:

    • To create a new macro, on the Create tab, in the Macros & Code group, click Macro.

    • To add the actions to an existing macro, right-click that macro in the Navigation Pane, and then click Design View.

  2. On the Design tab, in the Show/Hide group, click Show All Actions.

  3. In the macro designer, select LockNavigationPane from the drop-down list. The action appears in the macro designer.

  4. Specify a value for the Lock argument. Choose Yes to lock the Navigation Pane.

For more information, see LockNavigationPane Macro Action.

Use the RunMenuCommand Macro to hide the Navigation Pane

If you prefer to create your own navigation system, you can hide the Navigation Pane by using the RunMenuCommand macro action and the WindowHide argument.

  1. Do one of the following:

    • To create a new macro, on the Create tab, in the Macros & Code group, click Macro.

    • To add the action to an existing macro, right-click that macro in the Navigation Pane, and then click Design View.

  2. On the Design tab, in the Show/Hide group, click Show All Actions.

  3. In the macro designer, select RunMenuCommand from the drop-down list. The action appears in the macro designer.

  4. In the Command box, select WindowHide.

You can also turn the display of the Navigation Pane on or off by using the Display Navigation Pane check box in the Access Options dialog box. If you use the RunMenuCommand macro action with the WindowHide argument, it will hide the Navigation Pane whether the Display Navigation Pane check box is selected or cleared.

For more information, see RunMenuCommand Macro Action.

Top of Page

Present on multiple monitors and view speaker notes privately

You can present with 2 monitors: Using Presenter View is a great way to view your presentation with speaker notes on one monitor (your laptop, for example), while your audience views the notes-free presentation on a different monitor (like a larger screen you're projecting to).

Note: Make sure the device you're using for your presentation supports the use of multiple monitors. Check with your manufacturer for up-to-date information about multiple monitor support.

To do this procedure and split the view between projectors in this way, you must be connected to the second screen.

Set up PowerPoint to use Presenter view with two monitors

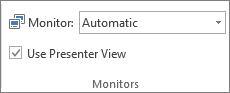
  1. On the Slide Show tab, in the Monitors group, select Use Presenter View.

    Monitors group on the Slide Show tab

    Windows Display Settings should open.

  2. In the Display Settings dialog box, on the Monitor tab, select the monitor icon that you want to use to view your speaker notes, and then select the This is my main monitor check box.

    If the This is my main monitor check box is selected and unavailable, the monitor is already designated as the primary monitor.

  3. Select the monitor icon for the second monitor—the one the audience will watch, and then select the Extend my Windows Desktop onto this monitor check box.

Notes: If the Windows Display Settings don't open, do the following:

  • Windows 10: Click Start > Settings > System > Display. At the top, under Customize your display, is a diagram of the screens connected to your computer, with each screen numbered. If you are connected to a project, typically it will be represented in the diagram as screen 2. Select screen 1 in the diagram, then scroll downward. Ensure that the check box named Make this my main display is selected. Above that check box, in the Multiple displays list, select Extend these displays.

  • Windows 8: Right-click the Windows Start button, click Control Panel >Display > Adjust resolution. In the Multiple displays list, click Extend these displays. Select the monitor on which you want to view your speaker notes, and click Make this my main display.

You can use PowerPoint on your smartphone as a remote control to run your presentation and view your speaker notes. See Using a laser pointer on your smartphone when presenting in PowerPoint for more information, including a brief video.

Deliver your presentation on two monitors

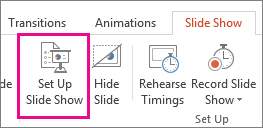
  1. On the Slide Show tab, in the Set Up group, click Set Up Slide Show.

    Set Up Slide Show button

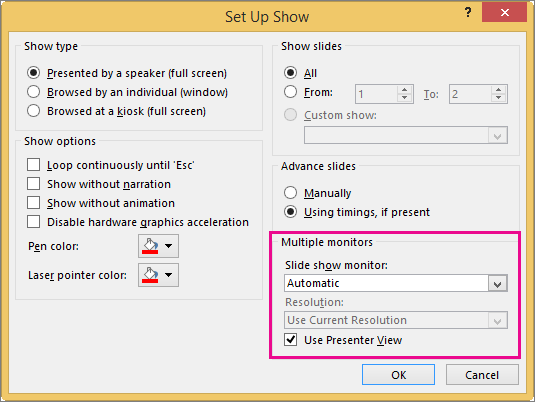
  2. In the Set Up Show dialog box, choose the options that you want, and then click OK. If you choose Automatic, PowerPoint will display speaker notes on the laptop monitor, if available. Otherwise, PowerPoint will display speaker notes on the main display identified in your Display settings (Settings > Display).

    Monitor options in the Set Up Show dialog box

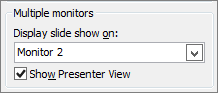
    (PowerPoint 2010)    To see your speaker notes on your primary monitor. select your secondary monitor from the Display slide show on list.

    PowerPoint 2010 Monitor options

  3. To begin delivering your presentation, on the Slide Show tab, click From the Beginning, or click the Slide Show button Click the picture of a computer screen in the status bar to see the slide show at the bottom of the PowerPoint window.

Extend vs. Duplicate: What happens after the slide show ends

PowerPoint does something behind the scenes to make the process of starting a slide show on a second monitor as smooth and quick as possible. When you enter Slide Show, PowerPoint automatically changes your display settings (also known as your display topology) to Extend.

What can be confusing is what happens after your slide show concludes:

  • In PowerPoint 2013, when your slide show ends, PowerPoint leaves the display topology as Extend. (The benefit of this approach is that the next time you present on a second monitor, the first slide will appear with minimal delay. The drawback is that PowerPoint may be overriding your preferred display setting of "duplicate". Some people don't like this override.)

  • In newer versions, in the same end-of-slide-show scenario, PowerPoint reverts to your default setting, returning to Duplicate, if that's what you have chosen.

If you are using PowerPoint 2013 and you want PowerPoint to revert to the default setting, rather that keeping the Extend setting, you can tell it to do that by making a small change to the Windows registry as described below.

In this procedure, you are creating a command that adds a new setting to the Windows Registry for PowerPoint, and then you are running that command:

  1. Create a new file in Notepad.

  2. Copy and paste the following three lines of text into Notepad:

      Windows Registry Editor Version 5.00   [HKEY_CURRENT_USER\Software\Microsoft\Office\15.0\PowerPoint\Options]   "RestoreTopology"=dword:00000001
  3. On the File menu in Notepad, click Save As.

  4. Name the file Update.reg. (It's important that the file name extension be .reg).

  5. In the Save as type box, choose All Files (*.*).

  6. Take note of the folder in which you are saving the file. Then click Save, and close Notepad.

  7. Open File Explorer from the Start menu, and navigate to the folder where you saved Update.reg.

  8. Double-click Update.reg.

  9. Answer "Yes" to the two prompts that ensue.

With that completed, PowerPoint will now revert to your default display topology at the conclusion of a slide show.

(Read more technical details in this community forum post that was answered by a PowerPoint program manager.)

See also

Video: Use Presenter view

View your speaker notes as you deliver your slide show

Video: Rehearse timings for a slide show

Zoom in to part of a slide in Slide Show view

Print your PowerPoint slides, handouts, and notes

Create a self-running presentation

Start the presentation and see your notes in Presenter view

PowerPoint videos not playing on secondary monitor

Filter for unique values or remove duplicate values

Your browser does not support video. Install Microsoft Silverlight, Adobe Flash Player, or Internet Explorer 9.

In Excel, there are several ways to filter for unique values—or remove duplicate values:

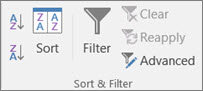
  • To filter for unique values, click Data > Sort & Filter > Advanced.
    The Sort &amp; Filter group on the Data tab

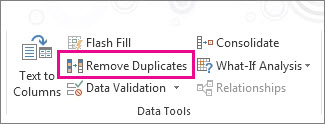
  • To remove duplicate values, click Data > Data Tools > Remove Duplicates.
    Remove Duplicates

  • To highlight unique or duplicate values, use the Conditional Formatting command in the Style group on the Home tab.

Filtering for unique values and removing duplicate values are two similar tasks, since the objective is to present a list of unique values. There is a critical difference, however: When you filter for unique values, the duplicate values are only hidden temporarily. However, removing duplicate values means that you are permanently deleting duplicate values.

A duplicate value is one in which all values in at least one row are identical to all of the values in another row. A comparison of duplicate values depends on the what appears in the cell—not the underlying value stored in the cell. For example, if you have the same date value in different cells, one formatted as "3/8/2006" and the other as "Mar 8, 2006", the values are unique.

Check before removing duplicates: Before removing duplicate values, it's a good idea to first try to filter on—or conditionally format on—unique values to confirm that you achieve the results you expect.

Follow these steps:

  1. Select the range of cells, or ensure that the active cell is in a table.

  2. Click Data > Advanced (in the Sort & Filter group).

    The Sort &amp; Filter group on the Data tab

  3. In the Advanced Filter popup box, do one of the following:

To filter the range of cells or table in place:

  • Click Filter the list, in-place.

To copy the results of the filter to another location:

  • Click Copy to another location.

  • In the Copy to box, enter a cell reference.

  • Alternatively, click Collapse Dialog Button image to temporarily hide the popup window, select a cell on the worksheet, and then click Expand Button image .

  • Check the Unique records only, then click OK.

The unique values from the range will copy to the new location.

When you remove duplicate values, the only effect is on the values in the range of cells or table. Other values outside the range of cells or table will not change or move.  When duplicates are removed, the first occurrence of the value in the list is kept, but other identical values are deleted. 

Because you are permanently deleting data, it's a good idea to copy the original range of cells or table to another worksheet or workbook before removing duplicate values.

Follow these steps:

  1. Select the range of cells, or ensure that the active cell is in a table.

  2. On the Data tab, click Remove Duplicates (in the Data Tools group).

    Remove Duplicates
  3. Do one or more of the following:

    • Under Columns, select one or more columns.

    • To quickly select all columns, click Select All.

    • To quickly clear all columns, click Unselect All.

      If the range of cells or table contains many columns and you want to only select a few columns, you may find it easier to click Unselect All, and then under Columns, select those columns.

      Note: Data will be removed from all columns, even if you don't select all the columns at this step. For example, if you select Column1 and Column2, but not Column3, then the "key" used to find duplicates is the value of BOTH Column1 & Column2.  If a duplicate is found in those columns, then the entire row will be removed, including other columns in the table or range.

  4. Click OK, and a message will appear to indicate how many duplicate values were removed, or how many unique values remain. Click OK to dismiss this message.

  5. Undo the change by click Undo (or pressing Ctrl+Z on the keyboard).

You cannot remove duplicate values from outline data that is outlined or that has subtotals. To remove duplicates, you must remove both the outline and the subtotals. For more information, see Outline a list of data in a worksheet and Remove subtotals.

Note: You cannot conditionally format fields in the Values area of a PivotTable report by unique or duplicate values.

Quick formatting

Follow these steps:

  1. Select one or more cells in a range, table, or PivotTable report.

  2. On the Home tab, in the Style group, click the small arrow for Conditional Formatting, and then click Highlight Cells Rules, and select Duplicate Values.
    Duplicate values

  3. Enter the values that you want to use, and then choose a format.

Advanced formatting

Follow these steps:

  1. Select one or more cells in a range, table, or PivotTable report.

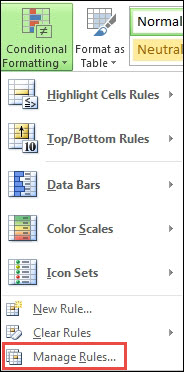
  2. On the Home tab, in the Styles group, click the arrow for Conditional Formatting, and then click Manage Rules to display the Conditional Formatting Rules Manager popup window.
    Conditional Formatting menu with Manage Rules highlighted

  3. Do one of the following:

    • To add a conditional format, click New Rule to display the New Formatting Rule popup window.

    • To change a conditional format, begin by ensuring that the appropriate worksheet or table has been chosen in the Show formatting rules for list. If necessary, choose another range of cells by clicking Collapse Button image button in the Applies to popup window temporarily hide it. Choose a new range of cells on the worksheet, then expand the popup window again Button image . Select the rule, and then click Edit rule to display the Edit Formatting Rule popup window.

  4. Under Select a Rule Type, click Format only unique or duplicate values.

  5. In the Format all list of Edit the Rule Description, choose either unique or duplicate.

  6. Click Format to display the Format Cells popup window.

  7. Select the number, font, border, or fill format that you want to apply when the cell value satisfies the condition, and then click OK. You can choose more than one format. The formats that you select are displayed in the Preview panel.

In Excel for the web, you can remove duplicate values.

Remove duplicate values

When you remove duplicate values, the only effect is on the values in the range of cells or table. Other values outside the range of cells or table will not change or move. When duplicates are removed, the first occurrence of the value in the list is kept, but other identical values are deleted.

Important: You can always click Undo to get back your data after you have removed the duplicates. That being said, it's a good idea to copy the original range of cells or table to another worksheet or workbook before removing duplicate values.

Follow these steps:

  1. Select the range of cells, or ensure that the active cell is in a table.

  2. On the Data tab, click Remove Duplicates .

  3. In the Remove Duplicates dialog box, unselect any columns where you don't want to remove duplicate values.

    Note: Data will be removed from all columns, even if you don't select all the columns at this step. For example, if you select Column1 and Column2, but not Column3, then the "key" used to find duplicates is the value of BOTH Column1 & Column2.  If a duplicate is found in Column1 and Column2, then the entire row will be removed, including data from Column3.

  4. Click OK, and a message will appear to indicate how many duplicate values were removed. Click OK to dismiss this message.

Note: If you want to get back your data, simply click Undo (or press Ctrl+Z on the keyboard).

Need more help?

You can always ask an expert in the Excel Tech Community or get support in the Answers community.

See Also

Count unique values among duplicates