You can present with 2 monitors: Using Presenter View is a great way to view your presentation with speaker notes on one monitor (your laptop, for example), while your audience views the notes-free presentation on a different monitor (like a larger screen you're projecting to).
Note: Make sure the device you're using for your presentation supports the use of multiple monitors. Check with your manufacturer for up-to-date information about multiple monitor support.
To do this procedure and split the view between projectors in this way, you must be connected to the second screen.
Set up PowerPoint to use Presenter view with two monitors
-
On the Slide Show tab, in the Monitors group, select Use Presenter View.

Windows Display Settings should open.
-
In the Display Settings dialog box, on the Monitor tab, select the monitor icon that you want to use to view your speaker notes, and then select the This is my main monitor check box.
If the This is my main monitor check box is selected and unavailable, the monitor is already designated as the primary monitor.
-
Select the monitor icon for the second monitor—the one the audience will watch, and then select the Extend my Windows Desktop onto this monitor check box.
Notes: If the Windows Display Settings don't open, do the following:
-
Windows 10: Click Start > Settings > System > Display. At the top, under Customize your display, is a diagram of the screens connected to your computer, with each screen numbered. If you are connected to a project, typically it will be represented in the diagram as screen 2. Select screen 1 in the diagram, then scroll downward. Ensure that the check box named Make this my main display is selected. Above that check box, in the Multiple displays list, select Extend these displays.
-
Windows 8: Right-click the Windows Start button, click Control Panel >Display > Adjust resolution. In the Multiple displays list, click Extend these displays. Select the monitor on which you want to view your speaker notes, and click Make this my main display.
You can use PowerPoint on your smartphone as a remote control to run your presentation and view your speaker notes. See Using a laser pointer on your smartphone when presenting in PowerPoint for more information, including a brief video.
Deliver your presentation on two monitors
-
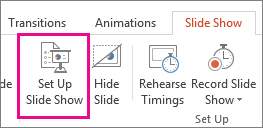
On the Slide Show tab, in the Set Up group, click Set Up Slide Show.

-
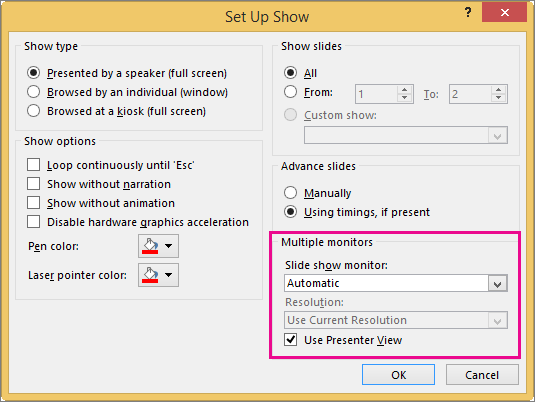
In the Set Up Show dialog box, choose the options that you want, and then click OK. If you choose Automatic, PowerPoint will display speaker notes on the laptop monitor, if available. Otherwise, PowerPoint will display speaker notes on the main display identified in your Display settings (Settings > Display).

(PowerPoint 2010) To see your speaker notes on your primary monitor. select your secondary monitor from the Display slide show on list.

-
To begin delivering your presentation, on the Slide Show tab, click From the Beginning, or click the Slide Show button
 at the bottom of the PowerPoint window.
Extend vs. Duplicate: What happens after the slide show ends
PowerPoint does something behind the scenes to make the process of starting a slide show on a second monitor as smooth and quick as possible. When you enter Slide Show, PowerPoint automatically changes your display settings (also known as your display topology) to Extend.
What can be confusing is what happens after your slide show concludes:
-
In PowerPoint 2013, when your slide show ends, PowerPoint leaves the display topology as Extend. (The benefit of this approach is that the next time you present on a second monitor, the first slide will appear with minimal delay. The drawback is that PowerPoint may be overriding your preferred display setting of "duplicate". Some people don't like this override.)
-
In newer versions, in the same end-of-slide-show scenario, PowerPoint reverts to your default setting, returning to Duplicate, if that's what you have chosen.
If you are using PowerPoint 2013 and you want PowerPoint to revert to the default setting, rather that keeping the Extend setting, you can tell it to do that by making a small change to the Windows registry as described below.
In this procedure, you are creating a command that adds a new setting to the Windows Registry for PowerPoint, and then you are running that command:
-
Create a new file in Notepad.
-
Copy and paste the following three lines of text into Notepad:
Windows Registry Editor Version 5.00 [HKEY_CURRENT_USER\Software\Microsoft\Office\15.0\PowerPoint\Options] "RestoreTopology"=dword:00000001
-
On the File menu in Notepad, click Save As.
-
Name the file Update.reg. (It's important that the file name extension be .reg).
-
In the Save as type box, choose All Files (*.*).
-
Take note of the folder in which you are saving the file. Then click Save, and close Notepad.
-
Open File Explorer from the Start menu, and navigate to the folder where you saved Update.reg.
-
Double-click Update.reg.
-
Answer "Yes" to the two prompts that ensue.
With that completed, PowerPoint will now revert to your default display topology at the conclusion of a slide show.
(Read more technical details in this community forum post that was answered by a PowerPoint program manager.)
See also
View your speaker notes as you deliver your slide show
Video: Rehearse timings for a slide show
Zoom in to part of a slide in Slide Show view
Print your PowerPoint slides, handouts, and notes
Create a self-running presentation
No comments:
Post a Comment