Wednesday, March 31, 2021

Configure web conferencing edge server

Use this dialog box to configure the settings for the internal and external interfaces of the Web Conferencing Edge Server.

External IP Address

The IP address used by the external interface of the Web Conferencing Edge Server. If you are using a load balancer, specify the IP address to which the load balancer connects.

FQDN

The fully qualified domain name (FQDN) of the external interface of the Web Conferencing Edge Server.

External ports

The port used for the external interface of the Web Conferencing Edge Server.

Data port

The port used for Web conferencing with external users. The default port is 443.

Internal ports

The port used for the internal interface of the Web Conferencing Edge Server.

Data port

The port used for traffic between internal Web Conferencing Servers and the Web Conferencing Edge Server. The default port is 8057.

Important:  If you change this port setting, make a corresponding change on your internal Web Conferencing Servers by using the Web Conferencing Edge Server tab of Web Conferencing Properties for each Standard Edition server or Enterprise pool.

Certificate for this IP address

The certificate associated with the external interface.

Select certificate

Click to assign a certificate to the external interface of the Web Conferencing Edge Server.

Note: You can also use the Certificate Wizard to guide you through the process of configuring the certificate, including assigning the certificate to the external interface of the Web Conferencing Edge Server.

Learn More Online

Click to expand or collapse

For details, see the Operations section of the Office Communications Server Technical Library.

Set call forwarding options

Call Forwarding lets you define how you want Lync to handle incoming calls, when you are away from your work phone or want someone else to take your calls.

Notes: 

  • For emergency services call, call forwarding rules are turned off for 120 minutes so that response personnel can reach you back. You can reset Call Forwarding options at any time by clicking the call forwarding menu at the lower-left corner of the Lync main window.

  • When you configure Call Forwarding in Lync, the number you set your calls to be forwarded to, will be displayed to the person who called you. This applies to Lync to Lync calls only.

Call Forwarding options

You can direct Lync to handle your incoming calls in the following ways:

Turn off call forwarding

Select this check box if you want to have calls ring only your work phone or Lync.

Forward my calls to:

If you want calls to be forwarded immediately and not to ring your work number at all, select this check box and then select one of the options from the drop-down menu:

  • Voice Mail: sends your calls directly to your voice mail, if it's been set up.

  • Mobile: sends your calls to your mobile phone, if the number is recorded on the Lync - Options > Phones window.

  • Home: sends your calls to your home phone, if the number is recorded on the Lync - Options > Phones window.

  • New Number or Contact: type a number where you can be reached at, or select a Lync contact you want to take your calls.

  • My Delegates: if you have set up your delegates, they receive your calls. You can also add delegates from this window if you haven't selected them, or click Edit my delegate members on the Call Forwarding window to manage the members.

Simultaneously Ring:

If you want calls to ring your work number and another number, select this check box and then choose one of the options from the drop-down menu:

  • Mobile: your calls ring you at your work and also your mobile number if recorded on the Lync - Options > Phones window.

  • Home: your calls ring you at your work and also your home number if recorded on the Lync - Options > Phones window.

  • New Number: enter a number where you want your calls to ring, in addition to your work number.

  • My Delegates: your calls ring at your work and also your delegates, if you've set them up. You can also add delegates from this window if you haven't selected them, or click Edit my delegate members on the Call Forwarding window to manage the members.

  • My Team-Call Group : if you have set up your team-call group, your calls ring at their phones, as well as your work number. You can also add or remove members of your team-call group at bottom of this window, if you haven't set them up, or click Edit my team-call group members on the Call Forwarding window to manage the members.

Top of Page

Call forwarding settings

To set the time before calls are forwarded, do the following:

  1. Under Your current call forwarding settings, click the link next to Unanswered calls will go to.

  2. Choose what number you want the call to go to. For example, Voice Mail, or New Number or Contact.

  3. In the Ring for this many seconds before redirecting menu, select a delay time before the call gets redirected.

  4. Click OK to go back to Lync – Options.

  5. Click the link next to These settings will apply, and choose All the time, or only During work hours set in Outlook.

Top of Page

Edit team-call members

A team-call group is a set of people who can answer your work calls, as long as your support team enables this feature. You can add or remove members, and select which ones can receive calls on your behalf.

Click Edit my team-call group members, and then do any of the following:

  • To add members, click Add, then double-click the contact you want.

  • To delete a member, select the contact, and then click Remove.

  • To specify the delay before the group's phones ring, select a time in the Ring your team-call group after this many seconds.

    Note:  Setting up team-call group doesn't automatically forward your calls to them. Make sure to choose an option under Simultaneously ring or Forward my calls to, in the call forwarding section.

Top of Page

Edit delegates

You can add delegates and choose if you want them to receive calls on your behalf. Lync creates a Delegates group in your Contacts list automatically when you add delegates.

To add, remove or manage your delegates:

  1. Click Edit my delegate members.

  2. Click Add, then double-click the contact you want.

  3. To enable your delegates to take your calls, check the box next to Receive Calls.

  4. To specify the delay before your delegates' phones ring, select a time in the Ring your delegates after this many seconds menu.

  5. To delete a delegate, select the name, then click Remove.

    Note:  Setting up delegates doesn't automatically forward your calls to them. Make sure to choose an option under Simultaneously ring or Forward my calls to, in the call forwarding section.

Top of Page

Set and update task progress

Sharing out task progress doesn't have to involve complicated calculations. In Planner, it's simple. Tasks can be:

  • Not started    

  • In progress     In Progress

  • Completed     The completed icon

Sometimes you may need more than simple task progress:

Done with a task?

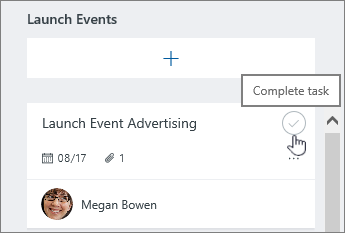
To quickly mark one of your tasks as Completed, point to it and select the check mark.

Click the checkmark to complete a task

Using a touch screen? If you're not using a mouse, you won't see the check box to mark something as completed. Instead, check out a few other ways to update progress.

Tip: Completed tasks are hidden at the bottom of the task list. Scroll down and choose Show completed.

Just getting started?

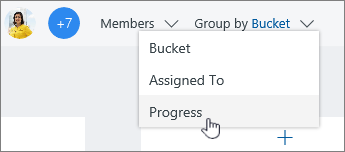
On the Board, select Group by > Progress,

Click Group by, and select Progress

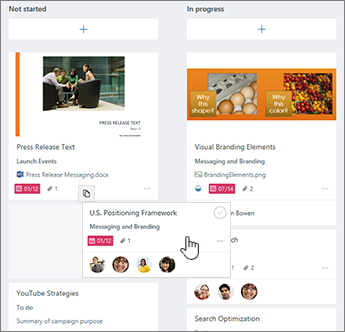
and then drag tasks between columns to quickly update your plan on the fly.

Drag tasks to the appropriate column

Other ways to update progress

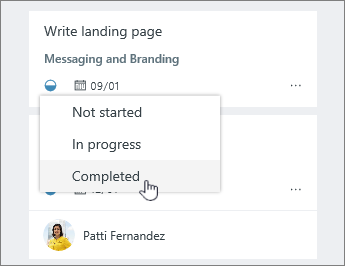
For tasks that are already marked as In progress, you can also change status by selecting the In progress symbol In Progress on the task and choosing another status.

Click the progress icon and change status

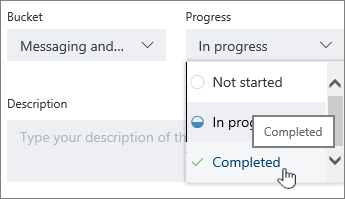
You can also update task progress by selecting the task itself and using the Progress drop-down box.

Click the task, and select another status in details

Frequently asked questions about mobile device management for office 365

Use a screen reader to add an appointment in outlook

Read out loud symbol with the label Screen reader content. This topic is about using a screen reader with Office

This article is for people with visual impairments who use a screen reader program with the Office products and is part of the Office Accessibility content set. For more general help, see Office Support home.

Use Outlook 2016 with your keyboard and a screen reader such as JAWS or Narrator, the built-in Windows screen reader, to add an appointment to your calendar. You can also copy an appointment and let others know your availability for meetings.

Notes: 

  • New Microsoft 365 features are released gradually to Microsoft 365 subscribers, so your app might not have these features yet. To learn how you can get new features faster, join the Office Insider program.

  • For keyboard shortcuts, go to Keyboard shortcuts for Outlook.

  • This topic assumes that you are using JAWS. To learn about JAWS for Windows, refer to JAWS for Windows Quick Start Guide.

  • This topic assumes that you are using the built-in Windows screen reader, Narrator. To learn more about using Narrator, go to Complete guide to Narrator.

  • This topic assumes you are using this app with a PC. Some navigation and gestures might be different for a Windows phone or tablet.

In this topic

Add an appointment to your calendar

  1. To open the Outlook calendar from anywhere in Outlook 2016, press Ctrl+2.

  2. Press Alt+H, N1 to open a blank appointment window. Focus is on the Subject box.

  3. You hear: "Subject edit. Type in text." Type the subject.

  4. Press the Tab key to move to the Location box. You hear: "Location edit." In Narrator, you hear "Location. Editable edit." Type a location for the appointment.

  5. Press Alt+T to move to the Start time area. Focus is on the start date for the appointment.

    Tips: Outlook can understand date information in many different forms.

    • You can type in ordinary words instead of dates. For example, you can type Today, Tomorrow, or any of most holiday names. You can even type something like Two weeks from tomorrow.

    • You can also use different formats when you type an actual date. For example, you can type Apr 25, April 25, 25 April, or 4/25.

      Outlook automatically translates each of these into its standard format, MM/DD/YYYY.

  6. After you type in a date, press Enter. Focus changes to the Start time box. You can type in the time of day, or you can use the Up or Down arrow keys to browse through different times of day until you reach the one that you want.

    Tips: If your appointment lasts an entire day, you can mark it as an All day event.

    • Press Alt+D to move to the End Date box.

    • Press the Tab key three times to move to the All day event checkbox, then press Spacebar to select it.

    • To move to the Notes area, press Enter.

  7. After you enter the start time, press Alt+D, or press the Tab key, to move to the End Date area. Focus is on the End Date box.

  8. By default, Outlook enters the same date as the Start Date in this box. To accept this date, press Enter. Or, you can type over this date by using the same methods that you used to type in a Start Date (see Step 4). When you finish typing an End Date, press Enter.

  9. The focus moves to the End time box. The end time is automatically set to half an hour after the start time. To change it, type a new time, or browse the options using the Up or Down arrow key. When done, press Enter.

  10. To move to the Notes area, press the Tab key until you hear, "Notes edit." In Narrator, you hear, "Message editing.". Type any information that you want for the appointment.

  11. To save and close the appointment, press Alt+H, A, V.

Copy an existing appointment

When you copy an existing appointment in your calendar, all the information—including any online meeting links—is copied and added to the new appointment you create.

  1. Press Ctrl+2 to go to Outlook Calendar.

  2. The focus is on today. To navigate forward or backward in the calendar, use the arrow keys. To jump between calendar events, press the Tab key to go forward and Shift+Tab to go backward.

  3. When on the appointment you want to copy, press Ctrl+C. JAWS announces: "Copied selection to clipboard." Narrator announces the command.

  4. Navigate to the date and time you want to schedule the new appointment at, and press Ctrl+V. JAWS announces: "Pasted from clipboard." Narrator announces: "<time, date>, one event."

    The new appointment is added to your calendar. The subject of the new appointment starts with "Copy," but you can edit it if you want to.

  5. To open the appointment for further editing, press the Tab key, and then press Ctrl+O. When done, press Alt+H, A, V to save and close.

Let people know your availability

You can add a status indicator to your appointment to let other people know your availability. If someone tries to schedule a meeting with you, they'll find this, and know if you are available.

  1. Open the appointment in the calendar by selecting the appointment and pressing Enter.

  2. To add a status indicator, press Alt+H, B to go to the Free/Busy drop down.

  3. Press the down arrow to browse and Enter to select one of these options: Free, Working Elsewhere, Tentative, Busy, and Out of Office.

  4. To save and close the appointment, press Alt+H, A, V.

See also

Use a screen reader to schedule a meeting in Outlook

Use a screen reader to read and reply to a meeting request in Outlook

Keyboard shortcuts for Outlook

Basic tasks using a screen reader with email in Outlook

Set up your device to work with accessibility in Microsoft 365

Use a screen reader to explore and navigate Outlook Calendar

Technical support for customers with disabilities

Microsoft wants to provide the best possible experience for all our customers. If you have a disability or questions related to accessibility, please contact the Microsoft Disability Answer Desk for technical assistance. The Disability Answer Desk support team is trained in using many popular assistive technologies and can offer assistance in English, Spanish, French, and American Sign Language. Please go to the Microsoft Disability Answer Desk site to find out the contact details for your region.

If you are a government, commercial, or enterprise user, please contact the enterprise Disability Answer Desk.

Mail merge preview results

You can preview your merged documents and make changes before you actually complete the merge.

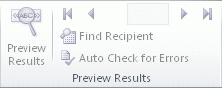
To preview, do any of the following in the Preview Results group of the Mailings tab:

Office 2010 Ribbon

  • Click Preview Results.

  • Page through each merged document by using the Next Record and Previous Record buttons in the Preview Results group.

  • Preview a specific document by clicking Find Recipient.

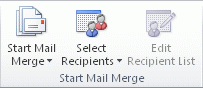
Note: Click Edit Recipient List in the Start Mail Merge group on the Mailings tab to open the Mail Merge Recipients dialog box, where you can filter the list or clear recipients if you see records that you don't want to include.

Office 2010 Ribbon

Join a skype for business meeting

Most of the time, joining a Skype for Business meeting is as simple as clicking the meeting link. And you can join from anywhere, such as an airport, a coffee shop, your hotel, or your mobile device when you're on the road.

Your browser does not support video.

Join a Skype for Business meeting on your Windows PC

  1. In your meeting request, click Join Skype Meeting.

    Join Skype Meeting Outlook meeting request

    Tips: 

    • The Meetings view lets you quickly check your upcoming meetings for the day, without having to go to your calendar. You can even join a Skype Meeting right from the Meetings tab, if the meeting was set up by an organizer inside your company.

    • In the Skype for Business main window, click the Meetings tab, and then right click a Skype meeting to join.
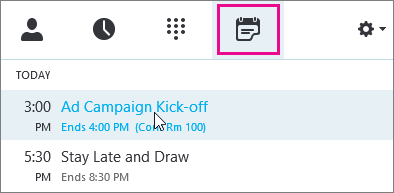
    Meeting tab with meetings

  2. Your mic is automatically muted. To unmute your mic, find the mic button, Mic, muted and click it. When it looks like this Mic, unmuted , people in the meeting can hear you.

    Note: Make sure you unmute your speakers too!

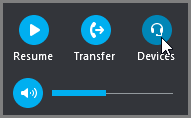
  3. If you need to switch to a different audio device, click the Call Controls button Call Controls button , then click Devices.

    Resume a call, transfer a call, or switch audio devices

  4. The Switch Devices box shows your available audio devices, with the current one selected. Choose a different one if you'd like.
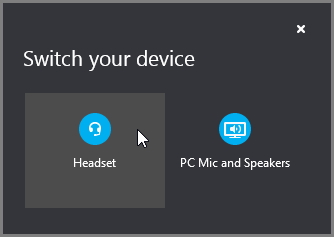
    Switch your device

What'd they say?

Audio quality depends on the network and the device you use. Use a wired network connection and switch off wireless on your computer. If you have to use wireless connection, make sure you have a strong signal. Also use a high quality headset for better audio. For more information, see Phones and Devices Qualified for Skype for Business.

Join with the Web App

Skype for Business Web App is an alternative way to join the meeting if you don't have Skype for Business installed. It opens automatically to connect you to the meeting. For more information, see What is Skype for Business Web App?

Join with phone only

If you're on the road, or if you don't have access to a computer, you can just call into the meeting with a phone. Make sure you grab the conference numbers and IDs from the meeting request before the meeting. See Call into a Skype for Business meeting on your mobile or desk phone.

If you prefer to call in with a phone, instead of using computer audio, you can find the conference numbers and ID in the meeting request. You can also click Find a local number in the meeting request if you're traveling.

What about the PIN? You only need a PIN if you are calling into the meeting as the presenter from a public or cell phone, or if the meeting is set with high security. Otherwise you don't need a PIN, just dial in and wait to get connected.

If you need a PIN and don't remember what it is, click Forgot your Dial-in PIN? in the meeting request, and follow the instructions on the page to reset.

Join a Skype for Business meeting on your Mac

Skype for Business on Mac lets you quickly check your upcoming meetings for the day, without having to go to your Outlook calendar. You can join a Skype for Business meeting right from the main window, if the meeting was set up by an organizer inside your company.

Join with Skype for Business on Mac

  1. In the Skype for Business on Mac main window, find and double-click the meeting you want to attend, or click the Join button.
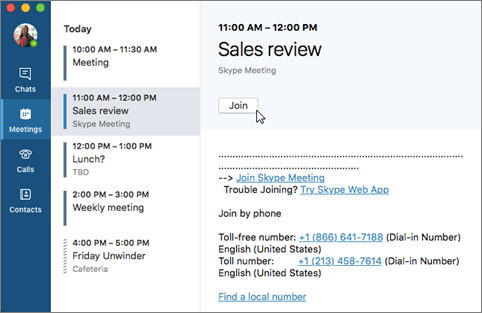
    Join a Skype for Business meeting
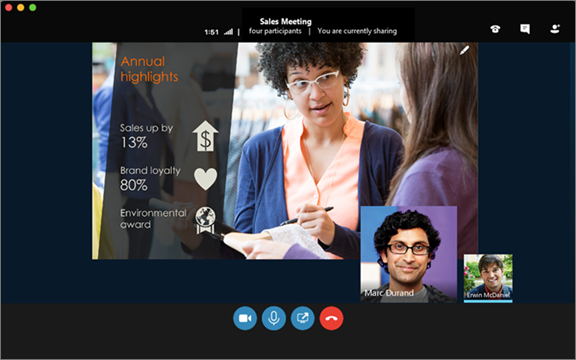
  2. Welcome to the meeting.

    Meeting window with participants
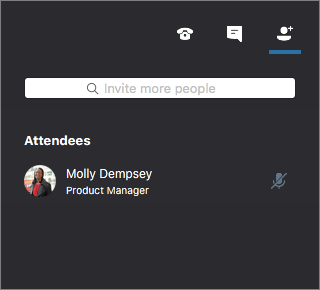
  3. To view meeting participants, to add others, and to mute participants if you're a presenter, click the Participants button button.

    Skype for Business for Mac meeting windows showing participants

    Use the Invite more people box to add more people to your meeting.

  4. To send an IM to meeting participants, click the IM button button.

    Skype for Business for Mac - Meeting window showing IM

    Type a message, and then press Enter or click Send an IM button to send the message.

  5. When you first join a meeting, your microphone is automatically muted, and people in the meeting can't hear you. To unmute your microphone, click the Unmute button button.

  6. When you first join a meeting, the video camera is inactive. To start your video camera, click the Video button button.

Disconnect from the meeting

  1. To exit the meeting, click the End the call button button.

  2. At the Need to leave? prompt, confirm you want to leave the meeting by clicking the Leave Meeting button.
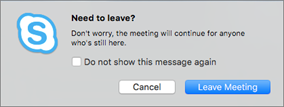
    Skype for Business for Mac - confirmation to leave a meeting

Related Topics

Join a Skype for Business meeting on a mobile device

Join a Lync Meeting