Sunday, July 1, 2018

Access Solution Wizard - Using an UpgradeCode

Access Solution Wizard - Using an UpgradeCode

In the Access Package Solution Wizard, the UpgradeCode field is primarily used for supporting major upgrades, although small and minor updates may use the UpgradeCode for product validation. During major upgrades, the FindRelatedProducts, MigrateFeatureStates, and RemoveExistingProducts actions detect, migrate, and remove previous versions of the product. The FindRelatedProducts action searches for products using criteria based upon the UpgradeCode, ProductLanguage, and ProductVersion. These criteria are specified in the Upgrade table.

Given the criteria used by the FindRelatedProducts action, the UpgradeCode can be the same for different languages and versions of a single product. This is because the Upgrade table allows for differentiating between products along version and language lines.

Across different versions of the same product, you may never need to change the UpgradeCode. Each stand-alone product should have its own UpgradeCode. A product suite should also have its own UpgradeCode. Doing so allows the suite to upgrade previous versions of the suite or stand-alone products by using multiple rows in the Upgrade table.

The following two scenarios illustrate the use of the UpgradeCode.

  • Product A and Product B were shipped with the same ProductLanguage, ProductVersion, and UpgradeCode. Product A and Product B have different ProductCodes. Because the products were assigned the same UpgradeCode, the Upgrade table cannot be authored to differentiate the older version of Product A from the older version of Product B. In this case, you will be unable to have an upgrade installation of Product A that ignores Product B. Because these were different products, they should have each been assigned a different UpgradeCode.

  • The English and French versions of Product A were shipped with the same ProductVersion and UpgradeCode. Both the English and French versions of Product A have different ProductLanguages and ProductCodes. Even though both the English and French language versions share the same UpgradeCode, it is possible to author the Upgrade table such that only the older English language version is detected and upgraded and the older French version ignored. Different language versions of a product can use the same UpgradeCode.

Combine text and numbers

Combine text and numbers

Let's say you need to create a grammatically correct sentence from several columns of data to prepare a mass mailing. Or, maybe you need to format numbers with text without affecting formulas that use those numbers. In Excel, there are several ways to combine text and numbers.

Use a number format to display text before or after a number in a cell

If a column that you want to sort contains both numbers and text—such as Product #15, Product #100, Product #200—it may not sort as you expect. You can format cells that contain 15, 100, and 200 so that they appear in the worksheet as Product #15, Product #100, and Product #200.

Use a custom number format to display the number with text—without changing the sorting behavior of the number. In this way, you change how the number appears without changing the value.

Follow these steps:

  1. Select the cells that you want to format.

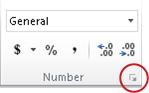
  2. On the Home tab, in the Number group, click the arrow .
    Dialog Box Launcher in Number group

  3. In the Category list, click a category such as Custom, and then click a built-in format that resembles the one that you want.

  4. In the Type field, edit the number format codes to create the format that you want.

    To display both text and numbers in a cell, enclose the text characters in double quotation marks (" "), or precede the numbers with a backslash (\).

    NOTE: Editing a built-in format does not remove the format.

To display

Use this code

How it works

12 as Product #12

"Product # " 0

The text enclosed in the quotation marks (including a space) is displayed before the number in the cell. In the code, "0" represents the number contained in the cell (such as 12).

12:00 as 12:00 AM EST

h:mm AM/PM "EST"

The current time is shown using the date/time format h:mm AM/PM, and the text "EST" is displayed after the time.

-12 as $-12.00 Shortage and 12 as $12.00 Surplus

$0.00 "Surplus";$-0.00 "Shortage"

The value is shown using a currency format. In addition, if the cell contains a positive value (or 0), "Surplus" is displayed after the value. If the cell contains a negative value, "Shortage" is displayed instead.

Combine text and numbers from different cells into the same cell by using a formula

When you do combine numbers and text in a cell, the numbers become text and no longer function as numeric values. This means that you can no longer perform any math operations on them.

To combine numbers, use the CONCATENATE or CONCAT, TEXT or TEXTJOIN functions, and the ampersand (&) operator.
 

Notes: 

  • In Excel 2016, Excel Mobile, and Excel Online, CONCATENATE has been replaced with the CONCAT function. Although the CONCATENATE function is still available for backward compatibility, you should consider using CONCAT, because CONCATENATE may not be available in future versions of Excel.

  • TEXTJOIN combines the text from multiple ranges and/or strings, and includes a delimiter you specify between each text value that will be combined. If the delimiter is an empty text string, this function will effectively concatenate the ranges. TEXTJOIN is not available in Excel 2013 and previous versions.

Examples

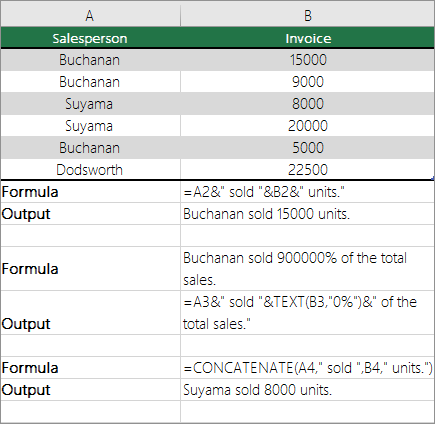
See various examples in the figure below.

Look closely at the use of the TEXT function in the second example in the figure. When you join a number to a string of text by using the concatenation operator, use the TEXT function to control the way the number is shown. The formula uses the underlying value from the referenced cell (.4 in this example) — not the formatted value you see in the cell (40%). You use the TEXT function to restore the number formatting.

Examples pf combining text and numbers

Need more help?

You can always ask an expert in the Excel Tech Community, get support in the Answers community, or suggest a new feature or improvement on Excel User Voice.

See Also

Actor shape

Actor shape

In a use case diagram, an actor Actor shape icon represents a role played by an outside object. One physical object, therefore, can be represented by several actors. A communicates relationship indicates how an actor participates in a use case.
Learn why an Actor shape has red error marking

Right-click the shape, and then click Display SemanticErrors. Read the error message selected in the Errors tab of the Output window.

Name an Actor shape and add other property values

Open the element's UML Properties dialog box by double-clicking the icon that represents the element in the tree view or the shape that represents the element in a diagram.

Tip

Control which property values appear on a shape in a diagram by right-clicking the shape, and then clicking Shape Display Options. In the UML Shape Display Options dialog box, select and clear options to display or hide property values.

Hide the name or stereotype of an Actor shape

Right-click the shape, click Shape Display Options, and then clear Name or Stereotype.

Show documentation and other tagged values associated with an Actor shape

Right-click the shape, click Shape Display Options, and then select Properties.

Navigate to other views of the actor

Right-click the shape, click Views, select the view you want, and then click OK.

Changing colors

Changing colors

You can change the color of many things, including text or font, the fill color of a cell or shape, the border of a shape or line, and the background color of a document or slide.

Apply a theme or standard color

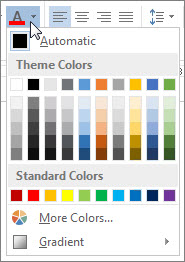
After you select the item whose color you want to change and click the related Color button on the toolbar such as Font Color, Text Highlight Color, or Fill Color, you can change to a theme or standard color or create a new custom color.

  • Select the color that you want under Theme Colors or Standard Colors.

    Font color palette

    If you select a standard color, either from the colors under Standard Colors, or by clicking a color via More Colors and then selecting the Standard tab, these colors will not be updated if you later change the document theme.

Create a new color

  1. Click More Colors, and then click the Custom tab.

  2. Click the color mix that you want.

Custom colors are not updated if you later change the document theme.

See Also

Choosing colors in the Colors dialog box

Change the font color

Change the color of text on a slide

Change the color of a picture

Change the color, style, or weight of a line

Change the color of text

Change the default theme

Apply, customize, and save a document theme in Word or Excel

Use Tell Me to quickly change colors

Find a contact

Find a contact

The quickest way to find a specific person, whether or not they are already in your Contacts list, is to start typing the person's name, phone number, or email address in the search box.

  1. To find a contact, from the left, tap the second icon to get to the Contacts screen.

  2. From the Lyncc tab, start typing a person's name, phone number or extension, or email address in the search box. The results are shown below the box.