Tuesday, May 1, 2018

Manage your Business Contact Manager database

Manage your Business Contact Manager database

To manage a Business Contact Manager for Outlook database, you may need to check its size, create or select a new or different database, clean up or check for errors in your database, delete databases, or switch to the sample business to try out different features before you use them in your own database.

This article covers checking the size of your database and switching to the sample business, and provides links to articles about creating or selecting a database, checking for errors in an existing database, and deleting a database.

What do you want to do?

Check the size of the database

Create or select a database

Check for errors in the database

Delete a database

Use the sample business database

Switch to the sample business database

Switch from the sample business database to your database

Check the size of the database

Business Contact Manager for Outlook uses Microsoft SQL Server Express, a smaller-scale version of Microsoft SQL Server, which supports databases of up to 4 GB. If you attach rather than link files to your Business Contact Manager records, the files increase the size of the database. To see how much space you have available in your database, you can check the size of your database. If you are using a full version of Microsoft SQL Server, you do not have the 4 GB size limit.

Tip:  If your database is shared, and a user does not have access to your network but needs to access files that are listed in the communication history, attach the files in the Comments section of your records, rather than linking the files to the communication history. Keep in mind that files that are attached increase the size of the database. For more information about sharing databases, see Share your Business Contact Manager data with other users.

  1. Click the File tab.

  2. Click the Business Contact Manager tab.

  3. Look in the Manage Databases section.

    • Database size    The amount of space used of the maximum 4,000 MB (4 GB) allowed for the database is displayed

The Manage Databases section also displays the following information:

  • Database name    The computer name and database name display (computer name\database name). If your database is shared, users need this information to connect to your database.

  • Database owner    The domain or workgroup name and the database owner name display (domain or workgroup name\database owner name).

Top of Page

Create or select a database

Business Contact Manager for Outlook stores your business data as records in the Business Contact Manager database that you will create or select. You can create a database when you first install Business Contact Manager for Outlook, or select an existing one. You can also create a new database at any time.

Make certain that you select the database version in Business Contact Manager that matches the version of Microsoft Office you're using.

For more information, see Custom Startup: Choose your Business Contact Manager database, if you have just installed Business Contact Manager for Outlook, or Create or select a new Business Contact Manager database if you are already using Business Contact Manager for Outlook, and you want to change your database or create a new one.

Warning:  If you install a trial version of Microsoft Office 2013 and decide to go back to an earlier version of Microsoft Office, back up your data first. You will need to save a copy of both your Business Contact Manager for Outlook database and your Business Contact Manager for Outlook 2010 database (synchronized into one backup database) in order to see any changes you made while using the trial version. For complete instructions, see Go back to an earlier version of Business Contact Manager and Microsoft Office.

Top of Page

Check for errors in the database

To improve the efficiency of your database, we recommend that you occasionally check for errors by performing the TE000129525 of your Business Contact Manager database. For more information, see Check for errors in your Business Contact Manager database.

Caution:  If your database is shared, before checking the database for errors, you should ask all of its users to exit Outlook to prevent errors.

Top of Page

Delete a database

From time to time, you may need to delete older versions of your Business Contact Manager database or a database that you no longer need. For more information, see Remove or delete a database in Business Contact Manager.

Important:  If you delete a database, the database cannot be restored. Because of this, it may be a good idea to create a backup file of the database before you delete it. For more information, see Why you should back up your Business Contact Manager data.

Top of Page

Use the sample business database

Business Contact Manager for Outlook includes a sample database to show you what a populated database looks like, and to help you get comfortable with using it.

The sample database contains business data for the fictional Adventure Works Bicycle company. You can use the sample database to practice configuring the workspaces, creating and naming your own forms, finding a record, or whatever you imagine, all without compromising your own business data. For more information, see About Adventure Works and the sample business database.

Note:  The database that you use for your own business is not affected by your temporary use of the sample business database.

Switch to the sample business database

To practice in the sample business database, switch to it at any time. You can switch back to your database whenever you need to.

  1. Click the File tab.

  2. Click the Business Contact Manager tab, and then click the Manage Databases button.

  3. Click Switch to Sample Business.

  4. In the Switch to Sample Business dialog box, click Next.

When the process completes and the Switch to Sample Business dialog box closes, the sample business database is ready for you to use.

Switch from the sample business database to your database

If you are practicing in the sample business database, you can return to your database at any time.

  1. Click the File tab.

  2. Click the Business Contact Manager tab, and then click the Manage Databases button.

  3. Click Switch to My Business.

    Note:  The Switch to My Business option appears only if you are in the sample database.

  4. In the Switch to My Business dialog box, click Next.

When the process completes and the Switch to My Business dialog box closes, the database that you were using before you switched to the sample business database is ready for you to use.

Top of Page

Apply a professional look to your drawings with themes

Apply a professional look to your drawings with themes

A theme in Microsoft Visio 2010 is a set of colors and effects that you can apply to a drawing with a single click. Themes are a quick and easy way to give your drawings a fresh and professionally designed look.

Your browser does not support video. Install Microsoft Silverlight, Adobe Flash Player, or Internet Explorer 9.

In this article

Apply a theme

Create a custom theme

Duplicate a theme

Edit a custom theme

Copy a custom theme to another drawing

Prevent themes from affecting a shape

Remove a theme from a shape

Delete a custom theme

A theme has two parts:

  • Theme colors—a set of colors designed to work well together

  • Theme effects—a set of effects for font, fills, shadows, lines, and connectors

You can mix and match theme colors and effects in any combination.

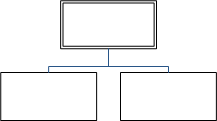
A simple organization chart before a theme has been applied.

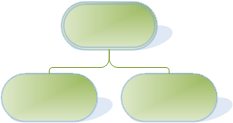
The same organization chart after a theme has been applied.

The same organization chart after a theme has been applied.

Microsoft Office Visio comes with a set of built-in themes, but you can also create and edit custom themes. For example, you can create a custom theme to match your company's logo and branding.

The built-in theme colors match the theme colors available in other Microsoft Office applications, such as PowerPoint and Word.

Apply a theme

  1. On the Design tab, in the Themes group, click More Button image .

  2. Do one of the following:

    • To apply a theme to the current drawing page, right-click a thumbnail, and then click Apply to Current Page.

    • To apply a theme to all the pages in your drawing, right-click a thumbnail, and then click Apply to All Pages.

      Tip: You can also click a thumbnail. Clicking a thumbnail applies the theme either to the current page or to all pages in your drawing, depending on what you did last.

      Notes: 

      • To remove the current theme colors or theme effects from all shapes, in the Themes group, click More Button image , and then click No Theme.

      • Some themes also contain a background color. To apply the new background color with the theme, on the Design tab, in the Backgrounds group, click Backgrounds and select the background that you want.

      • If you don't want the theme background color to appear when you print, select the No Background check box in the Print dialog box.

      • After you apply a theme, that theme is applied to any shapes you add to the drawing. To temporarily disable this functionality, in the Themes group, click More Button image , and then clear the Apply Theme to New Shapes selection.

Top of Page

Create a custom theme

To create custom theme colors, do the following:

  1. On the Design tab, in the Themes group, click the Colors button Button image , and then click Create New Theme Colors.

  2. In the New Theme Colors dialog box, choose the colors or effects that you want, and click OK.

    Note: When you change the theme colors, the colors in the Colors button Button image change accordingly.

To create custom theme effects, do the following:

  1. On the Design tab, in the Themes group, click the Effects button Button image , and then click Create New Theme Effects.

  2. In the New Theme Effects dialog box, choose the colors or effects you want, and click OK.

Tip: Before you create a custom theme, first apply a theme that is similar to the theme you want to create. Then, when you open the New Theme Colors or New Theme Effects dialog box, most of your choices will already have been made.

Top of Page

Duplicate a theme

To duplicate theme colors, do the following:

  • On the Design tab, in the Themes group, click the Colors button Button image , and then right-click the thumbnail for the theme colors you want and select Duplicate.

    The duplicated theme colors are added to the Colors Button image list under Custom.

To duplicate theme effects, do the following:

  • On the Design tab, in the Themes group, click the Effects button Button image , and then right-click the thumbnail for the theme effects you want and select Duplicate.

    The duplicated theme colors are added to the Effects Button image list under Custom.

Top of Page

Edit a custom theme

To edit theme colors, do the following:

  1. On the Design tab, in the Themes group, click the Colors button Button image , and then under Custom, right-click the thumbnail for the theme colors that you want to edit and select Edit.

  2. In the Edit Theme Colors dialog box, choose the options you want, and click OK.

To edit theme effects, do the following:

  1. On the Design tab, in the Themes group, click the Effects button Button image , and then under Custom, right-click the thumbnail for the theme effects that you want to edit and select Edit.

  2. In the Edit Theme Effects dialog box, choose the options you want, and click OK.

Note: You can't edit the built-in themes that are included with Visio. If you want to make a change to one of the built-in themes, duplicate it and then edit the duplicate theme.

Top of Page

Copy a custom theme to another drawing

  1. Open the drawing that has the custom theme you want to copy.

  2. Select a shape with the custom theme applied.

  3. On the Home tab, in the Clipboard group, click Copy copy .

  4. Open the drawing that you want to copy the custom theme to.

  5. On the Home tab, in the Clipboard group, click Paste. The custom theme colors and effects are added to the Colors Button image and the Effects Button image list under Custom.

  6. You can now delete the shape that you pasted into your drawing.

Note: You cannot copy a theme from another Microsoft Office program, such as PowerPoint or Word, to Visio. You also cannot copy a theme from Visio to another Microsoft Office program.

Top of Page

Prevent themes from affecting a shape

You may not want a theme to apply to every shape in a drawing. For example, if you have a traffic sign in your drawing, you probably do not want its fill color or pattern to change when you apply a theme.

To prevent themes from applying to a specific shape, you can either not allow themes for that shape or you can protect the shape from theme colors or theme effects.

Note:  Some of the shapes that are included with Visio are not affected by themes by default. Allowing themes to affect these shapes can cause unexpected results.

Not allow themes for a shape

  • Right-click the shape, point to Format, and uncheck the Allow Themes command.

Protect a shape from theme colors or theme effects

  1. Select the shape.

  2. On the Developer tab, in the Shape Design group, click Protection.

    Where is the Developer tab?

    To show the Developer tab, do the following:

    1. Click the File tab.

    2. Click Options.

    3. In the Visio Options dialog box, click the Customize Ribbon tab.

    4. In the Customize the Ribbon list, select Main Tabs, and then under Main Tabs select the Developer check box.

    5. Click OK.

  3. In the Protection dialog box, select the From theme colors or From theme effects check boxes.

Use a text, line, or fill color that doesn't change with the theme

  • Select the shape.

  • Do one of the following:

    • On the Home tab, in the Shape group, click Fill or Line, and then select one of the colors under Standard Colors.

    • On the Home tab, in the Font group, click the Font Color change text color button, and then select one of the colors under Standard Colors.

Top of Page

Remove a theme from a shape

  • Right-click the shape, point to Format, and click Remove Theme.

    Tip: To remove the current theme colors or theme effects from all shapes, in the Themes group, click More Button image , and then click No Theme.

Top of Page

Delete a custom theme

To delete theme colors, do the following:

  • On the Design tab, in the Themes group, click the Colors button Button image , and then under Custom, right-click the thumbnail for the theme colors that you want to delete and select Delete.

To delete theme effects, do the following:

  • On the Design tab, in the Themes group, click the Effects button Button image , and then under Custom, right-click the thumbnail for the theme effects that you want to delete and select Delete.

Note: You can't delete the built-in themes that are included with Visio.

Top of Page

Keyboard shortcuts in Excel Online

Keyboard shortcuts in Excel Online

Many users find that using an external keyboard with keyboard shortcuts for Excel Online on Windows helps them work more efficiently. For users with mobility or vision disabilities, keyboard shortcuts can be easier than using the touchscreen and are an essential alternative to using a mouse. This article itemizes the keyboard shortcuts for Excel Online on Windows.

Notes: 

  • The shortcuts in this topic refer to the US keyboard layout. Keys for other layouts might not correspond exactly to the keys on a US keyboard.

  • If a shortcut requires pressing two or more keys at the same time, this topic separates the keys with a plus sign (+). If you have to press one key immediately after another, the keys are separated by a comma (,).

In this article

Quick tips for using keyboard shortcuts with Excel Online

  • Excel Online runs in your web browser so the keyboard shortcuts are different than those in the Excel desktop program. For example, you'll use Ctrl+F6 instead of F6 to move to regions in the app.

    You can use common browser shortcuts like F1 and Ctrl+

  • You can find any command quickly by pressing Alt+Win+Q to jump to Tell Me, In Tell Me, you can just type a word or the name of a command you want (available only in Editing view). Tell Me searches for related options, and provides a list. Use the Up and Down arrows to select a command, and then press Enter.

  • To jump to a particular cell in a workbook, use the Go To command: press Ctrl+G, type the cell reference (such as B14), and then press Enter.

  • If you use a screen reader, see Common tasks in Excel Online.

Frequently used shortcuts

These are the most frequently used shortcuts for Excel Online.

To do this

Press

Go to a specific cell

Ctrl+G

Move down

Page down or Down Arrow

Move up

Page up or Up Arrow

Print

Ctrl+P

Copy

Ctrl+C

Paste

Ctrl+V

Cut

Ctrl+X

Undo

Ctrl+Z

Close workbook

Ctrl+W

Find

Ctrl+F

Bold

Ctrl+B

Open context menu

  • Windows keyboard: Windows context key+F10. The Windows context key is between the Left Alt key and the Left Ctrl key

  • Other keyboard: Shift+F10

Tell me

Alt+Q

Find

Ctrl+F or Shift+F3

Repeat Find, downward

Shift+F4

Repeat Find, upward

Ctrl+Shift+F4

Insert chart

Alt+F1

Access keys: Shortcuts for using the ribbon

Excel Online now offers access keys, keyboard shortcuts to navigate the ribbon. If you've used access keys to save time on Excel for desktop computers, you'll find access keys very similar in Excel Online.

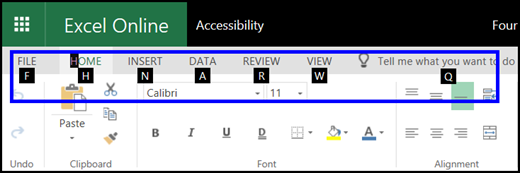
In Excel 2016 for Windows, access keys start with the Alt key. In Excel Online, access keys all start with Alt+Win, then add a letter for the ribbon tab. For example, to go to the Review tab, press Alt+Win+R.

ExcelOnline ribbon showing Home tab and KeyTips on all tabs
  • To get to the ribbon, press Alt+Win, or press Ctrl+F6 until you reach the Home tab

  • To move between tabs on the ribbon, press the Tab key.

  • To hide the ribbon so you have more room to work, press Ctrl+F1. Repeat to display the ribbon again.

To go directly to a tab on the Ribbon, press one of the following access keys:

To do this

Press

Open the Tell Me box on the ribbon and type a search term.

Alt+Win, Q

Open the File tab and use the Backstage view

Alt+Win, F

Open the Home tab and format text and numbers, or use other tools such as Find.

Alt+Win, H

Open the Insert tab and insert a function, table, chart, hyperlink, or comment.

Alt+Win, N

Open the Data tab and refresh connections or use data tools.

Alt+Win, A

Open the Review tab and use the Accessibility Checker or work with comments.

Alt+Win, R

Open the View tab to choose a view, freeze rows or columns in your worksheet, or show gridlines and headers

Alt+Win, W

The shortcuts in this table can save time when you work with the ribbon tabs and ribbon menus

To do this

Press

Select the active tab of the Ribbon, and activate the access keys.

Alt +Win. To move to a different tab, use an access keys or the Tab key.

Move the focus to commands on the Ribbon.

Enter, then Tab or Shift+Tab

Activate a selected button.

Spacebar or Enter

Open the list for a selected command

Spacebar or Enter

Open the menu for a selected button.

Alt + Down Arrow

When a menu or submenu is open, move to the next command.

Esc

Shortcuts for Excel Online commands in Editing view

If a spreadsheet opens in Excel Online Reading view, editing commands won't work. To switch to Edit view, move the focus out of the worksheet by pressing Ctrl+F6, and then tab to the Edit Workbook list. Press Spacebar, press the Down Arrow key, and then select Edit in Excel Online.

To do this

Press

Insert a row above the current row

Alt+Win+H, I, R

Insert a column to the left of the current column

Alt+Win+H, I, C

Cut

Ctrl+X

Copy

Ctrl+C

Paste

Ctrl+V

Undo

Ctrl+Z

Redo

Ctrl+Y

Start a new line in the same cell

Alt+Enter

Insert hyperlink

Ctrl+K

Insert Table

Ctrl+L

Insert function

Shift+F3

Increase font size

Ctrl+Shift+>

Decrease font size

Ctrl+Shift+<

To do this

Press

Complete cell entry and select the cell below

Enter

Complete cell entry and select the cell above

Shift+Enter

Complete cell entry and select the next cell in the row

Tab

Complete cell entry and select the previous cell in the row

Shift+Tab

Cancel cell entry

Esc

To do this

Press

Edit selected cell

F2

Clear selected cell

Delete

Clear selected cell and start editing

Backspace

Go to beginning of cell line

Home

Go to end of cell line

End

Select right by character

Shift+Right Arrow

Select to beginning of cell data

Shift+Home

Select to end of cell data

Shift+End

Select left by character

Shift+Left Arrow

Extend selection to the last nonblank cell in the same column or row as the active cell, or if the next cell is blank, to the next nonblank cell.

Ctrl+Shift+Right Arrow or Ctrl+Shift+Left Arrow

To do this

Press

Bold

Ctrl+B

Italics

Ctrl+I

Underline

Ctrl+U

Paste formatting

Shift+Ctrl+V

To do this

Press

Up one cell

Up Arrow, or Shift+Enter

Down one cell

Down Arrow, or Enter

Move right one cell

Right Arrow, or Tab

Go to the beginning of the row

Home

Go to cell A1

Ctrl+Home

Go to the last cell of used range

Ctrl+End

Move down one screen (28 rows)

Page Down

Move up one screen (28 rows)

Page Up

Move to the edge of the current data region

Ctrl+Right Arrow or Ctrl+Left Arrow

Move between ribbon and workbook content

Ctrl+F6

Move to a different ribbon tab

Tab.

Press Enter to go to the ribbon for that tab.

Insert new sheet

Shift+F11

Switch to next sheet

Alt+Control+Page Down

Switch to previous sheet

Alt+Control+Page Up

To do this

Press

Open menu/Drill down

Alt+Down Arrow

Drill up

Alt+Up Arrow

Follow hyperlink

Ctrl+Enter

Open Comment pane while editing

Shift+F2

To do this

Press

Select a range of cells

Shift+Arrow keys

Select an entire column

Ctrl+SPACE

Select a entire row

Shift+SPACE

Extend selection to the last nonblank cell in the same column or row as the active cell, or if the next cell is blank, to the next nonblank cell.

Ctrl+Shift+Right Arrow or Ctrl+Shift+Left Arrow

To do this

Press

From top to bottom (or forward through selection)

Enter

From bottom to top (or back through selection)

Shift+Enter

Forward through a row (or down through a single-column selection)

Tab

Back through a row (or up through a single-column selection)

Shift+Tab

To do this

Press

Calculate workbook (refresh)

F9

Full calculate

Ctrl+Shift+Alt+F9

Refresh external data

Alt+F5

Refresh all external data

Ctrl+Alt+F5

Auto Sum

Alt+Equals (=)

Excel Online Accessibility Shortcuts Menu (Alt+Shift+A)

Get easy access to common features by using the following shortcuts:

To do this

Press

Move among landmark regions

Ctrl+F6 or Ctrl+Shift+F6

Move within the landmark regions

Tab or Shift+Tab

Go to Tell Me box to run any command

Alt+Q

Display or hide Key Tips

Alt+Windows

Edit selected cell

F2

Go to a specific cell

Ctrl+G

Move to a different worksheet in the workbook

Ctrl+Alt+Page Up or Ctrl+Alt+Page Down

Open context menu

Shift+F10

Read row header

Ctrl+Alt+Shift+T

Read row until active cell

Ctrl+Alt+Shift+Home

Read row from active cell

Ctrl+Alt+Shift+End

Read column header

Ctrl+Alt+Shift+H

Read column until active cell

Ctrl+Alt+Shift+Page Up

Read column from active cell

Ctrl+Alt+Shift+Page Down

Dialogs moving option

Ctrl+Alt+Space

See also

Learn how to navigate in Excel using accessible features

Basic tasks using a screen reader with Excel

Technical support for customers with disabilities

Microsoft wants to provide the best possible experience for all our customers. If you have a disability or questions related to accessibility, please contact the Microsoft Disability Answer Desk for technical assistance. The Disability Answer Desk support team is trained in using many popular assistive technologies and can offer assistance in English, Spanish, French, and American Sign Language. Please go to the Microsoft Disability Answer Desk site to find out the contact details for your region.

If you are a government, commercial, or enterprise user, please contact the enterprise Disability Answer Desk.

Goal: Identify resource allocation problems

Goal: Identify resource allocation problems

By reviewing resource information, such as assignments, availability, overallocations or underallocations, costs, and variances between planned and actual work, you can verify that resources are optimally assigned to tasks to get the results you want.

Tip: This article is part of a series of articles within the Project Map that describe a broad set of project management activities. We call these activities "goals" because they are organized around the project management life cycle: Build a plan, track and manage a project, and close a project.

Previous goal  |  Next goal

See all goals on the Project Map

person working at a desk

number 1 Review resource assignments     To ensure that important tasks have not been overlooked and that the most appropriate resources are assigned to do each task, you need to look at the task list or resource list with assignments listed.

Number 2 Check for overallocated or underallocated resources     Review each resource's total amount of work to ensure that neither too much nor too little work has been assigned.

Number 3 Review the variance between a resource's planned and actual work     Once the project is under way, reviewing the difference between expected work and what is actually being completed is important so that you can effectively balance resource workloads over time and distribute work among resources.

Number 4 Review resource cost variances     Review costs and variances per task, per resource, or per assignment to gauge the progress of individual resources and resources that are working together on a task.
Previous goal  |  Next goal

See all goals on the Project Map

View sent email

View sent email

After you send an email message, you might want to find that email and resend it or forward it to someone else. Outlook stores your messages in the Sent Items folder. If you don't see the Sent Items folder, you may need to change your Outlook settings.

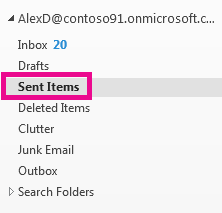
You can find your Sent Items folder in your folder list. If you have multiple email accounts in Outlook, each email account has its own Sent Items folder.

  1. Click Sent Items in the folder list.

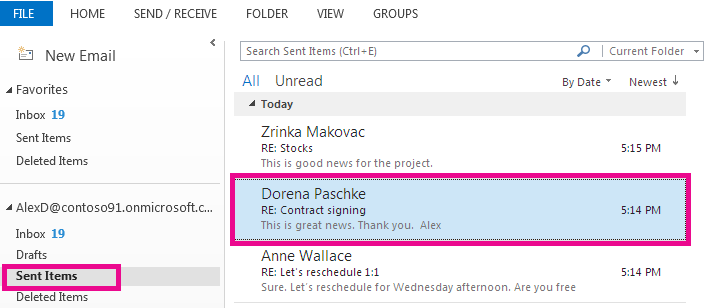
    The Sent Items folder holds the messages that you've sent.

    Tip: If you don't see the Sent Items folder, click the arrow (>) on the left of your account folder to expand the list of folders.

  2. Select the message you want to view.

    You can search email quickly by using the search option. Search by using keywords used in the message or by using someone's name. To narrow your search to a specific person or subject line, try typing To:<user name> or Subject:<keyword used in the subject line>.

    When you click a message, it's highlighted.

I can't find an item in my Sent Items folder

There are several reasons why an item might not appear in your Sent Items folder.

  • The item hasn't been sent yet. If the email message isn't sent successfully, for example because of connectivity problems or logon issues, it might be stuck in your Outbox folder. If you see a message in the Outbox folder, make sure your connection is working.

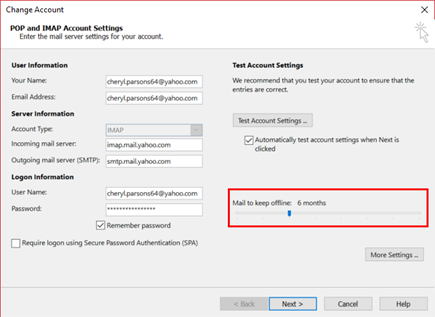
  • The item is too old. Many email accounts are set up to only synchronize sent items for a certain period of time. For example, if you're using Cached Exchange Mode or an IMAP account, you can choose to only keep a few weeks or months of email offline. To change this interval, use the following steps.

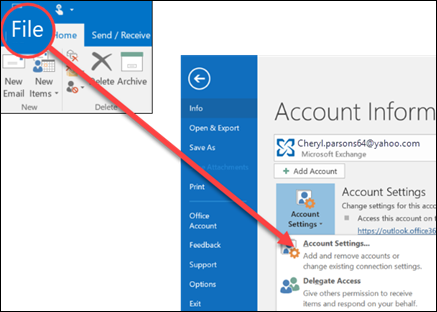
    • Select File > Account Settings > Account Settings.

      Select Account Settings to delete an account.
    • Select your email account and then click Change.

    • Change the Mail to keep offline slider to a longer interval.

      You can change how long mail is kept offline.
  • The item was deleted. Check your Deleted Items or Trash folder.

I can't find my Sent Items folder

You might not be able to view your sent email messages if Outlook isn't setup to keep a copy of sent items.

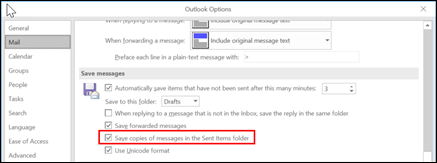
  1. Select File > Options > Mail.

  2. Scroll down to Save messages and make sure the check box for Save copies of messages in Sent Items folder is checked.

    Check the box to save copies of your sent items.

See Also

Resend an email message

Get help when your email messages don't send