Publish OneNote notebooks on Docs.com
Important: Microsoft is retiring the Docs.com service on Friday, December 15, 2017. Please move your existing Docs.com content to other file storage and sharing platforms as soon as possible, as Docs.com will no longer be available after this date. For more information, see Important information about Docs.com end of service.
Publishing a OneNote notebook to Docs.com is easy, but you should first check to see if those notes contain any private information that you don't want to make public. OneNote notebooks contain hidden information that keeps track of when notes were added or edited and who made the changes. Notebooks can also contain a history of previous versions of pages and of recently deleted pages. These features have intentional benefits, but you should consider removing such information before publishing a notebook on Docs.com.
Important: If you want to publish your notes on Docs.com but also want to keep all of the metadata and version history of your notebook intact for personal use, we recommend applying the steps below to a copy of your notebook, not to the original. To export an entire notebook in OneNote 2016, click File > Export > Notebook, and then select the format you want. Alternately, you can back up the original notebook before you begin. For more information, see Back up notes in OneNote 2016 for Windows.
Step 1: Remove hidden author names
Whenever you or someone else edits a page in a notebook, OneNote keeps track of the name of the person who made the changes and when those changes were made. In most cases, this information remains hidden until it is needed or useful to know (for example, when you search for notes). However, anyone who opens your notes after downloading the notebook from Docs.com will be able to see this information. The following steps walk you through the process of removing it.
-
Visit the Onetastic for OneNote site and click the Download link on the top navigation menu.
-
On the page that opens, click the Download Onetastic 32-bit link, and then double-click the downloaded file on your computer to extract the installer file to your hard drive.
Note: The version of Onetastic you choose to download should match your version of OneNote 2016 or 2013. If you're not sure which version you have, open OneNote on your computer, click File > Account, and then click the About OneNote button. The text at the top of the dialog box that opens will tell you whether you're using the 32-bit or 64-bit version of OneNote.
-
Shut down OneNote, if necessary, and then double-click the OnetasticInstaller.exe file to begin installation.
-
When Onetastic has been installed, start OneNote, and then navigate to the notebook you want to publish on Docs.com.
-
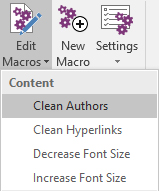
On the Home tab of the ribbon, click the Edit Macros button, and then click Clean Authors on the menu that appears.

-
On the right side of the dialog box that opens, under the Macro Commands heading, click CurrentPage, and then select CurrentNotebook on the menu that appears.

This sets up Onetastic to remove personal information from the entire notebook that you're currently working in, not just from the current page.
-
Click Save in the lower right corner of the Onetastic dialog box to save the change you've made, and then click the X in the upper right corner to close the dialog box.
-
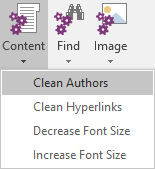
On the Home tab of the ribbon, click the Content button, and then click Clean Authors on the menu that appears.

Depending on the size of your notebook, you may see a progress bar while Onetastic replaces the hidden author names in the notebook with blank entries. When the progress bar has gone away, the author information has been successfully removed.
Step 2: Remove the notebook version history
Whenever you or someone else makes changes to the pages in your notebook, OneNote keeps a previous version of those notes in the notebook history. This feature is intended to let you review changes to important notes and revert to prior versions, if necessary. If you don't remove the notebook history from a notebook before publishing it on Docs.com, it will be available to anyone who downloads your notes. The following steps walk you through the process of removing this information.
-
In OneNote, navigate to the notebook you want to publish on Docs.com.
-
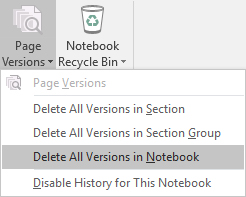
On the ribbon, click the History tab, and then click Page Versions.

-
On the menu that appears, do the following:
-
Click Delete All Versions in Notebook (if available).
-
Click Disable History for This Notebook.
Tip: In addition to keeping a history of page versions, OneNote also keeps automatic copies of any pages that have recently been deleted from the notebook. You may want to empty the Notebook Recycle Bin to avoid publishing any deleted information. To do this, click the History tab, click Notebook Recycle Bin, and then click Empty Recycle Bin.
-
Step 3: Manually sync your changes
In most cases, any changes you make to your notes will be synced by OneNote automatically. However, when preparing a notebook for publication to Docs.com, it's a good idea to force a manual sync to make sure that the removal of personal information was correctly synchronized.
-
In OneNote, click File > Info and then click the View Sync Status button.
-
In the dialog box that opens, click Sync All.
-
Click Close.
You're now ready to publish your notebook to Docs.com to share it with other people all over the world.
No comments:
Post a Comment