Thursday, March 24, 2022

Create a map in visio

  1. Click File > New.

  2. In the Categories list, click the Maps and Floor Plans category.

  3. Click Directional Map, and then click Create.

Add road and metro shapes

  1. From the Road Shapes and Metro Shapes stencils, drag a shape (such as Road round or Curve 1) onto your map, and then resize the shape as necessary.

  2. To set the thickness of a road shape, right-click it, and then click a thickness setting (Thin, Standard, Thick, or Custom.)

    If you choose Custom, you can drag a selection handle or control handle to change the road thickness.

  3. To change the direction of a road shape, use the rotation handle on the selected shape.

  4. To flip a shape, on the Home tab, in the Arrange group, click Position, point to Rotate Shapes, and then click a rotate or flip command.

  5. From Road Shapes, drag other shapes, such as bridges, roundabouts, and interchanges to your map.

Set the relative thickness of road and metro shapes

  1. Make sure that no shapes are selected.

  2. On the View tab, in the Show group, click Task Panes, and then select Shape Data.

  3. In the Shape Data pane, in the Road Width and Metro Width fields, type a base width value.

This value will be applied to thin roads and thin metro lines. The width of standard and thick roads and metro lines will be based on multiples of this value.

Add landmarks and a scale indicator

  • From Landmark Shapes, drag shapes onto your map to indicate natural features (such as trees and lakes) or buildings (such as schools and hospitals).

  • Drag the Scale shape onto your map. To associate the scale with a specific distance, select the shape and then type to add a distance measurement.

Label your map

  • Select a shape that you want to add text to, and then type.

Add text blocks to the page

  1. On the Home tab, in the Tools group, click the Text Block tool.

  2. Drag and draw a text block onto your map, then type your text.

  3. On the Home tab, click Pointer Tool when you are finished adding text.

Create a 3D map

  1. In the Maps and Floor Plans category, click Directional Map 3D, and then click Create.

  2. From Directional Map Shapes 3D, drag road shapes onto the drawing page. You can duplicate road shapes by selecting the shape, and then pressing CTRL+D. Repeat to create multiple road segments.

  3. Align the shapes to create the road configuration you want.

  4. To nudge a shape into position, select the shape and then press the arrow key that represents the direction you want.

  5. To create a longer road or a road grid that can be moved as a single unit, group multiple road shapes together.

  6. Drag other shapes, such as bridges, buildings, and cars onto your map.

  7. To rotate a selected shape, drag the Rotation handle.

  8. To add text to shapes, select a shape, and then type.

Use the Directional Map and Directional Map 3D templates to create drawings of simple maps.

Use directional map shapes, including clearly identifiable roadways, metro lines, and landmarks, to create easy-to-read maps and route directions.
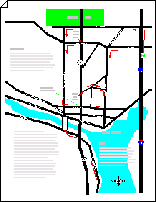
Directional map diagram

Use 3D directional maps to illustrate small geographic areas, such as villages or towns, using colorful three-dimensional shapes.

3-D directional map diagram

Create a directional map

  1. On the File tab, select New.

  2. Under Template Categories, click Maps and Floor Plans, select Direction Map, and then click Create.

  3. Add road, railroad, and metro shapes to your map to establish the route structure:

    Add road shapes

    1. From Road Shapes, drag a road shape (such as Road round or Curve 1) onto your map, and then resize the shape as necessary.

    2. To set the thickness of a road shape, right-click it, and then click a thickness setting (Thin, Standard, Thick, or Custom.)

      If you choose Custom, you can drag a selection handle Selection handles in Visio. or control handle Control handle image - yellow diamond to change the road thickness.

    3. To change the direction of a road shape, on the Home tab, in the Arrange group, click Position, point to Rotate Shapes, and then click a rotate or flip command.

      Tip: You can also change the direction of a shape by using the Rotation handle Rotation handle.

    4. From Road Shapes, drag other shapes, such as bridges, roundabouts and interchanges to your map.

    5. Connect road shapes, using straight segments to connect curved roads and intersections. Glue an end point on a Road round or Road square shape to a connection point on another road shape.

    Add metro shapes

    1. From Metro Shapes, drag metro shapes onto your map.

    2. To change the direction of a road shape, on the Home tab, in the Arrange group, click Position, point to Rotate Shapes, and then click a rotate or flip command.
      You can also change the direction of a shape by using the Rotation handle Rotation handle.

    3. Use straight metro line segments to connect curved metro shapes. Glue the end point of a Metro line or Rounded metro shape to a connection point on another metro shape.

  4. From Landmark Shapes, drag shapes onto your map to indicate natural features (such as trees and lakes) or buildings (such as schools and hospitals).

    Tip: To widen or lengthen a shape, drag a side selection handle. To resize a shape proportionally, drag a corner selection handle.

  5. Label your map.

    Add text to a shape

    Select the shape that you want to add text to, and then type.

    Add a callout

    1. In the Shapes pane, click More Shapes, point to Visio Extras, and select Callouts.

    2. From Callouts, drag a callout shape onto your map.

    Add a text block.

    1. On the Home tab, in the Tools group, click the Text Block tool The Text Box tool..

    2. Drag and draw a text block onto your map.

    3. To enter text, select the text block and then type.

    4. To change the width of the text block (and change the word wrapping), drag a side selection handle Selection handles in Visio..

  6. Add a scale indicator to your map.

    1. From Landmark Shapes, drag the Scale shape onto your map.

    2. To associate the scale with a specific distance, select the shape and then type to add a distance measurement.

  7. You can change the relative thickness of all road and metro shapes in your map.

    1. Make sure that no shapes are selected.

    2. On the View tab, in the Show group, click Task Panes, and then select Shape Data.

    3. In the Shape Data pane, for the Road Width and Metro Width, type a base width value.

      This value will be applied to thin roads and thin metro lines. The width of standard and thick roads and metro lines will be based on multiples of this value.

Create a 3D map

  1. On the File tab, select New.

  2. Under Template Categories, click Maps and Floor Plans, select Directional Map 3D, and then click Create.

  3. From Directional Map Shapes 3D, drag road shapes onto the drawing page. You can duplicate road shapes by selecting the shape, and then pressing CTRL+D. Repeat to create multiple road segments.

  4. Align the shapes to create the road configuration you want.

    Notes: 

    • To nudge a shape into position, select the shape and then press the arrow key that represents the direction you want.

    • To create a longer road or a road grid that can be moved as a single unit, group multiple road shapes together.

  5. Drag other shapes, such as bridges, buildings, and cars onto your map.

  6. To rotate a selected shape, drag the Rotation handle Rotation handle.

  7. To add text to shapes, select a shape, and then type.

Create business cards in word online

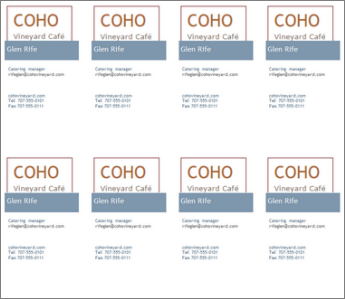
Making business cards like these while you're online is quick and easy.

Business Card template for Word Online

Choose our business card template, and open it in Word for the web.

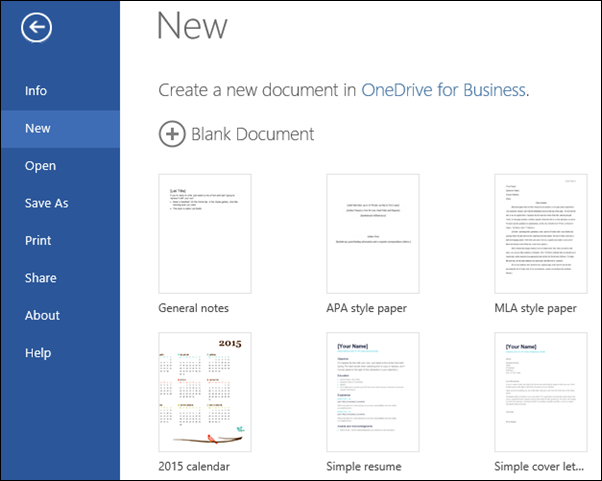
Tip: If you're already in Word for the web, get to the business card template by going to File > New, and then below the template images click More on Office.com.
click More on Office.com
You'll be on the Templates for Word page. In the list of categories, click Business.

When you're working on the business cards, you'll probably want to rename the file and swap out the placeholder pictures with pictures that work for you. Delete the pictures you don't want, and then insert pictures from your computer or from the web.

To print the business cards, press Ctrl+P, and wait for the Print dialog. This template makes 10 cards.

Note: If you don't see a Print dialog box, click the link for opening a PDF version of your business cards. From there, use the PDF program's Print command.

Video and audio file formats supported in powerpoint

Video recommendations

PowerPoint 2010 : .wmv

Newer versions of PowerPoint: .mp4 files encoded with H.264 video and AAC audio

Audio recommendations

PowerPoint 2010 : .wav, .wma

Newer versions of PowerPoint: .m4a files encoded with AAC audio

These names and formats sound complicated, but you can easily convert to and use these formats without having to know anything more than the names.

Supported formats

Supported video file formats

File Format

Extension

Windows Video file (Some .avi files may require additional codecs)

.asf

Windows Video file (Some .avi files may require additional codecs)

.avi

MP4 Video file*

.mp4, .m4v, .mov

Movie file

.mpg or .mpeg

Windows Media Video file

.wmv

*Only PowerPoint 2013 and newer versions. The 32-bit version of PowerPoint 2010 can play an .mp4 or .mov file only if the computer has a QuickTime Player installed. (Read Download QuickTime for Windows, on the Apple site, for more information.) PowerPoint 2013 and newer versions DO require the QuickTime Player to be installed for playing MP4 video files in one particular situation: when you are using Windows 7 running on a virtual machine (VM). 

Supported audio file formats

File format

Extension

AIFF Audio file

.aiff

AU Audio file

.au

MIDI file

.mid or .midi

MP3 Audio file

.mp3

Advanced Audio Coding - MPEG-4 Audio file*

.m4a, .mp4

Windows Audio file

.wav

Windows Media Audio file

.wma

*Only PowerPoint 2013 and newer versions. The 32-bit version of PowerPoint 2010 can only play an .mp4 or .mov file if the computer has a QuickTime Player installed. (Read Download QuickTime for Windows, on the Apple site, for more information.)

Additional information

See Also

Add audio to your presentation

Insert and play a video file from your computer

Insert or link to a video on YouTube

File formats that are supported in PowerPoint

PowerPoint videos not playing on secondary monitor

Video recommendations

.mp4 files encoded with H.264 video and AAC audio

Audio recommendations

.m4a files encoded with AAC audio

These names and formats sound complicated, but you can easily convert to and use these formats without having to know anything more than the names.

Audio from the iTunes Store may not play back when shared

Music files purchased from the iTunes Store can only be played on authorized computers, so people whom you share presentations with might be unable to play iTunes files.

PowerPoint for macOSSupported formats

Supported video file formats in PowerPoint 2016 for Mac, PowerPoint 2019 for Mac, and PowerPoint for Microsoft 365 for Mac

File Format

Extension

AVI movie (Some .avi files may require additional codecs)

.avi or .vfw

MPEG-4 movie

.mp4, .mpg4

Apple MPEG-4 movie

.m4v

MPEG movie

.mpg, .mpeg, .mpe, .m75, .m15

MPEG-2 video

.m2v

MPEG-2 Transport Stream

.ts

QuickTime movie

.mov or .qt

DVI movie

.dif

Supported audio file formats in PowerPoint 2016 for Mac, PowerPoint 2019 for Mac, and PowerPoint for Microsoft 365 for Mac

File format

Extension

AIFF Audio file

.aiff or .aif

AU Audio file

.au or .snd

MP3 Audio file

.mp3 or .mpga

MP2 audio

.mp2

MPEG-4 Audio file

mp4 or .mpg4

Waveform Audio file

.wav, .wave, .bwf

Audible.com audio

.aa or .aax

Apple MPEG-4 audio

.m4a

Advanced Audio Coding - MPEG-2 Audio file

.aac or .adts

Apple CoreAudio format

.caf

Ringtone

.m4r

AC-3 audio

.ac3

Enhanced AC-3 audio

.eac3, .ec3

Windows Media files (.wmv, .wma) aren't supported on PowerPoint 2016 for Mac or PowerPoint for Microsoft 365 for Mac. There are a number of 3rd party tools for Mac that can convert your .wmv or .wma file to one of the supported formats listed above.

Alternatively, if you have a Microsoft 365 subscription that includes Microsoft Stream you can upload the .wmv or .wma file to Stream and insert it into your presentation from there. Learn more about Microsoft Stream.

Audio from the iTunes Store may not play back when shared

Music files purchased from the iTunes Store can only be played on authorized computers, and people with whom you share presentations might be unable to play iTunes files.

Supported video file formats

File Format

Extension

MP4 Video file

.mp4, .m4v, .mov

Movie file

.mpg or .mpeg

Supported audio file formats

File format

Extension

AIFF Audio file

.aiff

AU Audio file

.au

MP3 Audio file

.mp3

Advanced Audio Coding - MPEG-4 Audio file

.m4a, .mp4

Supported video file formats

File Format

Extension

MP4 Video file

.mp4

VP8, VP9

.mkv

Supported audio file formats

File format

Extension

MP3 Audio file

.mp3

Windows Audio file

.wav

MIDI (Musical Instrument Digital Interface)

.mid, .midi

Insert media into your slide

Once you have a converted media file in a suitable format with the correct encoding, go back to the PowerPoint slide where you want to insert your video or audio file. On the Insert tab of the ribbon, click Audio or Video. (For complete details about inserting the media file, see Insert and play a video file from your computer or Add audio to your slides.)

Percentrank exc function

Returns the rank of a value in a data set as a percentage (0..1, exclusive) of the data set.

Syntax

PERCENTRANK.EXC(array,x,[significance])

The PERCENTRANK.EXC function syntax has the following arguments:

  • Array     Required. The array or range of data with numeric values that defines relative standing

  • X     Required. The value for which you want to know the rank.

  • Significance     Optional. A value that identifies the number of significant digits for the returned percentage value. If omitted, PERCENTRANK.EXC uses three digits (0.xxx).

Remarks

  • If array is empty, PERCENTRANK.EXC returns the #NUM! error value.

  • If significance < 1, PERCENTRANK.EXC returns the #NUM! error value.

  • If x does not match one of the values in array, PERCENTRANK.EXC interpolates to return the correct percentage rank.

Example

Copy the example data in the following table, and paste it in cell A1 of a new Excel worksheet. For formulas to show results, select them, press F2, and then press Enter. If you need to, you can adjust the column widths to see all the data.

Data

1

2

3

6

6

6

7

8

9

Formula

Description

Result

=PERCENTRANK.EXC(A2:A10, 7)

Returns the rank of the value 7 from the array contained in A2:A10.

0.7

=PERCENTRANK.EXC(A2:A10,5.43)

Returns the rank of the value 5.43 in the same array.

0.381

=PERCENTRANK.EXC(A2:A10,5.43,1)

Returns the rank of the value 5.43 in the same array, displaying only 1 significant digit in the result (the default is 3).

0.3

Change the appearance of nonworking time in timescale views

You can distinguish vacations and other nonworking days from working days by using colors and patterns.

Keep in mind, though, that this article does not discuss how to set up working and non-working time for your project and resource calendars. Learn more about how to create and manager project and resource calendars for your project.

Note: Although you can format nonworking time, you cannot remove it from the timescale in a view.

Format nonworking time in the Gantt Chart

  1. In the Task or View tab, click Gantt Chart in the View or Task Views section.

  2. In the View tab, click Timescale dropdown in the Zoom section and click Timescale... at the bottom.

  3. Click the Non-working time tab, and then select a color and a pattern to represent nonworking time in the Gantt Chart view.

  4. If you want to change the appearance of the Gantt Chart view to display nonworking time for a particular resource (such as vacation times as well as weekends), in the Calendar list, select the calendar for the resource.

Note: Nonworking time appears in the Gantt Chart view only when it occurs in default increments of the bottom tier of the timescale or greater. For example, if the bottom tier of the timescale is weeks and Saturdays are specified as nonworking time, the nonworking days don't appear.

These instructions are specific to Microsoft Project 2007.

Format nonworking time in the Gantt Chart

  1. On the View menu, click Gantt Chart.

  2. On the Format menu, click Timescale.

  3. Click the Non-working time tab, and then select a color and a pattern to represent nonworking time in the Gantt Chart view.

  4. If you want to change the appearance of the Gantt Chart view to display nonworking time for a particular resource (such as vacation times as well as weekends), in the Calendar list, select the calendar for the resource.

Note: Nonworking time appears in the Gantt Chart view only when it occurs in default increments of the bottom tier of the timescale or greater. For example, if the bottom tier of the timescale is weeks and Saturdays are specified as nonworking time, the nonworking days don't appear.

Format nonworking time in the Calendar view

  1. On the View menu, click Calendar.

  2. On the Format menu, click Timescale.

  3. Click the Date Shading tab.

  4. Under Exception type, click Base Calendar Nonworking Days or Resource Calendar Nonworking Days.

  5. In the Pattern and Color boxes, select the options you want.

  6. If you want to change the appearance of the Calendar view to display nonworking time for a particular resource (such as vacation times as well as weekends), in the Show working time for list, select the calendar for the resource, and then select Resource Calendar Nonworking Days in the Exception type list.

Productivity library

Collaborate in onedrive

Share files or folders

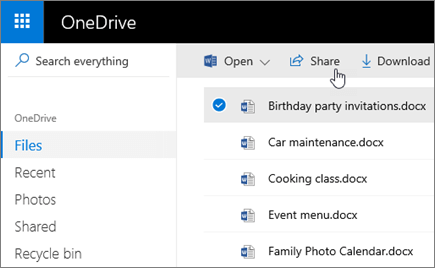
  1. Select the files or folder you'd like to share.

  2. Select Share Share.

  3. Select Anyone with this link can edit this item and set the permissions:

    • Select Allow editing if you want others to be able to edit the file.

    • Uncheck Allow editing if you only want others to be able to view the file.

Screenshot of a selected file and the Share button in OneDrive.

Stop or change sharing

If you are the file owner, or have edit permissions, you can stop or change the sharing permissions.

  1. Select the file or folder you want to stop sharing.

  2. Select Information Information in the upper-right corner to open the Details pane.
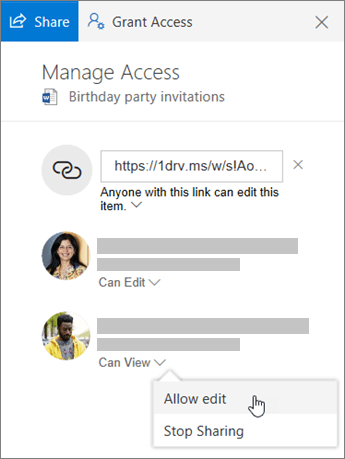
  3. Select Manage access and:

    • Select the X next to a link to disable it.

    • Select Can Edit or Can View, and then select Stop Sharing.

    • Select Can Edit or Can View and then select Change to….

Screenshot of the Sharing section of the Details pane for a shared file.