Monday, January 31, 2022

Work contour fields

The Work Contour field provides choices for the contour shape to use for the resources assigned to a task. The work contour determines how work for an assignment is to be distributed across the duration of the assignment. No information actually appears in the task or resource version of this field; it merely makes the corresponding Work Contour information available for assignments. 

There are several categories of Work Contour fields.

Data Type    Enumerated

Work Contour (task field)

Entry Type    Null

Best Uses    Add the Work Contour task field to the sheet portion of the Task Usage view when you want to see the corresponding Work Contour fields for the individual assignments on the task.

Examples    You are reviewing the work contours for task assignments. You add the Work Contour task field to the Task Usage view. No information appears in the Work Contour field next to the task name itself. However, the work contours for the tasks' assignments appear in the Work Contour assignment fields below each task name. You see that for the "Coordinate trade show" task, Jamie is assigned with a back-loaded work contour.

Work Contour (resource field)

Entry Type    Null

Best Uses    Add the Work Contour resource field to the sheet portion of the Resource Usage view when you want to see the corresponding Work Contour fields for a resource's individual assignments.

Examples    You are reviewing the work contours for your resources' assignments. You add the Work Contour resource field to the Resource Usage view. No information appears in the Work Contour field next to Jamie's name. However, the work contours for Jamie's assignments appear in the Work Contour assignment fields below Jamie's name. You see that for Jamie, the "Coordinate trade show " task has a back-loaded work contour.

Change where sent email messages are saved

In Outlook, you can specify the folder where sent email items are saved.

Outlook 2016 and Outlook 2013 for Windows use the Exchange protocol to connect to Outlook.com (formerly Hotmail). The Exchange protocol allows you to change where sent items are stored.

When you use an IMAP account, you can't change where sent items are stored, although you can turn off saving of sent messages entirely.

Note: You can check to see if you're using an IMAP account by selecting File > Account Settings > Account Settings.

For Outlook.com and other Exchange accounts use the steps below to save your sent messages in the originating folder.

Change where sent email messages are saved when using an Exchange account

  1. Click File > Options > Mail.

  2. Under Save messages, make sure the Save copies of messages in the Sent Items folder check box is selected.

  3. Select the When replying to a message that is not in the Inbox, save the reply in the same folder check box.
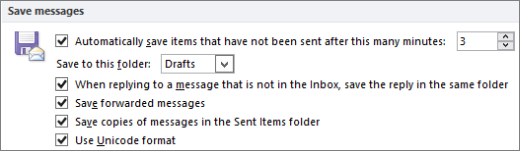
    Saving items in the original folder

Turn off saving sent items in an IMAP email account

If you are using an IMAP account with Outlook, you may notice that sent messages are being saved twice. To resolve this, you can turn off saving of sent items in Outlook.

  1. On the File menu, click Account Settings > Account Settings.

  2. Select the IMAP, and then click Change.

  3. Then select the Don't save copies of sent items check box.

  4. Click Next, then Done.

Change where sent email messages are saved when using an Exchange account

By default, a copy of each message that you send is saved in the Sent Items folder.

When you reply to or forward an email message that is saved in any folder other than the Inbox, you can configure Outlook to save a copy of the sent message in the same folder as the original message.

  1. Click File > Options > Mail.

  2. Under Save messages, make sure the Save copies of messages in the Sent Items folder check box is selected.

  3. Select the When replying to a message that is not in the Inbox, save the reply in the same folder check box.

    Saving items in the original folder

Change where sent messages are saved when using an IMAP email account

  1. On the File menu, click Account Settings > Account Settings.

  2. Select an email account that is not an Exchange account, and then click Change.

  3. Click More Settings.

  4. In the Internet email Settings dialog box, click the Sent Items tab.
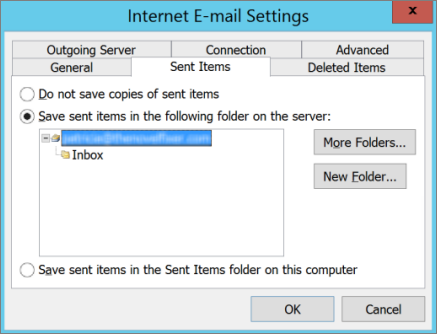
    Choosing a folder on the Sent Items tab

  5. Click Save sent items in the following folder on the server, expand the folder list, and then click a folder.

    Or, to choose a custom folder for saving your sent items, click Save sent items in the following folder on the server, and then click New Folder or More Folders.

Change where sent email messages are saved when using an Exchange account

By default, a copy of each message that you send is saved in the Sent Items folder.

When you reply to or forward an email message that is saved in any folder other than the Inbox, you can configure Outlook to save a copy of the sent message in the same folder as the original message.

  1. On the Tools menu, click Options, and then on the Preferences tab, click email Options.

  2. Under Message handling, the Save copies of messages in Sent Items folder check box must be selected.
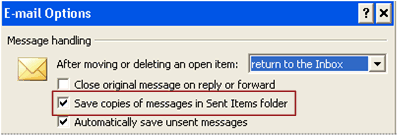
    Message handling options
  3. Click Advanced email Options.

  4. Select the In folders other than the Inbox, save replies with original message check box.

Change where sent messages are saved when using an IMAP email account

Note: The first time you send an email message with your IMAP account, you are prompted to choose the folder where you want sent items saved.

  1. On the Tools menu, click Account Settings.

  2. Select an email account that is not an Exchange account, and then click Change.

  3. Click More Settings.

  4. In the Internet email Settings dialog box, click the Folders tab.
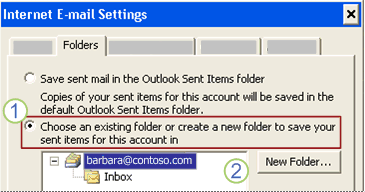
    Change the folder where sent items are saved

    1 To choose a custom folder for saving your sent items, click Choose an existing folder or create a new folder to save your sent items for this account in.

    2 Click a folder to save the sent items in, or click New Folder.

    By default, the sent messages from all your accounts are saved in the default Sent Items folder in Outlook. If you have an Exchange account in your Outlook profile, the default folder is Sent Items in your Exchange mailbox.

  5. Click Choose an existing folder or create a new folder to save your sent items for this account in, expand the folder list, and then click a folder. Usually, you choose Sent Items in the data file for the account that you selected.

    Note: You should first make sure that you are subscribed to the Sent Items folder so that it will appear in the Internet email Settings dialog box as described in step 4. For information about how to subscribe to IMAP account folders, see the See Also section.

Sunday, January 30, 2022

Custom form script is now disabled by default

Last updated: Oct 13, 2017

ISSUE

Custom form script is now disabled by default and requires setting registry keys to re-enable it.

  1. The new registry key has a default value of 1, which indicates form script should not run.

    First create this key:

    32 bit Office on 64 bit Windows

    HKEY_LOCAL_MACHINE\SOFTWARE\WOW6432Node\Microsoft\Office\16.0\Outlook\Security

    32 bit Office on 32 bit Windows or 64 bit Office on 64 bit Windows

    HKEY_LOCAL_MACHINE\SOFTWARE\Microsoft\Office\16.0\Outlook\Security

    Then create DWORD (32-bit) Value 0 and set the name to DisableCustomFormItemScript to enable custom form scripts.

  2. Once custom form scripts have been enabled at all, they must then be enabled per form message class. For instance, if you have a form with the message class IPM.Note.Custom, we must register "IPM.Note.Custom" as a trusted form message class. To do this, first create this key:

    32 bit Office on 64 bit Windows

    HKEY_LOCAL_MACHINE\SOFTWARE\WOW6432Node\Microsoft\Office\16.0\Outlook\Forms\TrustedFormScriptList

    32 bit Office on 32 bit Windows or 64 bit Office on 64 bit Windows

    HKEY_LOCAL_MACHINE\SOFTWARE\Microsoft\Office\16.0\Outlook\Forms\TrustedFormScriptList

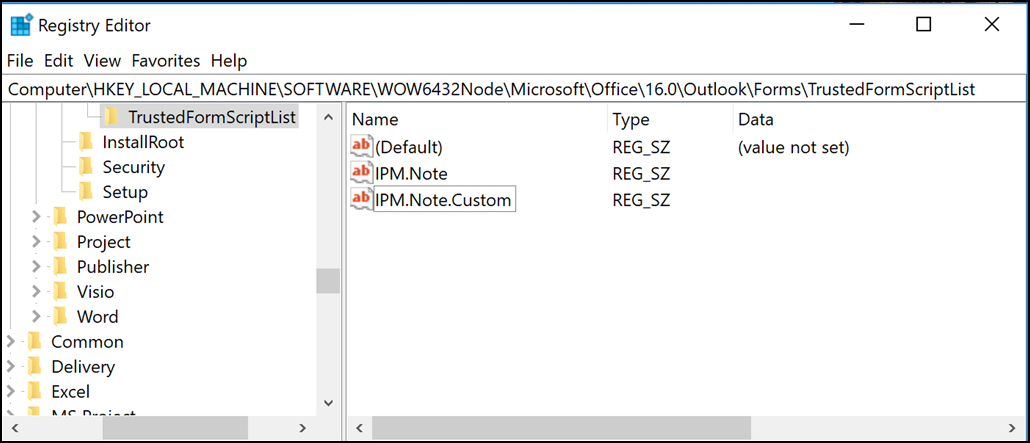
Then, create REG_SZ values in this key for each form you wish to allow scripts to run. In the above example, you would create a REG_SZ value named "IPM.Note.Custom" with empty data.

When designing a form, Run This Form will run a form using the message class of the base form. So if you started designing an IPM.Note form and want to Run This Form, you will need to have IPM.Note registered. After you publish, the published message class is what will be checked. Once you have finished designing your form and published it to a custom form name, remove the standard "IPM.Note" from the trusted list.

Notes: 

  • You need to restart Outlook after setting the TrustedFormScriptList key.

  • The example registry keys use 16.0 for Outlook 2016. Use 15.0 for Outlook 2013, 14.0 for Outlook 2010 and 12.0 for Outlook 2007.

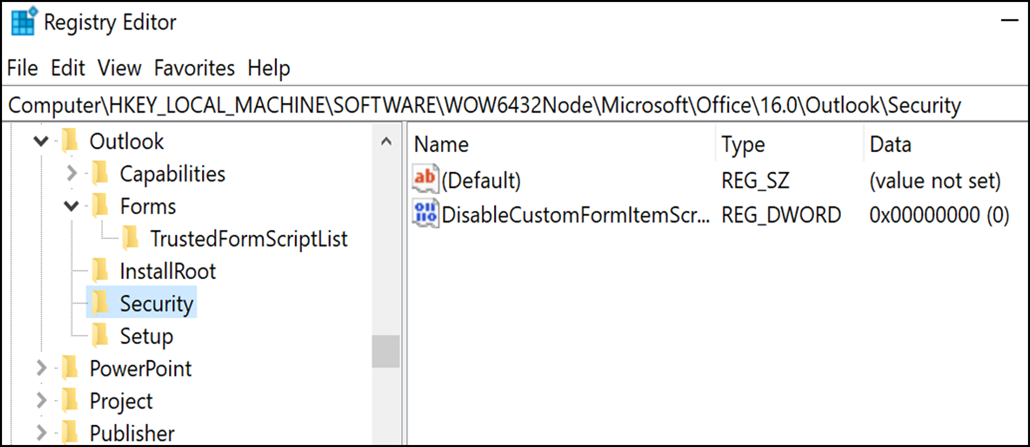
After making the above changes the registry keys will look like the following:

[HKEY_LOCAL_MACHINE\SOFTWARE\WOW6432Node\Microsoft\Office\16.0\Outlook\Security]

DisableCustomFormItemScript"=dword:00000000

[HKEY_LOCAL_MACHINE\SOFTWARE\WOW6432Node\Microsoft\Office\16.0\Outlook\Forms\TrustedFormScriptList]

"IPM.Note.Custom"=""

"IPM.Note"=""

Registry keys

Registry keys

NOTE: In some cases forms in secondary mailboxes and Public folders still don't work after the registry key settings. To fix this, enable scripts in the Trust Center:

  1. Click File > Options. Then select Trust Center > Trust Center Settings > Email Security.

  2. Under the Script in Folders section, click the checkbox for Allow script in shared folders and Allow script in Public folders and click OK and OK again to close out the windows.

STATUS

The change was first introduced in the September 12th, 2017 Outlook Public Updates and is included in the following MSI updates which now require the registry keys.

Outlook 2007

Outlook 2010

Outlook 2013

Outlook 2016

Click to Run status is as follows:

  1. Monthly Channel (Current Channel) will start supporting the registry keys in the update scheduled for September 18th release build 16.0.8431.2079.

  2. Semi-Annual Channel (FRDC) supports the registry keys with build 16.0.8431.2079.

  3. Deferred Channel supports the registry keys with build 16.0.8201.2193.

  4. Deferred Extended status is TBD.

  5. Insider Fast status is TBD.

  6. Insider Slow supports the registry keys with build 16.0.8431.2079.

More Resources

Icon Experts (brain, gears)

Ask the experts

Connect with experts, discuss the latest Outlook news and best practices, and read our blog.

Outlook Tech Community

Icon Community

Get help in the community

Ask a question and find solutions from Support Agents, MVPs, Engineers, and Outlook users.

Outlook Forum on Answers

Icon feature request (light bulb, idea)

Suggest a new feature

We love reading your suggestions and feedback! Share your thoughts. We're listening.

Find out how

See Also

Fixes or workarounds for recent issues in Outlook for Windows

Resolve Outlook for Windows issues with automated troubleshooting tools  

Change the color style or weight of a line in word for mac

You can change the look of a line shape by changing its color, line style, or weight. You can also apply a predefined Quick Style to quickly change the look of your line.

Note: A line shape is a line inserted by clicking the Shapes button on the Insert tab. For more about inserting lines, see Add shapes.

Add a Quick Style to a line

Quick Styles for lines include theme colors from the document theme, shadows, line styles, gradients, and three-dimensional (3-D) perspectives. Try different Quick Styles until you find one that you like.

  1. Select the line you want to change.

    If you want to change multiple lines, select the first line, and then press and hold COMMAND while you select the other lines.

  2. Click the Shape Format tab, and then click the Quick Style you want for the line.

    Shape Format tab with Lines gallery

    To see more Quick Styles, click the arrow at the bottom of the Quick Style gallery.

    Note: If you don't see the Shape Format tab, make sure you've selected the line.

Change the color of a line

  1. Select the line that you want to change.

    If you want to change multiple lines, select the first line, and then press and hold COMMAND while you select the other lines.

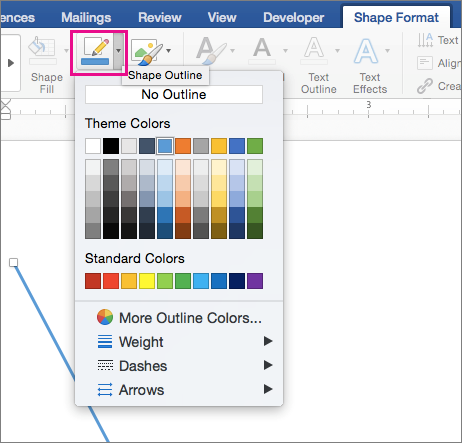
  2. Click the Shape Format tab, click the arrow next to Shape Outline, and then click the color that you want.

    Shape Format tab with Shape Outline option highlighted.

    Note: If you don't see the Shape Format tab, make sure you've selected the line.

    To use a color that isn't a theme color, click More Outline Colors, and then click the color you want. You can also mix your own color using the color wheel or the color palettes. Custom colors are not updated if you later change the document theme.

Make a line dashed

  1. Select the line you want to change.

    If you want to change multiple lines, select the first line, and then press and hold COMMAND while you select the other lines.

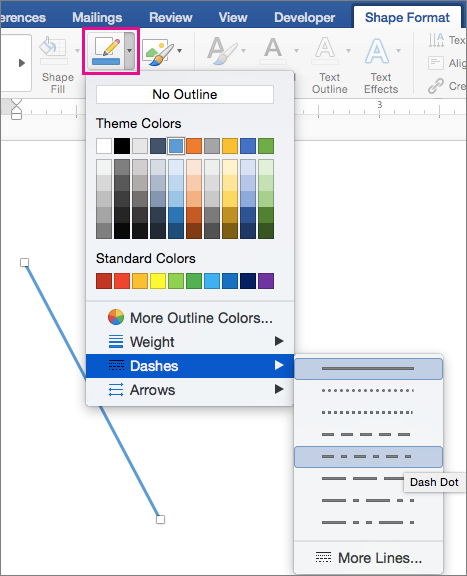
  2. Click the Shape Format tab, click the arrow next to Shape Outline, point to Dashes, and then click the style you want.

    Shape Format tab with Shape Outline highlighted and Dashes menu items.

  3. To create a custom style, click More Lines, and then choose the options that you want.

Change the weight of a line

  1. Select the line that you want to change.

    If you want to change multiple lines, select the first line, and then press and hold COMMAND while you select the other lines.

  2. Click the Shape Format tab, click the arrow next to Shape Outline, point to Weight, and then click the line weight that you want.

  3. To create a custom line weight, click More Lines, and then choose the options that you want.

    Note: To draw a double line, draw a single line, copy and paste a second line next to it, and then group the two lines.

Which Office program are you using?

Word

Do any of the following:

Add a line

  1. On the Home tab, under Insert, click Shape, point to Lines and Connectors, and then click the line style that you want.

    Word Home tab, Insert group

  2. In your document, hold down the mouse button and draw the line where you want.

    Tip: To draw a line at a pre-set angle, such as vertical or horizontal, hold down SHIFT as you draw the line.

Change line style

  1. Click the line that you want to change, and then click the Format tab.

  2. Under Shape Styles, click the style that you want.

    Format tab, Shape Styles group (Line)

    To see more styles, point to a style, and then click More Down Arrow.

Change line color

  1. Click the line that you want to change, and then click the Format tab.

  2. Under Shape Styles, click the arrow next to Line  Border Color button, and then click the color that you want.

Change line width

  1. Click the line that you want to change, and then click the Format tab.

  2. Under Shape Styles, click the arrow next to Line  Border Color button, point to Weights, and then click the width that you want.

Add arrows to the end of the line

  1. Click the line that you want to change, and then click the Format tab.

  2. Under Shape Styles, click the arrow next to Line  Border Color button, point to Arrows, and then click the arrow that you want.

Draw a custom line

  1. On the Home tab, under Insert, click Shape, point to Lines and Connectors, and then click Scribble  Scribble button.

    Word Home tab, Insert group

  2. In your document, hold down the mouse button and draw the line where you want.

Delete a line

  • Click the line that you want to delete, and then on the Standard toolbar, click Cut   Cut button.

PowerPoint

Do any of the following:

Add a line

  1. On the Home tab, under Insert, click Shape, point to Lines and Connectors, and then click the line style that you want.

    Home tab, Insert group

  2. In your document, hold down the mouse button and draw the line where you want.

    Tip: To draw a line at a pre-set angle, such as vertical or horizontal, hold down SHIFT as you draw the line.

Change line style

  1. Click the line that you want to change, and then click the Format tab.

  2. Under Shape Styles, click the style that you want.

    Format tab, Shape Styles group (Line)

    To see more styles, point to a style, and then click More Down Arrow.

Change line color

  1. Click the line that you want to change, and then click the Format tab.

  2. Under Shape Styles, click the arrow next to Line Border Color button, and then click the color that you want.

Change line width

  1. Click the line that you want to change, and then click the Format tab.

  2. Under Shape Styles, click the arrow next to Line Border Color button, point to Weights, and then click the width that you want.

Add arrows to the end of the line

  1. Click the line that you want to change, and then click the Format tab.

  2. Under Shape Styles, click the arrow next to Line Border Color button, point to Arrows, and then click the arrow that you want.

Draw a custom line

  1. On the Home tab, under Insert, click Shape, point to Lines and Connectors, and then click Scribble  Scribble button.

    Home tab, Insert group

  2. In your document, hold down the mouse button and draw the line where you want.

Delete a line

  • Click the line that you want to delete, and then on the Standard toolbar, click Cut   Cut button.

Excel

Do any of the following:

Add a line

  1. On the Standard toolbar, click Show or hide the Media Browser  Media Browser button.

  2. Click Shapes  Shapes tab, and then on the pop-up menu, click Lines and Connectors.

  3. Click the line style that you want.

  4. In your document, hold down the mouse button and draw the line where you want.

    Tip: To draw a line at a pre-set angle, such as vertical or horizontal, hold down SHIFT as you draw the line.

Change line style

  1. Click the line that you want to change, and then click the Format tab.

  2. Under Shape Styles, click the style that you want.

    Format tab, Shape Styles group (Line)

    To see more styles, point to a style, and then click More Down Arrow.

Change line color

  1. Click the line that you want to change, and then click the Format tab.

  2. Under Shape Styles, click the arrow next to Line Border Color button, and then click the color that you want.

Change line width

  1. Click the line that you want to change, and then click the Format tab.

  2. Under Shape Styles, click the arrow next to Line Border Color button, point to Weights, and then click the width that you want.

Add arrows to the end of the line

  1. Click the line that you want to change, and then click the Format tab.

  2. Under Shape Styles, click the arrow next to Line Border Color button, point to Arrows, and then click the arrow that you want.

Draw a custom line

  1. On the Standard toolbar, click Show or hide the Media Browser  Media Browser button.

  2. Click Shapes  Shapes tab, and then on the pop-up menu, click Lines and Connectors.

  3. Click Scribble Media Browser Scribble button.

  4. In your document, hold down the mouse button and draw the line where you want.

Delete a line

  • Click the line that you want to delete, and then on the Standard toolbar, click Cut   Cut button.

See also

Align objects

Add shapes

Your computer is causing poor audio quality

Your computer is running slow and it is causing poor audio quality. You may have too many applications running at the same time on your computer. Try closing a few unnecessary applications. Also, make sure your computer's device drivers are current.

Also, make sure the device you are using is optimized for Lync 2010. For a list of optimized devices, see Phones and Devices for Microsoft Office Communicator.

If the problem persists, transfer the call to a landline. To transfer a call, in the Lync conversation window, click the Transfer button, and do one of the following:

  • Click one of your other numbers (such as your mobile phone number).

  • Click Another Person or Number, and then in the dialog box that is displayed, type the phone number you want to transfer the call to, and then click OK.

Use onenote class notebook in teams

Every class team comes with its own linked OneNote Class Notebook. Your Class Notebook is a digital notebook for the whole class to store text, images, handwritten notes, attachments, links, voice, video, and more.

Teams delivers these essential components of the OneNote Class Notebook experience:

  • Student Notebooks - a private space shared between the teacher and each individual student. Teachers can access every student notebook, while students can only see their own.

  • Content Library - a read-only space where teachers can share handouts with students.

  • Collaboration Space - a space where everyone in your class can share, organize, and collaborate. 

In this article

Find Class Notebook  in Teams

The Class Notebook is the central location for viewing and interacting with the Content Library, Collaboration Space, and each student's private space.

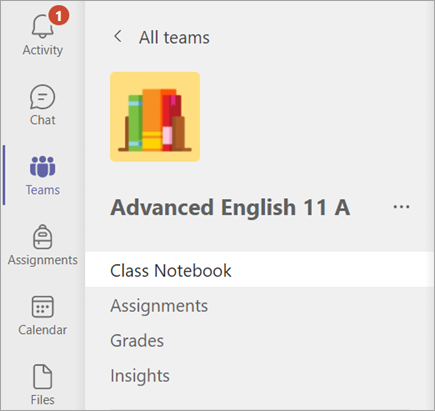
  1. Navigate to the desired class team, then select Class Notebook.

    Class Notebook tab in a class team

  2. Add or edit pages using the expandable menu at the left side of your notebook.

Set up your Class Notebook

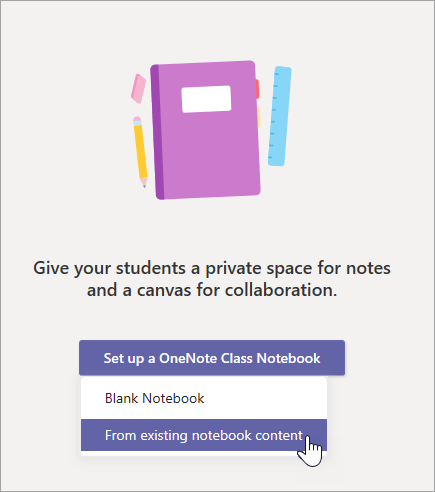
If you haven't set up your Class Notebook yet, you'll be guided through the right steps the first time you visit the Class Notebook app. You can either create a blank notebook from scratch or copy content from an existing Class Notebook.

Create a Class Notebook from existing notebook content.

Use Class Notebook in a channel

Each time you create a new channel in a class team, a new section is automatically created in the Class Notebook's Collaboration Space. All students and teachers can edit and work on OneNote pages within a channel.

  1. Navigate to a class team, then select a channel.

  2. Select the Notes tab.

    Highlighting the notes section found within a Class Team's channel. Use this button to access the Class Notebook in a channel.

Open Class Notebook in full-screen mode

Expand the Class Notebook tab to a bigger size by selecting Expand tab  Expand icon for Class Notebook in Teams.

Manage Class Notebook settings

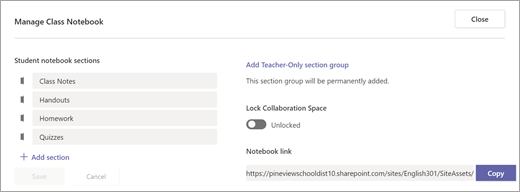
Manage your Class Notebook settings by navigating to your notebook in Teams, select Class Notebook, then Manage Notebooks.

Cursor hovers over the black notebook in the Class Notebook section in OneNote. Use this feature to manage your class notebooks.

Use these settings to:

  • Edit notebook sections 

  • Copy a link to your notebook

  • Create a Teacher-only section group

  • Lock the Collaboration Space

Manage Class Notebook options

Note: To create separate Collaboration Space permissions in your Class Notebook, follow these steps. All the Class Notebooks you've created in Microsoft Teams will be listed under your Co-owned notebooks.

Create assignments with Class Notebook pages

Add Class Notebook pages to assignments for students to edit or reference. To create an assignment using a Class Notebook page:

  1. Add the page to your notebook's Content Library or Collaboration Space.

  2. Navigate to Assignments in your class team and select the Create button.

  3. Fill out the details for your assignment and select Select to attach a file.Add resources. In the box that opens, select Class Notebook and navigate through your notebook's sections to choose the page you'd like to attach.
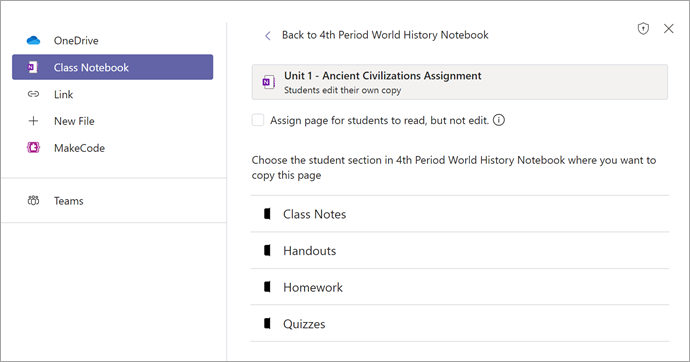
    Tip: When adding a page from your Content Library, click Assign page for students to read, but not edit to add resources as read-only materials. If you select this option, skip step 4.

  4. Choose the section of your students' notebooks you'd like the page distributed to. For example: Handouts.

  5. Select Done when you're finished. Each student will now have a copy of the page inside their Class Notebooks. They can also open the page directly from the assignment card in Microsoft Teams.

Assign page as an assignment in Teams using OneNote Class Notebook

Note: Check to see which version of OneNote students are using before creating your assignment. Using these versions of OneNote ensures that notebook pages you assign will lock and prevent students from editing them after the assignment's due date passes. The student's page will lock when they Turn in the assignment, but unlock when you Return an assignment or they select Undo turn in.

Review assignments with Class Notebook pages

Review assignments and add feedback in a breeze without leaving Microsoft Teams:

  1. Navigate to Assignments in your class team.

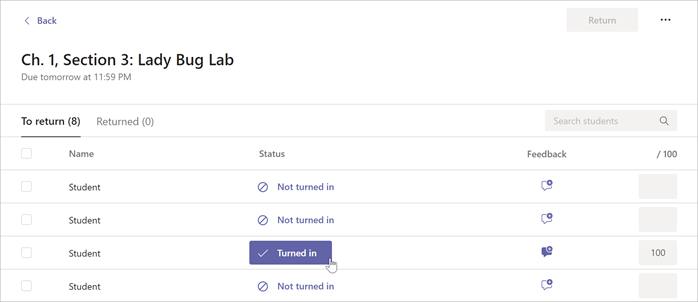
  2. Open the assignment, select the Turned in button underneath the student's work status.

    Cursor is hovering over the Turned in button inside of a selected Assignment in Microsoft Teams.

  3. Review the student's work and add any feedback or points. You can add feedback directly to the Class Notebook page or using the Feedback box. Your changes will be saved automatically.

    Tips: 

    • To open and edit the page in the desktop app or the browser, select More attachment options  More  next to the name of the Class Notebook page.
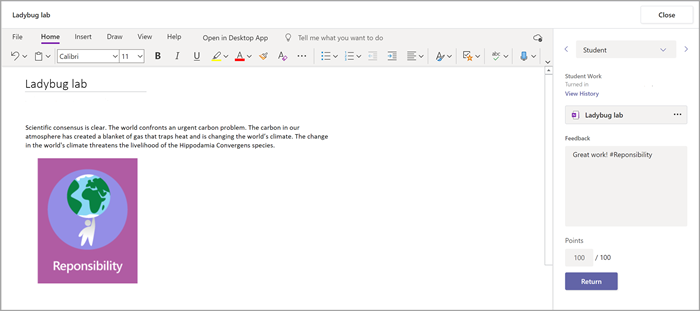
    • Add feedback to a students assignment using the Class Notebook add-in found in Microsoft Teams Assignments.

  4. When you're ready to return your student's work, select Return.

Open Class Notebook in OneNote

Select Open in OneNote to launch into OneNote and access all of Class Notebook's learning features.

Notes: 

  • When using a OneNote Class/Staff Notebook created via Microsoft Teams, you cannot add/remove Students or members using the Class Notebook Wizard online.

  • Notebook members must be added/removed via Microsoft Teams.

Learn more

Class Notebook Support Library 

Learn more about using Class Notebook in OneNote

Using OneNote for the web

Additional resources for educators