Saturday, July 31, 2021

Sort data in a table

Sorting is one of the most common tools for data management. In Excel, you can sort your table by one or more columns, by ascending or descending order, or do a custom sort.

Your browser does not support video.

Sort the table

  1. Select a cell within the data.

  2. Select Home > Sort & Filter.
    Sort&Filter
    Or, select Data > Sort.
    DATA-Sort&Filter

  3. Select an option:

    • Sort A to Z - sorts the selected column in an ascending order.

    • Sort Z to A - sorts the selected column in a descending order.

    • Custom Sort - sorts data in multiple columns by applying different sort criteria.

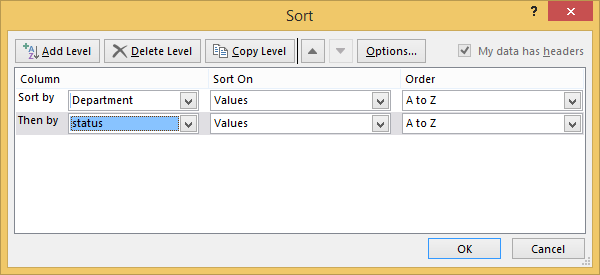
      Here's how to do a custom sort:

      1. Select Custom Sort.

      2. Select Add Level.
        Add Level

      3. For Column, select the column you want to Sort by from the drop-down, and then select the second column you Then by want to sort. For example, Sort by Department and Then by Status.

      4. For Sort On, select Values.

      5. For Order, select an option, like A to Z, Smallest to Largest, or Largest to Smallest.

      6. For each additional column that you want to sort by, repeat steps 2-5.

        Note: To delete a level, select Delete Level.

      7. Check the My data has headers checkbox, if your data has a header row.

      8. Select OK.

Need more help?

You can always ask an expert in the Excel Tech Community or get support in the Answers community.

See Also

Sort data in a range or table

Make confident purchase decisions from anywhere

It's difficult to make purchase decisions when reports, quotes, and contracts are stored in different locations. You need a way to organize and share information and documentation in one location that's easily accessible.

Your browser does not support video.

Details  

Make sure everyone on your team has access to the latest quotes and documentation by storing them in SharePoint. You can even give access to external vendors, clients, and partners. It's faster than email and it ensures everyone always has access to the latest requirements.

When your teams are on the go, they can still access the SharePoint and the necessary files using their mobile device, plus make edits, changes and update documentation.

Once you've all compared the various quotes, availability, and timing and have come to a decision, create a PO and share it by sending a link to the document from SharePoint.

Highlights

  • Access documents and reports from a central location, on any device.

  • Share files with internal and external teams.

  • Store and access important documents anytime to make decisions faster.

Learn More

What is SharePoint?

Call in to a skype for business meeting

If the meeting request for a Skype for Business Meeting includes a dial-in phone number and conference ID, then you can call into the meeting. Calling in is handy if you don't have a computer or prefer to use a phone for audio.

Important:  If you or another Skype for Business for Office 365 operated by 21Vianet user set up the meeting, the meeting request will not include call-in information. This might be true in other cases as well, depending on the meeting organizer's account configuration. For details contact your workplace technical support.

Note:  If you don't want to call in with a phone, you can connect to the meeting by using Skype for Business. For details, see Join a Lync Meeting.

  1. On your phone, dial the conference number listed in your meeting request.

Tip:  If you're traveling, click Find a local number in the meeting request to find the numbers available for your current location.

  1. Enter the Conference ID by using your phone dial pad.

  2. Enter a PIN and work number or extension if prompted. This happens only if you're an attendee of a secured meeting that requires admits only authenticated callers.

    Note:  If you don't remember your PIN, in the meeting request, click Forgot your Dial-in PIN, and follow the instructions about resetting your PIN.

    Depending on the Skype for Business Meeting settings, you might have to wait to be admitted, or you might get connected automatically.

  3. (Optional) When in the meeting, press *1 on your phone to get a list of the options you can use, such as mute, unmute, and so on.

Top of Page

View time clock data for your team in staffhub

Transfer a lync call

You can transfer a Lync call to another person or number. For example, if you need someone else to handle the call, you can transfer to them. Or if you need to leave your office, but want to continue your conversation, you can transfer the call to your cell phone.

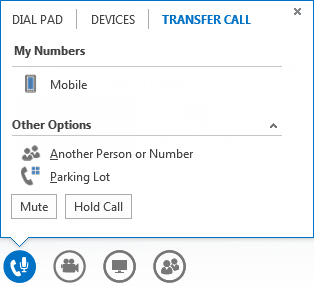
  1. Point to the phone/mic icon in the call window.

  2. Click the TRANSFER CALL tab, and choose one of the options:

  3. Under My Numbers, click one of your numbers, such as your mobile phone, (these are the numbers that were added to your Lync account).

  4. Under Other Options, click Another Person or Number. Then select a person, or type a number in the bar, and click OK.

Screen shot of transfer a call menu

Outlook 2016 keeps asking for username and password

Important: This issue is now closed with the fix indicated below. For more information on other recent issues for your application, see Fixes or workarounds for recent Office issues.

Last updated: September 2016

Issue

If you're connected to an Exchange 2013 server, you might be prompted to enter your user name and password in Outlook 2016, even though you're logged in to your computer with your network credentials and Outlook should silently log you in.

Status: Fixed

We apologize for any inconvenience this issue has caused and want to let you know that a fix has been released. Please install the latest updates to resolve this issue. To update Office, go to File > Account > Update Options > Update Now.

Have a feature request?

Lightbulb - Idea

We love reading your suggestions on new features and feedback about how you use our products! Share your thoughts on the Outlook UserVoice site. We're listening.

See Also

Fixes or workarounds for recent issues in Outlook for Windows

Create and add an email signature in outlook com

Create an email signature that you can add automatically to all outgoing messages or add manually to specific ones.

Create an email signature

  1. Sign in to Outlook.com and select Settings Settings > View all Outlook settings at the top of the page.

  2. Select Mail >Compose and reply.

  3. Under Email signature, type your signature and use the available formatting options to change its appearance.

    Note: You can have only one signature per account.

    • If you want your signature to appear at the bottom of all new email messages that you compose, select the Automatically include my signature on new messages I compose check box.

    • If you want your signature to appear on messages that you forward or reply to, select the Automatically include my signature on messages I forward or reply to check box.

    • If you don't select these options, you can manually add your signature to a selected message. For details, see Manually add your signature to a new message.

  4. Select Save when you're done.

    Note: You can always return to the Compose and reply page and select or clear the check box for automatically including your signature.

Manually add your signature to a new message

If you've created a signature, but didn't choose to automatically add it to all outgoing messages, you can add it later when you write an email message.

  1. Go to your mailbox and choose New message.

  2. Type your message, and then choose More actions > Insert signature at the bottom of the compose pane.


  3. When your email message is ready, choose Send.

Still need help?

Note: You will need to sign in first to get support. If you can't sign in, go to Account support.