Wednesday, December 30, 2020

Outline code1 10 fields

The Outline Code1 through Outline Code10 custom fields contain an alphanumeric code you define to represent a hierarchical structure of tasks or resources. Outline codes are custom tags for tasks or resources that share traits; you can use them to group tasks or resources in ways you need. For example, you can create outline codes to represent the cost accounting codes associated with tasks, an organizational breakdown structure, or job codes. You can then use one of the Outline Code fields to assign the appropriate outline codes to applicable tasks or resources. You can also see summarized, or rolled up, information about the grouping.

There are several categories of Outline Code1-10 fields.

Data Type    Outline code

Outline Code1-10 (task fields)

Entry Type    Entered

Best Uses    Add one of the Outline Code fields to a task sheet view when you want to display the custom outline code. You can also use the outline code for grouping, filtering, and sorting tasks. Create and apply outline codes that reflect the type of information and structure you need to see when viewing task information.

Example    The project accountant refers to the project plan to obtain information about task costs. She wants to see tasks grouped by cost centers and to obtain summarized information based on these cost centers. She creates a custom outline code field named "Task Cost Code," along with a lookup table with the list of codes. She then applies the appropriate cost codes to the applicable tasks. She gets the hierarchical and summarized information she needs when grouping by the custom Task Cost Code outline code field.

Remarks    You can define the set of outline codes, with a task sheet view displayed, in the Customize Fields dialog box.

You can copy the custom fields you create to other project files in the Organizer dialog box.

Outline Code1-10 (resource fields)

Entry Type    Entered

Best Uses    Add one of the outline code fields to a resource sheet view when you want to display the custom outline code. You can also use the outline code for grouping, filtering, and sorting resources. Create and apply outline codes that reflect the type of information and structure you need to see when viewing resource information.

Example    The project resource manager refers to the project plan to obtain organizational information about resources. He wants to see resources grouped according to the organizational breakdown structure, and to obtain summarized information based on this structure. He creates a custom outline code field named "Organization," along with a lookup table with the list of codes. He applies the appropriate organization codes to the applicable resources. He sees the hierarchical and summarized information he needs when grouping by the custom Organization outline code field.

Remarks    To define the set of outline codes, with a resource sheet displayed, in the Customize Fields dialog box.

You can copy the custom fields you create to other project files in the Organizer dialog box.

What s new in project 2013

The first thing you'll see when you open Project 2013 is a sharp new look. But don't stop there. Look closer, and you'll see that Project 2013 can help you:

If you're ready to jump right into a project, see The project management road map.

Get started quickly

The Project 2013 Welcome Center

Instead of dropping you in a blank file, Project 2013 takes you to a one-stop center for starting your project. Browse the premade templates, import info from Excel or a SharePoint site, or just click Blank Project to get a clean Gantt Chart. You can open previous projects from your computer or OneDrive from there, too.

Show off project data

Graphical reports

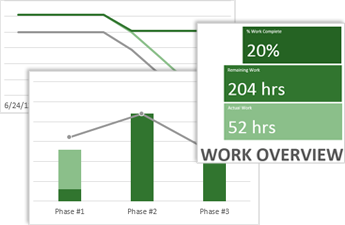
Sample Work Overview report

With Project 2013, you can create crisp, colorful, professional reports without having to export your data to another program. Add pictures, charts, animation, links, and more — everything you need to clearly and effectively share project status info with your stakeholders and team members.

To learn how to use the new reporting features, see Create a project report.

A whole new set of reports

An entirely new set of pre-installed reports takes full advantage of the new graphics and formatting capabilities. The walls of data are gone, replaced by vivid charts and images that better tell your project's story at a glance. You can add or remove whatever elements you want to these reports. You can even change the colors!

Burndown reports

Sample burndown chart showing baseling, remaining, and remaining actual tasks

Burndown reports show planned work, completed work, and remaining work as lines on a graph. They give you and your stakeholders an at-a-glance status, letting you know if your project is behind schedule. Or ahead of it.

Now you can create vibrant burndown reports in Project — no need to export your data!

To learn how, see Create a burndown report.

Talk to your team

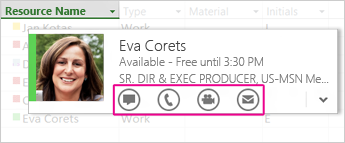
Lync contact card in Project 2013

Project 2013 helps you stay in touch with your team members. Get progress updates, ask quick questions, or even have long-term strategy discussions, all without leaving Project. Just hover over a name and start an IM session, a video chat, an email, or even a phone call.

You need to have Lync 2010 or later installed to take advantage of this feature.

Trace task paths

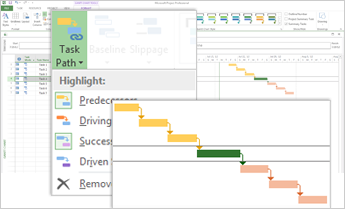
Task Path menu and Gantt bars with task paths highlighted

With a complex project, your Gantt Chart can start to look like a tangled knot of bars and link lines. To help sort this out, you can highlight the link chain — or task path — for any task. When you click a task, all of its predecessor tasks show up in one color and all of its successor tasks show up in another color.

To find out how to turn on task paths, see Trace task links.

Take projects into the far future

With Project 2013, you can set task and project dates up to 12/31/2149. That's a whole century longer than before!

Explore other new features

Share meetings

If you export Project reports, timelines, or data to other Office programs, you can take advantage of this new sharing feature. Join online meetings and share your PowerPoint slides, Word documents, Excel spreadsheets, and OneNote notes from any supported device, even if Office isn't installed.

Save and share files in the cloud

The cloud is like file storage in the sky. You can get to it anytime you're online. Now it's easy to save your Office files to your own OneDrive or to your organization's site. From there you can access and share your Project schedules, Excel spreadsheets, and other Office files.

Work from almost anywhere

If you have Project Online, you can access a full version of Project from almost anywhere, even on PCs that don't have Project 2013 installed. All you need is an internet connection and a PC running Windows 7 (or later). You'll always have the latest version because updates are automatic.

Opening pdfs in word

To open a PDF file without converting it to a Word document, open the file directly wherever it's stored (for example, double-click the PDF file in your Documents folder).

However, if you want to edit the PDF file, go ahead and open it in Word. Word makes a copy of the PDF, converting it to a Word document and attempting to match layout of the original PDF. You always have the original PDF file, in case you don't want to keep the version that Word converts.

Converting from PDF to Word works best with files that are mostly text—for example, business, legal, or scientific documents. But when you open a PDF file in Word, it might not look exactly the way it looked as a PDF.

If the PDF contains mostly charts or other graphics, the whole page might show up as an image. When that happens, the text can't be edited.

Sometimes, Word doesn't detect an element, and so the Word version doesn't match the original PDF file. For example, if Word doesn't recognize a footnote, it treats the footnote as regular text and might not put it at the bottom of the page.

Document elements that don't convert well

Some elements are known to be problematic when converting from PDF to Word format. If your PDF includes these, you might want to open it directly rather than converting it to a Word document:

  • Tables with cell spacing

  • Page colors and page borders

  • Tracked changes

  • Frames

  • Footnotes that span more than one page

  • Endnotes

  • Audio, video, and PDF active elements

  • PDF bookmarks

  • PDF tags

  • PDF comments

  • Font effects, like Glow or Shadow (in the Word file, the effects are represented by graphics)

How does conversion work?

PDF is a fixed file format, which means the file stores the location of text, pictures, and vector graphics on a page, but not necessarily the relationships among them. Most PDFs don't include information about structural content elements, such as paragraphs, tables, or columns. For example, PDF stores a table as a set of lines without any relationship to the content inside the table cells.

Different programs represent the same content using different structures in PDF files. For example, a PDF might contain invisible text, graphics, and images. It might use different text boundaries. But you can't see those differences when you look at the PDF in a reader.

When you open a PDF file in Word, Word uses a system of complex rules to figure out what Word objects (like headings, lists, tables, etc.) best represent the original PDF and where to put those objects in the Word document.

Tuesday, December 29, 2020

Find a conference room

When scheduling a meeting with Outlook 2016 for Mac, particularly a meeting where attendees will attend in person, you'll need to include a meeting room in the invitation. If you know the name of the meeting room, you can enter that name directly in the Location field. If you don't know the name, or if you're scheduling a meeting in a location that is unfamiliar, you can use Room Finder.

Note: Don't see Room Finder? Your admin needs to enable this feature on the Exchange server before the button will show up on your ribbon. Tell your admin to see Managing Resource Mailboxes and Scheduling for more information.

Open Room Finder

The Room Finder button is on the ribbon in the meeting invitation. (Create a meeting invitation)

Outlook ribbon with Room Finder button highlighted

If you're having a hard time finding Room Finder, you'll need to make sure this feature is enabled. If you are not the administrator of your organization, contact the administrator to enable Room Finder. If you are the administrator, you'll need to connect to PowerShell and run the following cmdlets:

New-DistributionGroup -Name "room list name" –RoomList

Add-DistributionGroupMember -Identity "room list name" -Member "room mailbox name"

This will allow the Room Finder to show up and allow you to view the room list and choose from the available rooms as desired.

A tour of Room Finder

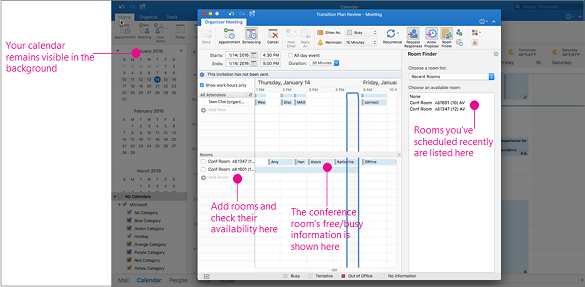
Room Finder opens in the scheduling page of your meeting invitation.

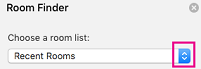
  1. Select Recent Rooms in Choose a room list to see any recent rooms you've scheduled.

  2. Select one of your recent rooms and it will be added to the Rooms list on the left side of the page. Its free/busy information will be shown in the scheduling grid.

    Room finder screen with where to add rooms and where to see rooms scheduled before

  3. Selecting the arrows in Choose a room list shows buildings and/or locations in your company. When you pick a room list, you'll see a list of all the conference rooms in that building or location that are available during the specified meeting time.

    Arrows on the Choose a room list

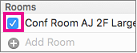
  4. Once you've found an available room, check the box next to its name to include it in your invitation.

    Check box next to the conference room to be added to the meeting

Tip: You can hide the Room Finder pane by clicking the Room Finder button again or by clicking the x at the top right of the Room Finder pane.

To create a meeting invitation

  1. At the bottom of the navigation pane, click Calendar.

    Click Calendar

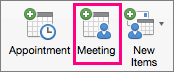
  2. On the Home tab, click Meeting.

    The Meeting option is highlighted on the Home tab.

  3. In the To box, enter the names of people or resources to include for the meeting.

  4. In the Subject box, enter a description of the meeting.

  5. Click Room Finder to select a room.

  6. Enter the details about the event.

  7. When you complete your invitation, on the Organizer Meeting tab, click Send.

    Send group

Related Topics

Create a meeting or appointment in Outlook 2016 for Mac

Schedule a meeting with other people

Successors task field

Data Type    Integer List

Entry Type    Entered

Description    The Successors field lists the task ID numbers for the successor tasks to a task. A task must start or finish before successor tasks can start or finish. Each successor is linked to the task by a specific type of task dependency and a lead time or lag time.

Best Uses    Add the Successors field to a task sheet when you want to display or update task successors. Each successor is represented by its task ID number, which may be followed by a dependency and the lead or lag time. The dependency types for successors are FS (finish-to-start), FF (finish-to-finish), SS (start-to-start), and SF (start-to-finish). To enter lead time, type a negative number. To enter lag time, type a positive number.

Example    You want to review the successors of tasks in your project to analyze and refine the schedule. You add the Successors field to the Task Sheet view. In the Successors field for the "Develop estimate" task, you see the entry "14FS+3d," which means that task14 is a successor of this task, with a finish-to-start dependency, and a three-day lag time. Before task14 can start, it must wait three days after the finish of this task. You also see that the Successors field for the "Conduct client meetings" task is blank. You type "15FS" to link this task to task15 with a finish-to-start dependency.

Remarks    If you enter only the task ID number in the Successors field, Microsoft Office Project assumes a finish-to-start dependency with zero lag time. If there is more than one successor, they are all listed and separated by the list-separator character, which is typically the comma or semicolon.

You can use the Link Tasks command on the Edit menu to link the selected tasks with finish-to-start dependencies and zero lag time. You can also link tasks by dragging from one task to the other on the chart portion of the Gantt Chart or Network Diagram view.

If a successor is a task in another project, the Successors field also contains the path to the linked project, in addition to the task ID and dependency type. An example is: C:\My Documents\Bldg E Construction.mpp\3FF.

Sort a chart in power view

In Power View you can organize your data in a chart with one click. You can sort chart categories by a category value (in the Axis box) or by a numeric value (in the Values box).

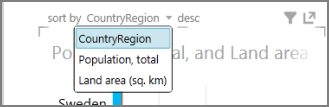
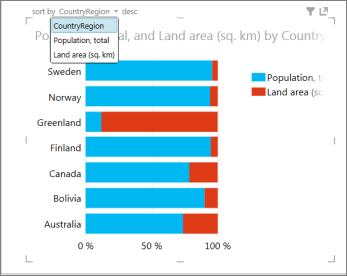
  1. Hover over the top edge of a chart until you see sort by in the upper-left corner, then the name of a field, and then either asc or desc.

  2. Click the field name to sort on a different value.

    Power View Sort icon and dropdown

  3. Click asc or desc to sort in the opposite direction.

    Chart sorted descending on the CountryRegion category value by default.

    Power View Sorting a Bar Chart

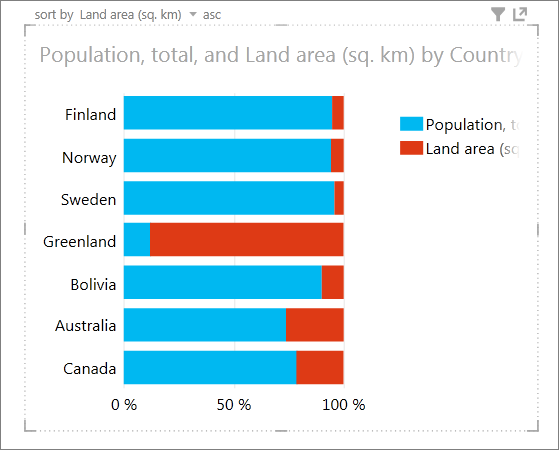
Chart sorted ascending by the Land area value.

Power View Sorting Ascending

Note: You can't disable sorting. People viewing your Power View sheets will be able to sort the charts.

Top of Page

Charts you can and can't sort

Some charts can't be sorted. Others can't be sorted as individual charts, but when used in multiples, the multiples can be sorted as shown in the following table.

Chart type

Can be sorted

Multiples can be sorted

Column

Yes

Yes

Bar

Yes

Yes

Line

No

Yes

Scatter or bubble

No

Yes

Stacked column or bar

Yes

Yes

100% stacked column or bar

Yes

Yes

Scatter or bubble with play axis

No

No

Top of Page

See Also

Charts and other visualizations in Power View

Power View and Power Pivot videos

Tutorial: PivotTable data analysis using a Data Model in Excel 2013

Power View: Explore, visualize, and present your data

Activate a content type syndication hub in sharepoint server versions

A content type hub enables you to publish SharePoint content types across a farm. You can use a content type hub to centrally manage key content types that you want to use in multiple site collections.

To create a content type syndication hub, we recommend that you create a site collection for that purpose. This site collection should be dedicated to creating and publishing content types.

Note: To create or manage a site content type, you must have at least Design permissions to that site.

In this article

Content type hub syndication

About attribute inheritance

Content type hub syndication

Content Type Publishing Hub allows SharePoint administrators to have a central location where they can manage and publish content types from across all their SharePoint web applications.

The Content Type Hub is activated as a Site Collection Feature. Other web applications can subscribe to the content type publishing hub and pull down published content types from the hub and receive updates on the published content types.

In the course of a single project, a business might produce several different kinds of content, for example, proposals, legal contracts, statements of work, and product design specifications. A business might want to collect and maintain different kinds of metadata about each kind of content. Metadata might include an account number, project number, or project manager, for example. Although documents might be stored together because they are related to a single project, they can be created, used, shared, and retained in different ways.

Content types enable organizations to organize, manage, and handle content in a consistent way across a site collection. By defining content types for specific kinds of documents or information products, an organization can ensure that content is managed in a consistent way. Content types can be seen as templates that you apply to a list or library and you can apply multiple templates to a list or library so that they can contain multiple item or document types.

Content type hub is available to SharePoint web applications via the Metadata Service Application. As long as the web applications use the same Metadata Service Application, the content types will be pushed to those web applications that are subscribed to it.

Content type hub syndication is achieved via timer jobs. When you publish a content type from the hub it is pushed out by the content type hub syndication job (running every 15 minutes by default) and then picked up by the subscriber job for you web application. So you may have to wait a while for you changes to show up or run the jobs manually in Central Administration.

Note: The more sites or content types you have, the longer it will take for the timer jobs to finish processing changes. While it might seem like the content hasn't updated in the span of a single job, future jobs will sequentially complete processing all the changes (including any subsequent changes).

Top of Page

About attribute inheritance

You never create content types from scratch. Instead, you are provided with a default set of content types which you can use as-is or customize. Content types are organized into a hierarchy that allows one content type to inherit its characteristics from another. This structure enables you to handle whole categories of documents consistently across your organization. The tables below describe each base content type and their related group and parent content type.

Note: Only changes to the content type itself are propagated from the root. When you republish the content type, new site collections will get the latest version of the published content type. However, for existing sites, changes to the content type field properties will not be propagated automatically.

Content type

Description

Parent content type

System

All content types inherit from the System content type. This content type is sealed and cannot be edited.

Group: Document Content Types

Content type

Description

Parent content type

Document

Create a document.

Item

XLS Style

Create a XSL style.

Document

Picture

Upload an image or photograph.

Document

Master Page

Create a master page.

Document

Basic Page

Create a basic page.

Document

Web Part Page

Create a Web Part page.

Document

Form

Create a form that can be filled out.

Document

Link to a document

Create a link to a document in a different location.

Document

Dublin Core Columns

Used for the Dublin Core metadata element set. Dublin Core Columns are an industry standard metadata definition for documents. For more information, see Dublin Core Metadata Initiative.

Document

Group: List Content Types

Content types

Description

Parent content type

Event

Create a new meeting, deadline or other event.

Item

Schedule+Resource

Schedule and reserve a resource.

Event

Reservations

Reserve a resource, such as a meeting room.

Item

Schedule

Create a new appointment.

Item

Issue

Track an issue or problem.

Item

Comment

Create a new blog comment.

Item

Item

Create a new list item.

System

East Asia Contact

Store information about a business or personal contact.

Item

Contact

Store information about a business or personal contact.

Item

Message

Create a new message.

Item

Task

Track a work item that you or your team needs to complete.

Item

Post

Create a new blog post.

Item

Announcement

Create a new news item, status or other short piece of information.

Item

Link

Create a new link to a Web page or other resource.

Item

Group: Group Work Content Types

Content type

Description

Parent content type

Circulation

Add a circulation.

Item

Holiday

Add a new holiday.

Item

Word

Add a new word to the list.

Item

Official Notice

Add a new official notice.

Item

Phone Call Memo

Add a new phone call memo.

Item

Resource

Add a new resource.

Item

Resource Group

Add a new resource group.

Item

Timecard

Add new timecard data

Item

Users

Add new users to the list.

Item

What's New Notification

Add a new What's New notification

Item

Group: Folder Content Types

Content type

Description

Parent content type

Discussion

Create a new discussion topic.

Folder

Folder

Create a new folder.

Item

Summary Task

Group and describe related tasks that you or your team needs to complete.

Folder

When you define a new custom site content type in the Site Content Type Gallery for a site, you start by selecting an existing parent site content type in the Site Content Type Gallery as your starting point. The new site content type that you create inherits all of the attributes of its parent site content type, such as its document template, read-only setting, workflows, and columns. After you create this new site content type, you can change any of these attributes.

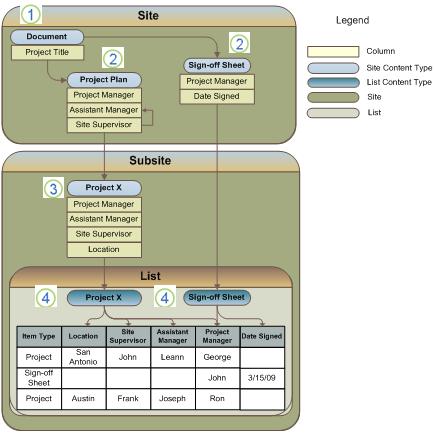
The following diagram helps show how content types inherit attributes from their parent content types.

Content type inheritance

1. This site content type is derived from the System content type.

2. These site content types are based on the Document content type. Any changes that you make to these content types will not affect their parent content type (Document).

3. This site content type is based on the Project Plan content type. Any changes you make to this content type will not affect its parent content type (Project Plan).

4. These list content types are based on the Project X and Sign-off Sheet content types. Any changes that you make to a list content type apply only to the instance of that content type that has been added to the list or library.

If you customize a child type with attributes that the parent doesn't have, such as additional columns, those customizations aren't written to the parent type. In other words, changes to inherited attributes can cascade downward from parent to child, but never upward.

The same rules apply when you create a list content type. For example, if you customize a list type with attributes that the parent type doesn't have, such as additional columns, those customizations don't affect the parent type. Also, remember you can customize a list type only for the list or library to which it was added, and when you change attributes in the parent type, your changes can overwrite the attributes in the child list type.

Top of Page