Friday, August 31, 2018

Convert a OneNote table to an Excel worksheet
Convert a OneNote table to an Excel worksheet
Sometimes, to improve the look of a table on a page, you might format a table to resemble a simple spreadsheet. In OneNote 2013 or 2016, you also have the option to convert it to a fully functioning Microsoft Excel spreadsheet.
-
In OneNote, open the page that contains the table you want to convert.
-
Activate the table by clicking inside any of its cells and reveal the hidden Table Tools tab.
-
In the Table Tools tab, choose Convert to Excel Spreadsheet.
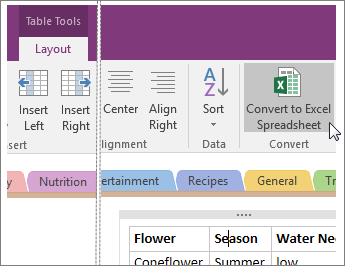
OneNote converts the table to an Excel spreadsheet and inserts a icon on the page and an embedded dynamic preview of the file. When you change or update the spreadsheet, the preview on the notes page automatically updates.
If your data is already in a spreadsheet, you can add an Excel spreadsheet to your page.
Configure a Related Actions Web Part on a Duet site
Configure a Related Actions Web Part on a Duet site
You can add web parts to a Task Detail page that help task decision makers request and receive reports that provide related information. These web parts can save users a lot of valuable time by putting the most current information together with the task itself:
-
Workflow Task Actions This Web Part provides links to Report Settings pages for reports that provide related information. Users can customize report parameters, and then run the report that they want.
-
Related Reports This Web Part lists reports that the user can open immediately. In addition, if the user runs a report from Workflow Task Actions, Duet delivers that report to the Related Reports list as soon as the report is available.
Duet Enterprise dynamically updates the actions and reports that these web parts display, so the task decision maker always gets the most recent information.
To configure the web part, you activate Duet Enterprise reporting features on the workflow site, and then edit the Task Detail page in SharePoint Designer to add the web parts. Typically, designers add these Web Parts to a Task Details page, but you can also add the Web Part to a page in the workflow site.
In this article
Introduction
On a Task Details page, a Workflow Task Actions Web Part and a Related Reports Web Part work together to provide information for a task decision maker. The decision maker can run a report, and then open the report without having to navigate to different sites. In addition, these web parts display only report options that relate to the current task, and Duet ensures that the reports reflect the most recent information. The task decision maker can open any listed report by just clicking the report name.
Before you can add and configure the Workflow Task Actions and Related Reports web parts, a farm administrator must import the appropriate Business Data Connectivity (BDC) model. This model contains the specifications for the actions that the Web Part displays. In addition, the administrator must configure report routing to deliver reports to the correct location.
If you do not know if this step is complete, check with the SAP workflow administrator.
Step 1: Activate reporting features on the workflow task site
Important: You must be a Site Collection administrator in the site that contains the SAP Workflow template to perform the steps in this procedure.
To configure a Related Reports Web Part in a workflow site, you must first activate specific reporting features for the workflow site. This enables Duet to display a list of reports (from the site reports library), and to display a list of links to report settings. Users can use report settings to view and edit report properties, and to run reports.
To enable reporting features on the Workflow Task site:
-
From the Duet Enterprise site collection home page, navigate to the workflow root site.
-
On the ribbon, select Site Actions and then select Site Settings.
-
On the Site Settings page, in the Site Actions group, click Manage site features to open the Features activation page.
-
On the Features page, locate Duet Enterprise Reporting, and then click Activate.
Step 2: Open the Task Detail page in SharePoint Designer
To modify the Task Detail page, you have to open the workflow site in Microsoft SharePoint Designer 2010, and then open the Task Detail page in the workflow editor. From the workflow editor, you can add the required design elements and then configure them.
To open a Task Detail page for editing:
-
From the Windows Start menu, click to open SharePoint Designer 2010, and then click Open Site.
-
In the Site URL box of the Open Site dialog box, enter the URL for the workflow task site that you want to work with. This opens the Site Information page for the workflow site.
-
In the Navigation pane, click Site Pages to open a list of pages that the workflow includes.
-
In the list of pages, click the name of the task details page file, such as WrkTaskIP.aspx, to open the settings page for that file.
-
On ribbon, in the Edit group, click the arrow next to Edit File, and then select Edit File in Advanced Mode. This opens the form for the Task Detail page.
-
In the PlaceHolderMain (Custom) area, decide where you want to place the Related Reports Web Part. For example, you can add the Web Part in one of the existing cells in the Placeholder. Alternatively, instead, you might decide to add another row or column to the form for the Web Part.
Step 3: Add Business Data Web parts to the Task Details form
Important: You must be a Site Owner to perform the steps in this procedure.
The Related Reports Web Part is actually two connected Web Parts. The two parts are a Business Data Actions Web Part that displays information, and a Business Data Item Builder Web Part that collects and configures the information for display.
To add the Business Data Web Parts:
-
Click in the form cell where you want to add Web Parts.
-
On the ribbon, click the Insert tab.
-
On the ribbon, in the Web Parts group, click the arrow next to Web Part, and then select Business Data Actions.
-
Right-click in the Business Data Actions Web Part, and then select Web Part Properties to open the Business Data Actionswindow.
-
In the Business Data Actions window, in the Type text box, enter Workflow Task.
-
On the ribbon, in the Web Parts group, click the arrow next to Web Part, and then select Business Data Item Builder.
-
Right-click in the Business Data Item Builder Web Part, and then select Add Connection to open the Web Part Connection Wizard.
-
In the Wizard, click Next to accept the Send Selected Item To action.
-
Select Connect to a Web Part on this page, and then click Next.
-
IN the Target Web Partdrop-down list, select Workflow Task Actions.
In the Target Action drop-down list, select Get Item From, and then click Next.
-
Click Finish to complete the connection.
Notice that Duet Enterprise automatically changes the Title of the Web Part to Workflow Task Actions.
Step 4: Add related reports as a Web Part
On a workflow task site, a Related Reports Web Part displays only those reports that are related to the current task. The first step in configuring this Web Part is to add a reports library as a Web Part. Next, you have to add a Web Part that will obtain the correct contextual information (the Context ID) for the workflow task. Finally, you have to add and configure a filter Web Part that Duet Enterprise can use to select the correct reports for display.
Add the reports library as a Web Part
-
Click in the cell of the Task Details form where you want to add the Reports list as a Web Part.
-
On the ribbon, click the Insert tab.
-
In the Data Views and Forms group, click the arrow next to Data View, and then select Reports.
Add the SAP Workflow Redirector
To filter the list of available reports, and select only the reports that are related to a task, Duet uses the Context ID for the task. A hidden Web Part, the SAP Workflow Redirector, provides this value for the reports Web Part.
-
In the ribbon, click the Insert tab.
-
In the Web Parts group, click the arrow next to Web Parts. Scroll down to the Duet Enterprise group, and then select SAP Workflow Redirector Web Part.
Add a filter Web Part
-
In the Web Parts group, click the arrow next to Web Parts. Scroll down to the Filters group, and select Query String (URL) filter.
Important: You must add this Web Part to a Web Part Zone. If necessary, add a Web Part Zone to the page before you insert the Web Part.
-
In the body of the Task Details form, right-click on the Query String (URL) Filter Web Part, and then select Web Part Properties.
-
In the Query String (URL) Filter window, in the Query String Parameter Name box, enterIwWfTaskID. This parameter provides identifier information about the SAP workflow.
-
In the body of the Task Details form, right-click on the Query String (URL) Filter Web Part, and then select Add Connection.
-
In the Web Part Connections Wizard, Take these steps:
-
In the Choose the action on the source Web Part to use for this connection drop-down list, select Send Filter Values to. Then, click Next to go on to the next page in the wizard.
-
Click Next to accept Connect to a Web Part on this page. Then, go on to the next page of the wizard.
-
Click Next to accept Reports as the Target Web Part, and Get Filter Values From as the Target action. Then, go on to the next page of the wizard.
-
Select QueryStringfrom Columns in Query String (URL) Filter, and then select Context ID from Columns in Reports. Click Next to go on to the final page of the wizard.
-
-
Click Finish.
For all future tasks in this workflow, the Task Details page will display two additional Web Parts: Workflow Task Actions, and Related Reports.
Specify 3D Maps scene options
Specify 3D Maps scene options
Use time options to control how long a tour scene lasts, and to set the length of time between scenes. Use effects to highlight a scene with circular motions, rotations, pans, or zooms.
Change how long it takes to switch between scenes
A transition is the change from one scene to the next, so to include a transition a tour must contain at least two scenes.
(Therefore, the first scene in a tour never has a transition; it starts immediately.)
-
Select the scene that the tour is switching to.
(For example, to set the time between the first and second scene, select the second scene.)
-
Click Home > Scene Options.
-
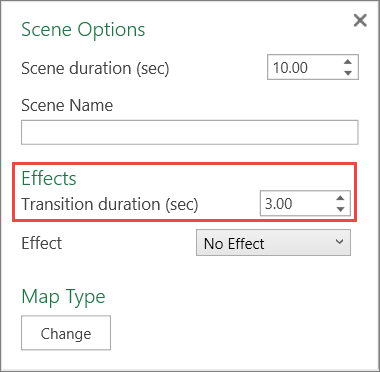
Under Effects, in the Transition duration (sec) box, select the number of seconds that you want the transition between the scenes to take.
Note:
-
The first scene in a tour doesn't have a transition; it starts immediately.
-
By default, a transition between scenes is 3 seconds.
-
A transition of 0 seconds creates a "cut" style transition where the incoming scene starts immediately.
-
A transition always travels the entire distance between two scenes.
For example, when a scene switches from a view featuring East Asia to a view of Europe, the globe rotates during the transition. The globe may pitch upward or downward, depending on where each scene is centered in relation to the equator.
-
During a transition, text boxes, annotations, and the last data state from the previous scene are preserved until the new scene starts.
-
Transitions are designed to rotate as little as possible between scenes.
Specify how long a scene lasts
A scene's duration value controls how long the scene lasts, and how quickly the geographic data are plotted and updated over time on the map.
-
Select the scene that you want to work with.
-
Click Home > Scene Options.
-
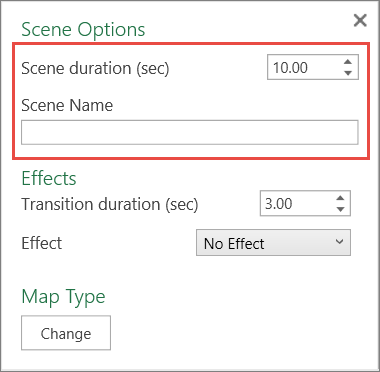
In the Scene duration (sec) box, enter the number of seconds that you want the scene to last.
If you want to give the scene a name, enter the name in the Scene Name box.
Specify the effect you want to apply
Use effects to highlight a scene with circular motions, rotations, pans, or zooms.
-
Select the scene that you want to work with.
-
Click Home > Scene Options.
-
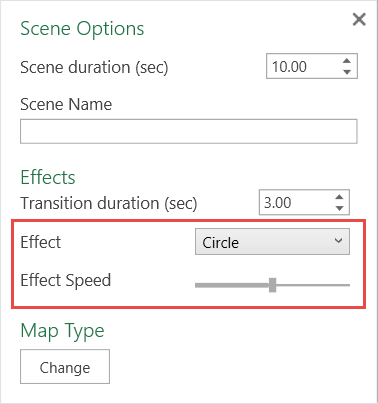
In the Effect box, pick the effect that you want, and then adjust the Effect Speed slider to control the speed and/or distance of the effect.
Note:
-
The Circle and Figure 8 effects move in a repetitive circular motion.
-
The Dolly and Rotate Globe effects move clockwise in a straight line.
-
The Push In effect "zooms in" on the scene, continuously increasing the size of the globe and zeroing in on the scene's center for the entire duration of the scene.
-
The Fly Over effect moves the globe, depending on where on the globe the scene is centered, downward (Northern hemisphere) or upward (Southern hemisphere).
-
All effects last for the entire duration of a scene.
-
You can use the Effect Speed slider to control how quickly the globe turns or how many circular motions are completed in the scene.