Tuesday, February 28, 2017

Automatically run a macro when opening a workbook

Automatically run a macro when opening a workbook

You might want a macro you recorded to run automatically when you open a specific workbook. The following procedure uses an example to show you how that works. You may also want to run macros automatically when Excel starts.

Before you get started, make sure the Developer tab is shown on the ribbon. If it's not there, do the following:

  1. Click File > Options > Customize Ribbon.

  2. Under Customize the Ribbon, in the Main Tabs box, check the Developer box.

  3. Click OK.

To use the example below in your own workbook, create sheets for each day of the month and name each sheet tab accordingly. For example, name them March 1, March 2, and so on, through March 31. The macro will automatically run when you open the workbook showing the tab for the current day of the month.

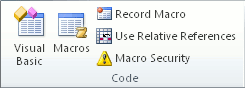
  1. Click Developer > Visual Basic.

Code group on the Developer tab

  1. Click Insert > Module.

  2. In the module, insert the following code:

    Private Sub Auto_Open()
    Dim vntToday As Variant
    vntToday = WorksheetFunction.Text(Date, "mmmm dd")
    On Error Resume Next
    Sheets(vntToday).Select
    If Err <> 0 Then
    MsgBox "Worksheet doesn't exist."
    Else
    Range("A1").Select
    End If
    End Sub

  3. Close Visual Basic (you don't have to save anything).

  4. Save the workbook as an Excel Macro-Enabled Workbook (*xlsm) and close it.

The next time you open the workbook, the tab for the current day will be selected, with the cursor in cell A1. If the worksheet for the day doesn't exist, the "Worksheet doesn't exist" message appears.

Tip:  You could create a new workbook for each month as it comes up, and create the macro again for the new workbook.

Add or delete table rows and columns

Add or delete table rows and columns

You can use the Table Tools to easily add and delete rows and columns in PowerPoint. Here's how.

Note: For information about merging, splitting, or clearing the contents of table cells, go to Merge, split, or delete table cells.

Add a row

  1. Click a table cell in the row above or below where you want the new row to appear.

  2. Under Table Tools, on the Layout tab, in the Rows & Columns group, do one of the following:

    • To add a row above the selected cell, click Insert Above.

    • To add a row below the selected cell, click Insert Below.

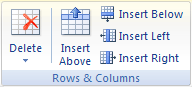
      Options in the Rows & Columns group

      Notes: 

      • To add multiple rows at once, using your mouse, drag to select an equal number of rows to the amount that you want to add, and then click Insert Above or Insert Below. For example, select three existing rows, click Insert Above or Insert Below, and three more rows will be added.

      • To add a row at the end of a table, click the rightmost cell of the last row, and then press TAB.

Add a column

  1. Click a table cell to the right or the left of the column where you want the new column to appear.

  2. Under Table Tools, on the Layout tab, in the Rows & Columns group, do one of the following:

    • To add a column to the left of the selected cell, click Insert Left.

    • To add a column to the right of the selected cell, click Insert Right.

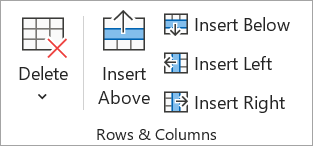
      Options in the Rows & Columns group

      Note: To add multiple columns at once, using your mouse, drag to select an equal number of columns to the amount that you want to add, and then click Insert Left or Insert Right. For example, select three existing columns, click Insert Left or Insert Right, and three more columns will be added.

Delete a row or column

  1. Click a table cell in the column or row that you want to delete.

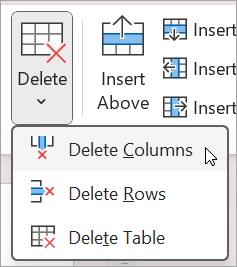
  2. Under Table Tools, on the Layout tab, in the Rows & Columns group, click Delete, and then click Delete Columns or Delete Rows.

    Deleting columns or rows

Delete a table

  1. Click the table to select it.

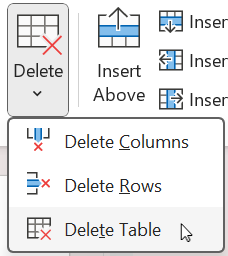
  2. Under Table Tools, on the Layout tab, in the Rows & Columns group, click Delete, and then click Delete Table or press DELETE on your keyboard.

    Deleting a table

See also

Add a table to a slide

Change the look of a table

Add a row

  1. Click a table cell in the row above or below where you want the new row to appear.

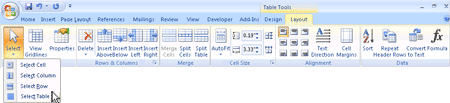
  2. Under Table Tools, on the Layout tab, in the Table group, click Select, and then click Select Row.

    word table tools layout tab image

  3. Under Table Tools, on the Layout tab, in the Rows and Columns group, do one of the following:

    PowerPoint Rows and Columns group image

    • To add a row above the selected row, click Insert Above.

    • To add a row below the selected row, click Insert Below.

      To add multiple rows at once, select the number of rows that you want to add, and then click Insert Above or Insert Below.

Tip: To add a row at the end of a table, click the last cell of the last row, and then press TAB.

Add a column

  1. Click a table cell in the column to the left or the right of where you want the new column to appear.

  2. Under Table Tools, on the Layout tab, in the Table group, click Select, and then click Select Column.

    word table tools layout tab image

  3. Under Table Tools, on the Layout tab, in the Rows and Columns group, do one of the following:

    PowerPoint Rows and Columns group image

    • To add a column to the left of the selected column, click Insert Left.

    • To add a column to the right of the selected column, click Insert Right.

      To add multiple columns at once, select the number of columns that you want to add, and then click Insert Left or Insert Right.

Delete a column or row

  1. Click a table cell in the column or row that you want to delete.

  2. Under Table Tools, on the Layout tab, in the Table group, click Select, and then click Select Column or Select Row.

    word table tools layout tab image

  3. Under Table Tools, on the Layout tab, in the Rows & Columns group, click the arrow under Delete.

    PowerPoint Rows and Columns group image

  4. Do one of the following:

    • To delete a column, click Delete Columns or press BACKSPACE.

    • To delete a row, click Delete Rows or press BACKSPACE.

Use a screen reader with Word 2016 to apply bold, italic, or underline formatting

Use a screen reader with Word 2016 to apply bold, italic, or underline formatting

If you have a vision or reading disability, this article tells you how to format text in Word 2016 by using only your keyboard and screen reader.

Formatting in Word 2016 makes your document easier to read. It also can affect the way words are spoken by a screen reader. To make it easier for you to apply formats on text, keyboard shortcuts are available for the most common format changes that people use, such as bold, italics, and underline.

Note: The procedures in this topic are documented using Narrator and JAWS. For information about how to work with a specific screen reader, contact your assistive technology (AT) manufacturer.

Tip: To hear how text is formatted in JAWS, press Insert+F. In Narrator, press Caps Lock+0. You may need to adjust your screen reader's verbosity settings.

In this article

Make text bold

Bold format adds visual emphasis to text by making the font thicker on the screen.

Tip: Many screen readers do not read bold formatting. If you want to apply this kind of emphasis in an accessible way, you can use the Strong paragraph style in Word 2016. See Use a screen reader to apply heading and paragraph styles in Word 2016.

  1. Select the text that you want to make bold.

  2. Press Ctrl+B.

Make text italic

Italic text is slanted, and the font appears more like script than conventional print. Italic text is sometimes used to identify the title of an article, or placeholder text that the reader should make a substitution for. For example, some books can record the child's name, and show the placeholder as ChildsName.

Tip: Many screen readers do not read italic formatting. If you want to apply italics in an accessible way, you can use the Emphasis paragraph style. See Use a screen reader to apply heading and paragraph styles in Word 2016.

  1. Select the text that you want to make italic.

  2. Press Ctrl+I.

Underline text

  1. Select the text you want to underline.

  2. Do one of the following:

    • To use the default underline style, press Ctrl+U.

    • To apply a double underline, press Ctrl+Shift+D.

    • To select an underline style, press Alt+H, then in the Underline box, use the arrow keys to select the style you want, and press Enter.

    • To underline just the words but not the spaces, press Ctrl+Shift+W.

Format text using Tell Me

When you don't know the keyboard shortcut or want to know about more options, try using the Tell me box.

  1. Select the text you want to format.

  2. To move to the Tell Me box, press Alt+Q.

  3. Type a keyword or phrase, then press the Down Arrow key to choose from the search results. For example, type font for options related to fonts, such as italics and font size. Some results may be submenus with more choices.

  4. To choose a result, press Enter.

Related information

Get help for using a screen reader with Word 2016

Keyboard shortcuts for Microsoft Word 2016 for Windows

Access 2010 specifications

Access 2010 specifications

This article has information about the limits of Microsoft Access database files and objects. In most cases when a database exceeds the following limits it might be an indication of a design issue. Using the information in this article and a careful examination of your database design might help you locate what needs to be corrected for successful implementation. For example, importing data directly from Microsoft Excel into Access without normalization can result in creation of additional fields (columns). If you'd like information about designing databases or normalization, take a look at the resources in the Additional information section.

In this article

Database specifications

Project specifications

Additional information

Database specifications

The following list of tables applies to Microsoft Access 2010 and Access 2007 databases:

General

Attribute

Maximum

Total size for an Access 2010 database (.accdb), including all database objects and data

2 gigabytes, minus the space needed for system objects.

Note: You can work around this size limitation by linking to tables in other Access databases. You can link to tables in multiple database files, each of which can be as large as 2GB.

Tip:  For more information on reducing the size of your database, see Help prevent and correct database file problems by using Compact and Repair.

Total number of objects in a database

32,768

Number of modules (including forms and reports that have the HasModule property set to True)

1,000

Number of characters in an object name

64

Number of characters in a password

14

Number of characters in a user name or group name

20

Number of concurrent users

255

Top of Page

Table

Attribute

Maximum

Number of characters in a table name

64

Number of characters in a field name

64

Number of fields in a table

255

Number of open tables

2,048 including linked tables and the tables opened internally by Access

Table size

2 gigabyte minus the space needed for the system objects

Number of characters in a Text field

255

Number of characters in a Memo field

65,535 when entering data through the user interface;
1 gigabyte of character storage when entering data programmatically

Size of an OLE Object field

1 gigabyte

Number of indexes in a table

32 including indexes created internally to maintain table relationships, single-field and composite indexes.

Number of fields in an index or primary key

10

Number of characters in a validation message

255

Number of characters in a validation rule including punctuations and operators

2,048

Number of characters in a field or table description

255

Number of characters in a record (excluding Memo and OLE Object fields) when the UnicodeCompression property of the fields is set to Yes

4,000

Number of characters in a field property setting

255

Top of Page

Query

Attribute

Maximum

Number of enforced relationships

32 per table, minus the number of indexes that are on the table for fields or combinations of fields that are not involved in relationships*

Number of tables in a query

32*

Number of joins in a query

16*

Number of fields in a recordset

255

Recordset size

1 gigabyte

Sort limit

255 characters in one or more fields

Number of levels of nested queries

50*

Number of characters in a cell in the query design grid

1,024

Number of characters for a parameter in a parameter query

255

Number of AND operators in a WHERE or HAVING clause

99*

Number of characters in an SQL statement

Approximately 64,000*

*Maximum values might be lower if the query includes multivalued lookup fields.

Top of Page

Form and Report

Attribute

Maximum

Number of characters in a label

2,048

Number of characters in a text box

65,535

Form or report width

22,75 in. (57.79 cm)

Section height

22.75 in. (57.79 cm)

Height of all sections plus section headers (in Design view)

200 in. (508 cm)

Number of levels of nested forms or reports

7

Number of fields or expressions that you can sort or group on in a report

10

Number of headers and footers in a report

1 report header/footer;
1 page header/footer;
10 group headers/footers

Number of printed pages in a report

65,536

Number of controls and sections that you can add over the lifetime of the form or report

754

Number of characters in an SQL statement that serves as the Recordsource or Rowsource property of a form, report, or control (both .accdb and .adp)

32,750

Top of Page

Macro

Attribute

Maximum

Number of actions in a macro

999

Number of characters in a condition

255

Number of characters in a comment

255

Number of characters in an action argument

255

Top of Page

Project specifications

The following list of tables applies to Access 2010 and Access 2007 projects:

General

Attribute

Maximum

Number of objects in an Access project (.adp)

32,768

Number of modules (including forms and reports that have the HasModule property set to True)

1,000

Number of characters in an object name

64

Number of columns in a table

250 (Microsoft SQL Server 6.5)

1024 (Microsoft SQL Server 7.0, 2000 and 2005)

Top of Page

Form and Report

Attribute

Maximum

Number of characters in a label

2,048

Number of characters in a text box

65,535

Form or report width

22 in. (55.87 cm)

Section height

22 in. (55.87 cm)

Height of all sections plus section headers (in Design view)

200 in. (508 cm)

Number of levels of nested forms or reports

7

Number of fields or expressions that you can sort or group on in a report

10

Number of headers and footers in a report

1 report header/footer;
1 page header/footer;
10 group headers/footers

Number of printed pages in a report

65,536

Number of controls and sections you can add over the lifetime of the form or report

754

Number of characters in an SQL statement that serves as the Recordsource or Rowsource property of a form, report, or control (both .accdb and .adp)

32,750

Top of Page

Macro

Attribute

Maximum

Number of actions in a macro

999

Number of characters in a condition

255

Number of characters in a comment

255

Number of characters in an action argument

255

Top of Page

Additional information

Top of Page

SINH function

SINH function

This article describes the formula syntax and usage of the SINH function in Microsoft Excel.

Description

Returns the hyperbolic sine of a number.

Syntax

SINH(number)

The SINH function syntax has the following arguments:

  • Number    Required. Any real number.

Remark

The formula for the hyperbolic sine is:

Equation

Example

Copy the example data in the following table, and paste it in cell A1 of a new Excel worksheet. For formulas to show results, select them, press F2, and then press Enter. If you need to, you can adjust the column widths to see all the data.

Formula

Description

R esult

=2.868*SINH(0.0342*1.03)

Probability of obtaining a result of less than 1.03 seconds.

0.1010491

Create Content Organizer rules to route documents

Create Content Organizer rules to route documents

To determine how to route a document, Content Organizer uses rules that you create. Rules are based on a combination of content types and metadata.

This article describes how to create rules for organizing and routing documents or records. Any SharePoint enterprise site can be enabled for document routing.

Important:  You must first enable the Content Organizer feature and configure the organizer to route records. Find out more about how to configure Content Organizer in the See Also section.

In this article

Before you create rules: First steps

Understand how documents are routed

Create rules to route documents

Before you create rules: First steps

There are several important steps that you have to follow before you create rules for routing documents.

  1. Activate the Content Organizer feature.

  2. Create libraries and folders that you want documents to be routed to. You might want to create folders for each type of document that you are routing. For example, create a library just for e-mail records or Excel spreadsheets. To learn about how to create libraries, see the links in the See Also section.

  3. Content types must be associated with documents that are to be routed. In them, the content type can be part of the criteria that determines the final location where a document is stored.

Top of Page

Understand how documents are routed

Documents can be routed to a library or folder in a Records Center site or any other kind of SharePoint site. The Drop Off library, which is automatically created when you activate the Content Organizer feature, serves as the default location. The document routing process is made up of several elements:

  • Target libraries and folders    Content stewards or records managers manually create libraries and folders where documents should be routed, and designate these libraries as target libraries.

  • Site content types    Every document must have a content type, and users can add appropriate site content types manually to target libraries.

  • Drop Off library    Documents that don't match a rule, or that are missing required metadata are sent to the Drop Off library so that users can enter required metadata. Or, you can configure the Content Organizer so that all uploaded documents are temporarily routed to the Drop Off library.

  • Document rules list    This is a collection of all the routing rules. Content stewards or records managers visit this list to create, manage, and view routing rules.

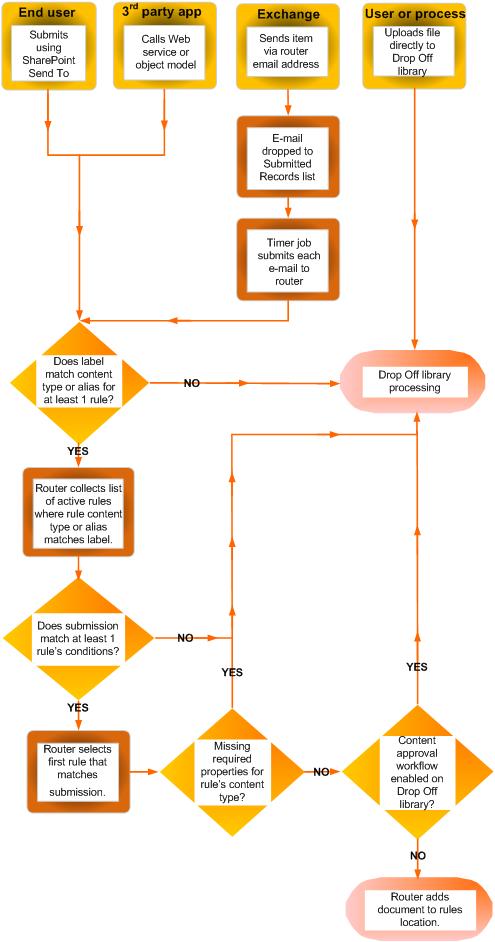
The following diagram shows how documents and email messages are routed based on meeting specific criteria, and how documents that are missing information are returned to the Drop Off Library.

Document routing using the content organizer. Shows several sources, and shows documents with missing metadata are returned to Drop Off Library.

Top of Page

Create rules to route documents

For each record type that you add to the Record Routing list, you specify a record title and description. You also specify the location in the site where the record is stored. To make sure that all relevant records are routed to the appropriate location, you can specify alternate names for the record type.

Note:  You must have at least Site Owner permissions to create rules to route documents.

  1. Navigate to the site for which you want to create Content Organizer rules.

  2. On the Quick Launch panel, click More… to see the Site Contents options.

  3. From the Apps menu line, click Settings.

  4. On the Site Settings page, under the Site Administration section, click Content Organizer Rules.

  5. On the Content Organizer Rules page, click add in Click to add a new item.

  6. In the Rule Name section, type a name that describes the rule's conditions and actions.

  7. In the Rule Status and Priority section, choose Active to apply the rule to incoming content. Then, select a priority that will determine how content is routed should it match more than one Content Organizer rule.
    If you do not want this rule to apply to incoming content, choose Inactive.

  8. In the Submission's Content Type section, associate the rule with a content type. By doing this, submissions to the organizer are labeled with the selected content type and properties used in the conditions of the rule are identified.

    • Select the appropriate content group. The group that you select determines the content types that you can choose from in the next step.

    • Select the appropriate content type.

    • If the content type that you selected has a different name on another SharePoint site, select the check box under Alternate names. Then type the name that is used on the other site in the field provided, and clickAdd. Names for alternate content types appear in the list underneath.

  9. In the Conditions section, select the conditions that a submission's properties must meet for the rule. You might, for example, want the rule to apply to all documents that have the word "budget" in the title. You can add more conditions by clicking the Add another condition link.

    Note: The properties available from the Property drop-down list differ according to the content type that you selected in step 6.

  10. In the Target Location section, type or browse for a location to place content that matches the rule. Select the Automatically create a folder check box to group similar documents together in folders. For example, if you have a property that lists all documents for projects in your organization, you can force the organizer to create a separate folder for each project.

Top of Page

Learn where to store, share, and sync your files

Learn where to store, share, and sync your files

Office Training Center > Office 2016 training > Store, Share, and Sync files training > Learn where to store, share, and sync your files

What you'll learn and do

To store, share, and sync your files in the cloud, you'll learn:

  • What are the Microsoft cloud services and why use them?

  • How to choose where to store files in the cloud.

  • What is sharing and synchronization.


Start now button

Course modules

Why store files in the cloud?

The Microsoft cloud services for files

Choosing where to store files in the cloud

What is file sharing?

What is file syncing?