Important Microsoft no longer recommends creating and using Access 2010 web databases. For more information, see Access 2010 web databases roadmap.
You can use Access 2010 and Access Services, a component of SharePoint, to build web database applications. This helps you:
-
Secure and manage access to your data
-
Share data throughout an organization, or over the Internet
Note: A user account is required to use a web database. Anonymous access is not supported.
-
Create database applications that don't require Access to use
This article provides an overview of Access web database design. For an introduction to desktop database design, see the articles Create a new desktop database and Database design basics.
Overview
Access 2010 and Access Services (an optional component of SharePoint) provide a platform for you to create databases that you can use on the Web. You design and publish a web database by using Access 2010 and SharePoint, and people who have SharePoint accounts use the web database in a web browser.
How it works
When you publish a web database, Access Services creates a SharePoint site that contains the database. All of the database objects and data move to SharePoint lists in that site. The following video illustrates the process.
After you publish, SharePoint visitors can use your database, based on their permissions for the SharePoint site.
-
Full Control This lets you make data and design changes.
-
Contribute This lets you make data changes, but not design changes.
-
Read This lets you read data, but you can't change anything.
You can open the web database in Access, revise the design, and then sync your changes — effectively, save them to the SharePoint site. The following video illustrates the process of making a design change after you have published your web database.
You can also take your web database offline, use the offline version, and then sync data and design changes when you are back online.
Note: To build a web database, you need Full Control permissions on the SharePoint site where you want to publish it. For more information about SharePoint permissions, see the See Also section.
Forms and reports run in the browser
Forms, reports, and most macros run inside the browser. This lets Access refresh data on the screen without having to redo the whole page.
You can create a form to help people navigate your application. A new control, the Navigation control, makes it easy to add standard Web-style navigation buttons to a form for this purpose.
Note: The Navigation Pane (the feature that you use in Access to browse the objects in a database) is not available in a web browser.
Data is stored in SharePoint lists
All of your tables become SharePoint lists, and records become list items. This lets you use SharePoint permissions to control access to your web database, as well as take advantage of other SharePoint capabilities.
Security Note: The connect string for linked tables is unencrypted, including the username and password if that information was saved (and the link target supports user accounts). In a database that has a link to a SharePoint list and the link includes the username and password, a malicious user could change which list is the target of the link, using the saved credentials. Even if the credentials aren't saved with the connect string, a malicious user could modify permissions on the SharePoint site with the assistance of a collaborator who already has sufficient permissions. Exercise caution when you share copies of a database that contains links to lists in a published web database.
Queries and data macros run on the server
All SQL processing happens on the server. This helps improve network performance by limiting traffic to result sets.
Intranet or Internet
You can publish to your own intranet SharePoint server, or to the Internet. Microsoft is offering an Internet-facing, hosted SharePoint solution.
Top of Page
Create a web database
This section describes key new features and provides steps for the basic design tasks you need to complete to create a web database.
Before you begin
There are a few tasks that you should perform before you start to design your web database. Moreover, there are design differences between web databases and desktop databases that you should know about, especially if you are an experienced Access developer.
-
Determine the purpose of your database Have a clear plan so you can make good decisions when working out design details.
-
Find and organize the information required You cannot use linked tables in a web database. Any data that you want to use that will not originate in the database must be imported before you publish. If you line up your data before you start designing, you can avoid having to refit your design to accommodate unexpected data challenges.
-
Identify the SharePoint site you will use to publish You cannot publish at all without SharePoint. If you want to test your design in a browser while you design it (not a bad idea), you have to publish it first.
-
Plan your security You can take advantage of SharePoint security to control access to your web database. Plan security early so you can build it into your design.
Design differences between desktop and web databases
Some database features that you can use in a desktop database are not available with Access Services. However, there are new features that support many of the same scenarios as these desktop features.
The following table lists the desktop-only features, and the new feature that helps support the same scenario.
| Scenario | Desktop-only feature | New feature |
| Designing database objects | Design view | Enhanced Datasheet view; Layout view |
| Reviewing summarized data, such as sums, averages, and groups | Group functions | Data macros; group functions in reports |
| Programming events | VBA | Macros and data macros; New macro design experience with IntelliSense |
| Navigate to a database object | Navigation Pane; switchboards | Navigation control or other form element |
| | |
Important: You can create many client objects in a web database, but you cannot use them in a browser. However, they are part of the web database and can be used in Access 2010 on the desktop. People can open the web database in Access, and then use the client objects. This is an effective way to share a database, and also opens new opportunities for working together over the Web. SharePoint handles any concurrency issues.
Desktop-only features with no Access Services counterpart
Note: The following list is not exclusive.
Consider using a template
When you have determined what your application must do, consider whether a database template would work. Database templates are pre-built applications that you can use as-is or modify to suit your particular needs.
You can review the available templates on the New tab in Backstage view. For more information about the templates that come with Access 2010, see the article Select and use an Access template.
Get started with a blank web database
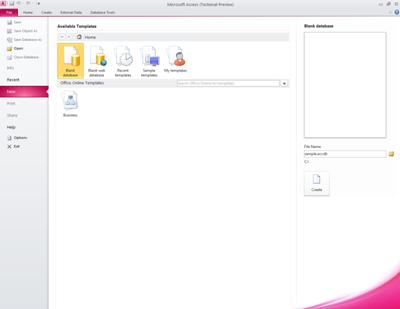
The File tab opens Backstage view, a new part of the Access interface where you'll find commands that apply to an entire database, such as Publish to SharePoint.
In Backstage view, the New tab has commands for creating a database.
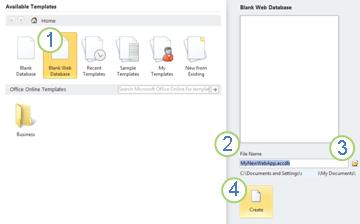
1. Under Available Templates, click Blank Web Database.
2. Review the proposed file name in the File Name box, and the path for the database file, listed just below. You can change the file name by typing in the File Name box.
3. To change the path, click the folder icon next to the File Name box to browse for a location to put your database file.
4. Click Create. Your new web database opens and displays a new empty table.
Design a web table
You use Datasheet view to design a web table.
When you first create a blank web database, Access creates a new table and opens it in Datasheet view. You can use the commands on the Fields tab and the Table tab to add fields, indexes, validation rules, and data macros — a new feature that lets you change data based on events.
After you edit and use the new table, you'll most likely want to create more tables.
Create a new web table
With your web database open:
When you first create a table, it has one field: an AutoNumber ID field. You can add new fields to store the items of information required by the table subject. For example, you might want to add a field that stores the date you begin tracking something.
Add a field from the field gallery
You can choose from a variety of preformatted fields and add them to your table by using the field gallery.
Add a field by clicking the datasheet
-
With the table open, click Click to Add, and then select a field type.
-
Give the field a name that reflects its contents.
Tip: To change the name of an existing field, double-click the field name.
-
Repeat for each field that you want to create.
Change field properties
Formatting and properties determine how a field behaves, such as what kind of data it can store. You can change these settings so that the field behaves the way that you want.
-
Select the field that has formatting and properties that you want to change.
-
On the ribbon, click the Fields tab.
-
Use the commands in the Formatting and Properties groups to change the settings.
Add a calculated field
You can add a field that displays a value that is calculated from other data in the same table. Data from other tables cannot be used as the source for the calculated data. Some expressions are not supported by calculated fields.
-
With the table open, click Click to Add.
-
Point to Calculated Field, and then click the data type that you want for the field.
The Expression Builder opens.
-
Use the Expression Builder to create the calculation for the field. Remember that you can only use other fields from the same table as data sources for the calculation. For Help using the Expression Builder, see the article Use the Expression Builder.
Set up data validation rules
You can use an expression to validate input for most fields. You can also use an expression to validate input for a table, which can be useful if you want to validate input for a field that does not support validation, or if you want to validate field input based on the value of other fields in the table. For a more thorough explanation of validation, see the article Restrict data input by using a validation rule.
You can also specify the message that is displayed when a validation rule prevents input, known as a validation message.
Set up a field validation rule and message
-
Select the field to which you want to add a validation rule.
-
On the ribbon, click the Fields tab.
-
In the Field Validation group, click Validation, and then click Field Validation Rule.
The Expression Builder opens.
-
Use the Expression Builder to create your validation rule. For Help using the Expression Builder, see the article Use the Expression Builder.
-
In the Field Validation group, click Validation, and then click Field Validation Message.
-
Type the message that you want to display when input data is not valid, and then click OK.
Set up a record validation rule and message
You can use a record validation rule to prevent duplicate records, or to require a certain combination of facts about the record are true, such as [Start Date] is greater than January 1, 2010, and less than [End Date]
-
Open the table to which you want to add a validation rule.
-
On the ribbon, click the Fields tab.
-
In the Field Validation group, click Validation, and then click Record Validation Rule.
The Expression Builder opens.
-
Use the Expression Builder to create your validation rule. For Help using the Expression Builder, see the article Use the Expression Builder.
-
In the Field Validation group, click Validation, and then click Record Validation Message.
-
Type the message that you want to display when input data is not valid, and then click OK.
Create a relationship between two web tables
To create a relationship in a web database, you use the lookup wizard to create a lookup field. The lookup field goes in the table that is on the many- side of the relationship, and points to the table that is on the one- side of the relationship.
Create a lookup field in Datasheet view
-
Open the table that you want on the many- side of the relationship.
-
Click the arrow next to Click to Add, and then click Lookup & Relationship.
-
Follow the steps of the Lookup Wizard to create the lookup field.
Modify a lookup field in Datasheet view
-
Open the table that has the lookup field that you want to modify.
-
Do one of the following:
-
On the Fields tab, in the Properties group, click Modify Lookups.
-
Right-click the lookup field, and then click Modify Lookups.
-
Follow the steps of the Lookup Wizard.
Maintain data integrity by using data macros
You can implement cascade updates and deletes by using data macros. You can use commands on the Table tab to create embedded macros that modify data. The following video shows you the basics.
For more information about creating data macros, see the article Create a data macro.
Create a web query
You can use a query as the data source for forms and reports. Queries run on the server, helping minimize network traffic.
For example, suppose you use a web database to track charitable contributions. You want to see who donated money while an event was occurring. You could use a query to select the data and prepare it for use in forms and reports.
Note: This procedure uses the charitable contributions template as an example. You can follow along if you create a new database by using the charitable contributions database template.
-
On the Create tab, in the Queries group, click Query.
-
In the Show Table dialog box, double-click each table that you want to include, and then click Close.
In this example, double-click Constituents, Donations, Events, and EventAttendees.
-
Create any required joins by dragging fields from one object to another in the query design window.
In this example, drag the ID field from Constituents to the DonorConstituentID field in Donations, and then drag the DonorConstituentID field from Donations to the ConstituentID field in EventAttendees.
-
Add the fields that you want to use. You can drag the fields to the grid, or you can double-click a field to add it.
In this example, add Event from the table Events, DonationDate from the table Donations, and Greeting, FirstName, and LastName from the table Constituents.
-
Add any criteria that you want to apply.
In this example, you want to limit DonationDate so that it falls between the StartDate and EndDate of the event. In the query design grid, in the Criteria row under DonationDate, type >=[StartDate] And <=[EndDate].
Create a web form
Forms are the main way to enter and edit data in your web database, and are also useful for reviewing data. Forms run in the browser, helping optimize performance. When you open a form, your browser retrieves the required data from the SharePoint server. You can filter and sort the data in the form without having to retrieve data from the server again.
Tip: For best performance, limit the records retrieved by your main forms and reports.
-
Select a table or query to use as a data source.
Note: If you want to create an unbound form, skip this step.
-
On the Create tab, in the Forms group, click one of the following buttons:
-
Form Create a simple form that shows one record at a time, using the object you selected as a data source.
Note: If you are creating an unbound form, this button is not available.
-
Multiple items Create a form that shows multiple records at a time, using the object you selected as a data source.
Note: If you are creating an unbound form, this button is not available.
-
Blank form Create a form that has nothing on it.
-
Datasheet Create a form that looks and behaves like a datasheet, using the object you selected as a data source.
Note: If you are creating an unbound form, this button is not available.
Create a web report
Reports are the main way to review or print data from your web database. Reports run in the browser, helping optimize performance. When you open a report, your browser retrieves the required data from the SharePoint server. You can filter and sort data in the report without having to retrieve data from the server again.
Tip: For best performance, limit the records retrieved by your main forms and reports.
-
Select a table or query to use as a data source.
-
On the Create tab, in the Reports group, click one of the following buttons:
Create a Navigation form and set it as the default form to display on start
People need a way to navigate your application. Remember — the Navigation Pane is not available in a web browser. For people to use your database objects, you must provide them a means. You can create a Navigation form and specify that it be displayed whenever someone opens your application in a web browser. Moreover, if you don't specify a form to display when the application starts, no form will open, making it difficult for anyone to use the application.
Tip: You might want to wait until last to create your Navigation form, so that that you can add all your objects to the form when you create it.
-
On the ribbon, click the Create tab.
-
In the Forms group, click Navigation, and then select a navigation layout from the list.
-
To add an item, drag it from the Navigation Pane to the Navigation control.
Note: You can only add forms and reports to a Navigation control.
-
Add any other controls that you want to the body of the Navigation form. For example, you might want to provide search functionality across all forms by adding some controls to your Navigation form.
Set your navigation form as the default web display form
-
On the File tab, under Help, click Options.
-
In the Access Options dialog box, click Current Database.
-
Under Application Options, click Web Display Form, and then select the form that you want from the list.
Note: You do not have to select your navigation form as the web display form. You can specify any web form.
Top of Page
Publish and synchronize changes to your application
Publish a web database
You can watch a video of this process in the Overview section.
-
On the File tab, click Save & Publish, and then click Publish to Access Services.
-
Click Run Compatibility Checker.
The compatibility checker helps you make sure that your database will publish correctly. If it discovers any issues, you should address them before you publish.
Note: If any issues are discovered, Access stores them in a table called Web Compatibility Issues. Each row in the table contains a link to troubleshooting information.
-
Under Publish to Access Services, fill in the following:
-
In the Server URL box, type the web address of the SharePoint server where you want to publish the database. For example, http://Contoso/.
-
In the Site Name box, type a name for your web database. This name will be appended to the Server URL to produce the URL for your application. For example, if the Server URL is http://Contoso/ and the Site Name is CustomerService, the URL is http://contoso/customerservice.
-
Click Publish to Access Services.
Synchronize a web database
After you make design changes or take a database offline, you eventually want to synchronize. Synchronizing resolves differences between the database file on your computer and the SharePoint site.
You can watch a video of this process in the Overview section.
-
Open the web database in Access and make your design changes.
-
When you are finished, click the File tab, and then click Sync All.
Top of Page
 Available
 Busy
Busy Do not disturb
 Be Right Back
 , click Status, and then click the arrows next to Show me as Inactive when my status has been idle for this many minutes and Show me as Away when my status has been Inactive for this many minutes.) You can also select this status by clicking the drop-down arrow.
 Offline
 Unknown

 Screen reader content
 in the Paragraph group on the Home tab.