Tuesday, February 1, 2022

Synchronize outlook and apple iphone or ipod touch calendars

Synchronization of calendars between Outlook and your Apple iPhone or iPod touch requires Apple iTunes. You can configure which items are synchronized during a one-time set up process.

After the initial setup, each time that you connect your iPhone or iPod touch to your computer, the changes made on your computer or device are synchronized.

Note: As a best practice, make sure that software on your computer and your Apple device is current. As a precaution, you also can back up your Outlook data before you begin.

Sync your Outlook calendar with your iOS device

  1. Connect your iPhone or iPod touch to your computer using the cable provided with your device or by placing the iPhone or iPod touch in the Apple Universal Dock.

    iTunes opens automatically when connected to your computer.

  2. In iTunes, in the source list, under Devices, click the entry for your iPhone or iPod touch.

  3. Click the Info tab.

  4. Under Calendars, click Sync calendars from, and then click Outlook.

  5. Do one of the following:

    • To synchronize all calendars, click All calendars.

    • To limit the calendars that are synchronized, click Selected calendars, and then click the calendars you want to synchronize.

      Note: To select multiple calendars, press Ctrl as you click each calendar name.

  6. Click Apply.

Outlook synchronization support for iPhone, iPod touch, and iTunes is provided by Apple support.

Back up your Outlook data

When you back up your Outlook data, you're creating (exporting) an Outlook Data File (.pst) that's used for POP3 and IMAP email accounts.

  1. On the File tab, choose Open & Export > Import/Export.
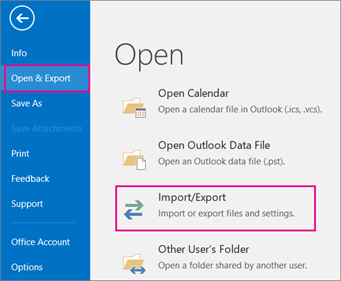
    Choose Open & Export, and then choose Import/Export.

  2. In the Import and Export Wizard, choose Export to a file > Next.
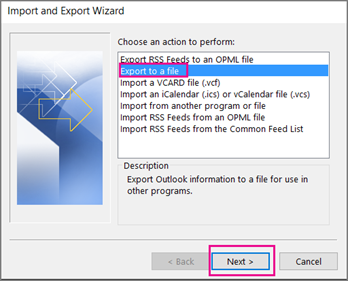
    Choose Export to a file.

  3. Under Create a file of type, choose Outlook Data File (.pst) > Next.

  4. Under Select the folder to export from, choose the folder to export and only information in that folder is exported.
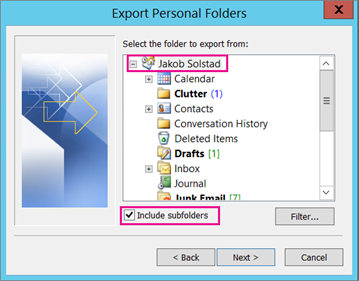
  5. Select the Include subfolders check box to make sure everything—Calendar, Contacts, and Inbox—in the account will be exported, and then choose Next.

  6. Under Save exported file as, click Browse to select where to save the Outlook Data File (.pst), type a file name, and then click OK to continue.

    Note: If you've used export before, the previous folder location and file name appear. Type a different file name, and then click OK.

  7. If you are exporting to an existing Outlook Data File (.pst), under Options, specify what to do when exporting items that already exist in the file.

  8. Click Finish.

Outlook begins the export immediately unless a new Outlook Data File (.pst) is created or a password-protected file is used.

  • If you're creating an Outlook Data File (.pst), an optional password can help protect the file. When the Create Outlook Data File dialog box appears, type the password in the Password and Verify Password boxes, and then click OK. In the Outlook Data File Password dialog box, type the password, and then click OK.

  • If you're exporting to an existing Outlook Data File (.pst) that is password protected, in the Outlook Data File Password dialog box, type the password, and then click OK.

Now that your Outlook data is in a .pst file, it's portable. You can save the .pst file to OneDrive or to a USB storage device, for example, and then download it to another computer or another device of your choice. See import your email, contacts, and calendar to Outlook to learn more.

  1. On the File tab, choose Options > Advanced.
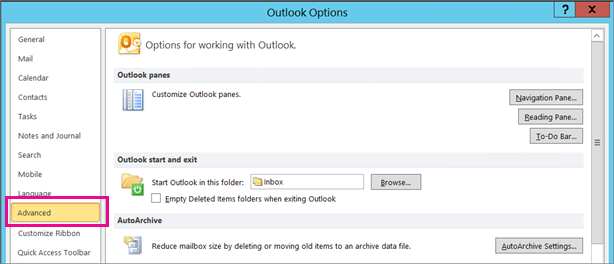
    Choose Advanced.

  2. Under the Export section, choose Export.

    On the Advanced page, choose Export

  3. Click Export to a file >Next.

  4. Click Outlook Data File (.pst) > Next.

  5. Under Select the folder to export from, choose the folder to export and only information in that folder is exported.

  6. Select the Include subfolders check box to make sure everything—Calendar, Contacts, and Inbox—in the account will be exported, and then choose Next.

  7. Click Browse to select where you want to save the Outlook Data File (.pst) and to enter a file name, and then click OK to continue.

    Note:  If you have previously used the export feature, the previous folder location and file name appear. Make sure that you change the file name if you want to create a new file instead of using the existing file.

  8. If you're exporting to an existing Outlook Data File (.pst), under Options, specify what to do when exporting items that already exist in the file.

  9. Click Finish.

The export begins immediately unless a new Outlook Data File (.pst) is created or the export is to an existing file that is password protected.

  • If you are creating a new Outlook Data File (.pst), an optional password can help protect the file. When the Create Outlook Data File dialog box appears, enter the password in the Password and Verify Password boxes, and then click OK. In the Outlook Data File Password dialog box, enter the password, and then click OK.

  • If you are exporting to an existing Outlook Data File (.pst) that is password protected, in the Outlook Data File Password dialog box, enter the password, and then click OK.

Now that your Outlook data is in a .pst file, it's portable. You can save the .pst file to OneDrive or to a USB storage device, for example, and then download it to another computer or another device of your choice. See import your email, contacts, and calendar to Outlook to learn more.

  1. On the File tab, choose Import and Export.
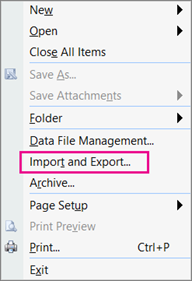
    Choose Import and Export.

  2. Under Choose an action to perform, choose Export to a file > Next.
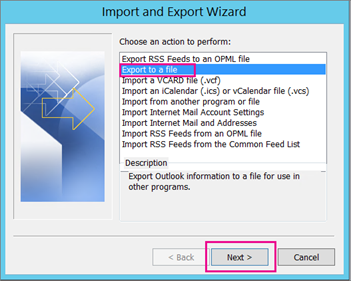
    Choose Export to a file and then choose Next.

  3. Click Personal File Folder (.pst) >Next.

  4. Choose the folder to export and only information in that folder is exported.

  5. Select the Include subfolders check box to make sure everything—Calendar, Contacts, and Inbox—in the account will be exported, and then choose Next.

  6. Click Browse to select where you want to save the Outlook Data File (.pst) and to enter a file name. Click OK to continue.

    Note:  If you have previously used the export feature, the previous folder location and file name appear. Make sure that you change the file name if you want to create a new file instead of using the existing file.

  7. If you're exporting to an existing Outlook Data File (.pst), under Options, specify what to do when exporting items that already exist in the file.

  8. Click Finish.

The export begins immediately unless you're creating a new Outlook Data File (.pst) or you're exporting is to an existing .pst file that is password protected. In those cases, you'll get this dialog box:
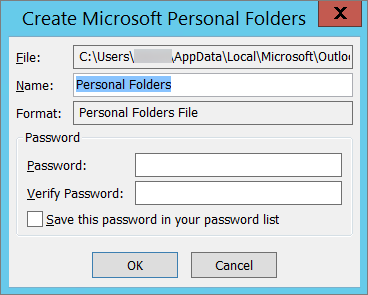
If you don't want to password protect your .pst file, choose OK.

Choose OK if you don't want to password protect your file. Otherwise:

  • If you want to password protect your .pst file: enter the password in the Password and Verify Password boxes, and then click OK. In the Outlook Data File Password dialog box, enter the password, and then click OK.

  • If you are exporting to an existing Personal File Folder (.pst) that is password protected, in the Outlook Data File Password dialog box, enter the password, and then click OK.

Dderequest function

You can use the DDERequest function over an open dynamic data exchange (DDE) channel to request an item of information from a DDE server application.

For example, if you have an open DDE channel between Microsoft Office Access 2007 and Microsoft Office Excel 2007, you can use the DDERequest function to transfer text from an Excel worksheet to an Access database.

Syntax

DDERequest ( channum , item )

The DDERequest function syntax has these arguments:

Ar gument

Description

channum

A channel number, the integer returned by the DDEInitiate function.

item

A string expression that's the name of a data item recognized by the application specified by the DDEInitiate function. Check the application's documentation for a list of possible items.


Remarks

The channum argument specifies the channel number of the desired DDE conversation, and the item argument identifies which data should be retrieved from the server application. The value of the item argument depends on the application and topic specified when the channel indicated by the channum argument is opened. For example, the item argument may be a range of cells in an Excel worksheet.

The DDERequest function returns a Variant as a string containing the requested information if the request was successful.

The data is requested in alphanumeric text format. Graphics or text in any other format can't be transferred.

If the channum argument isn't an integer corresponding to an open channel, or if the data requested can't be transferred, a run-time error occurs.

A file that was synchronized in sharepoint online or onedrive for business is moved to the recycle bin

Add a page border or title

A border or title in a Visio drawing is just like a background page. You see the border or title when you view the drawing, but you edit it separately from the foreground diagram.

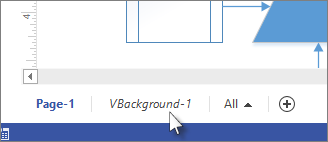
  1. Click Design > Borders & Titles, then click the style you want. The border appears as a background page, usually called something like VBackground-1.

    Background tab in Visio

    Tip:  If you add a border and one or more backgrounds to the same drawing page, Visio combines them into the same background page.

  2. To edit the background page with the title or border, click its page tab. Double-click any of the text areas to make changes. To delete any of the areas, click it to select it, and press Delete.
    Use the Design tab to change colors on the border or title page.

    Note:  If you apply a different theme or color variant to the border or title page, the same theme or variant is automatically applied to the drawing page the border or title belongs to.

  3. To finish editing the background page, click the page tab of another drawing page. The page with the title and border is not affected by any change you make to other pages.

Tip:  If you just want a title box to enter drawing data such as scale, author or revision tracking, use a shape from the Title Block stencil instead of a background page. Find it in the Shapes window – click More Shapes > Visio Extras > Title Blocks.

Adding a border or title to multiple pages

Border or title pages work best when applied to each drawing page individually, even if you want an identical border on every page.

When multiple drawing pages share a border or background page, the background page takes the size of the largest drawing page using it. So if all the drawing pages using a border are not the same size, the borders might appear mismatched to the size of some of the drawing pages.

If that happens, remove the border page and then assign a fresh border. Here's how:

  1. Click Design > Borders & Titles > No Border and Title.

  2. Click Design > Borders & Titles and then click the border style that you want.

    Note:  If you add a page to the drawing, it automatically shares the border or background you most recently applied to your drawing. That means the border will fit the new foreground pages correctly as long as all the added pages that share it are the same size. It's a good idea to check each of the borders and titles after you're done adding and building the foreground pages.

Insert a symbol

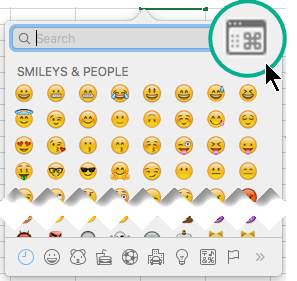
By default, the Symbol dialog box shows emoji at first when it's opened. But you can expand it to see other character sets: Scroll to the top and click the toggle button in the right corner:

The Symbol dialog box can be toggled to a larger view that shows several types of characters, not just emojis.
The expanded Character dialog has fun symbols and also technical characters such as math and latin symbols.

Word

Do any of the following:

Insert symbol

  1. On the Insert menu, click Advanced Symbol, and then click the Symbols tab.

  2. Click the symbol that you want.

Insert special characters

  1. On the Insert menu, click Advanced Symbol, and then click the Special Characters tab.

  2. Click the character that you want.

Excel

Insert a symbol

  1. On the Insert menu, click Symbol.

  2. Click the symbol that you want.

PowerPoint

Insert a symbol

  1. On the Insert menu, click Symbol.

  2. Click the symbol that you want.

Outlook

Insert a symbol

  1. On the Edit menu, click Emoji & Symbols.

  2. Click the symbol that you want.

See also

Video what is onenote

Your browser does not support video.

Try it!

OneNote is your very own digital notebook.

Whether you have a million ideas, a million things to do, Or a million things to remember, OneNote is the perfect app for capturing pretty much everything.

With OneNote, you can:

  • Type notes or record audio at your laptop.

  • Sketch or write ideas on your tablet.

  • Add picture from your phone.

  • Find notes instantly.

  • Freely move notes around the page.

  • Organize those pages into sections.

  • Keep your sections in one or more notebooks.

  • Switch devices and pick up right where you left off.

  • Share your notebooks with others so you can all view and contribute at the same time.

Want more?

Introducing OneNote

What's the difference between OneNote and OneNote 2016?

Analyze trends in data using sparklines

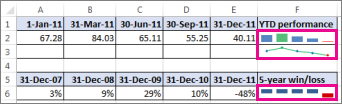
Sparklines are tiny charts inside single worksheet cells that can be used to visually represent and show a trend in your data. Sparklines can draw attention to important items such as seasonal changes or economic cycles and highlight the maximum and minimum values in a different color. Showing trends in your worksheet data can be useful, especially when you're sharing your data with other people.

Worksheet with sparklines

  1. Select a blank cell near the data you want to show in a sparkline.

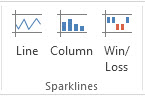
  2. On the Insert tab, in the Sparklines group, click Line, Column, or Win/Loss.

    Sparkline commands on the Insert tab

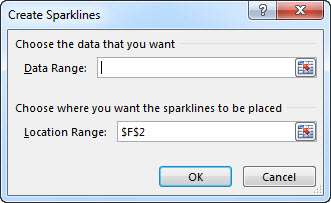
  3. In the Data Range box, enter the range of cells that has the data you want to show in the sparkline.

    For example, if your data is in cells A, B, C, and D of row 2, enter A2:D2.

    Create Sparklines dialog box

    If you'd rather select the range of cells on the worksheet, click Button image to temporarily collapse the dialog box, select the cells on the worksheet, and then click Button image to show the dialog box in full.
  4. Click OK.

    The Sparkline Tools appear on the ribbon. Use the commands on the Design tab to customize your sparklines.

    Sparkline Tools on the ribbon

Tips

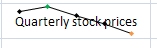
  • Because a sparkline is embedded in a cell, any text you enter in the cell uses the sparkline as its background, as shown in the following example.

    A cell containing a sparkline and text

  • If you select one cell, you can always copy a sparkline to other cells in a column or row later by dragging or using Fill Down (Ctrl+D).

Customize your sparklines

After you create sparklines, you can change their type, style, and format at any time.

  1. Select the sparklines you want to customize to show the Sparkline Tools on the ribbon.

    Sparkline Tools on the ribbon

  2. On the Design tab, pick the options you want. You can:

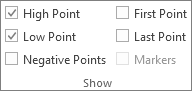
    • Show markers to highlight individual values in line sparklines.

      Show group on the Design tab of the Sparkline Tools

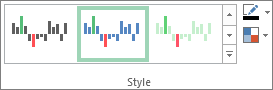
    • Change the style or format of sparklines.

      Styles on the Design tab of the Sparkline Tools

    • Show and change axis settings.

      Axis button on the Design tab of the Sparkline Tools

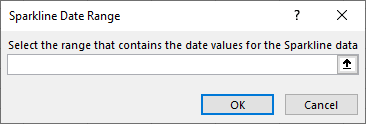
      If you click the Date Axis Type option in this drop-down, Excel opens the Sparkline Date Range dialog box. From here, you can select the range in your workbook that contains the date values you want for your Sparkline data.

      Select the range that contains the date values for the Sparkline data in the Sparkline Date Range dialog box.

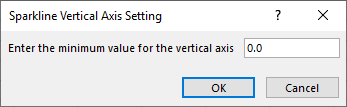
      If you click the Custom Value options in this drop-down, Excel opens the Sparkline Vertical Axis Setting dialog box. From here, you can enter either the minimum or maximum value (depending upon which option you selected) for the vertical axis for your Sparkline data. By default, Excel determines how to display the Sparkline data so with these options you can control the minimum and maximum values.

      Enter a minimum value for the vertical axis in the Sparkline Vertical Axis Setting dialog box.

    • Change the way data is shown.

      Edit Data button in the Sparkline group

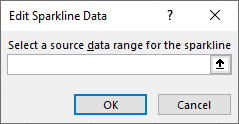
      If you click the Edit Single Sparkline's Data option in this drop-down, Excel opens the Edit Sparkline Data dialog box. From here, you can select the range in your workbook that contains the data you want for your Sparkline data. Use this option if you want to change only one Sparkline.

      Enter a source data range in the Edit Sparkline Data dialog box.

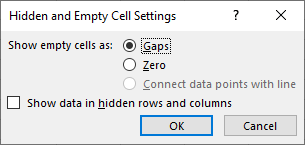
      If you click the Hidden & Empty Cells option in this drop-down, Excel opens the Hidden and Empty Cell Settings dialog box. Use this option to change how Excel treats hidden and null values for the Sparkline data.

      You can choose to show empty cells as Gaps, Zero, or Connect data points with line.

      Select the Show data in hidden rows and columns option to have Excel include data in hidden rows and columns in your Sparkline data. Clear this option to have Excel ignore data in hidden rows and columns.

      Decide how you want Excel to handle hidden or empty cells in sparklines on the Hidden and Empty Cell Settings dialog box.