Tuesday, February 1, 2022

Protect yourself from phishing schemes and other forms of online fraud

Phishing (pronounced: fishing) is an attack that attempts to steal your money, or your identity, by getting you to reveal personal information -- such as credit card numbers, bank information, or passwords -- on websites that pretend to be legitimate. Cybercriminals typically pretend to be reputable companies, friends, or acquaintances in a fake message, which contains a link to a phishing website.
Your browser does not support video. Install Microsoft Silverlight, Adobe Flash Player, or Internet Explorer 9.

Learn to spot a phishing message

Phishing is a popular form of cybercrime because of how effective it is. Cybercriminals have been successful using emails, text messages, direct messages on social media or in video games, to get people to respond with their personal information. The best defense is awareness and knowing what to look for.

Here are some ways to recognize a phishing email:

  • Urgent call to action or threats - Be suspicious of emails that claim you must click, call, or open an attachment immediately. Often they'll claim you have to act now to claim a reward or avoid a penalty. Creating a false sense of urgency is a common trick of phishing attacks and scams. They do that so that you won't think about it too much, or consult with a trusted advisor who may warn you away.

    Tip: Whenever you see a message calling for immediate action take a moment, pause, and look carefully at the message. Are you sure it's real? Slow down and be safe.

  • First time or infrequent senders - While it's not unusual to receive an email from someone for the first time, especially if they are outside your organization, this can be a sign of phishing. When you get an email from somebody you don't recognize, or that Outlook identifies as a new sender, take a moment to examine it extra carefully before you proceed.

  • Spelling and bad grammar - Professional companies or organizations usually have an editorial staff to ensure customers get high-quality, professional content. If an email message has obvious spelling or grammatical errors, it might be a scam. These errors are sometimes the result of awkward translation from a foreign language, and sometimes they're deliberate in an attempt to evade filters that try to block these attacks.

  • Generic greetings - An organization that works with you should know your name and these days it's easy to personalize an email. If the email starts with a generic "Dear sir or madam" that's a warning sign that it might not really be your bank or shopping site.

  • Suspicious links or unexpected attachments - If you suspect that an email message is a scam, don't open any links or attachments that you see. Instead, hover your mouse over, but don't click, the link to see if the address matches the link that was typed in the message. In the following example, resting the mouse on the link reveals the real web address in the box with the yellow background. Note that the string of IP address numbers looks nothing like the company's web address.

Fake IP address

Tip: On Android long-press the link to get a properties page that will reveal the true destination of the link. On iOS do what Apple calls a "Light, long-press".

  • Mismatched email domains - If the email claims to be from a reputable company, like Microsoft or your bank, but the email is being sent from another email domain like Yahoo.com, or microsoftsupport.ru it's probably a scam. Also be watchful for very subtle misspellings of the legitimate domain name. Like micros0ft.com where the second "o" has been replaced by a 0, or rnicrosoft.com, where the "m" has been replaced by an "r" and a "n". These are common tricks of scammers. 

Cybercriminals can also tempt you to visit fake websites with other methods, such as text messages or phone calls. Sophisticated cybercriminals set up call centers to automatically dial or text numbers for potential targets. These messages will often include prompts to get you to enter a PIN number or some other type of personal information.

Are you an administrator or IT pro?

If you have a Microsoft 365 subscription with Advanced Threat Protection you can enable ATP Anti-phishing to help protect your users. Learn more

If you receive a phishing email

  • Never click any links or attachments in suspicious emails. If you receive a suspicious message from an organization and worry the message could be legitimate, go to your web browser and open a new tab. Then go to the organization's website from your own saved favorite, or via a web search. Or call the organization using a phone number listed on the back of a membership card, printed on a bill or statement, or that you find on the organization's official website.

  • If the suspicious message appears to come from a person you know, contact that person via some other means such as text message or phone call to confirm it.

  • Report the message (see below).

  • Delete it.

How to report a phishing scam

  • Microsoft Office Outlook - With the suspicious message selected, choose Report message from the ribbon, and then select Phishing. This is the fastest way to report it and remove the message from your Inbox, and it will help us improve our filters so that you see fewer of these messages in the future. For more information see Use the Report Message add-in.

  • Outlook.com - Select the check box next to the suspicious message in your Outlook.com inbox. Select the arrow next to Junk, and then select Phishing.

Note: If you're using an email client other than Outlook, start a new email to phish@office365.microsoft.com and include the phishing email as an attachment. Please don't forward the suspicious email; we need to receive it as an attachment so we can examine the headers on the message. 

If you're on a suspicious website:

While you're on a suspicious site in Microsoft Edge, select the Settings and More (…) icon towards the top right corner of the window, then Help and feedback > Report unsafe site.  Or click here.

Tip: ALT+F will open the Settings and More menu.

For more information see Securely browse the web in Microsoft Edge.

What to do if you think you've been successfully phished

If you're suspicious that you may have inadvertently fallen for a phishing attack there are a few things you should do. 

  1. While it's fresh in your mind write down as many details of the attack as you can recall. In particular try to note any information such as usernames, account numbers, or passwords you may have shared.

  2. Immediately change the passwords on those affected accounts, and anywhere else that you might use the same password. While you're changing passwords you should create unique passwords for each account, and you might want to see Create and use strong passwords.

  3. Confirm that you have multifactor authentication (also known as two-step verification) turned on for every account you can. See What is: Multifactor authentication

  4. If this attack affects your work or school accounts you should notify the IT support folks at your work or school of the possible attack. If you shared information about your credit cards or bank accounts you may want to contact those companies as well to alert them to possible fraud.

  5. If you've lost money, or been the victim of identity theft, report it to local law enforcement. The details in step 1 will be very helpful to them.

See also

The keys to the kingdom - securing your devices and accounts
How malware can infect your computer

Faq about audio and video

This article contains frequently asked questions about using Lync audio and video.

Send us feedback if your question isn't answered.

In this article

How do I know my devices are set up correctly?

Lync automatically detects your audio and video devices. However, we strongly recommend that you check before making a call or joining a meeting, to make sure they are set up correctly.

See Set up, test, and troubleshoot Skype for Business (Lync) audio for instructions.

Top of Page

Can I use Lync to make a call?

Yes, there are two ways to call others with Lync:

  • Lync call

  • Using Dial Pad to call a number.

A Lync call is made from your computer to the computer of someone else who is also using Lync (computer audio).

  • A Lync call placed to a contact rings all their devices that are enabled for Lync, such as desktop and laptop computer.

  • If your company supports it, you can also make Lync calls to federated contacts. A federated relationship with other companies is just a virtual alliance that lets you add users from other companies to your contacts lists, send them IMs, make audio, video and conference calls, and exchange presence information.

You can also use Lync to call a regular phone line, just like a traditional desk phone. Start the call by using the dial pad to dial a number (see the next section for details) or pausing on a contact's picture and using the menu on the phone icon to choose a number to call.

For more information, see Make and receive a Skype for Business (Lync) video call.

Top of Page

Where is the Lync phone dial pad and how do I use it?

You use the Lync dial pad when:

  • You need to dial a phone number for people who aren't on your Contacts list.

  • You need to enter a PIN or make a selection to respond to an automated voice system or when in a conference call.

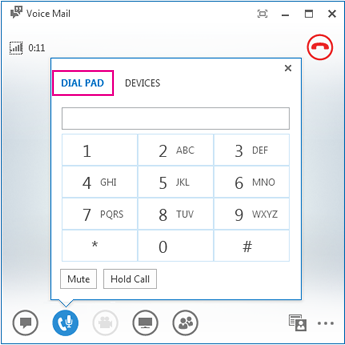
The Lync dial pad is available in two places:

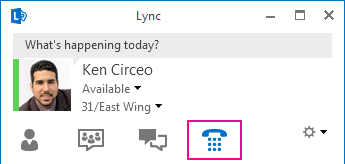
  • In the Lync main window, on the Phone tab.

    Dial pad tab

  • In the conversation window that opens when you start a call. Pause on the phone/mic icon to see the dial pad.

    Dial pad

Top of Page

Can I make a phone call without adding someone to my Contacts list?

Yes. You can type a phone number in the search box, on the Contacts view or Phone tab, and, in the results, double-click the number that you want to call.

You can also dial the number by using the dial pad on the Phone tab, and then clicking Call.

And, you can call someone by searching for him or her. Type the person's name in the search box, and, in the search results, pause on their picture, click the drop-down menu next to the phone button, and pick an option to call.

Top of Page

How can I add my numbers to my contact card?

Your phone numbers show up on your contact card and are visible to your Lync contacts, depending on the permission you choose when adding them.

  1. In the Lync main window, click the Options button, and then click Phones.

  2. Under My phone numbers, click a box, and type your number. Use only the digits 0123456789 and no parentheses or hyphens. When adding international numbers, type the + sign and then the country code followed by the local number.

  3. Select the boxes next to the number(s) that you want to show on your contact card.

For more information, see Phone options

Top of Page

What phone numbers are valid for calling contacts?

Follow these guidelines for valid phone numbers:

  • Use only digits. No hyphens, parentheses, or spaces are required. If Lync doesn't accept a phone number, contact your support team.

  • For local calls, dial the phone number. You may need to first dial a number such as 9 to go outside your company.

  • For long-distance calls, type the + sign, then use the country code, such as 1 for the United States, followed by the area code and number.

  • You can also enter 1-800 numbers and numbers with alphabetical characters in the search field. The alphabetical characters are converted to numbers to place the call.

Top of Page

Why am I having audio problems?

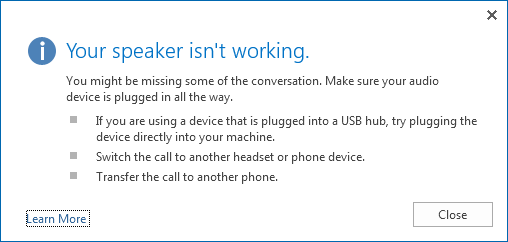
If there's a problem, a notification is displayed in the conversation window or the Lync main window. You can click the notification for more information or suggested solutions.

For example:

Screenshot of an audio error and options to check

If you're not getting sound, check that:

  • Your speakers are turned on, both in Lync and your computer, and the speaker volume is high.

  • Your telephone handset is on the cradle (if you're getting audio through a phone).

  • The device you're using is selected on the Devices tab, (pause on the phone/mic icon and click the Devices tab).

Top of Page

What can I do to improve device audio quality?

  • It's important that a noise-canceling microphone is positioned close to the mouth, approximately less than 1 inch away from the mouth, to filter out unwanted background noise.

  • Most headsets have a button to adjust the volume depending on which audio device the headset is connected to. If you or other callers hear a buzzing noise, make a test call, and then adjust the settings on the headset until the buzzing noise is gone.

  • If you're using the speaker on your phone and callers complain about background noise, make sure that the phone is on a flat surface, and you are close to the phone.

  • If you're using two separate devices for audio (such as desktop speakers and camera), try to place them at an appropriate distance from each other to minimize echo.

  • We recommend that you don't make calls over a wireless connection, virtual private network (VPN), or remote access service (RAS) connection.

Top of Page

Show a heat map in 3d maps

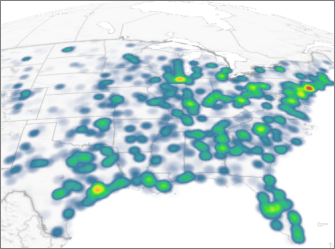
When you open 3D Maps, Bing Maps automatically plots your data in a column chart. You can change to a heat map, where colors represent your data, making it easy for people to take in lots of data at a quick glance.

Heat map of the middle and eastern US showing energy capacity
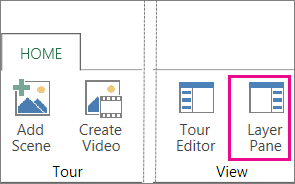
  1. Click Home >Layer Pane.

    Layer Pane button on the Power Map Home tab

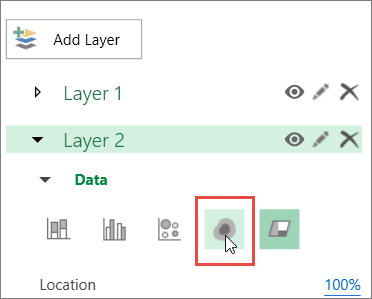
  2. In the Layer Pane, in the layer that you want to display as a heat map, click the Heat Map icon.

    Heat Map icon in Layer Pane

    Notes: 

    • When you switch to a heat map, the Height field changes to Value.

    • You may want to zoom in or rotate the chart to get a better view of the heat map.

    • You can't add annotations to heat maps.

Monday, January 31, 2022

Protection and security in excel

Excel gives you the ability to protect your work, whether it's to prevent someone from opening a workbook without a password, granting Read-Only access to a workbook, or even just protecting a worksheet so you don't inadvertently delete any formulas. In this topic we'll discuss the various ways you can utilize the primary options to protect and distribute your Excel files.

Warning: 

  • If you forget or lose your password, Microsoft can't retrieve it for you.

  • You should not assume that just because you protect a workbook or worksheet with a password that it is secure - you should always think twice before distributing Excel workbooks that could contain sensitive personal information like credit card numbers, Social Security Number, employee identification, to name a few.

  • Worksheet level protection is not intended as a security feature. It simply prevents users from modifying locked cells within the worksheet.

Following are the different options available for protecting your Excel data:

  • File-level: This refers to the ability to lock down your Excel file by specifying a password so that users can't open or modify it. You have two choices here:

    • File encryption: When you choose this option, you specify a password and lock the Excel file. This prevents other users from opening the file. For more information, see Protect an Excel file.

    • Setting a password to open or modify a file: You specify a password to open or modify a file. Use this option when you need to give Read-only or edit access to different users. For more information, see Protect an Excel file.

    • Mark as Final: Use this option if you want to mark your Excel file as the final version and want to prevent any further changes by other users. For more information, see Add or remove protection in your document, workbook, or presentation.

    • Restrict Access: If your organization has permissions set up using Information Rights Management (IRM), you can apply any of the available IRM permissions to your document. For more information, see Add or remove protection in your document, workbook, or presentation.

    • Digital signature: You can add digital signatures to your Excel file. For more information, see Add or remove a digital signature in Office files.

      Note: To add a digital signature, you need a valid certificate from a certificate authority (CA).

  • Workbook-level: You can lock the structure of your workbook by specifying a password. Locking the workbook structure prevents other users from adding, moving, deleting, hiding, and renaming worksheets. For more information on protecting workbooks, see Protect a workbook.

  • Worksheet-level: With sheet protection, you can control how a user can work within worksheets. You can specify what exactly a user can do within a sheet, thereby making sure that none of the important data in your worksheet are affected. For example, you might want a user to only add rows and columns, or only sort and use AutoFilter. Once sheet protection is enabled, you can protect other elements such as cells, ranges, formulas, and ActiveX or Form controls. For more information on protecting worksheets, see Protect a worksheet.

Which level of protection should I use?

  • To control the level of access users should have to an Excel file, use file-level protection. Let's say you have a weekly status report of your team members in an Excel file. You don't want anyone outside your team to be even able to open the file. There are two options available:

    • If you don't want others to open your file: You can encrypt the Excel file, which is the most common technique used. This basically means you lock it with a password and nobody except you can open it.

    • If you want to enable Read-only or editing access to different users: Maybe, you want the managers in your team to be able to edit the weekly status report, but team members should only have Read-only access. You can protect the Excel file by specifying two passwords: one to open, and the other to modify. You can later share the appropriate passwords with the team depending on the access they should be given.

  • To control how users should work with worksheets inside a your workbook's structure, use workbook-level protection. Let's say your status report workbook has multiple worksheets, and each worksheet is named after a team member. You want to make sure each team member can add data to their own worksheet, but not be able to modify any of the worksheets in the workbook, whether it be adding a new worksheet, or moving worksheets around within the workbook.

  • To control how users should work within an individual worksheet, use worksheet-level protection. Let's say each worksheet in your status report workbook contains data that is common to all worksheets, like header rows or a specific report layout, and you really don't want anyone to change it. By protecting your worksheet, you can specify that users can only perform specific functions in a sheet. For example, you can give users the ability to enter data, but keep them from deleting rows or columns, or only insert hyperlinks or sort data.

You can use one or more levels of protection for your Excel data depending on your/your organization's needs. You can choose to use all of the available options or a combination of options—it's completely up to the level of security you want for your Excel data. For example, you may choose to encrypt a shared Excel file, as well as enable workbook and worksheet protection, while only using worksheet protection on a personal workbook just so you don't accidentally delete any formulas.

Need more help?

You can always ask an expert in the Excel Tech Community or get support in the Answers community.

See Also

Protect an Excel file

Protect a workbook

Protect a worksheet

Share and collaborate

With Microsoft 365, you can securely share files, edit together in real time, and be productive wherever you are, on any device. Check out Best practices for collaborating to learn more.

Share files

To share a file from an Office app like Word, Excel, or PowerPoint:

  1. Select ShareShare on the ribbon.

  2. Enter a name or email address.

    Note: To change permissions, select the drop-down. Allow editing is checked by default. To change to view only, uncheck this box and select Apply.

  3. Select Send.

Your browser does not support video.

Collaborate with others

After you share your file, you can work on it with others at the same time.

You can co-author with others in the Office for the web, mobile, and desktop apps.

Colored flags show you who is editing and where.

Your browser does not support video.

Tdist function

Returns the Percentage Points (probability) for the Student t-distribution where a numeric value (x) is a calculated value of t for which the Percentage Points are to be computed. The t-distribution is used in the hypothesis testing of small sample data sets. Use this function in place of a table of critical values for the t-distribution.

Syntax

TDIST(x,degrees_freedom,tails)

X     is the numeric value at which to evaluate the distribution.

Degrees_freedom     is an integer indicating the number of degrees of freedom.

Tails     specifies the number of distribution tails to return. If tails = 1, TDIST returns the one-tailed distribution. If tails = 2, TDIST returns the two-tailed distribution.

Remarks

  • If any argument is nonnumeric, TDIST returns the #VALUE! error value.

  • If degrees_freedom < 1, TDIST returns the #NUM! error value.

  • The degrees_freedom and tails arguments are truncated to integers.

  • If tails is any value other than 1 or 2, TDIST returns the #NUM! error value.

  • TDIST is calculated as TDIST = p( x<abs(X)), where X is a random variable that follows the t-distribution.

Examples

X

Degrees

Formula

Description (Result)

1.96

60

=TDIST([X],[Degrees],2)

Two-tailed distribution (0.054644927 or 5.46 percent)

1.96

60

=TDIST([X],[Degrees],1)

One-tailed distribution (0.027322463 or 2.73 percent)