Sunday, August 1, 2021

Office add ins compatibility issues

The Compatibility Checker found one or more Office Add-in-related compatibility issues.

Note: New name for apps for Office - Office Add-ins. We are currently updating our products, documentation, samples, and other resources to reflect the platform name change from "apps for Office and SharePoint" to "Office and SharePoint Add-ins". We made this change to better distinguish the extension platform from Office apps (applications). While these changes are taking place, the dialogs and messages you see in your application might be different than what you see in this article.

Important: Before you continue saving the workbook to an earlier file format, you should address issues that cause a significant loss of functionality so that you can prevent permanent loss of data or incorrect functionality.

Issues that cause a significant loss of functionality

Issue

Solution

The workbook contains a task pane add-in.

What it means    Task pane add-ins can be saved only to the Office Open XML file formats, and are removed when you save the file to other formats. Any data in the worksheet that the add-in uses remains intact. Any cells that contain results from a task pane are saved with the value shown in the cell before the file is saved to the earlier file format.

What to do    Consider recreating the functionality of the task pane add-in; for example, by using cell formulas, objects, or external data references.

The workbook contains a content add-in.

What it means    Content add-ins can be saved only to the Office Open XML file formats, and are converted to pictures when you save the file to other formats.

What to do    Some content add-ins are charts, so you could replace the add-in with a chart that's supported in earlier versions of Excel. Consider replacing other types of content add-ins with an object connected to VBA code that will work in earlier Excel file formats.

Import data from an access database into an access web app

This article shows you how to bring data from an Access desktop database into an Access web app, so you can share it with friends and colleagues in an internet browser.

Not using an Access web app? Are you looking for information on how to import data into an Access desktop database? In that case, see Import or link to data in another Access database.

Important    Access Services 2010 and Access Services 2013 are being removed from the next release of SharePoint. We recommend you do not create new web apps, and migrate your existing apps to an alternative platform, such as Microsoft Power Apps.

Importing data into an Access web app

Before you get started, here are some things to consider:

  • Access will not import table relationships, calculated columns, validation rules, default values, attachment fields, OLE object fields, and certain other legacy data types into the web app.

  • Access will preserve lookups, so if you have related tables, make sure the relationships are established by using lookup fields before you import the tables into the web app.

Those preliminaries aside, here's how to do the import:

  1. If you've already started an Access web app, open it in Access (in the browser, click Settings > Customize in Access), then click Home > Table.

  2. If the Add Tables page isn't displayed, click Home > Table.

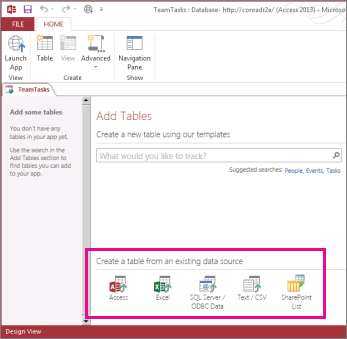
  3. On the Add Tables page (the first thing you see when creating a new custom app), you can import data from other Access databases, Excel workbooks, ODBC data sources, Text/CSV files, and SharePoint lists.

    Existing data source options on the Add Tables page.

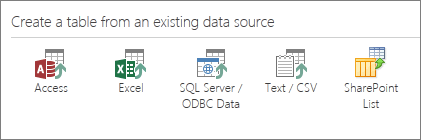
  4. Under Create a table from an existing data source, click Access.

    Creating a table from an existing data source.

    Note: If you want to import from other data sources besides Access, click the appropriate data source option and walk through the wizard steps.

  5. The Get External Data - Access Database dialog box opens.

  6. On the Get External Data - Access Database dialog box, click Browse, select the Access desktop database you're importing from, and click Open.

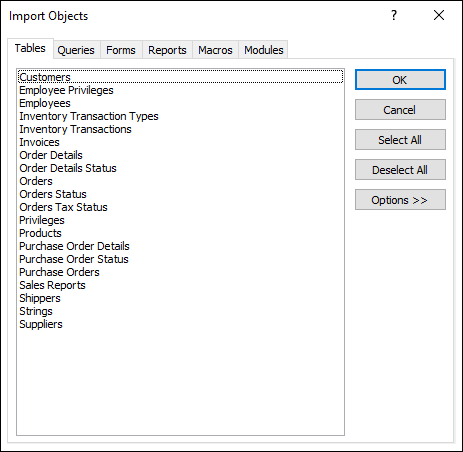
  7. The Import Objects dialog box opens.

    Select objects to import on the Import Objects dialog box

    Note: You can only import tables from an Access desktop database into an Access web app. You can't import any other object type.

  8. In the Import Objects dialog box, on the Tables tab, select the tables you want to import.

    To cancel a selected object, click the object again.

  9. Click OK to start the import process.

    Access imports the data and displays error messages if it encounters any problems.

  10. Access displays the new table(s) on the left side of the screen, and creates default views for each one. At this point, the best thing to do is click Home > Launch App. In the browser, click the new tables and views to see how everything looks. To make changes to the default views, close the browser and customize the web app in Access.

Notes: 

  • Importing data into an Access web app always creates a new table with default List and Datasheet views.

  • You can't append data to existing tables using the Import Wizard in an app. However, you can import data into a new table and then do one of the following:

    • Use datasheet views to copy and paste the data into the target table, or

    • Use the CreateRecord action in a data macro to add the imported data to the target table.

Tip:  Create lookups between new tables and existing ones to start tying data together. As long as a table's default views haven't been modified from the original, Access will add the appropriate "related data" controls to help you begin using the data.

External data operations available in Access web apps and desktop databases

This table gives you a quick reference of which kinds of files you can import or link to Access web apps or desktop databases.

Access web apps can import…

Access web apps can link to…

Desktop databases can import…

Desktop databases can link to…

Microsoft Excel

Green dot

Green dot

Green dot
(read-only)

Microsoft Access

Green dot

Green dot

Green dot

ODBC Databases, such as SQL Server

Green dot

Green dot

Green dot

Text or comma-separated value (CSV) files

Green dot

Green dot

Green dot
(add new records only)

SharePoint List

Green dot

Green dot
(read-only)

Green dot

Green dot

XML

Green dot

Data Services

Green dot

Green dot
(read-only)

HTML Document

Green dot

Green dot

Outlook folder

Green dot

Green dot

To learn how to import data into an Access desktop database, see Import or link to data in another Access database.

Use spellcheck in lync

Lync checks the spelling in your instant messages automatically. Lync won't mark as misspelled any word that you've added to your Office custom dictionary.

To turn off spellchecking in Lync, click the Options button Options tool button , then click IM and clear the Check spelling as I type check box.
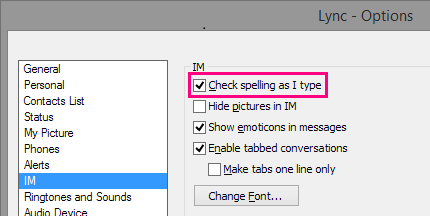
Screenshot IMl options window with check spelling highlighted

Top of Page

Use an apa or mla template to start a paper online

It's quick and easy to get started on a paper like this while you're online.

Choose an APA template or MLA template, or other college-related template and open it in Word for the web to make it yours.

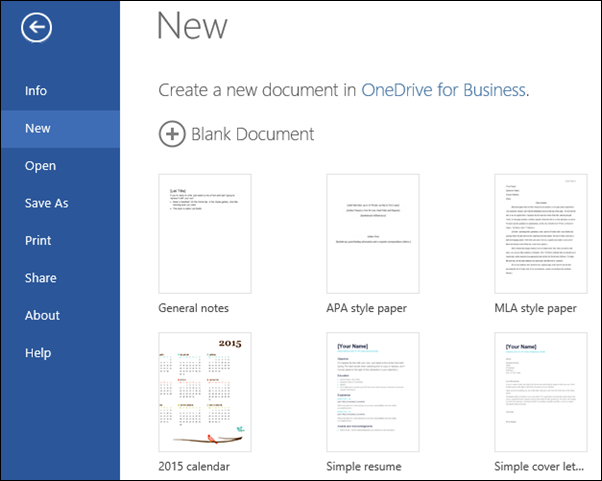
Tip: If you're already in Word for the web, get to college-related templates by going to File > New, and then below the template images click More on Office.com.
click More on Office.com
You'll be on the Templates for Word page. In the list of categories, click College Tools.

As you work on the paper, you'll probably want to rename it and edit the header with a running head of your own. When you cite sources, you'll want to add footnotes, and then compile your list of references (bibliography). Be sure also to include a table of contents that can update automatically. That way, you won't have to re-type page numbers every time you make changes that affect page breaks.

Work with others on your paper

If you're working with others, or even if you just want some feedback, you can easily share a link to the paper. People with the link can leave comments for you in the document.

When more than one person is editing in Word for the web, everyone will see each other's updates in the document. For more about how this works, see Work together on a document in Word for the web.

Turn in a hard-copy version

When you're finished, print out your paper to turn it in. You can do this with the paper still open in Word for the web. No need to save it first (that's already done for you).

To print, press Ctrl+P, and wait for the Print dialog.

Note: If you don't see a Print dialog box, click the link for opening a PDF version of your paper. From there, use the PDF program's Print command.

Video create a pivottable and analyze your data

Your browser does not support video.

Learn what a PivotTable and PivotCharts are, and how you can use them to summarize and analyze data in Excel 2013.

Create a PivotTable to analyze worksheet data

Being able to analyze all the data in your worksheet can help you make better business decisions. But sometimes it is hard to know where to start, especially when you have a lot of data.

Excel can help you by recommending, and then, automatically creating PivotTables, which are a great way to summarize, analyze, explore, and present your data.

  1. Make sure your data has column headings or table headers, and that there are no blank rows.

  2. Click any cell in the range of cells or table.

  3. Click INSERT > Recommended PivotTables.

  4. In the Recommended PivotTables dialog box, click any PivotTable layout to get a preview, and then pick the one that shows the data the way you want, and click OK.

Create a PivotChart

A PivotChart can help you make sense of PivotTable data. While a PivotChart shows data series, categories, and chart axes the same way a standard chart does, it also gives you interactive filtering controls right on the chart, so you can quickly analyze a subset of your data.

  1. Click anywhere in the data.

  2. On the INSERT tab, in the Charts group, pick Recommended Charts.

  3. On the Recommended Charts tab, pick any chart with the PivotChart icon in the top corner. A preview of your PivotChart appears in the preview pane.

  4. Once you find the PivotChart you like, click OK. If you don't find a PivotChart you like, click PivotChart on the INSERT tab, instead of Recommended Charts.

  5. In the PivotChart, click any interactive control, and then pick the sort or filtering options you want.

Want more?

Create a PivotTable to analyze external data

Create a PivotTable to analyze data in multiple tables

Show different calculations in PivotTable value fields

Create a PivotChart

Available chart types

PivotTable reports are a powerful way to summarize, analyze, explore, and present your data in a report.

PivotTables can help you make sense of your data, especially when you have a lot of it.

This table has 800 rows. Click any cell in your data.

Click INSERT and Recommended PivotTables.

Excel recommends PivotTable layouts that'll work well with your data.

To help you decide, pick each of the recommendations to see what your data will look like in the preview box.

Sum of Order Amount by Salesperson is what I want, so I click OK.

Excel creates the PivotTable on a new worksheet.

The PivotTable Fields List appears to the right; we'll cover that in the Create a PivotTable report manually video.

I'm going to zoom in a little, to make the PivotTable easier to read.

Right-click any cell in the Sum of Order Amount column.

Click Number Format, pick Currency, and click OK.

And the numbers in the column are formatted as currency.

Up next: Create a PivotTable report manually.

Answer a call in teams

When someone calls you, you'll get a notification that lets you accept or decline the call.

Teams-incoming call notification

  • Select Accept with audio Calls button to answer with audio only.

  • Select Accept with video Video call button to accept the call and enable video as well.

  • Select Decline call red phone to decline the call and go on with your day.
When a call comes in to Teams, a notification pops up, letting you know. Tap Answer Calls button (the blue one!) to start talking.

When you get an incoming call, you'll see an onscreen notification. Tap the notification to answer.

Add or remove columns in the inbox

You can add or remove columns in some folders and views, such as the Inbox and other Mail folders, contact lists, or task lists.

Important: In order to use these instructions, you have to switch to a view other than the default view.

Change your view to show columns

In order to add and remove columns, you must use a list view. The default view for the Inbox is Compact, showing messages grouped by conversation.

To switch your view to a list view:

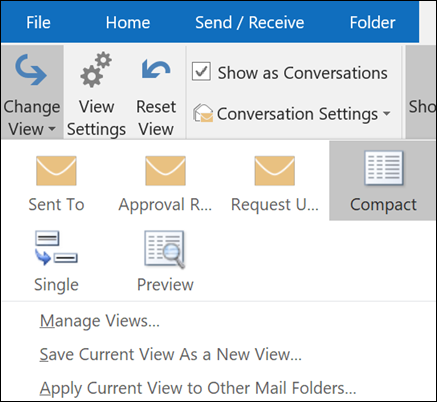
  1. Select the View menu, then Change View.

    Select Change View to pick a new view.
  2. Select Single or Preview.

Add or remove columns in a list view

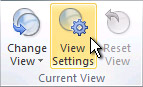
  1. On the View tab, in the Current View group, click View Settings.

    View Settings command on the ribbon

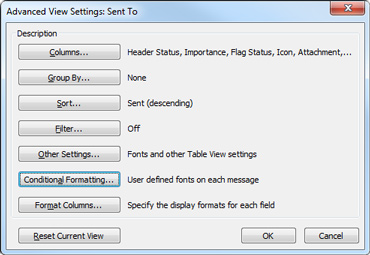
  2. In the Advanced View Settings dialog box, click Columns.

    Advanced View Settings dialog box

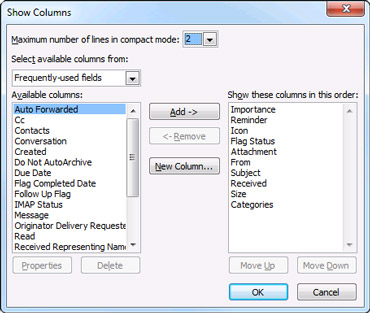
  3. In the Show Columns dialog box, in the Available columns list, click a column name, and then click Add.

    Show Columns dialog box

    If the column that you want is not in the Available columns list, click the Select available columns from box to see additional sets of columns.

    To create a custom column, click New Column, enter a Name for the column, and then click the Type and Format of information that you want the column to display.

    To remove a column, in the Show these columns in this order list, click a column name, and then click Remove.

  4. Click OK to save your changes and apply your new view.

    Important: If you don't see your new column appear in your view, you probably aren't using a list view. See Change your view to show columns to switch to a list view first, then repeat the steps in this procedure.

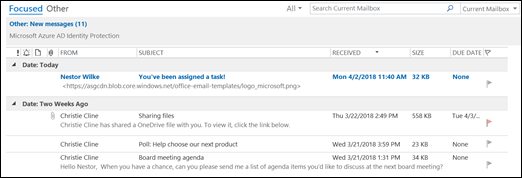
    You can add additional columns to your list view.

Columns in your Inbox and in other table  views of message lists are known as fields. To restore a column in these views, you need to add the column or field back to the views.

  1. On the View menu, point to Current View, and then click Customize Current View.

  2. Click Fields.

  3. In the Available fields list, click the field that you want to add.

    If the field that you want is not in the Available fields list, click a different set of fields in the Select available fields from box, and then click a field in the Available fields list.

  4. Click Add.