Thursday, April 1, 2021

Track the moving parts with to do

What is Microsoft To-do?

To-do is an app that can help you get stuff done. It's free and available for download on Windows, iOS, and Android devices.

Organize task lists, due dates, and priorities on all kinds of things. Here are just a few ideas:

  • Homework due dates

  • School supply shopping list

  • Reminders

  • A list of what to pack for away games

  • A list of errands you need to run

  • All the documents you need to turn in with a project

  • Ideas, songs, people, or movies you want to look up later

  • Anything!

Your first list

To get started, select the + New List icon on the toolbar and add a name to the list. We called ours the Oceans project. To make the list more fun, add an emoji by selecting the icon to the left of the list title.

Tip: To switch to Dark theme, go to Settings, then Theme.

To Do Interface

With the title settled, let's move on to the main point of the list: adding tasks. To add a task, select + Add a To-do and enter your task, then select the "Enter" key to confirm it. To edit, simply click on the task again. This allows you to add it to My Day, set a reminder, add a due date, add notes, or set the task to recur multiple times.

My Day is a way to pull together an agenda for each school day so you stay on top of what you need to get done.

Making a project

How can I use To-Do in school?

Microsoft To-Do is the perfect task management tool for your school life. Whether you're working on a project or trying to keep track of homework, To-Do can help keep you organized. Here are some examples of how to get the most out of your lists.

Managing a project

Make your To-do lists correspond to different parts of your project. Every task can be a different milestone or part of your project. You can set due dates and reminders, allowing you to be reminded ahead of time and prevent pulling an all-nighter.

If you're working on a project together, select the Share icon on your list to invite someone else to keep track of to-dos with you.
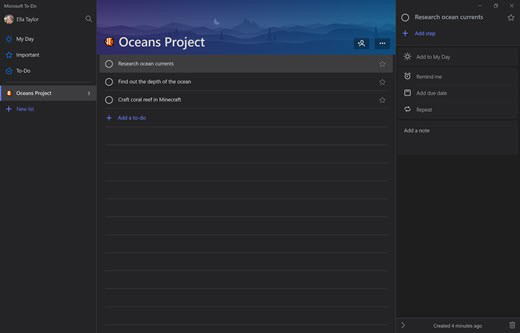
A project with details added

Homework planner

Create a Homework to-do list, where each task is a homework assignment. You can even add reminders and due dates, keeping you on task for what's coming up.

Change your dial in conferencing settings

If you're a Skype for Business Online user and have Microsoft set as your dial-in conferencing provider, you can manage settings related to your dial-in conferencing experience without requiring intervention from your Microsoft 365 administrator. Making changes to these settings will affect the dial-in conferencing experience for you and the participants of your meetings.

Reset my dial-in conferencing PIN

A dial-in conferencing PIN is a code made up of numbers that can be used by you to identify yourself as the organizer of your meetings and if required, it will allow you to start your meetings over the phone if the configuration of your organization is set such that a dial-in conferencing PIN is required to start meetings over the phone.

Regardless of the configuration of your organization to require a dial-in conferencing PIN to start meetings over the phone, meetings can be started when an authenticated user joins using a Skype for Business client. If one of your meetings has been already started by someone else, you don't need to input your dial-in conferencing PIN to start it if you're joining over the phone.

To reset your dial-in conferencing PIN

  1. In the Skype for Business main window, click the arrow next to the Options button The Options button in Skype for Business with the arrow on the right. and select Tools > Dial-in Conferencing Settings.
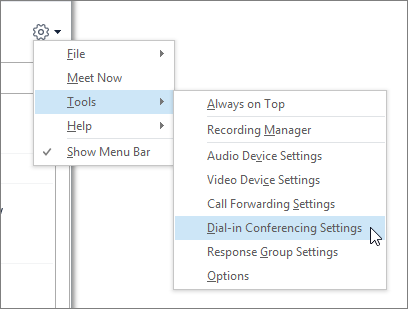
    Tools > Dial-in Conferencing Settings
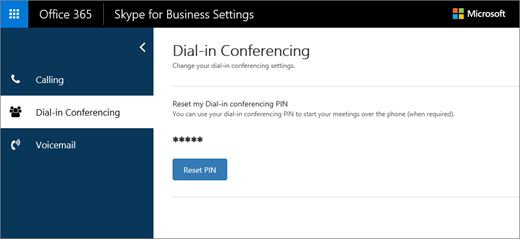
  2. On the Dial-in Conferencing settings page, select Reset PIN.

    Dial-in Conferencing settings page
  3. Your new dial-in conferencing PIN will be displayed.

    Note: The PIN will only be shown once after being reset. Your PIN will not be shown the next time you visit the Dial-in Conferencing settings page.

Edit a presentation in powerpoint for the web

PowerPoint for the web can open files stored on OneDrive, SharePoint, or Dropbox. 

Upload a file to OneDrive

If your file is saved on a computer hard disk, a flash drive, or a USB stick, the first thing to do is upload it to OneDrive.

  1. Sign in to OneDrive with your Microsoft account (hotmail.com, outlook.com, live.com, or msn.com)

    or Sign in to your Microsoft 365 work or school account (.com, .org, .edu) and go to OneDrive.

  2. Navigate to the destination folder.

  3. Select Upload to save the files to OneDrive.

Upload a file to SharePoint

  1. Sign in to your Microsoft 365 work or school account (.com, .org, .edu) and go to SharePoint.

  2. Navigate to the destination folder. 

  3. Select Upload to save the files to SharePoint.

Edit a file with a Microsoft account

In some cases, when you open a presentation from OneDrive directly or through a shared link with a Microsoft account, PowerPoint for the web displays the file in Reading view.

To edit such a file:

  1. In your web browser, navigate to the file in OneDrive.

  2. Click the file name once to open the file in PowerPoint for the web.

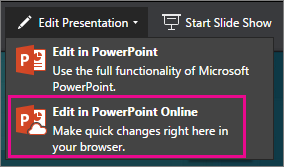
  3. select Edit Presentation, and then select Edit in PowerPoint for the web.

    Edit in PowerPoint Online

The file switches from Reading view to Editing view, where you can:

  • Add or change content

  • Share the file and collaborate with others

  • View the presentation in Slide Show

Edit a file with a Microsoft 365 work or school account

When you open a presentation from OneDrive for work or school or SharePoint directly or through a shared link with a Microsoft work or school account, PowerPoint for the web displays the file in Editing view by default. 

See Also

Editing an .odp or .pptx file in PowerPoint for the web

Using Office Online in OneDrive

Forecast linear function

This article describes the formula syntax and usage of the FORECAST.LINEAR and FORECAST functions in Microsoft Excel.

Note: In Excel 2016, the FORECAST function was replaced with FORECAST.LINEAR as part of the new Forecasting functions. The syntax and usage of the two functions are the same, but the older FORECAST function will eventually be deprecated. It's still available for backward compatibility, but consider using the new FORECAST.LINEAR function instead.

Description

Calculate, or predict, a future value by using existing values. The future value is a y-value for a given x-value. The existing values are known x-values and y-values, and the future value is predicted by using linear regression. You can use these functions to predict future sales, inventory requirements, or consumer trends.

Syntax

FORECAST.LINEAR(x, known_y's, known_x's)

- or -

FORECAST(x, known_y's, known_x's)

The FORECAST/FORECAST.LINEAR function syntax has the following arguments:

Argument   

Required   

Refers to   

x

yes

The data point for which you want to predict a value.

known_y's

yes

The dependent array or range of data.

known_x's

yes

The independent array or range of data.

Remarks

  • If x is nonnumeric, FORECAST and FORECAST.LINEAR return the #VALUE! error value.

  • If known_y's or known_x's is empty or one has more data points than the other, FORECAST and FORECAST.LINEAR return the #N/A error value.

  • If the variance of known_x's equals zero, then FORECAST and FORECAST.LINEAR return the #DIV/0! error value.

  • The equation for FORECAST and FORECAST.LINEAR is a+bx, where:

    Equation

    and:

    Equation

    and where x and y are the sample means AVERAGE(known_x's) and AVERAGE(known y's).

Example

Copy the example data in the following table, and paste it in cell A1 of a new Excel worksheet. For formulas to show results, select them, press F2, and then press Enter. If you need to, you can adjust the column widths to see all the data.

Known Y

Known X

6

20

7

28

9

31

15

38

21

40

Formula

Description

Result

=FORECAST.LINEAR(30,A2:A6,B2:B6)

Predicts a value for y given an x value of 30

10.607253

See Also

Forecasting functions (reference)

Resolve outlook for windows issues with automated troubleshooting tools

We have multiple tools to help you automatically diagnose an issue, troubleshoot, and fix problems with Outlook.

Microsoft Support and Recovery Assistant

The Microsoft Support and Recovery Assistant can help you automatically diagnose and fix a range of Outlook problems. You will need to download the application to your local computer, sign in with your home, work, or school account and select the issue you want help with.

The Microsoft Support and Recovery Assistant will run a series of diagnostic tests on your computer and help you set up a new profile, or resolve other issues. If any of the tests fails, it will provide suggested solutions to get your problem solved. If you're having a specific problem in Outlook, you can also try one of the following Microsoft Support and Recovery Assistant links:

For more information and to install the tool, see: About the Microsoft Support and Recovery Assistant.

Additional resources:
Office 365 Support Corner: These videos are created by Microsoft 365 support engineers to help you learn more about Microsoft 365, and are focused on support trends and top how-to questions and issues.

Calendar Checking Tool for Outlook (CalCheck)

CalCheck is a program that checks your Outlook calendar for problems, and performs various checks on general settings, such as permissions, free/busy publishing, delegate configuration, and automatic booking. Then, each item in your calendar folder is checked for known problems that can cause unexpected behavior, such as meetings that seem to be missing.

For more information and to install the tool, please visit: Calendar Checking Tool for Outlook (CalCheck).

Video search and find notes

Your browser does not support video.

Try it!

OneNote can help you find notes no matter where they are.

Search for notes

  1. Select the magnifying glass or press Ctrl+F.

  2. Type a search word or phrase.

    OneNote highlights search words in typed text, handwritten notes, and even words shown in pictures.

Narrow the search

  1. Select the search drop-down arrow.

  2. Select an option.

  3. Select one of the results.

Close the search results

  • Select the X to close the search results.

Want more?

Search for notes in OneNote for Windows 10

Add an autocomplete control to a view in an access app

Important    Access Services 2010 and Access Services 2013 are being removed from the next release of SharePoint. We recommend you do not create new web apps, and migrate your existing apps to an alternative platform, such as Microsoft Power Apps.

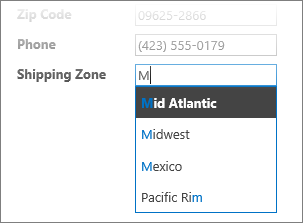
In Access web apps, an autocomplete controls shows choices as someone types to help them find the correct values. Picking the correct value from a long list of related items can be challenging but autocomplete controls can help with this task. For example, with this autocomplete control for shipping zones, if you type "m" you see four choices.

Partial matches appear as you type in an autocomplete box

If you add "e" to the "m" to form "me", the list is narrowed down to Mexico only. And if you type "mo", all the choices disappear from the box because there's no match.

Note: Autocomplete controls are available only to Access web apps and not in Access desktop databases.

Add an autocomplete control to a view

To add an autocomplete control, you edit the view in Access and add an autocomplete control from the Controls gallery.

  1. Start Access, and open the web app.

  2. Click the table caption name in the Table Selector in the left pane, then click the view in the View Selector.

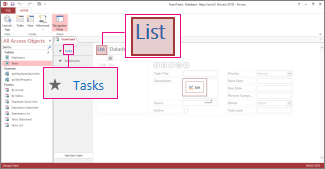
    In this example, Tasks is the table, and List is its view you want to add the autocomplete control to.

    Tasks table and List view in App design

  3. Click Edit in the middle of the screen to open the view in design mode.

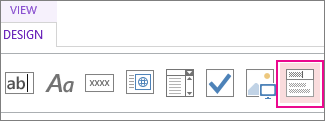
  4. Under View, click Design > AutoComplete Control.

    Autocomplete control

  5. Move the new autocomplete control to the position you want.

  6. Optionally, add a label control by clicking the label button in the Controls gallery, and move the label next to the autocomplete control. Enter a caption that helps explain the use for the autocomplete control.

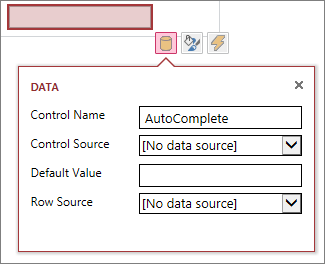
  7. Click the autocomplete control you added previously on the design grid, and then click the Data icon next to it to bring up its property options. This is where you'll hook the control up to its data source.

    Property box for a new autocomplete box control

  8. To "bind" the autocomplete control to a field (so the selected value is stored in that field), click Control Source, and select the field you want to store the value in.

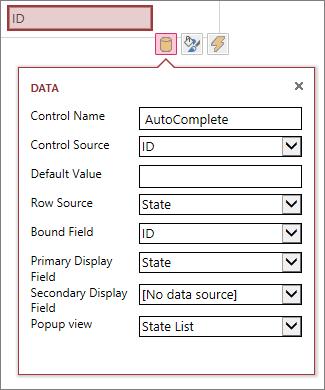
  9. Click Row Source, and select the table or query that contains the values you want to appear as a user types in the autocomplete control. After you select a table or query here, Access displays additional property options.

  10. In the Bound Field box, select the field that contains the values you want to store from the list. The bound field is the value Access stores in the control source field you defined previously. In some cases this will be the ID value depending upon how you designed your tables and lookup fields. In the Primary Display Field box, select the field that contains the values you want to display from the related table or query. These are the values users will see when using this control in their browser.

    All available properties in property box

  11. Click Save on the Quick Access Toolbar to save your view changes.

Using an autocomplete control in your browser

As you enter text in the autocomplete control, you'll see that...

  • The more characters you type, the more the list is narrowed down.

  • The search is not case-sensitive; upper and lower-case letters are considered the same.

  • If there are more than 8 matches, a message appears at the bottom of the list suggesting you do a more specific search – in this case, keep typing more characters.

Set additional options for the autocomplete control

  • In the Default Value box, you can enter a value to be used as the default when a new record is created. If you are using an ID value as the bound field, you'll need to use an appropriate ID value from the related table.

  • In the Popup View box, you can choose a view that "pops up" in a new window if you click the value shown in the box (except in Datasheet view). When you add a view name as a popup, the display options are formatted like a hyperlink in your browser to show that it's clickable.

For example, clicking someone's name in the List view could show a list of all the details for that person – it's just like choosing that person's record from the List view. If the view also contains related items, those rows also appear in the popup window.

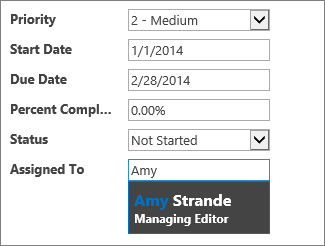
  • In the Secondary Display Field box, you can choose a "secondary" field to appear below each item – for example, suppose an employee's record has a field for their job title – you could choose the Job Title field as the secondary display field.

Here's an example that shows a secondary display field. Amy Strande's job title, "Managing Editor," is pulled from the Job Title field in Amy's record and is shown under her name. The secondary display field is available only in an autocomplete box while choosing values.

An autocomplete box search result with a secondary display field

  • On the Formatting properties, use the Hint box to enter descriptive text to help users understand how to use the autocomplete control. The default text is "Find..." but you can change that to something more suited to your needs such as "Enter an employee name."

An alternative to an autocomplete control is a combo box, which lets people click to see a dropdown list of choices, such as country/region names. To learn more about combo boxes, read adding a combo box to a view in an Access app.