Saturday, September 1, 2018

WEIBULL function

WEIBULL function

Returns the Weibull distribution. Use this distribution in reliability analysis, such as calculating a device's mean time to failure.

Syntax

WEIBULL(x,alpha,beta,cumulative)

X     is the value at which to evaluate the function.

Alpha     is a parameter to the distribution.

Beta     is a parameter to the distribution.

Cumulative     determines the form of the function.

Remarks

  • If x, alpha, or beta is nonnumeric, WEIBULL returns the #VALUE! error value.

  • If x < 0, WEIBULL returns the #NUM! error value.

  • If alpha ≤ 0 or if beta ≤ 0, WEIBULL returns the #NUM! error value.

  • The equation for the Weibull cumulative distribution function is:

    Equation

  • The equation for the Weibull probability density function is:

    Equation

  • When alpha = 1, WEIBULL returns the exponential distribution with:

    Equation

Examples

X

Alpha

Beta

Formula

Description (Result)

105

20

100

=WEIBULL([X],[Alpha],[Beta],TRUE)

Weibull cumulative distribution function for the specified arguments (0.929581)

105

20

100

=WEIBULL([X],[Alpha],[Beta],FALSE)

Weibull probability density function for the specified arguments (0.035589)

Make a checklist in Word

Make a checklist in Word

With Word, you can create two kinds of checklists:

  • Lists with check boxes or check marks instead of bullets or numbers. Use boxes if you plan to print the list, for example, and check off each item you complete.

  • Lists you can check off in Word. This involves adding a content control from the Developer tab, but you don't need to be a developer to do it.

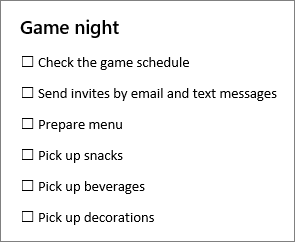
This sample checklist serves a dual purpose—it can be printed or used online.

You can create a checklist that you can print or use online by using the Check Box Content Control button on the Developer tab in Word.

Replace bullets or numbers with check marks or check boxes

  1. Select the entire list; the bullets or numbers won't look selected.

  2. Choose Home, and then choose the Bullets list.
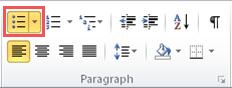
    Paragraph Bullets

  3. Do one of the following:

    • If you see the check mark or check box you want in the Bullet Library, select it.

    • If you don't see the check mark or check box you want, go to the next step.

  4. Choose Define New Bullet, and the Define New Bullet dialog box opens.

  5. Choose Symbol, and then choose a symbol from the table of symbols.

    Tip: For more choices, in the Font box, choose a symbol font, such as Wingdings.

  6. Scroll through the list of symbols and choose the symbol—such as an open box ( Open box ) or a three-dimensional box ( 3D box )—you want to use.

  7. Choose OK, and then choose OK again in the Define New Bullet dialog box.

The symbol you chose will be added to the Bullet Library so it'll be handy if you want to use it again.

Make a checklist you can check off in Word

There are four steps involved in creating a list with check boxes that you can check off in Word. This type of list requires a Check Box Content Control, found in the Developer tab.

  1. On the File tab, choose Options > Customize Ribbon.

  2. In the Customize the Ribbon list, choose Main Tabs.

  3. In the Main Tabs list, select the Developer check box, and then choose OK.
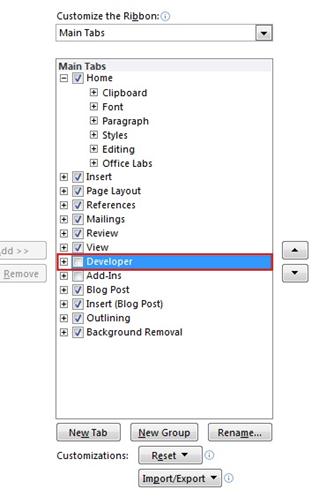
    Developer check box

  1. On the Developer tab, in the Controls group,. choose the Check Box Content Control button to insert a check box ( Open box ) in front of an item in an existing list or to create a new list.

  2. Press the Right Arrow key twice, type the first item in your list, and then press Enter.

  3. Select the check box control that you just created, and press Ctrl+C to make a copy of the control.

  4. On the new line, press Ctrl+V to paste the item, and then rename the item.

  5. Repeat steps 6 and 7 as needed until your list is complete.

  6. If you want to put an X in the check box, click inside the box.

More about the Check Box Content Control

You can use something other than the default check box and X.

  1. Select a Check Box Content Control, and in the Controls group, choose Properties.

  2. In the Content Control Properties dialog box, under Check Box Properties, choose Change next to Checked symbol and/or Unchecked symbol.

  3. In the Symbol dialog box, choose a new symbol, and then choose OK to save your choice.

If some items in your list are more than one line long, you can use hanging indents to align them.

  1. Select the list.

    Note: Bullets or numbers won't look selected.

  2. On the Home tab, in the Paragraph group, click the Paragraph dialog box launcher.
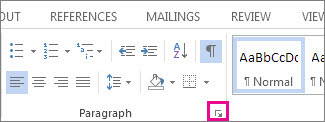
    Paragraph dialog box launcher

  3. Under Indentation, in the Left box, type 0.25.

  4. Under Special, choose Hanging.

  5. Click OK when finished.

When you're satisfied with the list, group it to lock the controls and listed items in place. That way, people can check off items on the list without changing the items themselves.

  1. Select the list (the check box controls and the listed items).

  2. On the Developer tab, in the Controls group, choose Group > Group.

    Note: If you need to change something later, select the list again and choose Group > Ungroup.

See Also

Make changes to check boxes
Create a fillable form
Keyboard shortcuts for Microsoft Word 2016 for Windows

Make a checklist to print

If you just need a checklist that you can print, you can make a list where each item has a check box that you can check off on paper. You can also create a list of check boxes and check off items electronically by opening the document in Word.

Note: If you can't check off an item electronically, it might be formatted for printing only or the document might be locked.

The way that you create the list depends on whether your document already contains bulleted lists with different kinds of bullets.

Create a bulleted list with custom bullets

  1. Type your list of items.

  2. Select the list.

  3. On the Home tab, in the Paragraph group, click the arrow next to Bullets.
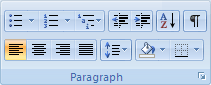
    Word Ribbon image

  4. Click Define New Bullet.

  5. Click Symbol.

  6. In the Font box, click a symbol font that is installed on your computer, such as Wingdings.

  7. Scroll through the list of available symbols, and then double-click the box symbol that you want to use, such as an open box ( Open box ) or a three-dimensional box ( 3D box ).

Create a table to prevent altering the existing bullets

  1. On the Insert tab, in the Tables group, click Table.
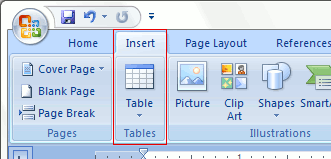
    Word Ribbon Image

  2. Click Insert Table.

  3. In the Number of columns box, enter 2.

  4. In the Number of rows box, enter the number of rows that you want. You need one row for each item in your list.

  5. Click OK.

  1. Click the top left cell.

  2. On the Insert tab, in the Symbols group, click Symbol, and then click More Symbols.

    Word Ribbon Image

  3. Click the Symbols tab.

  4. In the Font box, click a symbol font that is installed on your computer, such as Wingdings.

  5. Scroll through the list of available symbols, and then double-click the box symbol that you want to use, such as an open box ( Open box ) or a three-dimensional box ( 3D box ).

  6. Click Close.

  7. Click the next cell where you want to insert a box, and then press CTRL+Y to insert another box.

  8. After you insert a box for each item that you want, click the top-right cell and type the text for the first item. Repeat this step for each item in the list.

Although you are using the table to lay out the list, you probably want to adjust the spacing so that the column that contains the check boxes isn't too wide, and the text is lined up close to the check boxes. You probably don't want the border lines that Word usually includes with the table. To make these adjustments, do the following:

  1. Right-click the table, point to AutoFit, and then click AutoFit to Contents.

  2. Right-click the table, click Table Properties, and then click the Table tab.

  3. Click Options, and in the Left and Right boxes, enter a number that will provide a little bit of space between the check box and the text, such as .02 inches, and then click OK.

  4. On the Table tab, click Borders and Shading, and then click the Borders tab.

  5. Under Setting, click None, and then click OK.

    Note: After you remove the border lines, you may still see gray border lines. These are the table gridlines, and they do not show when the document is printed. If you don't want to see them at all, you can hide them by clicking View Gridlines in the Table group on the Layout tab under Table Tools.
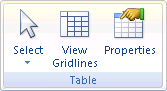
    Ribbon image

Make a checklist that you can check off in Word

To use check boxes that you can check off in Word, you insert the check box form field into your document. This looks best if you use a table to align the check boxes with the text, so your first step is to create a table. After you create the table, you can insert the check boxes in one column and the text in the other column, and then you can refine the layout. To check off the items, you lock the form.

The result looks like the following illustration.
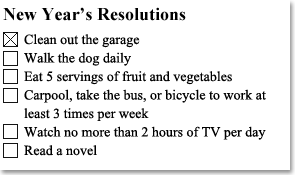
Example of a check list

  1. On the Insert tab, in the Tables group, click Table.

    Word Ribbon Image

  2. In the Number of columns box, enter 2.

  3. In the Number of rows box, enter the number of rows that you want. You need one row for each item in your list.

Don't worry about the size of the columns or the border lines in the table. You will fix those later.

To add the boxes that you will be able to check, you need to use the Developer tab.

Show Developer tab

  1. Click the Microsoft Office Button Office button image , and then click Word Options.

  2. Click Popular.

  3. Select the Show Developer tab in the Ribbon check box.

    Note: The Ribbon is a component of the Microsoft Office Fluent user interface.

Add check boxes

  1. Click the top left cell in the table that you inserted.

  2. On the Developer tab, in the Controls group, click Legacy Tools. Button image

  3. Under Legacy Forms, click Check Box Form Field Button image .

    Note: If the check box has a gray background, click Legacy Tools in the Controls group, and then click Form Field Shading Button image to remove the gray shading.

  4. Click the next cell where you want to insert a check box, and then press Ctrl+Y to insert another check box.

  5. After you insert a check box for each item that you want, click the top right cell and type the text for the first item. Repeat this step for each item in the list.

Although you're using the table to lay out the list, you probably want to adjust the spacing so that the column that contains the check boxes isn't too wide, and the text is lined up close to the check boxes. You probably don't want the border lines that Word usually includes with the table. To make these adjustments, do the following:

  1. Right-click the table, point to AutoFit, and then click AutoFit to Contents.

  2. Right-click the table, click Table Properties, and then click the Table tab.

  3. Click Options, and in the Left and Right boxes, enter a number that will provide a little bit of space between the check box and the text, such as .02 inches, and then click OK.

  4. On the Table tab, click Borders and Shading, and then click the Borders tab.

  5. Under Setting, click None, and then click OK.

    Note: After you remove the border lines, you may still see gray lines. These are the table gridlines, and they do not show when the document is printed. To hide the table gridlines on the screen, click the Layout tab under Table Tools, and in the Table group, click View Gridlines.

To check off the items by clicking in the check boxes, you need to lock the form. However, when the form is locked, you will not be able to make changes to the text or layout, so be sure to do this step last.

Note: If you want to check the spelling in your list, you must run spell check on the document before you lock the form.

When you want to edit the document, you can easily unlock the form. Just remember to lock it again so that you will be able to click the check boxes.

Lock the form

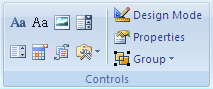
  1. Make sure that you are not in design mode by clicking Design Mode in the Controls group on the Developer tab.
    Button image

  2. On the Developer tab, in the Protect group, click Protect Document, and then click Restrict Formatting and Editing.

  3. In the Protect Document task pane, under Editing restrictions, select the Allow only this type of editing in the document check box.

  4. In the list of editing restrictions, select Filling in forms.

  5. Under Start enforcement, click Yes, Start Enforcing Protection.

  6. To assign a password to the document so that only reviewers who know the password can remove the protection, type a password in the Enter new password (optional) box, and then confirm the password.

    Important: If you choose not to use a password, all reviewers can change your editing restrictions.

Unlock the form

  1. On the Developer tab, in the Protect group, click Protect Document, and then click Restrict Formatting and Editing.

  2. In the Protect Document task pane, click Stop Protection.

Note: If you used a password to add protection to the document, you need to type the password before you can stop the protection.


Publish a project

Publish a project

After you have created a project in Project Web App, or after you have made changes to a project, you need to publish the project. Publishing the project makes the most current information available to others, including the team members assigned to the project's tasks.

Tip:  If you are making multiple changes to a project, or if you are in the process of building out the project plan, it can be helpful to wait until all information is current before you publish the project. You can make changes to the project and then, on the Project tab or the Task tab, in the Project group, click Save. This saves your changes without publishing them for others to view. Until you publish your changes, team members and others who access your project will see the last published version of the project.

To publish your project:

  1. Open the project for editing.

    Note:  Only enterprise projects, which are managed in Project Web App, can be published. SharePoint task list projects are automatically available to those who have access to the project site.

  2. On the Schedule page for the project, click the Task tab, and then, in the Project group, click Publish. The project is saved and then published.

Once you have finished publishing the project, if you have no other changes, you can click Close in the Project group on the Project tab or the Task tab. This will prompt you to either check the project in, or keep it checked out.

Skype minutes in Office 365

Skype minutes in Office 365

Your Office 365 Home or Office 365 Personal subscription comes with 60 Skype minutes.

Skype-to-Skype calls are always free. But you can also use Skype to call mobile phones and landlines. Office 365 Home and Office 365 Personal includes 60 minutes per month of Skype calls to mobile phones in more than 8 countries and to landlines in 60+ countries (only in markets where Skype is available). Just dial from Skype and your friends and family can pick up on their phone.

How to activate your minutes

If you have a Skype account, sign in at account.microsoft.com/services with your Microsoft account and click the link Get Skype minutes to activate your Skype minutes.

If you don't have a Skype account, sign up for one and then click the link to activate your minutes. You'll see a confirmation at account.microsoft.com/services when the minutes have been activated.

Countries and regions you can call using Skype minutes

You can call phones around the world with your Skype minutes. See the complete list of supported destinations.

Important:  Special, premium, and non-geographic numbers aren't covered by Skype minutes. Also, it isn't possible to place emergency calls.

Calling countries and regions that aren't included in Skype minutes

Skype offers a variety of pay-as-you-go and subscription options to supplement Skype minutes. Visit www.skype.com for more details.

If you're already paying for Skype minutes

If you already have a Skype account, you can use it for your minutes. Skype uses your Skype minutes before any prepaid minutes.

Outlook for Mac 2011 Help

Outlook for Mac 2011 Help

Customer support and troubleshooting for Office for Mac 2011 ends October 2017. To get all the latest features, upgrade to Office 2016 for Mac. Make a one-time purchase, or buy an Office 365 subscription and stay up to date.

Link to buy or try Office

Set up your accounts

Title

Description

Set up email in Outlook for Mac 2011

Learn how to configure POP and IMAP e-mail accounts from e-mail service providers such as AOL, Gmail, MobileMe, and Windows Live Hotmail.

Add an email account to Outlook

Connect to the Microsoft Exchange account provided by your company or organization.

Import a .pst file from Outlook for Windows

Watch this short overview on how to import an Outlook for Windows Data File (.pst).

Work with mail, calendar, and address book

Title

Description

Add a picture or background to a message

Make your e-mail messages more interesting by including a picture as part of the message.

Create a signature

Add a signature manually or automatically to each message that you send.

Create a meeting or appointment

Learn the difference between a meeting and an appointment and how to create each on your calendar.

Create a contact group (also called a distribution list)

Learn how to create a distribution list so that you can send a message to everyone in a group without typing each recipient's address.

Organize and search for items

Title

Description

Add or remove folders

Create additional folders to organize your messages, contacts, tasks, and notes.

Find items in Outlook by doing a basic search

Quickly search the current folder, and expand the search to include additional folders or item types.

Create a rule

Create a rule to automatically sort incoming messages into folders.

Synchronize and share

Title

Description

Open a shared calendar, address book, or e-mail folder

Open a Microsoft Exchange calendar, address book, or e-mail folder that you have permission to open.

Add and manage your delegates

Give a delegate access to and set permissions on your Microsoft Exchange calendar, inbox, and address book.

Manage junk e-mail, security, and privacy

Title

Description

Customize junk e-mail protection

Adjust the junk e-mail filter to classify more or fewer messages as "junk."

Send a digitally signed or encrypted message

Make your messages more secure by using digital signatures and encryption.

Create a message with restricted permission

Use Information Rights Management (IRM) to restrict permission to a message, for example, prevent recipients from forwarding the message.

Troubleshooting

Title

Description

I'm not receiving e-mail or other items in my Exchange account

Explore common causes and solutions for e-mail issues.

Rebuild the Office database

Learn how to use the Microsoft Database Utility to rebuild a damaged Office database.

Explore other useful resources

Title

Description

Make Outlook your default application for e-mail, calendar, and contacts

Set up Outlook to open automatically when you click a link in a document or on a Web page to send e-mail (also known as a "mailto" link).

Outlook keyboard shortcuts

See the full list of keyboard shortcuts, organized into logical categories.

Customize the Outlook window

Learn the main elements of the Outlook window and how to customize each one.

Work with packages in UML models

Work with packages in UML models

Packages are the key organizing elements for UML models. You can use packages as containers for elements, views (diagrams), and other packages. Packages provide a way for you to divide large diagrams and models into manageable subsets. You can think of the entire system as a single high-level package with all the models and elements in it.

When you create a new model, the UML Model Diagram template automatically creates a top package for the model. This package serves as the container for all the elements, packages, and diagrams you create as part of the model.

Create a new package from the Model Explorer

In the tree view, right-click the package you want to create the new package in, click New, and then click Package.

A new package icon is automatically added to the tree view and the UML Package Properties dialog box opens.

Create a new package from a diagram

  1. In the tree view, double-click the icon for the diagram you want to add the package to.

    The drawing page for the diagram appears.

  2. From UML Static Structure, UML Use Case, UML Component, or UML Deployment, drag a package shape onto the drawing page.

An icon representing the package is added to the tree view.

Create a new diagram from a package

To automatically create a new diagram each time you add a new package to your model, on the UML menu click Options, and then, on the UML Add-In tab, select Create a diagram page when a package or subsystem shape is added to a document.

To create a new diagram if this option is not selected, right-click the new Package shape and click Diagrams, and then click New. Type a name for the diagram and select a diagram type, and then click OK.

Add elements to a package

In the tree view, right-click the package you want to add elements to, click New, and then choose the type of element you want to add.

An icon for the element is added to the tree view.

Represent package contents in a diagram

  1. In the tree view, right-click the icon for the package with contents you want to represent, and then choose the type of diagram you want to include in the package.

    The appropriate stencil and a blank drawing page appear. A watermark with the name of the diagram type appears on the workspace.

  2. Drag shapes representing the elements you want to include in the package onto the drawing page.