Thursday, March 1, 2018

Introduction to working with publishing sites

Introduction to working with publishing sites

This article contains information about working with publishing site templates and content types.

In this article

About publishing-enabled site templates

About publishing-enabled content types

About publishing-enabled site templates

When you create a site, you select a site template from the Select a template list. For example, to create a site for publishing a team's Web pages, you select the Publishing Site template.

A site template is a file that dictates the overall look and feel of a site. It can include the following:

  • Web Part pages

  • Custom pages

  • Themes and borders

  • Customizations to the Quick Launch

  • Site content (list and document library contents — optional)

Publishing sites have publishing features enabled. These include commands on the Ribbon that enable you to submit a page for approval, manage its properties, publish it, and check it in or out. The following table contains a brief description of each publishing site template.

Template

Purpose

Publishing Site

Creates a site for publishing Web pages. The template includes a document and picture library for storing Web publishing assets. You can make it easy for teams to manage changes with the page editing toolbar and check out and content editor features.

Publishing Site with Workflow

Creates a site for publishing Web pages on a schedule by using approved workflows. The template includes a document and picture library for storing Web publishing assets. By default, you can only create publishing subsites under the sites that you created by using this template.

Enterprise Wiki

Creates a large-scale wiki with categories and page layouts. For the Enterprise Wiki template to be available, Enterprise Wiki Layouts must be activated in the Site Collection Features page.

Notes: 

  • By default, you can select only the Publishing Site or Publishing Site with Workflow site template when creating a subsite of a publishing site. You can, however, enable additional site templates for use under Page Layouts and site templates on the Site Settings page.

  • You can create a site collection using the Enterprise Wiki site template only if you are a term store administrator. It is not necessary to be a term store administrator to create a subsite that uses the Enterprise Wiki site template.

Top of Page

About publishing-enabled content types

Modifying a content type enables you to customize all pages that use that content type. For example, if you want to add an additional image field to all Article pages, you can do this by modifying the Article Page content type, which makes the field available to use as a page-layout element. Any pages to which the content type is applied will be able to use the new field.

You can manage and customize content types that have the Publishing feature enabled by using the Content Type Gallery page of the top-level site in your site collection.

  1. On the Site Actions menu, click Site Settings.

  2. On the Site Settings page, under Galleries, click Site content types.

  3. Click the content type that you want to modify.

When you modify a content type, you can choose whether to have pages that inherit from that content type use the change or not. In the Update Lists and Site Content Types section, specify whether the child site content types that inherit from this site content type will be updated with your changes.

There are six content types that have the Publishing feature enabled. The following table shows each type, where it is listed, and its description.

Content type

Listed under

Content type description

Article Page

Page Layout Content Types

Article Page is a system content type template that you create by using the Publishing Resources feature. It is the associated content type template for the default page layouts that you can use to create article pages in sites that have the Publishing feature enabled.

Redirect Page

Page Layout Content Types

Redirect Page is a system content type template that you create by using the Publishing Resources feature. It is the associated content type template for the redirect page layout.

Welcome Page

Page Layout Content Types

Welcome Page is a system content type template that you create by using the Publishing Resources feature. It is the associated content type template for the default page layout that you can use to create welcome pages in sites that have the Publishing feature enabled.

Page

Publishing Content Types

Page is a system content type template that you create by using the Publishing Resources feature. The column templates from Page will be added to all Pages libraries created by the Publishing feature.

Page Layout

Publishing Content Types

Page Layout is a system content type template that you create by using the Publishing Resources feature. All page layouts will include the column templates from Page Layout.

Publishing Master Page

Publishing Content Types

Master Page is a system content type template that you create by using the Publishing Resources feature. All master pages will include the column templates from Master Page.

Top of Page

WBS Predecessors (task field)

WBS Predecessors (task field)

Data Type     Integer List

Entry Type     Calculated

Description     The WBS Predecessors field lists the work breakdown structure (WBS) codes associated with the predecessor tasks on which the task depends before it can start or finish. Each predecessor is linked to the task by a specific type of task dependency and a lead time or lag time.

Best Uses     Add the WBS Predecessors field to a task sheet when you want to display a list of the task predecessors. Also use the WBS Predecessors field when sorting, grouping, or filtering by WBS predecessors. Each predecessor task is represented by its WBS code, which may be followed by a link type and the lead or lag time. The link types for predecessors are FS (finish-to-start), FF (finish-to-finish), SS (start-to-start), and SF (start-to-finish). Lead time is represented by a negative number, and lag time is represented by a positive number.

Example     You use a custom WBS code structure in your project and you want to review the predecessors of tasks in your project to analyze and refine the schedule. You add the WBS Predecessors field to the Task Sheet view. For the "Write proposal" task, the WBS Predecessors field contains the entry "B.15.c[FS+3 days]." This means that the task with the WBS code of B.15.c is a predecessor of this task, with a finish-to-start dependency and a three-day lag time. Before this task can start, it must wait three days after the finish of task B.15.c.

Remarks     You can use the Link Tasks command to link the selected tasks with finish-to-start dependencies and zero lag time. You can also link tasks by dragging from one task to the other on the chart portion of the Gantt Chart or Network Diagram view. You can set other dependency types and any delays to the tasks you want in the Task Information dialog box.

If there is more than one predecessor, they are all listed and separated by the list-separator character, such as the comma or semicolon.

If a predecessor task does not have a WBS code, the field is blank.

If a predecessor is a task in another project, the WBS Predecessors field contains the full path name for the task, along with the WBS code.

Show the Developer tab

Show the Developer tab

The Developer tab is not displayed by default, but you can add it to the ribbon when you want to do or use the following:

  • Write macros.

  • Run macros that you previously recorded.

  • Use XML commands.

  • Use ActiveX controls.

  • Create applications to use with Microsoft Office programs.

  • Use form controls in Microsoft Excel.

  • Work with the ShapeSheet in Microsoft Visio.

  • Create new shapes and stencils in Microsoft Visio.

After you show the tab, it stays visible, unless you clear the check box or have to reinstall a Microsoft Office program.

Show the Developer tab in your Office application

  1. Click the File tab.

  2. Click Options.

  3. Click Customize Ribbon.

  4. Under Customize the Ribbon and under Main Tabs, select the Developer check box.

Top of page

Show the developer tab in Excel, PowerPoint, or Word

  1. Click the Microsoft Office Button Office button image , and then click Excel Options, PowerPoint Options, or Word Options.
  2. Click Popular, and then select the Show Developer tab in the Ribbon check box.

    Note: The Ribbon is part of the Microsoft Office Fluent user interface

Show the developer tab in Outlook

  1. On the Tools menu, click Options.

  2. On the Other tab, click Advanced Options, and then select the Show Developer tab in the Ribbon check box.

Run in developer mode in Visio

  1. On the Tools menu, click Options.

  2. On the Advanced tab, under Advanced Options, select the Run in developer mode check box.

Top of page

Add a motion path animation effect

Add a motion path animation effect

You can apply motion path animation effects to move slide objects in a sequence that tells an effective story.

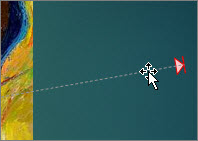
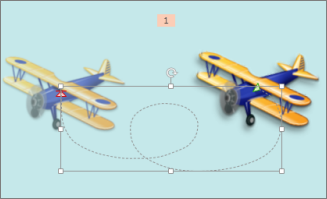
For example, the plane on the right (below) shows the starting point of the plane, and the dotted line between the two planes shows the path it will take when the animation plays. The transparent image on the left is where the plane will end up when the motion path animation is done.

Your browser does not support video. Install Microsoft Silverlight, Adobe Flash Player, or Internet Explorer 9.

Add a motion path to an object

"Curvey Left" motion path

  1. Click the object you want to animate.

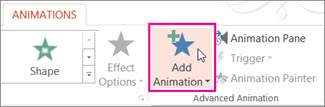
  2. On the Animations tab, click Add Animation.

    Add Animation

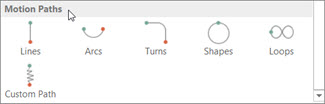
  3. Scroll down to Motion Paths, and pick one.
    Scroll down to Motion Paths

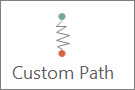
    Tip:   If you choose the Custom path option, you will draw the path that you want the object to take.

    Draw a custom path

    To stop drawing a custom path, press Esc.

Advanced motion path options

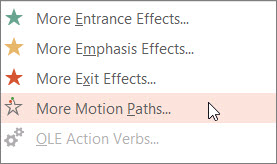
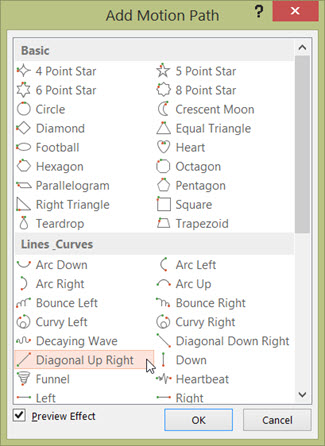
  1. If you don't see a motion path that you want, at the bottom of the gallery, click More Motion Paths.
    More motion paths

    Click an animation to see a preview of how the object will move on your slide.

    Click a motion path animation

  2. Once you pick the motion path you want, click OK.

    To remove and animation, on the slide, click the motion path (dotted line with arrow), and then press Delete.

    Click the motion path and press DELETE

Editing motion paths

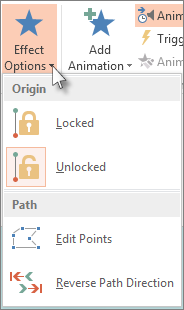
  1. To do things like change the direction of the motion path, edit the individual points of the motion path, or to lock (make it so others can't change the animation) or unlock the animation, click Effect Options.

    Edit a motion path effect

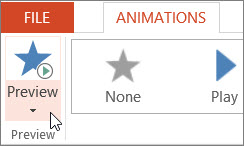
  2. To preview the motion path, click the object on the slide, and then click Animations > Preview.

    Tip:   Preview is located on the Animations tab, just below the File tab on the far left.

    Click Preview

Office 365 subscribers have a new option for motion-based animation: Morph

Using Break Out Rooms

Using Break Out Rooms

Break out rooms are a feature of the Microsoft Office Live Meeting service. During a meeting, presenters can use break out rooms to create separate meeting spaces.

To enter a break out room

  • When the presenter moves you to a break out room, you will see a transition page indicating that you are transitioning to a breakout room.

Outlook Web App Light > Supported browsers

Outlook Web App Light > Supported browsers

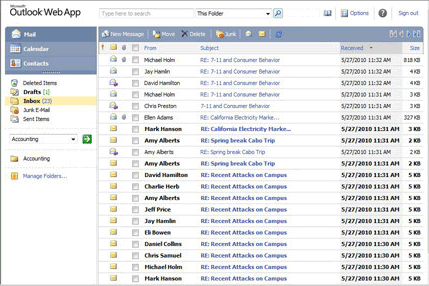
If Outlook Web App looks like this, you're using the light version of Outlook Web App. This could be because you selected the option to use the light version, or because you're using a web browser that doesn't support the standard version of Outlook Web App.

Outlook Web App Light

For a list of browsers that support the standard version of Outlook Web App, see our Supported browsers.

What if I want to know more?

Outlook Web App Light

Outlook Web App Light > Options