Photos and other types of attachments can vary in size. Many email systems, including Gmail, Yahoo, and Exchange limit the size of email messages you can send. If you're concerned about the size of your email messages or if you've received a message that your email is too large to send, there are several steps you can take to reduce the size of the attached pictures and other documents.
In addition to restricting the size of individual messages, some email systems put a cap on the total size of your mailbox. Since each message you send is stored in your Sent Items folder, reducing the size of attachments can also help keep your mailbox size small.
What would you like to do?
Insert a picture
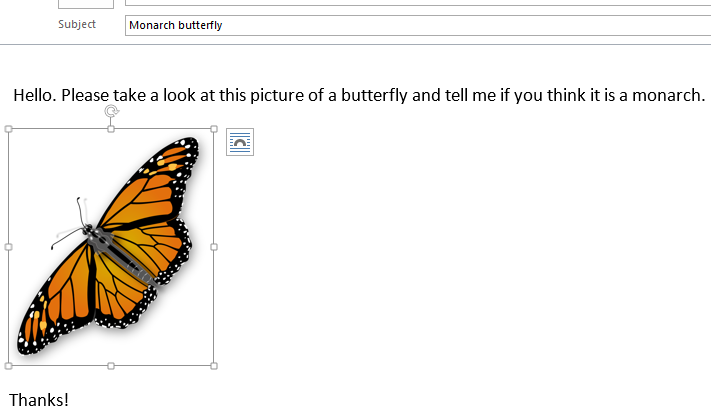
To insert a picture in the body of your email message, place your cursor in the body of the email message, select the Insert menu, and then choose Pictures from the Illustrations group on the Ribbon.
If the picture looks too big (or too small), you can use the sizing handles on the picture to resize the image.
Resize a picture
You can change the visible size of the picture; for example, how much of the screen it takes up, without changing the file size or resolution of the picture. This, however, will not shrink the total size of the email message you're sending.
-
Click or tap the picture to display a small circular sizing handle at each corner of the picture.

-
Click (or press and hold) one of handles, then drag the sizing handle toward the center to reduce the size of the image or away from the center to increase the size of the image.
Tip: There are additional sizing handles in the center of each side of the picture. If you want to maintain the picture's proportions, only use the sizing handles in the corners. Using the handles in the center of each side will distort the picture.
Resize a picture to exact dimensions
-
Select the picture you want to resize.
-
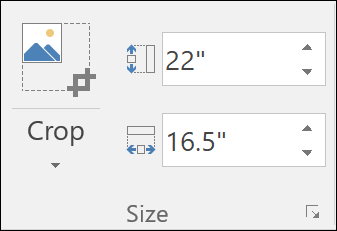
On the Format tab, in the Size group, enter the required height. The width changes automatically to stay in proportion to the height.

If you want to change the height and width separately, clear the Lock aspect ratio check box before you change the required height or width in step 2.
Compress pictures to reduce file size
Compressing a picture maintains the height and width of the picture, but reduces the resolution. Lower resolution pictures have a smaller file size.
-
Select the picture or pictures you need to reduce.
-
Under Picture Tools on the Format tab, select Compress Pictures
 from the Adjust group. Depending on your screen resolution, you may only see the Compress Pictures icon.
 -
Select the compression and resolution options and then select OK. For pictures that won't be printed, Web (150 ppi) is the most common resolution.
Important: Compressing a picture to reduce the size of the file changes the amount of detail retained in the source picture. This means that after compression, the picture can look different than before it was compressed.
When you attach a picture as a file, the picture won't display directly in the body of the email message. Instead, an icon of the picture will appear under the message subject. For image files, you'll also see a small preview of the picture along with the name and size of the file.

If the picture attachment is too large, you can tell Outlook to resize the picture for you when you send the message.
-
Select File.
-
If your image is large, you'll see this message: Some recipients may not receive this message because of image attachments. Resizing large images may help the message get delivered. Resized images will be a maximum of 1024x768 pixels.
-
Select Resize large images when I send this message.
-
Select the left arrow at the top left corner of the screen to return to your message. Compose your message, and when you select Send, all picture attachments will be automatically resized.
Note: If you embed the picture in the message body — the picture appears in the message — by using the Picture command in the Illustrations group, the image attachment resize feature is not available.
Documents, spreadsheets, PDF files, and other types of files can vary greatly in size. There are several methods you can use to keep the size of your email messages and attachments small when sending these files.
Note: For more information specific to reducing picture files, see the section Insert and resize pictures in the body of an email message.
Send a link to the file
-
In your email message, select Attach File from the ribbon.
-
Select your file.
-
If the file is already stored on OneDrive, OneDrive for Business, or a SharePoint site, you can select Send a link. This attaches a shortcut to the file to your email message, not the file itself. Recipients can open the shortcut and download or open the file.
Copy a sharing link from another cloud storage service
Most cloud storage solutions such as Dropbox or Google Drive allow you to get a shareable link to your file. See their help files for more information on how to obtain a sharing link. Once you have a sharing link, paste it in the body of your email message.
Compress your files before sending
Most files can be compressed into a zip file to reduce their size. Windows allows you to create and open zip files without any additional software.
-
Navigate to the folder that contains the file you want to send.
-
Select a file. To select multiple files, press and hold CTRL as you click each file.
-
Right-click the selection, select Send To > Compressed (zipped) Folder.
-
This creates a new zip file that contains the file or files you selected in step 2. The name of the zip file is chosen automatically from the name of the original file.
-
Either return to your email message and choose Attach File from the ribbon, or right-click the new zip file, select Send To > Mail Recipient to open a new email message with the file already attached.
What would you like to do?
Insert a picture
To insert a picture in the body of your email message, place your cursor in the body of the email message, select the Insert menu, and then choose Pictures from the Illustrations group on the Ribbon.
If the picture looks too big (or too small), you can use the sizing handles on the picture to resize the image.
Resize a picture
You can change the visible size of the picture, e.g., how much of the screen it takes up, without changing the file size or resolution of the picture. This, however, will not shrink the total size of the email message you're sending.
-
Click or tap the picture to display a small circular sizing handle at each corner of the picture.

-
Click (or press and hold) one of handles, then drag the sizing handle toward the center to reduce the size of the image or away from the center to increase the size of the image.
Tip: There are additional sizing handles in the center of each side of the picture. If you want to maintain the picture's proportions, only use the sizing handles in the corners. Using the handles in the center of each side will distort the picture.
Resize a picture to exact dimensions
-
Select the picture you want to resize.
-
On the Format tab, in the Size group, enter the required height. The width changes automatically to stay in proportion to the height.

If you want to change the height and width separately, clear the Lock aspect ratio check box before you change the required height or width in step 2.
Compress pictures to reduce file size
Compressing a picture maintains the height and width of the picture, but reduces the resolution. Lower resolution pictures have a smaller file size.
-
Select the picture or pictures you need to reduce.
-
Under Picture Tools on the Format tab, select Compress Pictures from the Adjust group. Depending on your screen resolution, you may only see the Compress Pictures icon.
-
Select the compression and resolution options and then select OK. For pictures that won't be printed, Web (150 ppi) is the most common resolution.
Important: Compressing a picture to reduce the size of the file changes the amount of detail retained in the source picture. This means that after compression, the picture can look different than before it was compressed.
When you attach a picture as a file, the picture won't display directly in the body of the email message. Instead, an icon of the picture will appear under the message subject.
If the picture attachment is too large, you can tell Outlook to resize the picture for you when you send the message.
-
Select File.
-
If your image is large, you'll see this message: Some recipients may not receive this message because of image attachments. Resizing large images may help the message get delivered. Resized images will be a maximum of 1024x768 pixels.
-
Select Resize large images when I send this message.
-
Select the left arrow at the top left corner of the screen to return to your message. Compose your message, and when you select Send, all picture attachments will be automatically resized.
Note: If you embed the picture in the message body — the picture appears in the message — by using the Picture command in the Illustrations group, the image attachment resize feature is not available.
Documents, spreadsheets, PDF files, and other types of files can vary greatly in size. There are several methods you can use to keep the size of your email messages and attachments small when sending these files.
Copy a sharing link from a cloud storage service
Most cloud storage solutions such as OneDrive, OneDrive for Business, Dropbox or Google Drive allow you to get a shareable link to your file.
For OneDrive or OneDrive for Business, see Share OneDrive files and folders. For other cloud storage solutions, see the service's help files for more information on how to obtain a sharing link. Once you have a sharing link, paste it in the body of your email message.
Compress your files before sending
Most files can be compressed into a zip file to reduce their size. Windows allows you to create and open zip files without any additional software.
-
Navigate to the folder that contains the file you want to send.
-
Select a file. To select multiple files, press and hold CTRL as you click each file.
-
Right-click the selection, select Send To > Compressed (zipped) Folder.
-
This creates a new zip file that contains the file or files you selected in step 2. The name of the zip file is chosen automatically from the name of the original file.
-
Either return to your email message and choose Attach File from the ribbon, or right-click the new zip file, select Send To > Mail Recipient to open a new email message with the file already attached.
Important: Office 2007 is no longer supported. Upgrade to Microsoft 365 to work anywhere from any device and continue to receive support.
Upgrade now
What would you like to do?
There are two ways to select pictures to automatically reduce them in size and include them as an attachment to an e-mail message — in Microsoft Office Outlook, or from Windows Explorer.
Note: Your original picture will not be modified. Only the copy of the picture being sent will be reduced in size.
-
Create a new e-mail message in Outlook.
-
On the Insert tab, in the Include group, click Attach File.
Tip: You can also drag and drop a picture from Windows Explorer. The picture file will be attached to the e-mail message.
-
On the Insert tab, click the Include Dialog Box Launcher
 .
. -
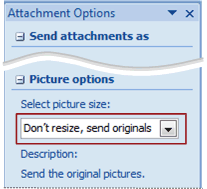
In the Attachment Options pane, under Picture options, in the Select picture size drop-down list, click the size of the picture you want to include.

Note: If you embed the picture in the body of the message by using the Picture command in the Illustrations group, the automatic picture resize feature is not available.
-
When you are finished composing your e-mail message, click Send.
-
Open Windows Explorer by clicking Start, and then double-clicking Computer.
Keyboard shortcut To open Windows Explorer, press Windows logo key+E.
-
Navigate to the folder that contains the pictures you want to send.
-
Select a picture. To select multiple files, press and hold CTRL as you click each file.
-
Right-click a selected file, point to Send To, and then click Mail Recipient.
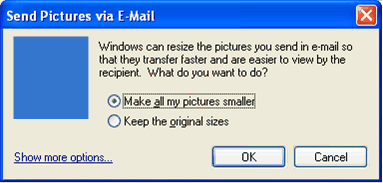
The Send Pictures via E-mail dialog box appears.
-
Click Make all my pictures smaller, and then click OK.

Note: To specify the exact size to make the picture, click Show more options, and then click the size you want.
A new Outlook message window appears with the attached picture.
-
Enter the recipient information in the To, Cc, and Bcc boxes.
-
If you want, change the subject information in the Subject box.
-
If you want, change or enter any information you want to include in the message body.
-
Click Send.
The following is a list of best practices to use when sending pictures and attachments:
-
Post or publish large attachments - If you're sending attachments or pictures to someone with whom you are willing to share a stored location in the cloud, or on your organization's network, you can include a link to that location in your e-mail message.
-
Limit the size of your attachments - This is a general guideline; for slower, connections (such as a mobile device) you should use a much smaller size, such as 250 kilobytes (KB). If you must send larger attachments, verify the maximum size of the message that you can send. Your mail server administrator or the organization providing your email service can tell you this. Likewise, ask the recipient what their maximum limit is. Finally, consider the recipient's Internet connection speed. Downloading a large attachment on a mobile internet connection can take a long time.
-
Send multiple attachments by using several e-mail messages - Multiple smaller messages have a higher likelihood of being delivered versus one large message. This technique might help you avoid per-message limits, but the recipient's mailbox limit can still be exceeded. Any messages received after a person's mailbox has reached its storage limit can sometimes be rejected.
-
Use compressed graphic file formats - There are far too many graphic file formats to list here, but of the most commonly used, the best picture file formats for e-mail are .jpg, .png, and .gif. The largest graphics file formats are those that are not saved in a compressed file format, such as .tif and .bmp (the default file format of Windows Paint).
-
Use smaller original files - The size of a photo taken by a mobile phone or a digital camera is typically large, even when saved in a compressed file format such as .jpg. It's not uncommon for a single picture to be several megabytes. Remember that the size of the e-mail message will increase by approximately one-third while in transit on the internet. Use a lower resolution setting on your camera when taking a digital photo. Use compressed file formats such as .jpg. In a graphics program, crop photographs to the essential content.
-
Use a file compression utility - In addition to third-party utilities, Windows includes a file compress utility that uses the compressed .zip file format. Many attachment file formats can be reduced with the use of a compression utility. The amount of reduction will be minimal with some file formats that are already saved in a compressed format. For example, a Notepad .txt text file will reduce dramatically, while a .jpg image will not. The .jpg file format is already a compressed file format.
-
Review your Sent Items folder - By default, a copy of each message that you send is kept in the Sent Items folder. This increases the size of your Outlook Data File (.pst), which can, with certain accounts, count against your mailbox size limit because the sent items are saved on your mail server.
Important: Compressing a picture to reduce the size of the file changes the amount of detail retained in the source picture. This means that after compression, the picture can look different than before it was compressed. Because of this, you should compress the picture before applying an artistic effect.
Microsoft Office Tutorials: Reduce The Size Of Pictures And Attachments In Outlook Email Messages >>>>> Download Now
ReplyDelete>>>>> Download Full
Microsoft Office Tutorials: Reduce The Size Of Pictures And Attachments In Outlook Email Messages >>>>> Download LINK
>>>>> Download Now
Microsoft Office Tutorials: Reduce The Size Of Pictures And Attachments In Outlook Email Messages >>>>> Download Full
>>>>> Download LINK zl