If you want to visually organize information in your notes, you can insert and format a table in OneNote for Windows 10.

-
In OneNote, click or tap on the page where you want your table to appear.
-
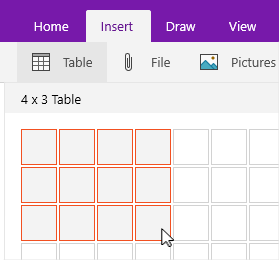
Click or tap Insert > Table, and then drag the cursor over the grid until you highlight the number of columns and rows you want. When the table is inserted, the Table tab appears on the ribbon with controls you can use to customize the table.
-
Do any of the following to customize the table:
-
To add a column or row, select a cell next to or above the row or column you want to add, and then on the Table tab, click or tap where you want to add the row or column.
-
To change a column width, click or tap the edge of the column to drag it.
-
To sort a table column, click or tap a cell in the column by which you want to sort, and then on the Table tab, click or tap Sort.
-
To hide table borders, click or tap a cell in the table, and then on the Table tab, click or tap Hide Borders.
-
To shade a cell, row, or column, select the cell, row, or column, and then on the Table tab, click or tap Shading.
-
To change the font of table text, select the text, and then on the Home tab, click or tap the font, size, highlighting, or other effect you want.
-
Note: If you delete a row or column in your table that you didn't mean to get rid of, select Undo  in the upper-right corner of the app window, or press Ctrl+Z on your keyboard.
No comments:
Post a Comment