Show student grades online
You can show each student their grades online and keep track of grades by storing them in a list in your My Site. While you can see and change all the grades in the list, the student can only see their grades in the Web Part page. The Web Part page only shows his grades because this page uses the student's logon information and the Current User Filter Web Part to only show information related to that student.
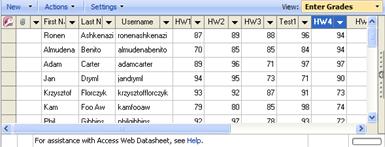
When you work with the list, you use the datasheet view so that you can see all the grades of all students. The datasheet view lets you quickly add new or change an existing grade in the list.
When the student logs on the school network and visits this Web Part page, he sees only his grades.
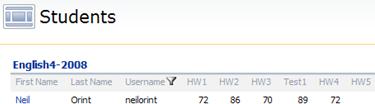
The Web Part page shows only the grades of the student because the Current User Filter Web Part shows information related only to the user name of the person looking at the page. The list in this page is configured so that the student has only view permissions for his grades — the student cannot change their grades in this page.
To create this functionality, you will do the following:
-
Create a new or use an existing Excel worksheet — you will create a worksheet in an Excel workbook that will contain student information and grades. If you already have an existing worksheet with the student information, you can go to the next step. If your grades are stored in a list that is already on your My Site, you can skip the next step and go to the third step, Create a datasheet view.
-
Create the list — you will import the information in the worksheet into your site as a new list. After you create the new list, you can archive or delete the workbook because you no longer need the workbook. You will work in this list to add new or change existing grades.
-
Create a datasheet view — you will create a view for the list so that you can easily add new or update existing grades.
-
Create a student view — you will create a limited view for students because your list might contain additional information that you do not want to show in the Web Part page.
-
Create a Web Part page — you will create a Web Part page where a student can see his grades. This page will only show the grades of the student who is looking at this page.
-
Add the Web Parts — you will add the List Web Part and a Current User Filter Web Part to the Web Part page you created in the previous step.
-
Configure the Web Part — you will configure the List Web Part to use the student view.
-
Connect the Web Parts — you will connect the Web Parts together to show only the grades of the student who is looking at this page.
Step 1: Create a new or use an existing Excel worksheet
Your worksheet should contain the following columns:
-
User name — the name the student uses to log into the school network. The Current User Filter Web Part uses this information to show only the grades of that student.
-
A column for each homework and test grade — the assignment and test grades for each student.
Your worksheet could resemble the following worksheet:
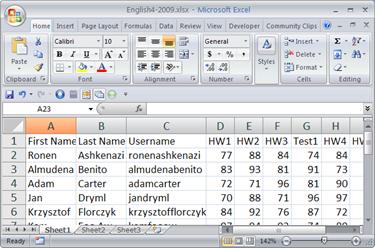
After you create the worksheet, save the worksheet to a location that is available to the site, such as the local drive.
Step 2: Create the list
-
Click View All Site Content, and then click Create on the All Site Content page.
Tip: In most cases, you can use the Site Actions menu
 instead to complete this step.
-
Under Custom Lists on the Create page, click Import Spreadsheet.
-
In the Name box on the New page, type English4-2008. The name appears in the title bar and in the URL of the new list.
-
In the Description box, type Grades for the English 4-2008 class. The description appears under the title on the new list.
-
Click Browse. In the Choose file properties page, browse to the location of the worksheet, click the worksheet, and then click Open.
-
On the New page, click Import.
-
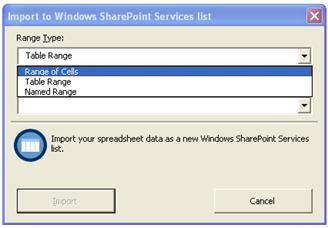
In the Range Type list on the Import to Windows SharePoint Services list properties page, click Range of Cells.
-
Click inside the Select Range box and then in Excel, select the cells with the information that you want to import into this list.
-
Click Import.
Note: After you create the new list with the information in the worksheet, you can archive or delete the workbook as you will enter or update grades directly in this list. The worksheet is not connected to the list.
Step 3: Create a datasheet view
This is the view that you, the instructor, will use to add new and update existing grades.
-
On the View menu
 , click Create View.
 -
Under Choose a view format on the Create View: English4-2008 page, click Datasheet View.
-
In the View Name box, type Enter Grades. This name appears in the View menu on the new list.
-
Click OK.
Step 4: Create a student view
This is the view the students will use to view their personal grades.
-
On the View menu
, click Create View. -
Under Choose a view format on the Create View: English4-2008 page, click Standard View.
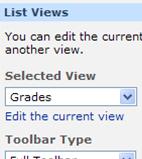
-
In the View Name box, type Grades. This name appears in the Selected View list on the tool pane of the English4-2008 Web Part.
-
Under View Audience in the Audience section, click Create a Public View.
-
In the Columns section, clear all check boxes for columns that you want to hide from the students. Keep the Username column selected as the Current User Filter Web Part uses this column to show only the grades of a student.
-
Click the appropriate number in the Position from Left list to arrange the columns.
-
Click OK.
Step 5: Create a Web Part page
This is the Web Part page where the students can see their grades.
-
Click View All Site Content, and then click Create on the All Site Content page.
Tip: In most cases, you can use the Site Actions menu
instead to complete this step.
-
Under Web Pages on the Create page, click Web Part Page.
-
In the View Name box, type Students. The name appears in the title bar and the URL of the new page.
-
In the Choose a Layout Template in the Layout section, click Full Page, Vertical.
-
In the Document Library list in the Save Location section, click Shared Documents.
-
Click Create.
Write down the URL of this page. You will give the students this URL when this page is ready.
Step 6: Add the Web Parts
-
In the Web Part page, click Add a Web Part.
-
Under the List and Libraries section in the Add Web Parts--Webpage Dialog box, select the English4-2008 check box.
-
Under the Filters section, select the Current User Filter check box.
-
Click Add.
Step 7: Configure the Web Parts
-
On the English4-2008 Web Part, click the Edit button
 , and then click Modify Shared Web Part.
The tool pane opens so that you can configure the properties to show the correct view and prevent the students from changing the grades. This is a read-only view that shows only information for the user that SharePoint determines is viewing the page.

-
In the Selected View list, click Grades.
-
In the message box about the results of switching the view, click OK.
-
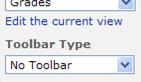
In the Toolbar Type list, click No Toolbar. This item in the list hides the toolbar in the English4-2008 Web Part to prevent a student from changing his grades.
-
Click OK.
-
On the Current User Filter Web Part, click the Edit button
, and then click Modify Shared Web Part.The tool pane opens so that you can configure the properties to show information related only to the user name of the person looking at the page.

-
Under Select value to provide, click Current user name.

-
In the tool pane, click OK
Step 8: Connect the Web Parts
-
On the Current User Filter Web Part, click the Edit button
, point to Connections, point to Send Filter Values To, and then click English4-2008. -
In the Consumer Field Name list, click Username, and then click Finish.
-
Click Exit Edit Mode.
When the students logs into the school network and goes to the student page, the Current User Filter Web Part shows only grades for that user. You disabled the toolbar for the list in this page to prevent students from changing their grades.
To add new or update existing grades, visit the list. On the View menu , click Enter Grades to change to the datasheet view so that you can quickly add new or update existing grades.
No comments:
Post a Comment