Morph transition: Tips and tricks
by Lauren Janas, PowerPoint PM
PowerPoint for Office 365 has Morph to help you make smooth animations, transitions, and object movements across the slides in your presentation.

To learn the basics of applying the Morph transition, be sure to read Using the Morph transition in PowerPoint.
This feature is only available to Office 365 subscribers. If you have an Office 365 subscription, make sure you have the latest version of Office.
Use Morph to create the following kinds of effects and animations:
Select a heading below to open it and see the detailed instructions.
Create motion and emphasis animations
-
Create a slide with the object positioned in its starting state.
-
Duplicate the slide, or copy and paste the object you want to move or emphasize onto the next slide.
Do any of the following:
-
To create a Motion path animation, move the object on the second slide to the destination position you'd like it to end up in.
-
For a Rotation animation, select the object and use the Rotate handle to turn the object on the second slide to where you'd like to see it rotate to during the Morph transition.
-
To create a Zoom animation, resize the object on the second slide to make it grow or shrink into position.
-
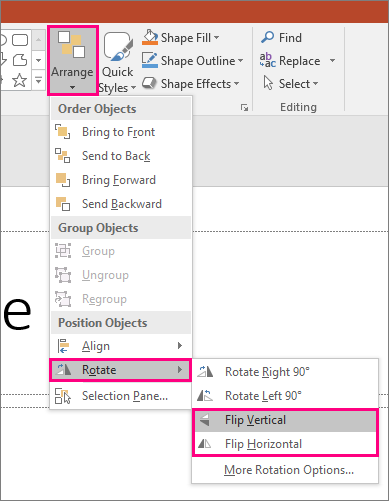
For a Flip animation, select the object on the second slide and go to Home > Arrange > Rotate > Flip horizontal or Flip vertical.
-
If you change color or formatting properties of the object on the second slide, Morph will animate the formatting changes in a smooth and seamless way when you transition between the first and second slide.
-
-
Select the second slide in the thumbnail pane and go to Transitions > Morph to apply the Morph transition, and then click Preview to see it in action.
Any of these effects can be used in combination—an object can be moved, resized, rotated, and have its color changed all at once. Just set up your starting and ending state on the first and second slides, apply the Morph transition to the second slide with the ending state, and Morph will do the rest.
Create entrance and exit animations
-
Create a slide with the object positioned in its starting state.
-
Duplicate the slide, or copy and paste the object you want to move or emphasize onto the next slide.
Do any of the following:
-
Fade entrance animation: Add a new object to the second slide after you duplicate the slide.
-
Fade exit animation: Delete the object on the second slide to make it disappear during the transition.
-
Fly in animation: Move the object off the first slide (in the direction you'd like it to fly in from). You may need to zoom out to make room to drag your object off the slide.
-
Fly out animation: Move the object off the second slide entirely (in the direction you'd like it to fly out from). You may need to zoom out to make room to drag your object off the slide.
-
-
Select the second slide in the thumbnail pane and go to Transitions > Morph to apply the Morph transition, and then click Preview to see it in action.
Animate words
-
Create a slide with the words you want to animate positioned in their starting state.
-
Duplicate the slide, or copy and paste the words you want to move or emphasize onto the next slide.
-
Move the words around to the state you'd like them to end up in—or change anything else, such as font style, size, or color—on the second slide and apply the Morph transition.
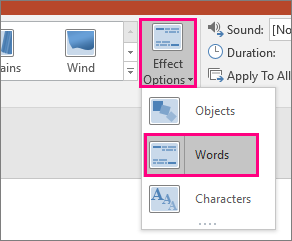
On the Transitions tab, set the Effect Option to Words. Depending on the effect you want to achieve, you can emphasize the addition, removal, motion, or appearance of a word from one slide to the next. Click Preview to see it in action.
Create an anagram effect
Morph can rearrange individual characters on a slide to create an anagram effect in a word or phrase.
-
Create a slide with the characters you want to animate positioned in their starting state.
-
Duplicate the slide, or copy and paste the characters you want to move or emphasize onto the next slide.
-
Move the characters around to the state you'd like them to end up in on the second slide and apply the Morph transition.
On the Transitions tab, set the Effect Option to Characters, and click Preview to see it in action.

Zoom in on, scroll, and crop images
If you have an image that covers the whole background of your slide, you can create a zoom effect by making it bigger than the slide canvas.
-
Create a slide with the picture you want to zoom in on positioned as the background.
-
Duplicate the slide, or copy and paste the picture onto the next slide.
-
Drag the corners of the picture so that it extends beyond the slide canvas, as far out as you want to create the desired zoom effect.
-
Select the second slide in the thumbnail pane and go to Transitions > Morph to apply the Morph transition, and then click Preview to see it in action.
To create a scrolling effect, use a vertical image (such as a screen shot of a web page) taller than a normal landscape slide and show the top part of the image. Then, on the second slide, move the image up so the part you want to highlight is centered on the slide. Apply Morph to the second slide and watch the presentation appear to scroll to the relevant part of the image.
Morph can also be applied to bring motion to image cropping to easily emphasize part of an image.
Create a 3-D rotation
-
Create a slide with an object and add an initial 3-D rotation by going to Drawing Tools > Shape Effects > 3D rotation.

-
Duplicate the slide and go to Drawing Tools > Shape Effects > 3-D rotation once again to create the 3-D rotation ending state.
-
Select the second slide in the thumbnail pane and go to Transitions > Morph to apply the Morph transition, and then click Preview to see it in action. You'll see the object animate in 3D from its starting position to its final position.
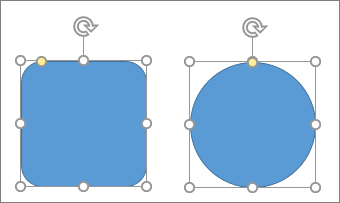
Morph a shape into another shape
By default, Morph doesn't automatically animate different shapes into one another. However, you can create this effect by using the reshape tool that appears on certain PowerPoint shapes, like the rounded rectangle. The reshape tools are the yellow handles that appear on the perimeter of the shape. When selected, you can drag them around to alter what the shape looks like. In the example below, a rounded rectangle is morphed into a circle using reshape tools. Just set your starting state and ending state slides, and then apply the Morph transition to the ending state slide.
If you want even more control over shapes, you can edit the points of a shape to Morph it into another shape.
-
Create a slide with a shape in its starting state.
-
Duplicate the slide, or copy and paste the shape you want to change onto the next slide.
-
On the second slide, edit the points of the shape on the Drawing Tools tab by going to Edit Shape > Edit Points.

Move the points around until you have the final shape you want. For best results, keep the total number of points the same on both slides.
-
Select the second slide in the thumbnail pane and go to Transitions > Morph to apply the Morph transition, and then click Preview to see it in action.
Microsoft Office Tutorials: Morph Transition: Tips And Tricks >>>>> Download Now
ReplyDelete>>>>> Download Full
Microsoft Office Tutorials: Morph Transition: Tips And Tricks >>>>> Download LINK
>>>>> Download Now
Microsoft Office Tutorials: Morph Transition: Tips And Tricks >>>>> Download Full
>>>>> Download LINK lg