Word Options (Advanced)
Use advanced Word options to customize editing tasks, document display, printing preferences, and more.
To choose your advanced Word options, select File > Options, and on the left pane, select Advanced.
| Editing options Set up the way you select, replace, and format words and paragraphs. | |
| Cut, copy, and paste Choose how you want to paste content and formatting within the same document or between different documents and apps. | |
| Image Size and Quality Apply image size and quality settings for an open document or for all new documents. | |
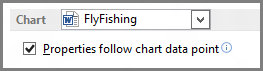
| Chart Allow custom formatting and labels to stay with data points, even if the chart changes. | |
| Show document content Choose formatting, text, and image options. | |
| Display Choose a measurement format, show scrolling bars, and select the number of documents shown in the Recent Documents list. | |
| Optimize the appearance of the hard-copy version of the document or change your printer paper size. | |
| Save Save backup copies, automatically save changes to templates, or allow backup saves. | |
| Preserve fidelity when sharing this document Make sure the look of your document is preserved when you share the document with someone who uses a different version of Word. | |
| General Among the options in this section, you can change where Word saves your changes by selecting File Locations . Or choose to open documents in Draft view. | |
| Layout options for: Modify the layout, such as character spacing, for an open document or all new documents. | |


To choose your advanced Word options, select File > Options, and on the left pane, select Advanced.
In this article
Editing options
Typing replaces selected text Select this option to delete the selected text when you begin to type. If you clear this check box, Microsoft Office Word inserts new text in front of the selected text and does not delete the selected text.
When selecting, automatically select entire word Select this option to select entire words when you select part of one word and then part of the next word. Turning this option on also causes Word to select a word and the space that follows it when you double-click a word.
Allow text to be dragged and dropped Select this option to be able to move or copy selected text by dragging it. To move text, select the text, and then drag it to a new location. To copy text, select the text, and then hold down CTRL while you drag the selection to its new location.
Use CTRL + Click to follow hyperlink Select this option to make it easier to edit the text of hyperlinks. When this option is turned on, you must press CTRL while you click the link in order to follow the link. When this option is turned off, clicking the link causes Word to go to the destination of the link, which makes it more difficult to edit the text of the link.
Automatically create drawing canvas when inserting AutoShapes Select this option to place a drawing canvas around drawing objects or ink drawings and writing when you insert them into your document. A drawing canvas helps you to arrange drawing objects and pictures, and to move them as a unit.
Use smart paragraph selection Select this option to select the paragraph mark when you select a whole paragraph. If you include the paragraph mark when you cut and paste a paragraph, you don't leave a blank paragraph, and your formatting automatically stays with the paragraph.
Use smart cursoring Select this option to specify that the cursor moves as you scroll up or down. When you press the LEFT ARROW, RIGHT ARROW, UP ARROW, or DOWN ARROW key after you scroll, the cursor responds at the page currently in view, not at its previous position.
Use the Insert key to control overtype mode Select this option to turn Overtype mode on or off by pressing INSERT.
-
Use overtype mode Select this option to replace existing text as you type, one character at a time. If Use the Insert key to control overtype mode is selected, you can turn this option on or off by pressing INSERT.
Add double quote for Hebrew alphabet numbering Select this option to add double quotation marks (") to numbering.
This option is available only if Hebrew is enabled for editing text.
Prompt to update style Select this option to be prompted when you directly modify text to which a style is applied and then you reapply the style to the modified text. When prompted, you can either update the style based on recent changes or reapply the formatting of the style.
Use Normal style for bulleted or numbered lists Select this option to base list styles on the Normal paragraph style instead of the Paragraph List style.
Keep track of formatting Select this option to keep track of your formatting as you type. This helps you to easily apply the same formatting elsewhere. This option must be turned on before you can use the Select Text with Similar Formatting command on the shortcut menu that appears if you right-click selected text. To display a list of the formatting that you used, click the Options command on the Style pane, and then select the Paragraph level formatting, Font formatting, and Bullet and numbering formatting check boxes.
-
Mark formatting inconsistencies Select this option to mark formatting with a wavy blue underline when it is similar to, but not exactly the same as, other formatting in your documents. To use this option, you must also select the Keep track of formatting check box.
Updating style to match selection In the list, click Keep previous numbering and bullets pattern to make any paragraphs in that style that aren't numbered stay unnumbered. Click Add numbering or bullets to all paragraphs with this style to number any paragraphs that have the style applied.
Enable click and type Select this option to insert text, graphics, tables, or other items in a blank area of a document by double-clicking in the blank area. The Click and Type feature automatically inserts paragraphs and applies the alignment necessary to position the item where you double-clicked. This feature is available only in Print Layout view and Web Layout view.
-
Default paragraph style Select the style that is applied to text when you use click and type.
Show AutoComplete suggestions Select this option to see complete AutoText entries when you type the first four characters of the entry. You can press ENTER to add the full AutoText entry to your document, or you can continue to type the text you want. If you don't want to see the AutoText suggestions, clear this check box.
Cursor movement This option specifies the direction in which the cursor moves when you press the arrow keys on your keyboard.
This option is available only if a right-to-left language is enabled for editing text.
-
Logical Select this option to move the cursor according to the direction of the text encountered. For example, when you are using the arrow keys to move through Arabic and then English text in the same sentence, the cursor moves from right to left through the Arabic text and then starts at the leftmost character in the English word and progresses from left to right.
-
Visual Select this option to move the cursor to the next visually adjacent character. For example, when you are using the arrow keys to move from right to left through Arabic and then English text in the same sentence, the arrow key moves from right to left regardless of the direction of the text.
Cursor visual selection This option specifies how text is selected as you extend the selection.
This option is available only if a right-to-left language is enabled for editing text.
-
Block Select this option to wrap text from line to line as you select downward, with all selected lines being the same width.
-
Continuous Select this option to wrap text from line to line as you select downward and vary the width of the final line of the block.
Use sequence checking Select this option to validate whether a newly typed character occurs in the correct sequence to be used as a tone mark, diacritic, or vowel to be placed above, below, in front of, or behind the consonant it goes with.
This option is available only if a complex script language is enabled for editing text.
-
Type and replace Select this option to replace the previously typed character with the newly typed character if the two characters cannot coexist in the same text cluster.
Asian fonts also apply to Latin text Select this option to change Latin characters to the selected Asian font when you apply the Asian font to selected text. Clear this check box if you want Latin characters to remain in the Latin font while you apply the Asian font to the rest of the document.
This option is available only if an East Asian language is enabled for editing text.
Automatically switch keyboard to match language of surrounding text Select this option to change the keyboard language and font based on the language of the text where the cursor is placed. If you clear this option, only the font is changed.
Note: This option is available only if an East Asian language is enabled for editing text and an Input Method Editor for typing East Asian characters is installed.
IME Control Active Select this option to start an Input Method Editor (IME). Clear this check box to stop an IME.
Note: This option is available only if an East Asian language is enabled for editing text and an Input Method Editor for typing East Asian characters is installed.
IME Settings Click to open the Properties for IME Name dialog box. Use this dialog box to set or change the text, keyboard, character conversion, and other options for the active IME.
Note: This option is available only if an East Asian language is enabled for editing text and an Input Method Editor for typing East Asian characters is installed.
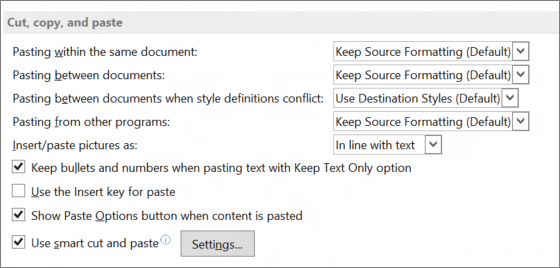
Cut, copy, and paste
Pasting within the same document This option displays the default behavior that occurs when you paste content into the same document from which you copied the content. In the drop-down list, select one of the following:
-
Keep Source Formatting (Default) This option retains character styles and direct formatting that were applied to the copied text. Direct formatting includes characteristics such as font size, italic, or other formatting that is not included in the paragraph style.
-
Merge Formatting This option discards most of the formatting that was applied directly to the copied text, but it retains formatting that is considered emphasis, such as bold and italic, when it is applied to only a portion of the selection. The text takes on the style characteristics of the paragraph where it is pasted. The text also takes on any direct formatting or character style properties of text that immediately precedes the cursor when the text is pasted.
-
Keep Text Only This option discards all formatting and nontext elements, such as pictures or tables. The text takes on the style characteristics of the paragraph where it is pasted and takes on any direct formatting or character style properties of text that immediately precedes the cursor when the text is pasted. Graphical elements are discarded, and tables are converted to a series of paragraphs.
Pasting between documents This option displays the default behavior that occurs when you paste content that was copied from another document in Word. In the drop-down list, select one of the following:
-
Keep Source Formatting (Default) This option retains formatting that was applied to the copied text. Any style definition that is associated with the copied text is copied to the destination document.
-
Merge Formatting This option discards most formatting that was applied directly to the copied text, but it retains formatting that is considered emphasis, such as bold and italic, when it is applied to only a portion of the selection. The text takes on the style characteristics of the paragraph where it is pasted. The text also takes on any direct formatting or character style properties of text that immediately precedes the cursor when the text is pasted.
-
Keep Text Only This option discards all formatting and nontext elements, such as pictures or tables. The text takes on the style characteristics of the paragraph where it is pasted and takes on any direct formatting or character style properties of text that immediately precedes the cursor when the text is pasted. Graphical elements are discarded, and tables are converted to a series of paragraphs.
Pasting between documents when style definitions conflict This option displays the default behavior that occurs when you paste content that was copied from another document in Word, and the style that is assigned to the copied text is defined differently in the document where the text is being pasted. In the drop-down list, select one of the following:
-
Keep Source Formatting This option retains the look of the copied text by assigning the Normal style to the pasted text and applying direct formatting. Direct formatting includes characteristics such as font size, italic, or other formatting to mimic the style definition of the copied text.
-
Use Destination Styles (Default) This option retains the style name that is associated with the copied text, but it uses the style definition of the document where the text is being pasted. For example, you copy Heading 1 text from one document to another. In one document, Heading 1 is defined as Arial bold, 14-point, and in the document where you are pasting the text, Heading 1 is defined as Cambria bold, 16-point. When you use the Use Destination Styles option, the pasted text uses Heading 1 style, Cambria bold, 16-point.
-
Merge Formatting This option discards the style definition and most formatting that was applied directly to the copied text, but it retains formatting that is considered emphasis, such as bold and italic, when it is applied to only a portion of the selection. The text takes on the style definition in the document where the text is being pasted.
-
Keep Text Only This option discards all formatting and nontext elements, such as pictures or tables. The text takes on the style characteristics of the paragraph where it is pasted and takes on any direct formatting or character style properties of text that immediately precedes the cursor when the text is pasted. Graphical elements are discarded, and tables are converted to a series of paragraphs.
Pasting from other programs This option displays the default behavior that occurs when you paste content that was copied from another program. In the drop-down list, select one of the following:
-
Keep Source Formatting (Default) This option retains the formatting of the copied text.
-
Merge Formatting This option discards most formatting that was applied directly to the copied text, but it retains formatting that is considered emphasis, such as bold and italic, when it is applied to only a portion of the selection. The text takes on the style characteristics of the paragraph where it is pasted. The text also takes on any direct formatting characteristics of text that immediately precedes the cursor when the text is pasted.
-
Keep Text Only This option discards all formatting and nontext elements, such as pictures or tables. The text takes on the style characteristics of the paragraph where it is pasted and takes on any direct formatting or character style properties of text that immediately precedes the cursor when the text is pasted. Graphical elements are discarded, and tables are converted to a series of paragraphs.
Insert/paste pictures as This option displays how Word inserts pictures relative to the text in your document. You can insert images inline with text, allow images to move with text, or wrap text around, in front of, or behind an image. In the drop-down list, select one of the following:
-
In line with text This option inserts the graphic in a paragraph as if it were text. This option is used by default. The graphic moves as you add or delete text. You can drag the graphic to reposition it the same way that you drag text.
-
Square This option wraps the text around all sides of a square around the graphic. The graphic does not move as you add or delete text, but you can drag the graphic to reposition it.
-
Tight This option wraps the text around the graphic in an irregular shape around the actual image. The graphic does not move as you add or delete text, but you can drag the graphic to reposition it.
-
Behind text This option inserts the graphic so that the graphic floats on its own layer behind the text. There is no border around the graphic. The graphic does not move as you add or delete text, but you can drag the graphic to reposition it.
-
In front of text This option inserts the graphic so that the graphic floats on its own layer in front of the text. There is no border around the graphic. The graphic does not move as you add or delete text, but you can drag the graphic to reposition it.
-
Through This option wraps the text around the graphic, including filling the space created by a concave shape, such as a crescent moon. The graphic does not move as you add or delete text, but you can drag the graphic to reposition it.
-
Top and bottom This option prevents text from wrapping on the sides of the graphic. The graphic does not move as you add or delete text, but you can drag the graphic to reposition it.
Keep bullets and numbers when pasting text with Keep Text Only option Select this option to convert numbering and bullets into text symbols.
Add control characters in Cut and Copy Select this option to retain right-to-left cursor movement when you cut or copy text from a Word document and paste as plain text (for example, in Notepad).
Use the Insert key for paste Select this option to use the INSERT key to insert the contents of the Office Clipboard into a document.
Show Paste Options buttons when content is pasted Select this option to display the Paste Options button when you paste content. You can use the Paste Options button to override or modify the settings you make in this section of the Word Options dialog box.
Use smart cut and paste Select this option to automatically adjust formatting as you paste text. After you select this check box, you can click Settings to set additional options for pasting.
-
Settings Click this to open the Settings dialog box. Use this dialog box to specify default behavior when merging, cutting, and pasting text. You can override default behavior by using the Paste Options button that appears when you paste content from the Clipboard into your document. This button is available only when the Use smart cut and paste option is turned on.
-
Use default options for Click an item in the list to pre-select a configuration of options in the dialog box. To select your own configuration of options, click Custom in this list.
-
Adjust sentence and word spacing automatically Select this option to remove extra spaces when deleting text or add necessary spaces when pasting text from the clipboard.
-
Adjust paragraph spacing on paste Select this option to prevent creating empty paragraphs and to prevent inconsistent paragraph spacing.
-
Adjust table formatting and alignment on paste Select this option to control the formatting and alignment of tables. When this option is turned on, single cells are pasted as text, table portions are pasted as rows into an existing table (rather than as a nested table), and when you add a table to an existing table, the pasted table is adjusted to match the existing table.
-
Smart style behavior Selecting this option has no effect. To fine-tune the behavior of styles when pasting content, use the Pasting options in the Cut, copy, and paste section of the Advanced options.
-
Merge formatting when pasting from Microsoft PowerPoint Select this option to control the results when you paste content from a PowerPoint presentation. When this option is turned on, the formatting of the surrounding text or table is applied to the pasted text, the most recently used bullet, number, or list style is applied to the pasted list, and the look of items such as tables, hyperlinks, images, OLE objects, and shapes is preserved from the source in PowerPoint.
-
Adjust formatting when pasting from Microsoft Excel Select this option to control the results when pasting data from Excel. When this option is turned on, pasted data is placed in a table, and charts are pasted as pictures rather than as OLE objects.
-
Merge pasted lists with surrounding lists Select this option to format list items to conform to the surrounding list when you are pasting the items into a list.
-
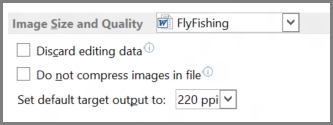
Image size and quality
Image Size and Quality Select the document that these settings apply to. In the list, click the name of a document that is already open, or click All New Documents to make the setting apply to all documents that you will create.
Discard editing data Select this option to save only the edited picture. Data from the original picture, before it was edited, will be unavailable.
Do not compress images in file Select this option to keep pictures at their full size. This option might make the document file size large.
Set default target output to This option determines the resolution of compressed images. Select a value for pixels per inch (ppi) from the list.
-
220 ppi Select this option if you're planning to print your document.
-
150 ppi Select this option for documents that will be read on the screen.
-
96 ppi Select this option for documents you want to send in email.
Show document content
Show background colors and images in Print Layout view Select this option to display background colors and images.
Show text wrapped within the document window Select this option to wrap text to the document window, so that it is easier to read on the screen.
Show picture placeholders Select this option to display an empty box in place of each picture in your documents. This option speeds the process of scrolling through a document that contains a large number of pictures.
Show drawings and text boxes on screen Select this option to display objects that are created with the Word drawing tools in Print Layout view or Web Layout view. Clear this check box to hide drawings and possibly speed the display of documents that contain many drawings. Drawings will be printed even if you clear this check box.
Show text animation Select this option to display text animations on your screen. Clear the check box to see how the text will look when printed.
Note: Use this option when viewing animated text in documents that were created in a version of Word earlier than Word 2007. The current version of Word no longer provides the ability to create animated text.
Show control characters Select this option to display right-to-left control characters.
This option is available only if a right-to-left language is enabled for editing text.
Show bookmarks Select this option to display bookmarks on the screen. If you assign a bookmark to an item, the bookmarked item appears in brackets ([…]). If you assign a bookmark to a location, the bookmark appears as an I-beam. The brackets and the I-beam do not appear in printed documents.
Show text boundaries Select this option to display dotted lines around text margins, columns, and paragraphs. The boundaries are for layout purposes; they do not appear in printed documents.
Show crop marks Select this option to display the corners of the margins.
Show field codes instead of their values Select this option to display field codes instead of field results in your documents. For example, you may see { TIME @\"MMMM, d, YYYY" } instead of February 4, 2008. Clear this check box to view field results.
Regardless of this setting, you can always switch between displaying field codes and field code results by pressing ALT+F9.
Field shading This option displays whether and when fields are shaded. In the list, select Always or When Selected to shade your fields. Shading fields makes them easy to identify. The shading appears on the screen but not in the printed document.
Numeral This option determines how numerals will appear in documents. Select an item from the list.
This option is available only if an Arabic language is enabled for editing text.
-
Arabic Select this option to display numerals in a format familiar to speakers of English and other European languages.
-
Hindi Select this option to display numerals in a format familiar to speakers of Arabic and Hindi.
-
Context Select this option to display numerals according to the language of the surrounding text.
-
System Select this option to display numerals according to the regional settings in Control Panel.
Month names This option determines how Western (Gregorian) month names appear in Arabic text. Select an item from the list.
This option is available only if an Arabic language is enabled for editing text.
-
Arabic Select this option to use Arabic native month names.
-
English transliterated Select this option to spell out Western (Gregorian) month names in English pronunciation by using Arabic text.
-
French transliterated Select this option to spell out Western (Gregorian) month names in French pronunciation by using Arabic text.
Diacritics This option displays diacritics in the document.
This option is available only if a language that uses diacritics is enabled for editing text.
-
Use this color for diacritics Select this option to specify a color for display of all diacritics, regardless of the color of the diacritics in the original document. In the list, select a color.
Use draft font in Draft and Outline views On computers with extremely limited resources, select this option to speed the screen display of documents.
-
Name Select the font to use for drafts of your documents. This option is available only when you select the Use draft font in Draft and Outline views check box.
-
Size Select the point size of the draft font. This option is available only when you select the Use draft font in Draft and Outline views check box.
Document view This option specifies the text direction for new documents.
This option is available only if a right-to-left language is enabled for editing text.
-
Right-to-left Select this option to lay out documents right to left. For example, paragraphs start on the right side of a document with text flowing to the left.
-
Left-to-right Select this option to lay out documents left to right. For example, paragraphs start on the left side of a document with text flowing to the right.
Font Substitution Click this to open the Font Substitution dialog box. Use this option to determine whether the active document uses any fonts that are not available on your computer. If the document uses fonts that are not on your computer, you can use the dialog box to specify a substitute font.
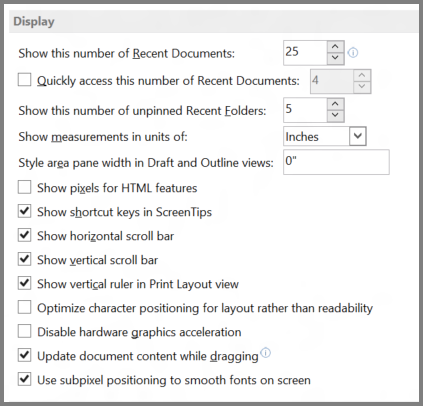
Display
Show this number of Recent Documents Enter the number of items, between 1 and 50, to display in the Recent Documents list.
Note: Only the first nine files in the list are assigned an accelerator key. You can open these documents by pressing 1 through 9 after you press ALT+F.
Show measurements in units of Select the measurement unit that you want to use for the horizontal ruler and for measurements that you type in dialog boxes.
Style area pane width in Draft and Outline views Type a positive decimal, such as 0.5, in the box to open the style area, which displays the names of the styles applied to text. To close the style area, enter 0.
Show measurements in width of characters Select this option to use character width as the basis for aligning text, such as in the vertical and horizontal rulers.
This option is available only if an East Asian language is enabled for editing text.
Show pixels for HTML features Select this option to use pixels as the default unit of measurement in dialog boxes that are related to HTML features.
Show all windows in the Taskbar Select this option to display an icon on the Microsoft Windows taskbar for each open window in a Microsoft Office program. Clearing this check box places a single icon for each open program on the taskbar.
Show shortcut keys in ScreenTips Select this option to display keyboard shortcuts in ScreenTips.
Show horizontal scroll bar Select this option to display the horizontal scrollbar at the bottom of the document window.
Show vertical scroll bar Select this option to display the vertical scroll bar at the side of the document window.
-
Left scroll bar Select this option to place the vertical scroll bar on the left side of the document window. Use this option when working with documents that predominantly use right-to-left text.
This option is available only if a right-to-left language is enabled for editing text.
Show vertical ruler in Print Layout view Select this option to display the vertical ruler at the side of the document window. Make sure that you also select the Ruler check box in the Show/Hide group on the View tab of the Ribbon, a component of the Microsoft Office Fluent user interface.
-
Show right ruler in Print Layout view Select this option to display the vertical ruler at the right side of the document window.
This option is available only if a right-to-left language is enabled for editing text.
Optimize character positioning for layout rather than readability Select this option to display character positioning accurately, as it will appear in the printed document with respect to blocks of text. Spacing between characters may be distorted when this option is turned on. For best readability on the screen, turn this option off.
Disable hardware graphics acceleration Select this option to stop using the computer's graphics card for rendering three-dimensional shapes, shape effects, and text effects.
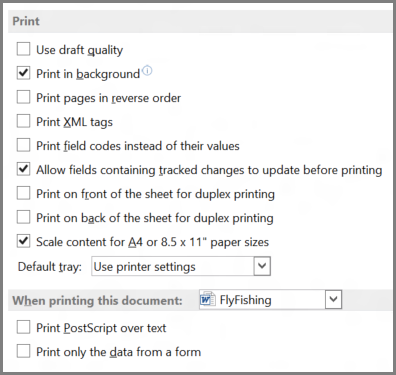
Use draft quality Select this option to print the document with minimal formatting, which may speed the printing process. Many printers do not support this function.
Print in background Select this option to print documents in the background, which allows you to continue to work while you print. This option requires more available memory to allow you to work and print at the same time. If working with your document while printing becomes unacceptably slow, turn this option off.
Print pages in reverse order Select this option to print pages in reverse order, beginning with the last page in your document. Do not use this option when you print envelopes.
Print XML tags Select this option to print the XML tags for the XML elements that are applied to an XML document. You must have a Schema attached to the document, and you must apply elements that are provided by the attached Schema. The tags appear in the printed document.
Print field codes instead of their values Select this option to print field codes instead of field results — for example, { TIME @\"MMMM, d, YYYY" } instead of February 4, 2008.
Allow fields containing tracked changes to update before printing Select this option to ensure that any field codes that were inserted while tracked changes were turned on will print showing the changed text.
Print on front of the sheet for duplex printing Select this option to print the front of each sheet when printing on a printer that does not have duplex capability. Pages will print in reverse order so that when you flip the stack to print on the back, the pages will print in the proper order.
Print on back of the sheet for duplex printing Select this option to print the back of each sheet when printing on a printer that does not have duplex capability. Pages will print in ascending order so that they correspond to a stack of pages that were printed on the front in reverse order.
Scale content for A4 or 8.5 x 11" paper sizes Select this option to automatically adjust documents that are designed for 8.5-by-11-inch paper to fit A4 paper and to adjust documents that are designed for A4 paper to fit 8.5-by-11-inch paper. This option takes affect only if the A4 or 8.5-by-11-inch paper in the printer does not match the paper size that is set on the Page Layout tab of Word. This option affects printouts only; it does not affect formatting.
Default tray This option displays the printer tray that is used by default. To follow the settings in your printer, select Use printer settings. To choose a particular tray, select it in the list. The choices in the list depend on your printer's configuration.
When printing this document
When printing this document Select the document that these printing settings apply to. In the list, select the name of a document that is already open, or select All New Documents to make the setting apply to all documents that you will create.
Print PostScript over text Select this option to print PostScript code when a document contains PRINT fields.
Print only the data from a form Select this option to print the data that is entered into an online form without printing the form.
Save
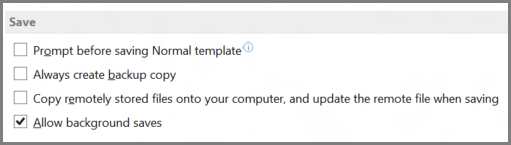
Prompt before saving Normal template Select this option to display, when you close Word, a message that asks if you want to save any changes that were made to the default template. Because changes to the default template will affect any new documents that you create, you may want to be alerted when the template has changed. Clearing this check box automatically saves changes without prompting you.
Always create backup copy Select this option to create a backup copy of a document each time you save the document. Each backup copy replaces the previous backup copy. Word adds the phrase "Backup of" to the file name and applies the file extension .wbk to all backup copies. The backup copies are saved in the same folder as your original document.
Copy remotely stored files onto your computer, and update the remote file when saving Select this option to temporarily store a local copy of a file that you store on a network or removable drive. When you save the local copy, Word saves your changes to the original copy. If the original file is not available, Word prompts you to save the file in another location to avoid data loss.
Allow background saves Select this option to save your document while you work. A progress meter appears in the status bar when Word performs a background save.
Preserve fidelity when sharing this document
Preserve fidelity when sharing this document Select the document that these settings apply to. In the list, select the name of a document that is already open, or select All New Documents to make the setting apply to all documents that you will create.
Save form data as delimited text file Select this option to save the data that is entered into an online form as a single, tab-delimited text file in plain text format. You can then import the contents of that file into a database.
Embed linguistic data Select this option to save linguistic data, such as speech and handwritten text.
General
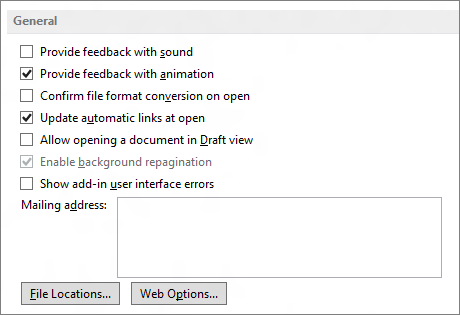
Provide feedback with sound Select this option to add sounds to certain actions or events in Word and other programs in 2007 Microsoft Office system. For example, Word can play a sound when it completes a process. To change the sound that is associated with an event, open the folder for sounds and audio devices in Control Panel. Your computer must have a sound card to play most sounds.
Provide feedback with animation Select this option to animate the movement of your pointer in Word and the other Office programs. This option also provides animated cursors for actions such as printing, saving, automatic formatting, and find-and-replace operations.
Confirm file format conversion on open Select this option to choose the file converter that Word uses to open files that were created in another program. Clear this check box if you want Word to select a converter automatically.
Update automatic links at open Select this option to automatically update any content that is linked to other files each time you open a document.
Allow opening a document in Draft view Select this option to be able to open a document in Draft view.
Note: To make a document open in Draft view by default, you need to turn on this option and then on the View tab in the Document Views group, click Draft. Make some kind of change to the document, and then save the document.
Enable background repagination Select this option to repaginate documents automatically as you work. This option is available in Draft and Outline views only. Clearing this check box prevents page numbers from updating (when displayed in the status bar) until you switch to Print Layout view.
Show add-in user interface errors Select this option to display error messages from programs that customize the user interface. This option is especially useful for authors of software solutions, because it provides information for debugging customizations to the user interface.
Show customer submitted Office.com content Select this option to see templates and images created by customers in addition to the content provided by Microsoft Office.
Mailing address Type the address that you want Word to use as the default return address for envelopes and letters.
File Locations Click this to see the default storage location for documents, templates, and other items that you create and use in Word. In the File Locations dialog box, click the item you want to change, and then click Modify to set a new default location.
The default locations for templates and the Startup folder are treated as trusted locations. If you change the location, be sure that the new folder is a secure location.
Web Options Click this to open the Web Options dialog box. Use this dialog box to set options for using Word to create Web pages.
Compatibility
English Word 6.0/95 documents This option specifies your preferences for converting text. Earlier versions of Word were sometimes used in conjunction with third-party programs designed to support Chinese or Korean on English versions of Microsoft Windows. If the use of these add-ins results in incorrect text display in a document you are trying to open, you can use these options to convert the document so that text is displayed correctly. After successfully opening the file, be sure to reset this option to Open normally; otherwise, correctly stored files may be opened incorrectly.
This option is available only if an East Asian language is enabled for editing text.
-
Contain Asian text Select this option if you know the document contains East Asian text, so that the text will display correctly.
-
Open normally Select this option after the file has been opened to display the text correctly.
-
Automatically detect Asian text Select this option if you are not sure whether the document contains East Asian text. Word attempts to detect East Asian text and display it correctly.
Compatibility options for
Compatibility options for Select the document that these settings apply to. In the list, select the name of a document that is already open, or select All New Documents to make the setting apply to all documents that you will create.
Lay out this document as if created in Select the word-processing program that you expect to be used for opening the document. The settings in the list of Layout options change according to the word-processing program that you select. To specify your own configuration of settings, select Custom.
Layout options Lists options for laying out the document. Select the check boxes for the options you want.
To choose your advanced Word options, click the Microsoft Office Button  > Word Options, and on the left pane, select Advanced.
In this article
Editing options
Typing replaces selected text Select this option to delete the selected text when you begin to type. If you clear this check box, Microsoft Office Word inserts new text in front of the selected text and does not delete the selected text.
When selecting, automatically select entire word Select this option to select entire words when you select part of one word and then part of the next word. Turning this option on also causes Word to select a word and the space that follows it when you double-click a word.
Allow text to be dragged and dropped Select this option to be able to move or copy selected text by dragging it. To move text, select the text, and then drag it to a new location. To copy text, select the text, and then hold down CTRL while you drag the selection to its new location.
Use CTRL + Click to follow hyperlink Select this option to make it easier to edit the text of hyperlinks. When this option is turned on, you must press CTRL while you click the link in order to follow the link. When this option is turned off, clicking the link causes Word to go to the destination of the link, which makes it more difficult to edit the text of the link.
Automatically create drawing canvas when inserting AutoShapes Select this option to place a drawing canvas around drawing objects or ink drawings and writing when you insert them into your document. A drawing canvas helps you to arrange drawing objects and pictures, and to move them as a unit.
Use smart paragraph selection Select this option to select the paragraph mark when you select a whole paragraph. If you include the paragraph mark when you cut and paste a paragraph, you don't leave a blank paragraph, and your formatting automatically stays with the paragraph.
Use smart cursoring Select this option to specify that the cursor moves as you scroll up or down. When you press the LEFT ARROW, RIGHT ARROW, UP ARROW, or DOWN ARROW key after you scroll, the cursor responds at the page currently in view, not at its previous position.
Use the Insert key to control overtype mode Select this option to turn Overtype mode on or off by pressing INSERT.
-
Use overtype mode Select this option to replace existing text as you type, one character at a time. If Use the Insert key to control overtype mode is selected, you can turn this option on or off by pressing INSERT.
Add double quote for Hebrew alphabet numbering Select this option to add double quotation marks (") to numbering.
This option is available only if Hebrew is enabled for editing text.
Prompt to update style Select this option to be prompted when you directly modify text to which a style is applied and then you reapply the style to the modified text. When prompted, you can either update the style based on recent changes or reapply the formatting of the style.
Use Normal style for bulleted or numbered lists Select this option to base list styles on the Normal paragraph style instead of the Paragraph List style.
Keep track of formatting Select this option to keep track of your formatting as you type. This helps you to easily apply the same formatting elsewhere. This option must be turned on before you can use the Select Text with Similar Formatting command on the shortcut menu that appears if you right-click selected text. To display a list of the formatting that you used, click the Options command on the Style pane, and then select the Paragraph level formatting, Font formatting, and Bullet and numbering formatting check boxes.
-
Mark formatting inconsistencies Select this option to mark formatting with a wavy blue underline when it is similar to, but not exactly the same as, other formatting in your documents. To use this option, you must also select the Keep track of formatting check box.
Enable click and type Select this option to insert text, graphics, tables, or other items in a blank area of a document by double-clicking in the blank area. The Click and Type feature automatically inserts paragraphs and applies the alignment necessary to position the item where you double-clicked. This feature is available only in Print Layout view and Web Layout view.
-
Default paragraph style Select the style that is applied to text when you use click and type.
Cursor movement This option specifies the direction in which the cursor moves when you press the arrow keys on your keyboard.
This option is available only if a right-to-left language is enabled for editing text.
-
Logical Select this option to move the cursor according to the direction of the text encountered. For example, when you are using the arrow keys to move through Arabic and then English text in the same sentence, the cursor moves from right to left through the Arabic text and then starts at the leftmost character in the English word and progresses from left to right.
-
Visual Select this option to move the cursor to the next visually adjacent character. For example, when you are using the arrow keys to move from right to left through Arabic and then English text in the same sentence, the arrow key moves from right to left regardless of the direction of the text.
Cursor visual selection This option specifies how text is selected as you extend the selection.
This option is available only if a right-to-left language is enabled for editing text.
-
Block Select this option to wrap text from line to line as you select downward, with all selected lines being the same width.
-
Continuous Select this option to wrap text from line to line as you select downward and vary the width of the final line of the block.
Use sequence checking Select this option to validate whether a newly typed character occurs in the correct sequence to be used as a tone mark, diacritic, or vowel to be placed above, below, in front of, or behind the consonant it goes with.
This option is available only if a complex script language is enabled for editing text.
-
Type and replace Select this option to replace the previously typed character with the newly typed character if the two characters cannot coexist in the same text cluster.
Asian fonts also apply to Latin text Select this option to change Latin characters to the selected Asian font when you apply the Asian font to selected text. Clear this check box if you want Latin characters to remain in the Latin font while you apply the Asian font to the rest of the document.
This option is available only if an East Asian language is enabled for editing text.
Automatically switch keyboard to match language of surrounding text Select this option to change the keyboard language and font based on the language of the text where the cursor is placed. If you clear this option, only the font is changed.
This option is available only if an East Asian language is enabled for editing text and an Input Method Editor for typing East Asian characters is installed.
Use legacy IME mode to enable Overtype mode Select this option to allow the characters that you type to replace existing characters (overtype) while you are using an Input Method Editor (IME) on a computer that is running the Microsoft Windows XP operating system. If Word is installed on a computer that is running Windows Vista, this option does not appear because Overtype mode is supported automatically.
This option is available only if an East Asian language is enabled for editing text, and an Input Method Editor for typing East Asian characters is installed.
IME Control Active Select this option to start an Input Method Editor (IME). Clear this check box to stop an IME.
This option is available only if an East Asian language is enabled for editing text and an Input Method Editor for typing East Asian characters is installed.
IME TrueInline Select this option to use a natural language interface on IME-enabled computers.
This option is available only if an East Asian language is enabled for editing text and an Input Method Editor for typing East Asian characters is installed.
IME Settings Click to open the Properties for IME Name dialog box. Use this dialog box to set or change the text, keyboard, character conversion, and other options for the active IME.
This option is available only if an East Asian language is enabled for editing text and an Input Method Editor for typing East Asian characters is installed.
Cut, copy, and paste
Pasting within the same document This option displays the default behavior that occurs when you paste content into the same document from which you copied the content. In the drop-down list, select one of the following:
-
Keep Source Formatting (Default) This option retains character styles and direct formatting that were applied to the copied text. Direct formatting includes characteristics such as font size, italic, or other formatting that is not included in the paragraph style.
-
Match Destination Formatting This option discards most of the formatting that was applied directly to the copied text, but it retains formatting that is considered emphasis, such as bold and italic, when it is applied to only a portion of the selection. The text takes on the style characteristics of the paragraph where it is pasted. The text also takes on any direct formatting or character style properties of text that immediately precedes the cursor when the text is pasted.
-
Keep Text Only This option discards all formatting and nontext elements, such as pictures or tables. The text takes on the style characteristics of the paragraph where it is pasted and takes on any direct formatting or character style properties of text that immediately precedes the cursor when the text is pasted. Graphical elements are discarded, and tables are converted to a series of paragraphs.
Pasting between documents This option displays the default behavior that occurs when you paste content that was copied from another document in Word. In the drop-down list, select one of the following:
-
Keep Source Formatting (Default) This option retains formatting that was applied to the copied text. Any style definition that is associated with the copied text is copied to the destination document.
-
Match Destination Formatting This option discards most formatting that was applied directly to the copied text, but it retains formatting that is considered emphasis, such as bold and italic, when it is applied to only a portion of the selection. The text takes on the style characteristics of the paragraph where it is pasted. The text also takes on any direct formatting or character style properties of text that immediately precedes the cursor when the text is pasted.
-
Keep Text Only This option discards all formatting and nontext elements, such as pictures or tables. The text takes on the style characteristics of the paragraph where it is pasted and takes on any direct formatting or character style properties of text that immediately precedes the cursor when the text is pasted. Graphical elements are discarded, and tables are converted to a series of paragraphs.
Pasting between documents when style definitions conflict This option displays the default behavior that occurs when you paste content that was copied from another document in Word, and the style that is assigned to the copied text is defined differently in the document where the text is being pasted. In the drop-down list, select one of the following:
-
Keep Source Formatting This option retains the look of the copied text by assigning the Normal style to the pasted text and applying direct formatting. Direct formatting includes characteristics such as font size, italic, or other formatting to mimic the style definition of the copied text.
-
Use Destination Styles (Default) This option retains the style name that is associated with the copied text, but it uses the style definition of the document where the text is being pasted. For example, you copy Heading 1 text from one document to another. In one document, Heading 1 is defined as Arial bold, 14-point, and in the document where you are pasting the text, Heading 1 is defined as Cambria bold, 16-point. When you use the Use Destination Styles option, the pasted text uses Heading 1 style, Cambria bold, 16-point.
-
Match Destination Formatting This option discards the style definition and most formatting that was applied directly to the copied text, but it retains formatting that is considered emphasis, such as bold and italic, when it is applied to only a portion of the selection. The text takes on the style definition in the document where the text is being pasted.
-
Keep Text Only This option discards all formatting and nontext elements, such as pictures or tables. The text takes on the style characteristics of the paragraph where it is pasted and takes on any direct formatting or character style properties of text that immediately precedes the cursor when the text is pasted. Graphical elements are discarded, and tables are converted to a series of paragraphs.
Pasting from other programs This option displays the default behavior that occurs when you paste content that was copied from another program. In the drop-down list, select one of the following:
-
Keep Source Formatting (Default) This option retains the formatting of the copied text.
-
Match Destination Formatting This option discards most formatting that was applied directly to the copied text, but it retains formatting that is considered emphasis, such as bold and italic, when it is applied to only a portion of the selection. The text takes on the style characteristics of the paragraph where it is pasted. The text also takes on any direct formatting characteristics of text that immediately precedes the cursor when the text is pasted.
-
Keep Text Only This option discards all formatting and nontext elements, such as pictures or tables. The text takes on the style characteristics of the paragraph where it is pasted and takes on any direct formatting or character style properties of text that immediately precedes the cursor when the text is pasted. Graphical elements are discarded, and tables are converted to a series of paragraphs.
Insert/paste pictures as This option displays how Word inserts pictures relative to the text in your document. You can insert images inline with text, allow images to move with text, or wrap text around, in front of, or behind an image. In the drop-down list, select one of the following:
-
In line with text This option inserts the graphic in a paragraph as if it were text. This option is used by default. The graphic moves as you add or delete text. You can drag the graphic to reposition it the same way that you drag text.
-
Square This option wraps the text around all sides of a square around the graphic. The graphic does not move as you add or delete text, but you can drag the graphic to reposition it.
-
Tight This option wraps the text around the graphic in an irregular shape around the actual image. The graphic does not move as you add or delete text, but you can drag the graphic to reposition it.
-
Behind text This option inserts the graphic so that the graphic floats on its own layer behind the text. There is no border around the graphic. The graphic does not move as you add or delete text, but you can drag the graphic to reposition it.
-
In front of text This option inserts the graphic so that the graphic floats on its own layer in front of the text. There is no border around the graphic. The graphic does not move as you add or delete text, but you can drag the graphic to reposition it.
-
Through This option wraps the text around the graphic, including filling the space created by a concave shape, such as a crescent moon. The graphic does not move as you add or delete text, but you can drag the graphic to reposition it.
-
Top and bottom This option prevents text from wrapping on the sides of the graphic. The graphic does not move as you add or delete text, but you can drag the graphic to reposition it.
Keep bullets and numbers when pasting text with Keep Text Only option Select this option to convert numbering and bullets into text symbols.
Use the Insert key for paste Select this option to use the INSERT key to insert the contents of the Office Clipboard into a document.
Show Paste Options buttons Select this option to display the Paste Options button when you paste content. You can use the Paste Options button to override or modify the settings you make in this section of the Word Options dialog box.
Use smart cut and paste Select this option to automatically adjust formatting as you paste text. After you select this check box, you can click Settings to set additional options for pasting.
-
Settings Click this to open the Settings dialog box. Use this dialog box to specify default behavior when merging, cutting, and pasting text. You can override default behavior by using the Paste Options button that appears when you paste content from the Clipboard into your document. This button is available only when the Use smart cut and paste option is turned on.
-
Use default options for Click an item in the list to pre-select a configuration of options in the dialog box. To select your own configuration of options, click Custom in this list.
-
Adjust sentence and word spacing automatically Select this option to remove extra spaces when deleting text or add necessary spaces when pasting text from the clipboard.
-
Adjust paragraph spacing on paste Select this option to prevent creating empty paragraphs and to prevent inconsistent paragraph spacing.
-
Adjust table formatting and alignment on paste Select this option to control the formatting and alignment of tables. When this option is turned on, single cells are pasted as text, table portions are pasted as rows into an existing table (rather than as a nested table), and when you add a table to an existing table, the pasted table is adjusted to match the existing table.
-
Smart style behavior Selecting this option has no effect. To fine-tune the behavior of styles when pasting content, use the Pasting options in the Cut, copy, and paste section of the Advanced options.
-
Merge formatting when pasting from Microsoft Office PowerPoint Select this option to control the results when you paste content from a PowerPoint presentation. When this option is turned on, the formatting of the surrounding text or table is applied to the pasted text, the most recently used bullet, number, or list style is applied to the pasted list, and the look of items such as tables, hyperlinks, images, OLE objects, and shapes is preserved from the source in PowerPoint.
-
Adjust formatting when pasting from Microsoft Office Excel Select this option to control the results when pasting data from Excel. When this option is turned on, pasted data is placed in a table, and charts are pasted as pictures rather than as OLE objects.
-
Merge pasted lists with surrounding lists Select this option to format list items to conform to the surrounding list when you are pasting the items into a list.
-
Show document content
Show background colors and images in Print Layout view Select this option to display background colors and images.
Show text wrapped within the document window Select this option to wrap text to the document window, so that it is easier to read on the screen.
Show picture placeholders Select this option to display an empty box in place of each picture in your documents. This option speeds the process of scrolling through a document that contains a large number of pictures.
Show drawings and text boxes on screen Select this option to display objects that are created with the Word drawing tools in Print Layout view or Web Layout view. Clear this check box to hide drawings and possibly speed the display of documents that contain many drawings. Drawings will be printed even if you clear this check box.
Show text animation Select this option to display text animations on your screen. Clear the check box to see how the text will look when printed.
Use this option when viewing animated text in documents that were created in a version of Word earlier than Word 2007. The current version of Word no longer provides the ability to create animated text.
Show control characters Select this option to display right-to-left control characters.
This option is available only if a right-to-left language is enabled for editing text.
Show bookmarks Select this option to display bookmarks on the screen. If you assign a bookmark to an item, the bookmarked item appears in brackets ([…]). If you assign a bookmark to a location, the bookmark appears as an I-beam. The brackets and the I-beam do not appear in printed documents.
Show smart tags Select this option to display a purple dotted underline beneath text that is recognized as a smart tag.
Show text boundaries Select this option to display dotted lines around text margins, columns, and paragraphs. The boundaries are for layout purposes; they do not appear in printed documents.
Show crop marks Select this option to display the corners of the margins.
Show field codes instead of their values Select this option to display field codes instead of field results in your documents. For example, you may see { TIME @\"MMMM, d, YYYY" } instead of February 4, 2008. Clear this check box to view field results.
Regardless of this setting, you can always switch between displaying field codes and field code results by pressing ALT+F9.
Field shading This option displays whether and when fields are shaded. In the list, select Always or When Selected to shade your fields. Shading fields makes them easy to identify. The shading appears on the screen but not in the printed document.
Numeral This option determines how numerals will appear in documents. Select an item from the list.
This option is available only if an Arabic language is enabled for editing text.
-
Arabic Select this option to display numerals in a format familiar to speakers of English and other European languages.
-
Hindi Select this option to display numerals in a format familiar to speakers of Arabic and Hindi.
-
Context Select this option to display numerals according to the language of the surrounding text.
-
System Select this option to display numerals according to the regional settings in Control Panel.
Month names This option determines how Western (Gregorian) month names appear in Arabic text. Select an item from the list.
This option is available only if an Arabic language is enabled for editing text.
-
Arabic Select this option to use Arabic native month names.
-
English transliterated Select this option to spell out Western (Gregorian) month names in English pronunciation by using Arabic text.
-
French transliterated Select this option to spell out Western (Gregorian) month names in French pronunciation by using Arabic text.
Diacritics This option displays diacritics in the document.
This option is available only if a language that uses diacritics is enabled for editing text.
-
Use this color for diacritics Select this option to specify a color for display of all diacritics, regardless of the color of the diacritics in the original document. In the list, select a color.
Use draft font in Draft and Outline views On computers with extremely limited resources, select this option to speed the screen display of documents.
-
Name Select the font to use for drafts of your documents. This option is available only when you select the Use draft font in Draft and Outline views check box.
-
Size Select the point size of the draft font. This option is available only when you select the Use draft font in Draft and Outline views check box.
Document view This option specifies the text direction for new documents.
This option is available only if a right-to-left language is enabled for editing text.
-
Right-to-left Select this option to lay out documents right to left. For example, paragraphs start on the right side of a document with text flowing to the left.
-
Left-to-right Select this option to lay out documents left to right. For example, paragraphs start on the left side of a document with text flowing to the right.
Font Substitution Click this to open the Font Substitution dialog box. Use this option to determine whether the active document uses any fonts that are not available on your computer. If the document uses fonts that are not on your computer, you can use the dialog box to specify a substitute font.
Display
Show this number of Recent Documents Enter the number of items, between 1 and 50, to display in the Recent Documents list.
Only the first nine files in the list are assigned an accelerator key. You can open these documents by pressing 1 through 9 after you press ALT+F.
Show measurements in units of Select the measurement unit that you want to use for the horizontal ruler and for measurements that you type in dialog boxes.
Style area pane width in Draft and Outline views Type a positive decimal, such as 0.5, in the box to open the style area, which displays the names of the styles applied to text. To close the style area, enter 0.
Show measurements in width of characters Select this option to use character width as the basis for aligning text, such as in the vertical and horizontal rulers.
This option is available only if an East Asian language is enabled for editing text.
Show pixels for HTML features Select this option to use pixels as the default unit of measurement in dialog boxes that are related to HTML features.
Show all windows in the Taskbar Select this option to display an icon on the Microsoft Windows taskbar for each open window in a Microsoft Office program. Clearing this check box places a single icon for each open program on the taskbar.
Show shortcut keys in ScreenTips Select this option to display keyboard shortcuts in ScreenTips.
Show horizontal scroll bar Select this option to display the horizontal scrollbar at the bottom of the document window.
Show vertical scroll bar Select this option to display the vertical scroll bar at the side of the document window.
-
Left scroll bar Select this option to place the vertical scroll bar on the left side of the document window. Use this option when working with documents that predominantly use right-to-left text.
This option is available only if a right-to-left language is enabled for editing text.
Show vertical ruler in Print Layout view Select this option to display the vertical ruler at the side of the document window. Make sure that you also select the Ruler check box in the Show/Hide group on the View tab of the Ribbon, a component of the Microsoft Office Fluent user interface.
-
Show right ruler in Print Layout view Select this option to display the vertical ruler at the right side of the document window.
This option is available only if a right-to-left language is enabled for editing text.
Optimize character positioning for layout rather than readability Select this option to display character positioning accurately, as it will appear in the printed document with respect to blocks of text. Spacing between characters may be distorted when this option is turned on. For best readability on the screen, turn this option off.
Use draft quality Select this option to print the document with minimal formatting, which may speed the printing process. Many printers do not support this function.
Print in background Select this option to print documents in the background, which allows you to continue to work while you print. This option requires more available memory to allow you to work and print at the same time. If working with your document while printing becomes unacceptably slow, turn this option off.
Print pages in reverse order Select this option to print pages in reverse order, beginning with the last page in your document. Do not use this option when you print envelopes.
Print XML tags Select this option to print the XML tags for the XML elements that are applied to an XML document. You must have a Schema attached to the document, and you must apply elements that are provided by the attached Schema. The tags appear in the printed document.
Print field codes instead of their values Select this option to print field codes instead of field results — for example, { TIME @\"MMMM, d, YYYY" } instead of February 4, 2008.
Print on front of the sheet for duplex printing Select this option to print the front of each sheet when printing on a printer that does not have duplex capability. Pages will print in reverse order so that when you flip the stack to print on the back, the pages will print in the proper order.
Print on back of the sheet for duplex printing Select this option to print the back of each sheet when printing on a printer that does not have duplex capability. Pages will print in ascending order so that they correspond to a stack of pages that were printed on the front in reverse order.
Scale content for A4 or 8.5 x 11" paper sizes Select this option to automatically adjust documents that are designed for 8.5-by-11-inch paper to fit A4 paper and to adjust documents that are designed for A4 paper to fit 8.5-by-11-inch paper. This option takes affect only if the A4 or 8.5-by-11-inch paper in the printer does not match the paper size that is set on the Page Layout tab of Word. This option affects printouts only; it does not affect formatting.
Default tray This option displays the printer tray that is used by default. To follow the settings in your printer, select Use printer settings. To choose a particular tray, select it in the list. The choices in the list depend on your printer's configuration.
When printing this document
When printing this document Select the document that these printing settings apply to. In the list, select the name of a document that is already open, or select All New Documents to make the setting apply to all documents that you will create.
Print PostScript over text Select this option to print PostScript code when a document contains PRINT fields.
Print only the data from a form Select this option to print the data that is entered into an online form without printing the form.
Save
Prompt before saving Normal template Select this option to display, when you close Word, a message that asks if you want to save any changes that were made to the default template. Because changes to the default template will affect any new documents that you create, you may want to be alerted when the template has changed. Clearing this check box automatically saves changes without prompting you.
Always create backup copy Select this option to create a backup copy of a document each time you save the document. Each backup copy replaces the previous backup copy. Word adds the phrase "Backup of" to the file name and applies the file extension .wbk to all backup copies. The backup copies are saved in the same folder as your original document.
Copy remotely stored files onto your computer, and update the remote file when saving Select this option to temporarily store a local copy of a file that you store on a network or removable drive. When you save the local copy, Word saves your changes to the original copy. If the original file is not available, Word prompts you to save the file in another location to avoid data loss.
Allow background saves Select this option to save your document while you work. A progress meter appears in the status bar when Word performs a background save.
Preserve fidelity when sharing this document
Preserve fidelity when sharing this document Select the document that these settings apply to. In the list, select the name of a document that is already open, or select All New Documents to make the setting apply to all documents that you will create.
Save smart tags as XML properties in Web pages Select this option to save all of the smart tags in a document as Extensible Markup Language (XML) within a Hypertext Markup Language (HTML) file.
Save form data as delimited text file Select this option to save the data that is entered into an online form as a single, tab-delimited text file in plain text format. You can then import the contents of that file into a database.
Embed linguistic data Select this option to save linguistic data, such as speech and handwritten text.
Embed smart tags Select this option to save smart tags as part of your document.
General
Provide feedback with sound Select this option to add sounds to certain actions or events in Word and other programs in 2007 Microsoft Office system. For example, Word can play a sound when it completes a process. To change the sound that is associated with an event, open the folder for sounds and audio devices in Control Panel. Your computer must have a sound card to play most sounds.
Provide feedback with animation Select this option to animate the movement of your pointer in Word and the other Office programs. This option also provides animated cursors for actions such as printing, saving, automatic formatting, and find-and-replace operations.
Confirm file format conversion on open Select this option to choose the file converter that Word uses to open files that were created in another program. Clear this check box if you want Word to select a converter automatically.
Update automatic links at open Select this option to automatically update any content that is linked to other files each time you open a document.
Allow opening a document in Draft view Select this option to be able to open a document in Draft view.
To make a document open in Draft view by default, you need to turn on this option and then on the View tab in the Document Views group, click Draft. Make some kind of change to the document, and then save the document.
Allow background open of Web pages Select this option to open Web page documents in the background while you work. A progress meter appears in the status bar when Word opens the page in the background.
Enable background repagination Select this option to repaginate documents automatically as you work. This option is available in Draft and Outline views only. Clearing this check box prevents page numbers from updating (when displayed in the status bar) until you switch to Print Layout view.
Show add-in user interface errors Select this option to display error messages from programs that customize the user interface. This option is especially useful for authors of software solutions, because it provides information for debugging customizations to the user interface.
Mailing address Type the address that you want Word to use as the default return address for envelopes and letters.
File Locations Click this to see the default storage location for documents, templates, and other items that you create and use in Word. In the File Locations dialog box, click the item you want to change, and then click Modify to set a new default location.
The default locations for templates and the Startup folder are treated as trusted locations. If you change the location, be sure that the new folder is a secure location.
Web Options Click this to open the Web Options dialog box. Use this dialog box to set options for using Word to create Web pages.
Service Options Click this to open the Service Options dialog box. Use this dialog box to set options for shared workspaces.
Compatibility
English Word 6.0/95 documents This option specifies your preferences for converting text. Earlier versions of Word were sometimes used in conjunction with third-party programs designed to support Chinese or Korean on English versions of Microsoft Windows. If the use of these add-ins results in incorrect text display in a document you are trying to open, you can use these options to convert the document so that text is displayed correctly. After successfully opening the file, be sure to reset this option to Open normally; otherwise, correctly stored files may be opened incorrectly.
This option is available only if an East Asian language is enabled for editing text.
-
Contain Asian text Select this option if you know the document contains East Asian text, so that the text will display correctly.
-
Open normally Select this option after the file has been opened to display the text correctly.
-
Automatically detect Asian text Select this option if you are not sure whether the document contains East Asian text. Word attempts to detect East Asian text and display it correctly.
Compatibility options for
Compatibility options for Select the document that these settings apply to. In the list, select the name of a document that is already open, or select All New Documents to make the setting apply to all documents that you will create.
Lay out this document as if created in Select the word-processing program that you expect to be used for opening the document. The settings in the list of Layout options change according to the word-processing program that you select. To specify your own configuration of settings, select Custom.
Layout options Lists options for laying out the document. Select the check boxes for the options you want.
No comments:
Post a Comment