Create DNS records at Oray for Office 365
If Oray is your DNS hosting provider, follow the steps in this article to verify your domain and set up DNS records for email, Lync, and so on.
These are the main records to add.
After you add these records at Oray, your domain will be set up to work with Office 365 services.
If you have a SharePoint Online Public Website, you can set it up to use your custom domain for the website URL address, like www.your_domain.com.
Note: Typically it takes about 15 minutes for DNS changes to take effect. However, it can occasionally take longer for a change you've made to update across the Internet's DNS system.
Add a TXT record for verification
Before you use your domain with Office 365, we have to make sure that you own it. Your ability to log in to your account at your domain registrar and create the DNS record proves to Office 365 that you own the domain.
Note: This record is used only to verify that you own your domain; it doesn't affect anything else. You can delete it later, if you like.
-
In your browser, go to your domains list at Oray and sign in.
-
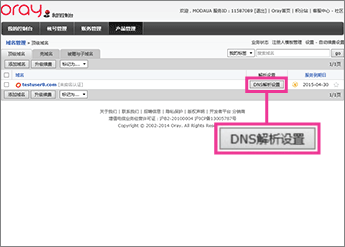
In the right pane, in the 解析设置 (DNS record management) column for the domain that you want to update, click DNS解析设置 (DNS record management).
The DNS records page for your domain opens.
-
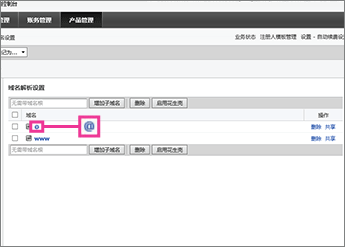
In the 域名解析设置 (DNS record management) list, click the @ subdomain name.
-
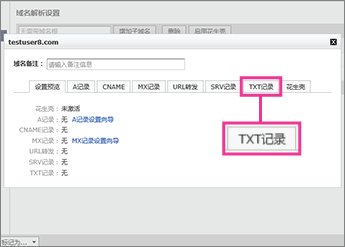
Click the TXT记录 (TXT record) tab.
-
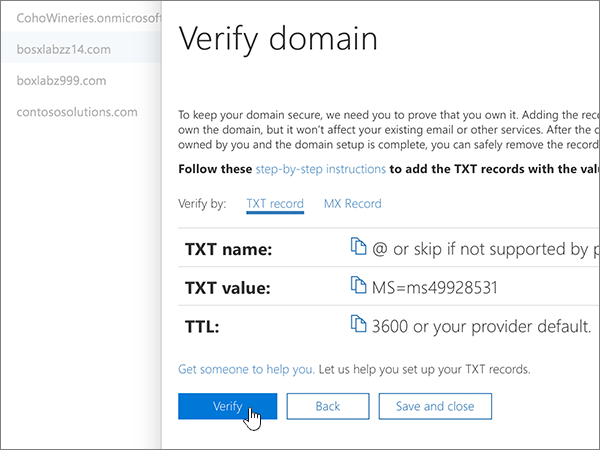
Make sure that the fields are set to precisely the following values for the empty record:
-
说明 (value): Paste Destination or Points to Address value from the table in Office 365, for example MS=msXXXXXXX. How do I find this?
-
TTL: 3600

-
-
Click 增加 (add).
Now that you've added the record at your domain registrar's site, you'll go back to Office 365 and request Office 365 to look for the record.
When Office 365 finds the correct TXT record, your domain is verified.
-
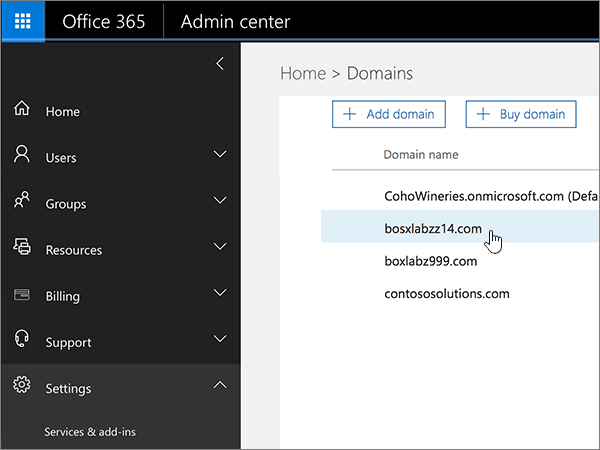
Choose Setup > Domains.
-
On the Domains page, choose the domain that you are verifying.
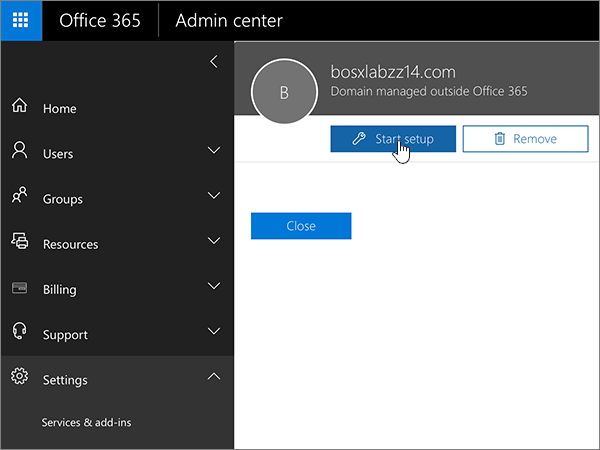
-
On the Setup page, choose Start setup.
-
On the Verify domain page, choose Verify.
Add MX record
-
In your browser, go to your domains list at Oray and sign in.
-
In the right pane, in the 解析设置 (DNS record management) column for the domain that you want to update, click DNS解析设置 (DNS record management).
The DNS records page for your domain opens.
-
In the 域名解析设置 (DNS record management) list, click the @ subdomain name.
-
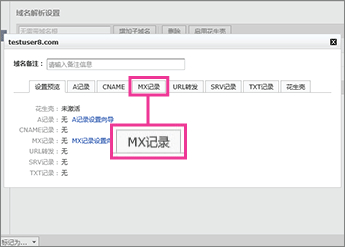
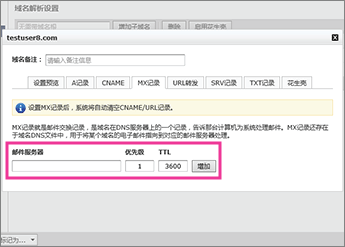
Click the MX记录 (MX record) tab.
-
Make sure that the fields are set to precisely the following values for the empty record:
-
邮件服务器 (mail server): Paste the Points to address value from Office 365: <domain-key>.mail.protection.partner.outlook.cn
Note: Get your <domain-key> from your Office 365 portal account.
How do I find this? -
优先级 (priority): 0
-
TTL: 3600
-
-
Click 增加 (add).
-
If you have any MX records for this domain that send email to someplace other than Office 365, remove them:
-
Click the MX记录 (MX record) tab.
-
On the row of the obsolete record, click 删除 (remove).
-
Add CNAME records
-
Add the email (Exchange) Autodiscover CNAME record.
-
In your browser, go to your domains list at Oray and sign in.
-
In the right pane, in the 解析设置 (DNS record management) column for the domain that you want to update, click DNS解析设置 (DNS record management).
The DNS records page for your domain opens.
-
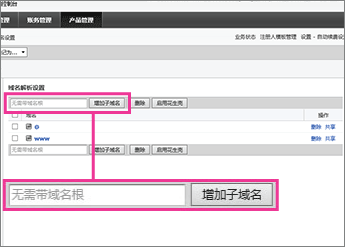
On the DNS records page for your domain, in the 无需带域名根 (subdomain name) box, type autodiscover, and then click 增加子域名 (add subdomain).
-
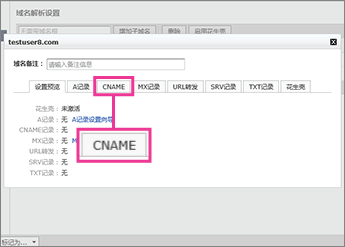
Click the newly added subdomain name autodiscover.
-
Click the CNAME tab.
-
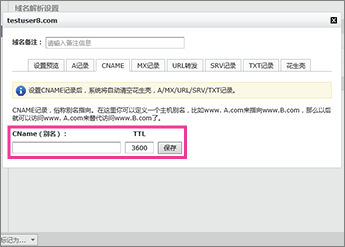
Make sure that the fields are set to precisely the following values for the empty record:
-
CName (别名): autodiscover.partner.outlook.cn
-
TTL: 3600
-
-
Click 保存 (save).
-
-
Add the Lync Autodiscover CNAME record.
-
On the DNS records page for your domain, in the 无需带域名根 (subdomain name) box, type lyncdiscover, and then click 增加子域名 (add subdomain).
-
Click the newly added subdomain name lyncdiscover.
-
Click the CNAME tab.
-
Make sure that the fields are set to precisely the following values for the empty record:
-
CName (别名): webdir.online.partner.lync.cn
-
TTL: 3600
-
-
Click 保存 (save).
-
-
Add the Lync SIP CNAME record.
-
On the DNS records page for your domain, in the 无需带域名根 (subdomain name) box, type sip, and then click 增加子域名 (add subdomain).
-
Click the newly added subdomain name sip.
-
Click the CNAME tab.
-
Make sure that the fields are set to precisely the following values for the empty record:
-
CName (别名): sipdir.online.partner.lync.cn
-
TTL: 3600
-
-
Click 保存 (save).
-
-
Add the Office 365 MSOID CNAME record. This is an additional record that is required for Office 365.
-
On the DNS records page for your domain, in the 无需带域名根 (subdomain name) box, type msoid, and then click 增加子域名 (add subdomain).
-
Click the newly added subdomain name msoid.
-
Click the CNAME tab.
-
Make sure that the fields are set to precisely the following values for the empty record:
-
CName (别名): clientconfig.partner.microsoftonline-p.net.cn
-
TTL: 3600
-
-
Click 保存 (save).
-
Add a TXT record to help with spam prevention
-
In your browser, go to your domains list at Oray and sign in.
-
In the right pane, in the 解析设置 (DNS record management) column for the domain that you want to update, click DNS解析设置 (DNS record management).
The DNS records page for your domain opens.
-
In the 域名解析设置 (DNS record management) list, click the @ subdomain name.
-
Click the TXT记录 (TXT record) tab.
-
Make sure that the fields are set to precisely the following values for the empty record:
-
说明 (value): v=spf1 include:spf.protection.partner.outlook.cn -all
-
TTL: 3600
-
-
Click 增加 (add).
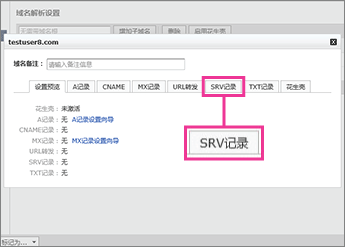
Add SRV records
Note: Currently you can't add the SRV records for Office 365 due to the Oray website's restrictions on subdomain character types. To add the SRV records, contact the Oray support team at 800@oray.com and ask them to create the SRV records for you according to the following information.
-
Add the SIP SRV record for Lync federation.
-
On the DNS records page for your domain, in the 无需带域名根 (subdomain name) box, type _sipfederationtls._tcp, and then click 增加子域名 (add subdomain).
-
Click the newly added subdomain name _sipfederationtls._tcp.
-
Click the SRV记录 (SRV record) tab.
-
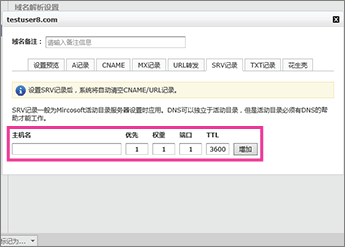
Make sure that the fields are set to precisely the following values for the empty record:
-
主机名 (host name): sipfed.online.partner.lync.cn
-
优先 (priority): 100
-
权重 (weight): 1
-
端口 (port)): 5061
-
TTL: 3600
-
-
Click 增加 (add).
-
-
Add the SIP SRV record for Lync web conferencing.
-
On the DNS records page for your domain, in the 无需带域名根 (subdomain name) box, type _sip._tls, and then click 增加子域名 (add subdomain).
-
Click the newly added subdomain name _sip._tls.
-
Click the SRV记录 (SRV record) tab.
-
Make sure that the fields are set to precisely the following values for the empty record:
-
主机名 (host name): sipdir.online.partner.lync.cn
-
优先 (priority): 100
-
权重 (weight): 1
-
端口 (port)): 443
-
TTL: 3600
-
-
Click 增加 (add).
-
Microsoft Office 365 + 1TB storage free for students, teachers and schools FREE
ReplyDeleteMicrosoft Office Tutorials: Create Dns Records At Oray For Office 365 >>>>> Download Now
ReplyDelete>>>>> Download Full
Microsoft Office Tutorials: Create Dns Records At Oray For Office 365 >>>>> Download LINK
>>>>> Download Now
Microsoft Office Tutorials: Create Dns Records At Oray For Office 365 >>>>> Download Full
>>>>> Download LINK QN