Review changes with Track Markup
You can use the Track Markup feature in Microsoft Office Visio to easily suggest and view proposed changes in a drawing.
In this article
About markup
With Track Markup turned on, shapes, ink shapes, or comments that you or your reviewers add are tracked on separate markup overlays without changing the original drawing. As shown in the following illustration, each person is automatically assigned a separate colored and tabbed layer. When you view the drawing, you can see all of the changes at once.
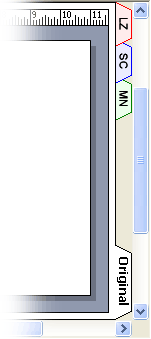
1. This layer contains all of the markup by one reviewer.
2. This layer contains markup by a second reviewer.
3. The original drawing remains untouched.
4. When you view the drawing, you can see each layer of markup and the original drawing.
You can share a separate copy of the drawing with each reviewer, or make the original drawing available to a group of reviewers by saving the drawing to a network share, or posting the drawing to an intranet site. Using a network share, intranet site, or other accessible central location allows you to capture all reviewers' markup in one file.
Notes:
-
Each reviewer must use Microsoft Office Visio 2007 or Microsoft Office Visio 2003 to add markup.
-
Shapes are displayed on the markup overlay in the assigned color for that overlay. If a reviewer applies a text color, fill color, or line color to a shape, those colors will not appear on the markup overlay.
-
Comments cannot be printed.
-
Markup does not appear on a drawing saved as a Web page.
Start or stop tracking markup
For each reviewer who opens a drawing when Track Markup is started, a markup overlay is created and a color is assigned.
Note: To quickly see whether Track Markup is started, look at the text at the top of the Reviewing task pane. If the text says Current Reviewer, the original drawing is protected and you can track markup. Otherwise, markup tracking is stopped and you can make changes to the original drawing.
Start tracking markup for the first time
-
On the Tools menu, click Track Markup.
-
The Reviewing task pane opens and a markup overlay is created for you.
Note: When Track Markup is started, you can make changes only to your markup overlay. To make changes to the original drawing, stop markup tracking and then click the Original tab.
Restart tracking markup
-
On the Reviewing task pane, click Track Markup.
-
The text at the top of the task pane changes to Current Reviewer, and you can make changes to your markup overlay.
Note: When Track Markup is restarted, you can make changes only to your markup overlay. To make changes to the original drawing, stop markup tracking and then click the Original tab.
Stop tracking markup
-
On the Reviewing task pane, click Track Markup.
-
The text at the top of the task pane changes to Markup tracking is off, and you can make changes to the original drawing.
Show or hide markup
-
Open the Reviewing task pane, if it is not already open:
-
On the View menu, click Task Pane.
-
Click the arrow at the top of the task pane, and then click Reviewing.
-
-
If markup tracking is stopped and you don't see any reviewers' names under Show Markup Overlays, on the View menu, click Markup.
Note: If the Markup command is not available, Track Markup is started and you can view markup.
-
Under Show Markup Overlays on the Reviewing task pane, do any of the following:
-
To show markup overlays for all reviewers, click Show All.
-
To hide markup overlays for all reviewers, click Hide All.
-
To show or hide markup overlays for an individual reviewer, select or clear the check box next to the reviewer's name.
Notes:
-
If Track Markup is started, you cannot hide your own markup overlay.
-
The selections you make in step 3 are not saved with the drawing.
-
-
No comments:
Post a Comment