Create an organizational chart with SmartArt in Office for Mac
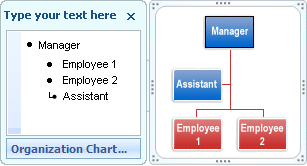
Use a SmartArt graphic to create an organization chart in your Office documents to show the reporting relationships in an organization, such as department managers and non-management employees.

Create an organization chart
-
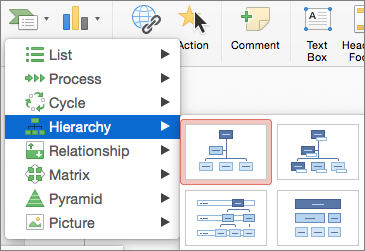
On the Insert tab, click SmartArt > Hierarchy.

-
Click an organization chart layout.

-
To enter your text, do one of the following:
-
Click in a box in the SmartArt graphic, and then type your text.
Note: For best results, use this option after you add all the boxes that you want.
-
Click [Text] in the SmartArt Text pane, and then type your text.
-
Copy text from another location or program, click [Text] in the SmartArt Text pane, and then paste your text.
-
Create an organization chart with text and pictures
-
In your document, presentation, or spreadsheet, on the Insert tab, click SmartArt > Picture.

-
To add a picture, in the box where you want to add the picture, click the picture icon, locate the folder that contains the picture that you want to use, click the picture file, and then click Insert.

A picture icon -
To enter your text, do one of the following:
-
Click in a box in the SmartArt graphic, and then type your text.
Note: For best results, use this option after you add all of the boxes that you want.
-
Click [Text] in the SmartArt Text pane, and then type your text.
-
Copy text from another location or program, click [Text] in the SmartArt Text pane, and then paste your text.
-
Add or delete boxes in your organization chart
Add a box
-
Click the existing box that is located closest to where you want to add the new box.
-
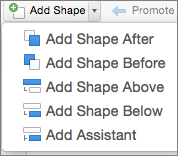
In the SmartArt Design tab, click the arrow next to Add Shape, and then do one of the following:

Note: If you do not see the SmartArt Design tab, make sure that you have selected the SmartArt graphic.
-
To insert a box at the same level as the selected box but following it, click Add Shape After.
-
To insert a box at the same level as the selected box but before it, click Add Shape Before.
-
To insert a box one level above the selected box, click Add Shape Above.
The new box takes the position of the selected box, and the selected box and all the boxes directly below it are each demoted one level.
-
To insert a box one level below the selected box, click Add Shape Below.
-
To add an assistant box, click Add Assistant.
The assistant box is added above the other boxes at the same level in the SmartArt graphic, but it is displayed in the Text pane after the other boxes at the same level.
Add Assistant is available only for organization chart layouts. It is not available for hierarchy layouts, such as Hierarchy.
-
Delete a box
To delete a box, click the border of the box you want to delete, and then press Delete.
No comments:
Post a Comment