Align and position shapes in a diagram
Visio has manual guides and automatic tools to help ensure the shapes in your diagram are aligned and spaced well. That helps make your drawing as clear as possible and give it a professional look.
-
Select the shapes you want to align and space, or click a blank area of the page to remove any selection. If nothing is selected, all shapes will be affected.
-
Click Home > Arrange > Position and then click Auto Align & Space.
If Auto Align & Space doesn't arrange the shapes the way you want them, move the shapes manually or try some of the other options. Undo Auto Align & Space by pressing Ctrl+Z.
Align
The commands under the Align button align shapes without changing their spacing. You can hold the pointer over a command to see a preview of the effect it will have before you commit to the change.
To use Auto Align
-
Select the shapes you want to align.
-
Click Home > Arrange > Align and click Auto Align.
To specify an alignment direction
-
Select the shape to which you want the other shapes to align (the first shape selected is the primary shape), and then press Shift and click the shapes you want to align to it.
Tip: If the shapes you're aligning are together on the page, drag to create a box around them. This selects the shapes, connectors and other objects inside the box, called an "area select."
-
Click Home > Arrange > Align and click the alignment option you want.
The specific Align commands align the selected shapes with the primary shape. However, the Auto Align command does not align to a primary shape.
Position
-
Select the shapes you want to space, or click a blank area of the page to remove any selection. If nothing is selected, all shapes will be affected.
-
Click Home > Arrange > Position and then click Auto Space to move all selected shapes to a specified distance from neighboring shapes.
To change the spacing distance, click Spacing Options and then set the distance.
Manually position shapes
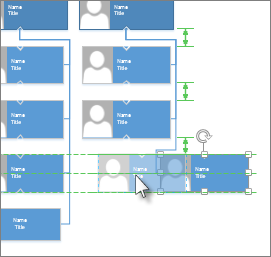
When you drag a shape, green positioning guides help you place it exactly where you want it. In the illustration below, the distribution arrows appear when the shape is dragged to match the distribution of other nearby shapes. Dashed lines appear to help you align horizontally or vertically with other shapes.
Other spacing options
The spacing commands from earlier versions of Visio are still available, which present different spacing options.
-
Select three or more shapes by holding down Shift or Ctrl while clicking shapes. The commands for distributing shapes aren't available if you don't select three or more shapes.
-
Click Home > Arrange > Position and then choose a distribution option. Click More Distribute Options to open the Distribute Shapes dialog box.
-
For Vertical distribution, the boundaries are defined by the top and bottom shapes in the selection.
-
For Horizontal distribution, the boundaries are defined by the leftmost and rightmost shapes in the selection.
-
To add guides and glue the shapes to them, select the Create guides and glue shapes to them check box. If you choose this option, you can move an outermost guide to redistribute all the shapes.
-
Re-Layout Page gallery
Re-Layout Page is located on the Design tab, in the Layout group. If you have a simple diagram and you're not sure about the best way to arrange it, select the shapes you want to rearrange or click a blank area of the page to remove any selection and affect all shapes. Then try holding the mouse pointer over the various designs in the gallery to see what effect they have. You can see a preview without committing to a layout until you click it.
No comments:
Post a Comment