Add an editing language or set language preferences in Office
You can use the Office language options to add a language or to choose the language in which the Help and ScreenTips display.
In Office 2016, Office 2013, and Office 2010, the language options are in the Set the Office Language Preferences dialog box. The display and help languages can be set independently. For example, you could have everything match the language of your operating system, or you could use a combination of languages for your operating system, editing, display, and Help.
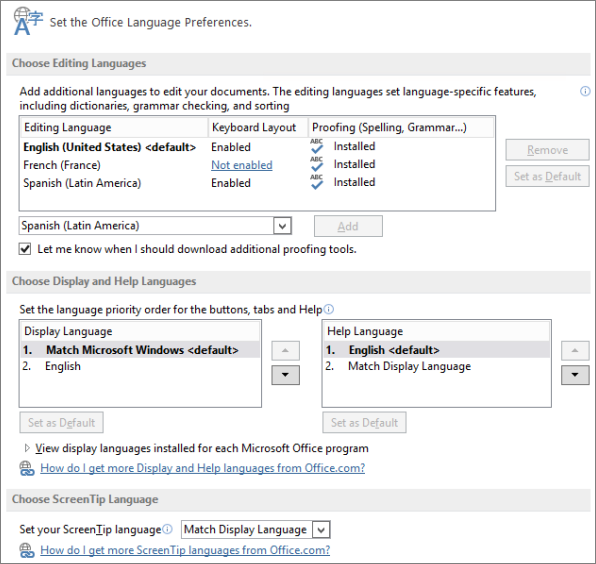
The available languages depend on the language version of Office and any additional language pack, language interface pack, or ScreenTip languages that are installed on your computer. If the proofing tools, display, or Help language that you want is not available, you might need to obtain and install a language pack or language interface pack. For more information, see Do I need a language pack or language interface pack?
Add a language
You can add a language to Office programs by adding an editing language. An editing language consists of the keyboard layout and proofing tools for that language. The proofing tools include language-specific features, such as dictionaries for spelling and grammar checking, or paragraph direction buttons. (The default editing language appears at the top of the list in bold. If needed, this can be changed by selecting the language you want and clicking Set as Default.)
-
Open an Office program, such as Word.
-
Click File > Options > Language.
-
In the Set the Office Language Preferences dialog box, under Choose Editing Languages, select the editing language that you want to add from the Add additional editing languages list, and then click Add.
The added language appears in the list of editing languages.
If Not enabled appears in the Keyboard Layout column, do the following:
-
Click the Not enabled link.
-
In the Add Languages dialog box, click Add a language, select your language in the list, and then click Add.
-
Close the Add Languages dialog box. Your language should display as Enabled under Keyboard Layout in the Choose Editing Languages section.
If Not Installed appears in the Proofing column, you might need to obtain a language pack or language interface pack to obtain the proofing tools for your language.
-
To go online and get the language pack you need, click the Not installed link.
Set the default display and Help language
The display and Help languages are the languages used in Office for display elements, such as menu items, commands, and tabs, in addition to the Help file display language.
The default language appears in bold at the top of the list. The order of the languages in the display and Help lists is the order in which languages are used by Office. For example, if your display language order is Spanish <default>, German, and Japanese, and the Spanish language tools are removed from your computer, German becomes your default display language.
To set the default language:
-
Open an Office program, such as Word.
-
Click File > Options > Language.
-
In the Set the Office Language Preferences dialog box, under Choose Display and Help Languages, select the language that you want to use, and then click Set as Default.
Which display language is being used for which Office program?
If you use multiple languages and have customized Office so that it fits the way that you want to work, you can review all of the Office programs to see which language is the default display language for each.
-
In the Set the Office Language Preferences dialog box, under Choose Display and Help languages, click View display languages installed for each Microsoft Office program.
Set the ScreenTip language
Note: This feature is available only for the following Office programs: Excel, OneNote, Outlook, PowerPoint, Publisher, Visio, and Word. It is not available for Office 2016 programs.
ScreenTips are small pop-up windows that provide brief, context-sensitive help when you rest the pointer on a display element, such as a button, tab, dialog box control, or menu. Setting the ScreenTip language in one Office program sets it for all of the Office programs that you have installed.
-
Open an Office program, such as Word.
-
Click File > Options > Language.
-
In the Set the Office Language Preferences dialog box, under Choose ScreenTip Language, select your ScreenTip language.
Notes:
-
This feature is not available in Office 2016.
-
If the language that you want is not listed, you might need to add more language services. Click How do I get more ScreenTip languages from Office.com, and then follow the download and installation instructions.
-
After you install a new ScreenTip language, it becomes your default ScreenTip language.
-
For more information about ScreenTips, see Show or hide ScreenTips.
Microsoft Office 2007 Language Settings turn on language-specific options, such as options available for a particular language in the Ribbon and dialog boxes. For example, when you turn on the language options for Japanese, the Phonetic Guide and Enclose characters language options are turned on.
If you install a 2007 Microsoft Office Language Pack, you can change the language of the Ribbon, menus, dialog boxes, and Help to the Language Pack language. Additionally, you can use proofing tools, such as spelling or grammar checker in another language. For more information about Language Pack features, see Office Language Interface Pack (LIP) downloads.
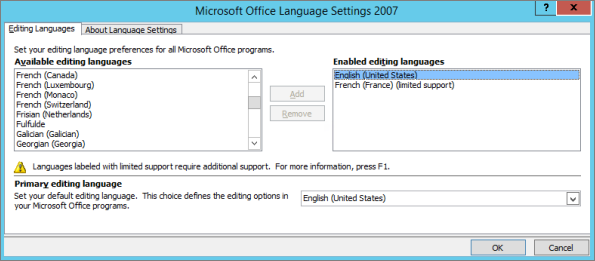
In Office 2007, language options are in the Microsoft Office Language Settings 2007 dialog box.
Add a language
To add a language in Office 2007 programs, first make sure that the language that you want to use is installed on your computer. If you need a Language Pack for a particular language, see Office Language Interface Pack (LIP) downloads. Then, you must enable the language that you want to use. The language-specific options that are turned on depend on the language(s) that are enabled and the programs that you use.
-
Click Start >All Programs >Microsoft Office > Microsoft Office Tools > Microsoft Office 2007 Language Settings.
-
Click the Editing Languages tab.
-
Select the language you want to enable in the Available editing languages list, and then click Add.
The language is added to the Enabled editing languages list and all language-specific options available in 2007 Office release programs are turned on.
The default editing language appears at the bottom of the Editing Languages tab. If needed, this can be changed by selecting the language you want in the Primary editing language list.
When you change the primary editing language, the Normal.dotm template in Word is automatically replaced. We recommend that you save a copy of Normal.dotm and rename it with its language, for example, Normal_English.dotm, before you change the primary editing language. The Normal.dotm template is typically saved to C:\Users\username\AppData\Roaming\Microsoft\Templates, where "username" is the name of the person who is logged on to the computer.
Note: You cannot remove a language from the Enabled editing languages list if that language is set as the primary editing language. To remove the language from the Enabled editing languages list, you must first select another language in the Primary editing language list, and then remove the language from the Enabled editing languages list.
Change the display and Help language
Important: A Language Pack may be required to change the display and Help language. If you have not installed a Language Pack for the language that you want to use, see Office Language Interface Pack (LIP) downloads.
-
Click Start > All Programs > Microsoft Office > Microsoft Office Tools > Microsoft Office 2007 Language Settings.
-
Click the Display Language tab.
Note: The Display Language tab is only visible after you install a Language Pack. To install a language pack, see Office Language Interface Pack (LIP) downloads.
-
Select the language that you want to use for the Ribbon, menus, and dialog boxes from the Display Microsoft Office menus and dialog boxes in list.
-
Select the language that you want to use for Help from the Display Help in list.
-
If you have three or more languages installed, the Display language priority order list is displayed. To change the language priority, select a language in the list, and then click Up or Down.
What does limited support mean?
If you see (limited support) after a language in the Enabled editing languages list, it means that the language options for that language are turned on but the keyboard layout for that language has not been installed in the Windows operating system.
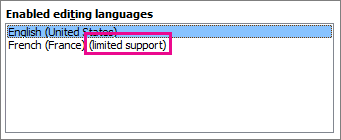
If you want to use the same keyboard layout for all enabled languages, you can safely ignore the (limited support) message for your languages. If you want to use a keyboard layout for a language that has limited support, you must enable the keyboard layout for that language.
Enable a keyboard layout
If you want to type in a non-Latin-based language, such as Arabic or Chinese, or you want to use the native language keyboard layout when typing in different Latin-based languages, you need to enable the keyboard layout for that language, and then you can switch between languages using the Language bar.
Enable Office 2007 keyboard layouts in Windows 10, Windows 8.1, and Windows 8
-
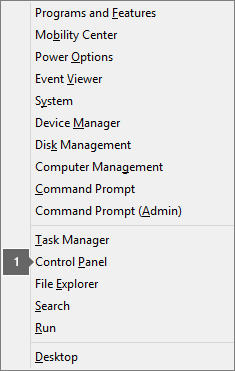
Press the Windows logo key + X, and then click Control Panel.
-
Under Clock, Language, and Region, click Change input methods.
-
For the language you want to add, click Options.

-
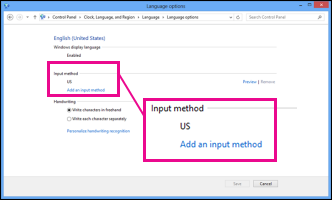
Under Input method, click Add an input method. You can even click Preview to see what the input device is like.
-
Click the input method you want, and then click Add.

Enable Office 2007 keyboard layouts in Windows 7 and Windows Vista
-
Click Start > Control Panel.
-
Under Clock, Language, and Region, under Region and Language, click Change keyboards or other input methods.
Note: In Classic View, double-click Regional and Language Options, and then click the Keyboards and Languages tab.
-
In the Region and Language dialog box, on the Keyboards and Languages tab, click Change keyboards
 .
. -
In the Text Services and Input Languages dialog box, under Default input language, click the language that you want to use as the default language.
If the language that you want to use as the default input language is not listed, complete steps 5 through 8.
-
Under Installed services, click Add.
-
Expand the language that you want to use as the default input language, and then expand Keyboard.
-
Select the check box for the keyboard or Input Method Editor (IME) that you want to use, and then click OK. The language is added to the Default input language list.
In Windows XP (for Office 2010 and 2007)
-
Click Start, point to Settings, and then click Control Panel.
-
Click Date, Time, Language, and Regional Options, and then click Regional and Language Options.
Note: In Classic View, double-click Regional and Language Options.
-
In the Regional and Language Options dialog box, click the Languages tab, and then under Text services and input languages, click Details.
-
In the Text Services and Input Languages dialog box, under Installed services, click Add.
-
In the Add Input Language dialog box, click the language that you want from the Input language list, and then click OK.
See also
Enable or change the keyboard layout language
Check spelling and grammar in a different language
Turn on automatic language detection
Automatically switch keyboard to match language of surrounding text
No comments:
Post a Comment