Update the data in a database
This article explains how to update existing data. Microsoft Office Access 2007 provides a number of tools for updating existing records, including datasheets, forms, queries, find-and-replace, and the new Data Collection feature.
As you proceed, remember that updating data is not the same process as entering new data. For information about entering new data in a database, see the article Add one or more records to a database.
In this article
How database design affects updating
Read this section if you are new to Access or unfamiliar with the concepts behind relational databases. Large updates become much easier to perform when you understand some of the basic principles of database design.
An Access database is not a file in the same sense as a Microsoft Office Word 2007 document or a Microsoft Office PowerPoint 2007 slide deck. Instead, a typical Access database is a a collection of tables, plus a set of objects built around those tables — forms, reports, queries, and so on.
In addition, those objects must adhere to a set of design principles or the database will either work poorly or fail altogether. In turn, those design principles affect how you enter data. Remember these facts about database objects and design as you proceed.
-
With a few exceptions (such as a type of list called a value list), Access stores all data in one or more tables. The number of tables depends on the design and complexity of the database. Although you may view or update the data in a form, a report, or in the results returned by a query, Access stores the data only in tables.
-
Each table should store data for a single issue, category, or purpose. For example, a table of business contact information should not contain sales information. If it does, finding the correct information can become difficult, if not impossible.
-
Each of the fields in a table should accept only one type of data. For example, you should not store notes in a field set to accept numbers. If you try to enter text in such a field, Access displays an error message.
-
With one exception, the fields in a record should accept only one value. For example, a properly designed database will prevent you from entering more than one address in an address field. This is in contrast to Microsoft Office Excel 2007, which, by default, allows you to enter any number of names, addresses, or images in a single cell unless you set that cell to accept limited types of data.
However, Office Access 2007 also provides a new feature called a multivalued field. You use multivalued fields to attach multiple pieces of data to a single record, and to create lists that accept multiple values. For example, you can attach a text file, a Office PowerPoint 2007 slide deck, and any number of images to a record in your database. You can also create a list of names and select as many of those names as needed. The use of multivalued fields may seem to break the rules of database design because you can store more than one piece of data per table field, but it actually doesn't, because Access enforces the rules "behind the scenes," by storing the data in special, hidden tables.
The following links take you to articles that provide more information about the subjects and features discussed in this section.
-
Database design basics —This article explains fundamental concepts such as planning a database, designing the data, and normalization — the process of splitting your data into related tables and eliminating redundant data.
-
Create tables in a database —This article explains how to create tables, add primary keys (fields that uniquely identify each row or record in the table), and how to set data types and table properties.
-
Attach files and graphics to the records in your database —This article explains how to attach one or more pieces of data to an Attachment field.
-
Use a list that stores multiple values and Guide to multivalued fields —These articles explain how to use check box lists and check box drop-down lists to store more than one value.
How data types affect updating
Read this section if you are new to Access or unfamiliar with the concepts behind relational databases. Large updates become much easier to perform when you understand some of the basic principles of database design.
When you design a database table, you select a data type for each of the fields in that table, a process that helps ensure more accurate data entry. For example, suppose you specify the Number data type for a field because you need to calculate sales figures. If someone tries to enter text in that field, Access displays an error message and will not let that user save the changed record, a step that helps protect your figures.
Show me how to view data types
Access now provides two ways to view the data types for a table field. You can use the commands on the Datasheet tab, or you can open the table in Design view. The following sets of steps explain how to use both techniques.
View data types by using commands on the Datasheet tab
-
In the Navigation Pane, double-click the table that you want to use.
-
Click the field that you want to investigate.
-
On the Datasheet tab, in the Data Type & Formatting group, click the down arrow for the Data Type list to view the data type set for the field.
View data types in Design view
-
In the Navigation Pane, right-click the table and click Design View on the shortcut menu.
Access opens the table in the design grid, and the upper section of the grid shows the name and data type of each table field.
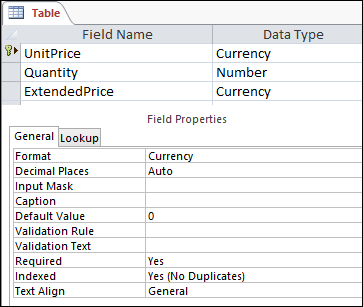
The data type set for each table field provides the first level of control over what you can and cannot enter into a field. In some cases, a data type setting prevents you from entering any information at all. The following table lists the data types that Office Access 2007 provides and describes how they affect data entry.
| Data type | Effect on data entry |
| Text | Text fields accept either text or numeric characters, including delimited lists of items. A text field accepts a smaller number of characters than does a Memo field — from 0 to 255 characters. In some cases, you can use conversion functions to perform calculations on the data in a Text field. |
| Memo | You can enter large amounts of text and numeric data in this type of field. Also, if the database designer sets the field to support rich text formatting, you can apply the types of formatting that you normally find in word processing programs, such as Office Word 2007. For example, you can apply different fonts and font sizes to specific characters in your text, and make them bold or italic, and so on. You can also add Hypertext Markup Language (HTML) tags to the data. For more information about using rich-text formatting in a Memo field, see the article Format data in rows and columns. Like Text fields, you can also run conversion functions against the data in a Memo field. |
| Number | You can enter only numbers in this type of field, and you can perform calculations on the values in a Number field. |
| Date/Time | You can enter only dates and times in this type of field. Depending on how the database designer sets the field, you may encounter these conditions:
|
| Currency | You can enter only currency values in this type of field. Also, you do not have to manually enter a currency symbol. By default, Access applies the currency symbol ( ¥, £, $, and so on) specified in your Windows regional settings. |
| AutoNumber | You can not enter or change the data in this type of field at any time. Access increments the values in an AutoNumber field whenever you add a new record to a table. |
| Yes/No | When you click a field that is set to this data type, Access displays either a check box or a drop-down list, depending on how you format the field. If you format the field to show a list, you can select either Yes or No, True or False, or On or Off from the list, again depending on the format applied to the field. You cannot enter values in the list or change the values in the list directly from a form or table. |
| OLE Object | You use this type of field when you want to display data from a file created in another program. For example, you can display a text file, an Excel chart, or a PowerPoint slide deck in an OLE Object field. Attachments provide a faster, easier, and more flexible way to view data from other programs. See the Attachment entry, later in this table, for more information. |
| Hyperlink | You can enter any data in this type of field, and Access wraps it in a Web address. For example, if you type a value in the field, Access surrounds your text with Uniform Resource Locator (URL) text, like so: http://www.your_text.com. If you enter a valid Web address, your link will work — otherwise, your link will result in an error message. Also, editing existing hyperlinks can be difficult because clicking a hyperlink field with your mouse starts your Web browser and takes you to the site specified in the link. To edit a hyperlink field, you select an adjacent field, use the TAB or arrow keys to move the focus to the hyperlink field, and then press F2 to enable editing. |
| Attachment | You can attach data from other programs to this type of field, but you cannot type or otherwise enter text or numeric data. For information about using an Attachment field, see the article Attach files and graphics to the records in your database. |
| Lookup Wizard | The Lookup Wizard is not a data type. Instead, you use the wizard to create two types of drop-down lists: value lists and lookup fields. A value list uses a delimited list of items that you enter manually when you use the Lookup Wizard. Those values can be independent of any other data or object in your database. In contrast, a lookup field uses a query to retrieve data from one or more of the other tables in a database, or in another location, such as a server running Windows SharePoint Services 3.0. The lookup field then displays the data in a drop-down list. By default, the Lookup Wizard sets the table field to the Number data type. You can work with lookup fields directly in tables, and also in forms and reports. By default, the values in a lookup field appear in a type of list control called a combo box — a list that has a drop-down arrow: If you cannot directly edit the values in a lookup list, you have to add or change the data in your predefined list of values, or in the table that serves as the source for the Lookup field. For information about doing so, see the section titled "Edit the items in a lookup field" in the article Add one or more records to a database. Finally, when you create a Lookup field, you can optionally set it to support multiple values. When you do so, the resulting list displays a check box next to each list item, and you can select or clear as many of the items as needed. This figure illustrates a typical multi-valued list: For information about creating multivalued lookup fields and using the resulting lists, see the articles Use a list that stores multiple values and Guide to multivalued fields. |
How table field properties affect updating
Read this section if you are new to Access or unfamiliar with the concepts behind relational databases. You cannot perform large updates successfully unless you understand how the properties set for table fields affect updating.
When you design a database, you typically start by designing one or more tables. You decide what kinds of data each table will contain, you set primary keys — a field that uniquely identifies each record (row) — for each table, and you create the relationships among the tables.
As part of that process, you set properties for the fields in each table. For example, you can set a Text field to accept no more than 50 characters, and you can set a Number field to accept only currency values.
You can set most field properties by using Design view. However, you can also set some properties by using commands in the groups on the Ribbon, part of the Microsoft Office Fluent user interface. For example, you can set visual formats for Text and Memo fields by using the commands in the Font group on the Home tab. For more information about using those commands, see the article Format data in rows and columns.
Show me how to set or change the properties for a table field.
Access now provides two ways to view the properties for a table field — you can use the commands on the Datasheet tab, or you can open the table in Design view. The following sets of steps explain how to use both techniques.
View table properties by using commands on the Datasheet tab
-
In the Navigation Pane, double-click the table that you want to use.
-
Click the Datasheet tab, and use the commands in the Data Type & Formatting group to view the properties for each table field.
View table properties in Design view
-
In the Navigation Pane, right-click the table and click Design View.
Access opens the table in the design grid.
-
In the lower part of the grid, under Field Properties, click the General tab, if it isn't already selected.
–or–
To see the properties for a lookup field, click the Lookup tab.
A lookup field is a table field that uses either a hard-coded list of values, or a query that retrieves values from one or more tables in a database. By default, the lookup field presents those values to you in the form of a list. Depending on how a database designer sets the lookup field, you can select one or more items from that list.
Lookup fields often confuse new Access users because a list of items appears in one location (the list that Access creates from the data in the lookup field), but the data can reside in another location (the table that contains the data). Remember that when you update the data in a lookup field, you must update the source table (the second location). You cannot update a Lookup field from the list.
The following table lists the table properties that have the greatest effect on data entry and explains their impact.
| Property | Location in table design grid | Possible values | Behavior when you try to enter data |
| Field Size | General tab | 0-255 | The character limit applies only to fields set to the Text data type. If you try to enter more than the specified number of characters, the field cuts them off. |
| Required | General tab | Yes/No | When turned on, this property forces you to enter a value in a field, and Access will not let you save any new data until you complete the field. When turned off, the field will accept null values, meaning the field can remain blank. Note: A null value is not the same thing as a zero. Zero is a digit, and Access can use it in calculations. A null is a missing, undefined, or unknown value. |
| Allow zero length strings | General tab | Yes/No | When turned on, you can enter zero-length strings — strings that contain no characters. To create a zero-length string, you type a pair of double quotation marks with no space between them ("") and press ENTER. |
| Indexed | General tab | Yes/No | When you index a table field, Access prevents you from adding duplicate values. |
| Input Mask | General tab | Predefined or custom sets of literal and placeholder characters | An input mask forces you to enter data in a predefined format. The masks appear when you select a field in a table or a control on a form. For example, suppose you click a Date field and see this set of characters: MMM-DD-YYYY. That set of characters is known as an input mask. It forces you to enter month values as three-letter abbreviations, such as OCT, and the year value as four digits, instead of two. So if you see that mask, you enter a date such as OCT-15-2006. Note: Remember that input masks only control how you enter data, not how Access displays that data. For example, you can enter a date as OCT-15-2006, but Access might store the value as 10152006 — that is, with no formatting characters. Then, when you view the date in a table, form, or report, Access might be set to display it as 10/15/2006. For more information about creating and using input masks, see the article Format data in rows and columns. |
| Display Control | Lookup tab | Values depend on the data type set for the field | For Text and Number fields, you can choose between a text box, list box, or combo box control. For Yes/No fields, you can choose between a check box, text box, or combo box control. Note: If you select anything other than List Box or Combo Box, Access hides the remaining properties on the Lookup tab. |
| Row Source Type | Lookup tab | Table/Query | If you set the Display Control property box to either List Box or Combo Box, you can set this property to Table/Query, Value List or Field List. In turn, this property controls the type of value that you can use in the Row Source property. See the next entry. |
| Row Source | Lookup tab | Depends on the Row Source Type property. | If you set the Row Source Type property to Table/Query, this property field can contain the name of a table or a query. If you set the property to Value List, this property contains a list of values separated by semicolons (;). If you set the Row Source Type property to Field List, this property contains the name of a table, query, or Structured Query Language (SQL) statement. |
| Limit to List | Lookup tab | Yes/No | When set to Yes, Access finds matching values as users enter text in a combo box control. Put another way, the Yes setting enables type-ahead. The Yes setting also prevents users from editing the items in a list directly from the list or combo box control. Instead, users must edit the items in the Row Source property box, or in the case of lookup fields, edit the items in the table that contain the source data for the Lookup field. For more information about using lookup fields, see the section titled "Edit the items in a lookup field" in the article Add one or more records to a database. |
| Allow Value List Edits | Lookup tab | Yes/No | Enables or disables the Edit List Items command for value lists, but not for lookup fields. To enable that command for lookup fields, enter a valid form name in the List Items Edit Form property. The Allow Value List Edits command appears on a shortcut menu that you open by right-clicking a list box or combo box control. When a you run the command, the Edit List Items dialog box appears. Alternately, if you specify the name of a form in the List Items Edit Form property box, Access starts that form instead of the dialog box. You can run the Edit List Items command from list box and combo box controls located on forms, and from combo box controls located in tables and query result sets. Forms must be open in either Design view or Browse view; tables and query result sets must be open in Datasheet view. |
| List Items Edit Form | Lookup tab | Name of a data entry form | If you specify the name of a data entry form in this table property, that form opens when a user runs the Edit List Items command. Otherwise, the Edit List Items dialog box appears when users run the command. |
For more information about designing database tables and setting properties, see the following articles.
-
Database design basics explains fundamental concepts such as planning a database, designing the data, and normalization — the process of splitting your data into related tables and eliminating redundant data.
-
Create tables in a database explains how to create tables, add primary keys (fields that uniquely identify each row or record in the table), and how to set data types and table properties.
Use a form to update data
You use a form to update small amounts of data. In this case, "small" means any number of records that you want to update manually. Forms can provide an easier, faster, and more accurate way to edit and update small amounts data.
How you use a form to edit data depends on the design of the form. Forms can contain any number of controls such as lists, text boxes, buttons, and datasheets — grids that look like Excel worksheets. In turn, each of the controls on the form either reads data from or writes data to an underlying table field. What you do with a given control depends on the data type set for the underlying table field, any properties set for that field, and possibly on several properties that the database designer sets for each control. For more information about how data types and field properties affect data entry, see How data types affect the way you enter data and How table field properties affect the way you enter data, earlier in this article.
The following sections explain how to use the most common data entry controls. If you have questions about your specific database, contact your system administrator or the database designer.
Add or edit text in a text box
Access provides one text control for use with Text and Memo fields. Typically, you can tell if the underlying field is text or memo by the size of the control, which usually reflects the size of the underlying table field. For example, if you bind the control to a text field that accepts no more than 50 characters, you size the control accordingly. In contrast, if you bind the control to a Memo field, you can size the control to display one or two paragraphs of text without having to scroll.
In addition, you can set a Memo field to support rich-text formatting. You can then apply different fonts, sizes, styles, and colors to your text.
Edit text in a text box
-
Place the cursor in the text box and change your data. Remember that you cannot perform calculations on numbers in a Text or Memo field.
Apply rich-text formatting
Note: You can follow these steps only when a text box is bound to a Memo field. See the steps in View properties for a table field, earlier in this article.
-
With the table open in Datasheet view, select the Memo field. Typically, you can look for a field named "Comments," Notes," or "Description."
-
On the Home tab, in the Font group, use the buttons and menus to format the text.
You can apply different fonts and sizes, make text bold or italic, change colors, and so on.
Use a datasheet to update data
You can change data by working directly in Datasheet view (a row and column grid similar to an Excel worksheet). You can change data in tables, query result sets, and forms that display datasheets.
Typically, you use datasheets when you need to change only a small number of records or parts of a single record. If you are familiar with Excel, datasheets should be relatively easy to understand, and you can make changes without any deeper knowledge of Access, such as the ability to create and run queries.
Remember these facts as you proceed.
-
You do not need to explicitly save your changes. Access commits them to the table when you move the cursor to a new field in the same row, or when you move the pointer to another row.
-
By default, the fields in an Access database should be set to accept a specific type of data, such as text or numbers. You must enter the type of data that the field is set to accept. If you don't, Access displays an error message.
-
A field may have an input mask applied. An input mask is a set of literal and placeholder characters that force you to enter data in a specific format. For example, an input mask for a postal code may require data that conforms to the French format, while an input mask for a phone number may require you to enter numbers in the German format.
For more information about input masks, see the article Format data in rows and columns.
-
With the exception of attachments and multivalued lists, you can enter only one value in most fields. If you don't know whether a field accepts attachments, contact your database designer or system administrator. You can always identify a multivalued list because Access displays a check box next to each list item.
Change data in a datasheet
-
In the Navigation Pane, double-click the table or query that contains the data you want to change.
By default, Access opens the table or query in Datasheet view — a grid that resembles an Excel worksheet.
-
Click or otherwise place the focus on the first field that you want to change, and edit the data.
-
To move to the next field, press TAB, use one of the arrow keys, or click the next field.
When you press TAB, by default, Access uses your Windows regional settings to determine whether it moves the cursor to the left or to the right. If the computer is set to use a language that reads from left to right, the cursor moves to the right when you press the TAB key. If the computer is set for a language that reads from right to left, the cursor moves to the left.
Apply rich-text formatting to data in a Memo field
-
With the table or query result open in Datasheet view, select the Memo field.
Typically, you can look for a field named "Comments," "Notes," or "Description." If you still can't find the Memo field, see the steps in View properties for a table field, earlier in this article.
-
On the Home tab, in the Font group, use the buttons and menus to format the text.
You can apply different fonts and sizes, make text bold or italic, change colors, and so on.
Use an update query to change existing data
You use update queries to add, change, or delete part (but not all) of one or more existing records. You can think of update queries as a powerful form of the Find and Replace dialog box. You enter a select criterion (the rough equivalent of a search string) and an update criterion (the rough equivalent of a replacement string). Unlike the dialog box, update queries can accept multiple criteria, allow you to update a large number of records in one pass, and allow you to change records in more than one table.
Remember that you cannot use update queries to add entire records. To do that, you use an append query.
For more information, see the article Add records to a table by using an append query.
Note: The safest way to use an update query is to first create a select query that tests your selection criteria. For example, suppose that you want to update a series of Yes/No fields from No to Yes for a given customer. To do so, you add criteria to your select query until it returns all of the desired No records for that customer. When you are sure that you have the correct records, you then convert your select query to an update query, enter your update criteria, and then run the query to update the selected values. The steps in this section explain how to create a select query and then convert it to an update query.
Create a select query
-
Open the database that contains the records you want to update.
-
On the Create tab, in the Other group, click Query Design.
The query designer opens, the Design tab appears, and the Show Table dialog box opens.
-
Select the table or tables that contain the records you want to update and click Add, and then click Close.
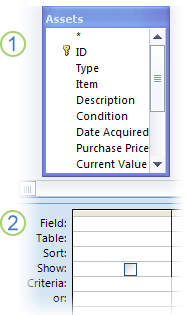
The table or tables appear as one or more windows in the upper section of the query design grid, and the windows list all the fields in each table. The following figure shows the query designer with a typical table.
-
Double-click the fields that you want to update. The selected fields appear in the Field row in the lower section of the query designer.
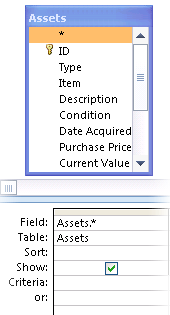
You can add one table field per column in the lower section, or, you can add all the fields in a table quickly by double-clicking the asterisk (*) at the top of the list of table fields. The following figure shows the query designer with all fields added.
-
Optionally, you can enter one or more criteria in the Criteria row of the design grid. The following table shows some example criteria and explains the effect they have on a query.
| Criteria | Effect |
| > 234 | Returns all numbers greater than 234. To find all numbers less than 234, use < 234. |
| >= "Callahan" | Returns all records from Callahan through the end of the alphabet |
| Between #2/2/2006# And #12/1/2006# | Returns dates from 2-Feb-06 through 1-Dec-06 (ANSI-89). If your database uses the ANSI-92 wildcard characters, use single quotation marks (') instead of pound signs. Example: Between '2/2/2006' And '12/1/2006' |
| Not "Germany" | Finds all records where the exact contents of the field are not exactly equal to "Germany." The criterion will return records that contain characters in addition to "Germany," such as "Germany (euro)" or "Europe (Germany)". |
| Not "T*" | Finds all records except those beginning with T. If your database uses the ANSI-92 wildcard character set, use the percent sign (%) instead of the asterisk. |
| Not "*t" | Finds all records that do not end with t. If your database uses the ANSI-92 wildcard character set, use the percent sign (%) instead of the asterisk. |
| In(Canada,UK) | In a list, finds all records containing Canada or UK. |
| Like "[A-D]*" | In a text field, finds all records that start with the letters A through D. If your database uses the ANSI-92 wildcard character set, use the percent sign (%) instead of the asterisk. |
| Like "*ar*" | Finds all records that include the letter sequence "ar". If your database uses the ANSI-92 wildcard character set, use the percent sign (%) instead of the asterisk. |
| Like "Maison Dewe?" | Finds all records that begin with "Maison" and contain a 5-letter second string in which the first 4 letters are "Dewe" and the last letter is unknown. If your database uses the ANSI-92 wildcard character set, use the underscore (_) instead of the question mark. |
| #2/2/2006# | Finds all records for February 2, 2006. If your database uses the ANSI-92 wildcard character set, surround the date with single quotation marks instead of pound signs ('2/2/2006'). |
| < Date() - 30 | Returns all dates more than 30 days old. |
| Date() | Returns all records containing today's date. |
| Between Date() And DateAdd("M", 3, Date()) | Returns all records between today's date and three months from today's date. |
| Is Null | Returns all records that contain a null (blank or undefined) value. |
| Is Not Null | Returns all records that contain a value. |
| "" | Returns all records that contain a zero-length string. You use zero-length strings when you need to add a value to a required field, but you don't yet know what that value is. For example, a field may require a fax number, but some of your customers may not have fax machines. In that case, you enter a pair of double quotation marks with no space between them ("") instead of a number. |
-
On the Design tab, in the Results group, click Run.
Verify that the query returned only the records that you want to update. As needed, you can select fields you don't want and press DELETE to remove them, you can drag additional fields to the design grid, and you can change your criteria until you are satisfied with the query results.
-
Go to the next steps.
Update records
-
On the Design tab, in the Query Type group, click Update.
This changes the select query to an update query. Access adds the Update to row in the lower section of the query designer.

-
Locate the field that contains the data you want to change, and enter your expression (which will change your data) in the Update to row for that field.
This table shows some example expressions and explains how they change data.
| Expression | Result |
| "Salesperson" | In a Text field, changes a text value to Salesperson. |
| #8/10/06# | In a Date/Time field, changes a date value to 10-Aug-06. |
| Yes | In a Yes/No field, changes a No value to Yes. |
| "PN" & [PartNumber] | Adds "PN" to the beginning of each specified part number. |
| [UnitPrice] * [Quantity] | Multiplies the values in fields named UnitPrice and Quantity. |
| [Freight] * 1.5 | Increases the values in a field named Freight by 50 percent. |
| DSum("[Quantity] * [UnitPrice]", | Where the ProductID values in the current table match the ProductID values in table named Order Details, this expression updates sales totals by multiplying the values in a field named Quantity by the values in a field named UnitPrice. |
| Right([ShipPostalCode], 5) | Truncates the leftmost characters in a text or numeric string and leaves the five rightmost characters. |
| IIf(IsNull([UnitPrice]), 0, [UnitPrice]) | Changes a null (unknown or undefined) value to a zero (0) in a field named UnitPrice. |
-
On the Design tab, in the Results group, click Run.
An alert message appears. The following figure shows the message:

-
Click Yes to run the query.
Note: You can turn off the alert messages. To do so, click the Microsoft Office Button
 , click Access Options, click Advanced, and under Confirm, clear the Action queries check box.
 -
To see the results of your update query, on either the Home tab or the Design tab, in the Views group, click View, and then click Datasheet View. You can also click the Datasheet View button located on the Access status bar.
Note: When you run the query, you may notice that some fields are missing from your result set. If your query contains fields that you don't update, Access removes those fields by default. For example, you may include ID fields from two tables to help ensure your query returns and operates on the correct records. If you don't update those ID fields, Access removes them.
Use an append query to add records to tables
One of the most frequent uses of an append query is to add a group of records from one or more tables in a source database to one or more tables in a destination database. For example, suppose that you acquire some new customers and a database containing a table of information about those customers. To avoid entering that new data manually, you can append it to the appropriate table or tables in your database. You can also use append queries to:
-
Append records based on criteria. For example, you might want to append only the names and addresses of customers with outstanding orders.
-
Append records when some of the fields in one table don't exist in the other table. For example, suppose that your Customers table has 11 fields, and the fields in the Customers table in another database match 9 of your 11 fields. You can use an append query to add just the data in the matching fields and ignore the others.
The process of creating an append query to append data from one database to another database follows these basic steps:
-
Open the source database (the database that contains the records you want to append) and create a select query that returns only the records that you you want to append.
-
Convert that select query to an append query.
-
Add the destination tables and fields to the append query. If you are appending records to another database, you first open that database and then select the tables.
-
Run the query to append the records.
Note: Back up your data before you start. If you make a mistake, you can delete the appended records from the destination table, but manually deleting a large number of records can take a long time. Having a backup on hand can help you fix any mistakes in less time.
Create a select query
-
Open your source database — the database that contains the records that you want to append.
-
On the Create tab, in the Other group, click Query Design.
The query design grid appears, and the Show Table dialog box appears.
-
Select the table that contains the records that you want to append, click Add, and then click Close.
The table appears as a window in the upper section of the query design grid. The window lists all the fields in the table. This figure shows a typical table in query designer:

-
Drag the fields that you want to append from the table to the Field row in the lower section of the query design grid.
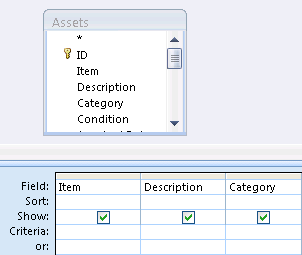
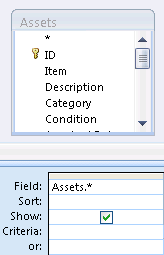
You can add one table field per column in the lower section. To add all the fields quickly, click the asterisk (*) at the top of the list of table fields. This figure shows the query designer with several table fields added:
This figure shows the designer with all fields added:
-
On the Design tab, in the Results group, click Run.
Verify that the query returned the records that you want to append. As needed, you can clear the Show check box or press DELETE to remove unwanted fields. You can also drag additional fields to the design grid until you are satisfied with the query results.
-
Continue to the next steps.
Convert the query to an append query
-
On the Design tab, in the Query Type group, click Append.
The Append dialog box appears.
-
At this point, you can append records from one table to another in the same database, or append records to a table in another database.
-
Append records to a table in the same database
-
In the Append dialog box, click Current Database (if it isn't already selected) and then select the destination table from the Table Name list.
-
Click OK.
In step 4 of the previous section, you added part or all of the fields in the source table to the query design grid. If you added the entire table during that step, Access now adds the entire destination table to the Append to row, as shown here:

–or–
If you added individual fields in step 4 in the previous section, and the field names in the source and destination tables match, Access automatically adds the destination field names in the Append to row, as shown here:

–or–
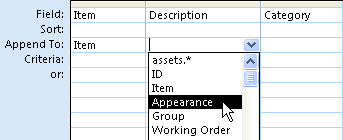
If you added individual fields, and some or all of the names in the source and destination tables don't match, Access leaves the mismatched fields in the Append to row blank. Click each blank field and select the source field you want from the resulting list, as shown here.
-
To preview your changes, click View.
-
Return to Design view and then click Run to append the records.
-
-
Append records to a table in another database
-
In the Append dialog box, click Another Database.
-
In the File Name field, type the location and name of the destination database.
-
In the Table Name field, type the name of the destination table, and then click OK.
–or–
Click Browse and use the second Append dialog box to locate the destination database. Click OK after you locate and select the destination database. This closes the second dialog box. In the first dialog box, in the Table Name field, enter the name of the destination table, and then click OK.
Type the name of the destination table, and then click OK to close the first Append dialog box.
In step 4 of the previous section, you added part or all of the fields in the source table to the Field row in the query design grid. If you added the entire table during that step, Access now adds the entire destination table to the Append to row, as shown here:

–or–
If you added individual fields in step 4 and the field names in the source and destination tables match, Access automatically adds the destination field names in the Append to row, like so:

–or–
If you added individual fields, and some or all of the names in the source and destination tables don't match, Access leaves the mismatched fields in the Append to row blank. Click each blank field and select the destination field you want from the resulting list, like so:

-
To preview your changes, click View.
-
Switch to Design view , and then click Run to append the records.
-
-
Use Data Collection to update records
Office Access 2007 provides a new feature called Data Collection. You can set up a data entry form in Microsoft Office Outlook 2007, gather information, and store that data in an Access database. Explaining how to use the Data Collection feature is beyond the scope of this article.
For information about using Data Collection, see the article titled Collect data through e-mail messages.
Use the Find and Replace dialog box to change data
The Find and Replace dialog box provides another way to change small amounts of data in less time and with less effort. Explaining how to use the dialog box is beyond the scope of this article.
For information about using the dialog box, see the article Use the Find and Replace dialog box to change data.
Use cascading updates to change primary and foreign key values
At times, you may need to update a primary key value. If you use that primary key as a foreign key, you can automatically update your changes through all child instances of the foreign key.
As a reminder, a primary key is a value that uniquely identifies each row (record) in a database table. A foreign key is a column that matches the primary key. Typically, foreign keys reside in other tables, and they enable you to create a relationship (a link) between the data in the tables.
For example, suppose you use a product ID number as a primary key. One ID number uniquely identifies one product. You also use that ID number as a foreign key in a table of order data. That way, you can find all the orders that involve each product, because any time someone places an order for that product, the ID becomes part of the order.
Sometimes, those ID numbers (or other types of primary keys) change. When they do, you can alter your primary key value and have that change automatically cascade through all related child records. You enable this behavior by turning on referential integrity and cascading updates between the two tables.
Remember these rules as you proceed:
-
You can enable cascading updates only for primary key fields set to the Text or Number data types. You cannot use cascading updates for fields set to the AutoNumber data type.
-
You can enable cascading updates only between tables with a one-to-many relationship.
The following steps explain how to create a relationship and enable cascading updates for that relationship.
Create the relationship
-
On the Database Tools tab, in the Show/Hide group, click Relationships.
-
On the Design tab, in the Relationships group, click Show Table.
The Show Table dialog box appears.
-
If it isn't already selected, click the Tables tab, select the tables that you want to change, click Add, and then click Close.
You can press SHIFT to select multiple tables, or you can add each table individually. Select only the tables on the "one" and "many" sides of the relationship.
-
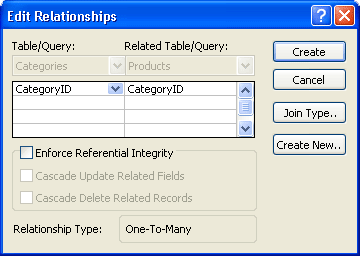
In the Relationships window, drag the primary key from the table on the "one" side of the relationship and drop it on the Foreign key field of the table on the "many" side of the relationship.
The Edit Relationships dialog box appears. The following figure shows the dialog box:
-
Select the Enforce Referential Integrity check box and click Create.
-
Go to the next set of steps.
Enable cascading updates in primary keys
-
If you did not follow the steps in the previous section, open the database that contains the relationship that you want to change.
-
On the Database Tools tab, in the Show/Hide group, click Relationships.
The Relationships window appears, and displays the joins (shown as connecting lines) between the tables in the database. The following figure shows a typical relationship:

-
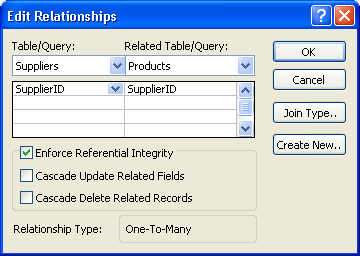
Right-click the join line between the parent and child tables, and click Edit Relationship.
The Edit Relationships dialog box appears. The following figure shows the dialog box:
-
Select Cascade Update Related Fields, ensure that the Enforce Referential Integrity check box is selected, and then click OK.
For more information about creating relationships. see the following articles:
 . Depending on how the database designer has set the Lookup field and the combo box, you can edit the items in the list and add items to the list. To do that, the database designer must set a property for the Lookup field (the property is called Limit To List, and the designer has to turn it off).
No comments:
Post a Comment